clock Mercury Grand Marquis 1011 s User Guide
[x] Cancel search | Manufacturer: MERCURY, Model Year: 1011, Model line: Grand Marquis, Model: Mercury Grand Marquis 2011Pages: 333, PDF Size: 2.23 MB
Page 55 of 333
Replacing exterior bulbs
Check the operation of all bulbs frequently.
Replacing headlamp bulbs (Crown Victoria only)
To remove the headlamp bulb:
1. Make sure the headlamp switch is in the off position, then open the
hood.
2. Remove the radiator cover by turning the three retainers to the unlock
position.
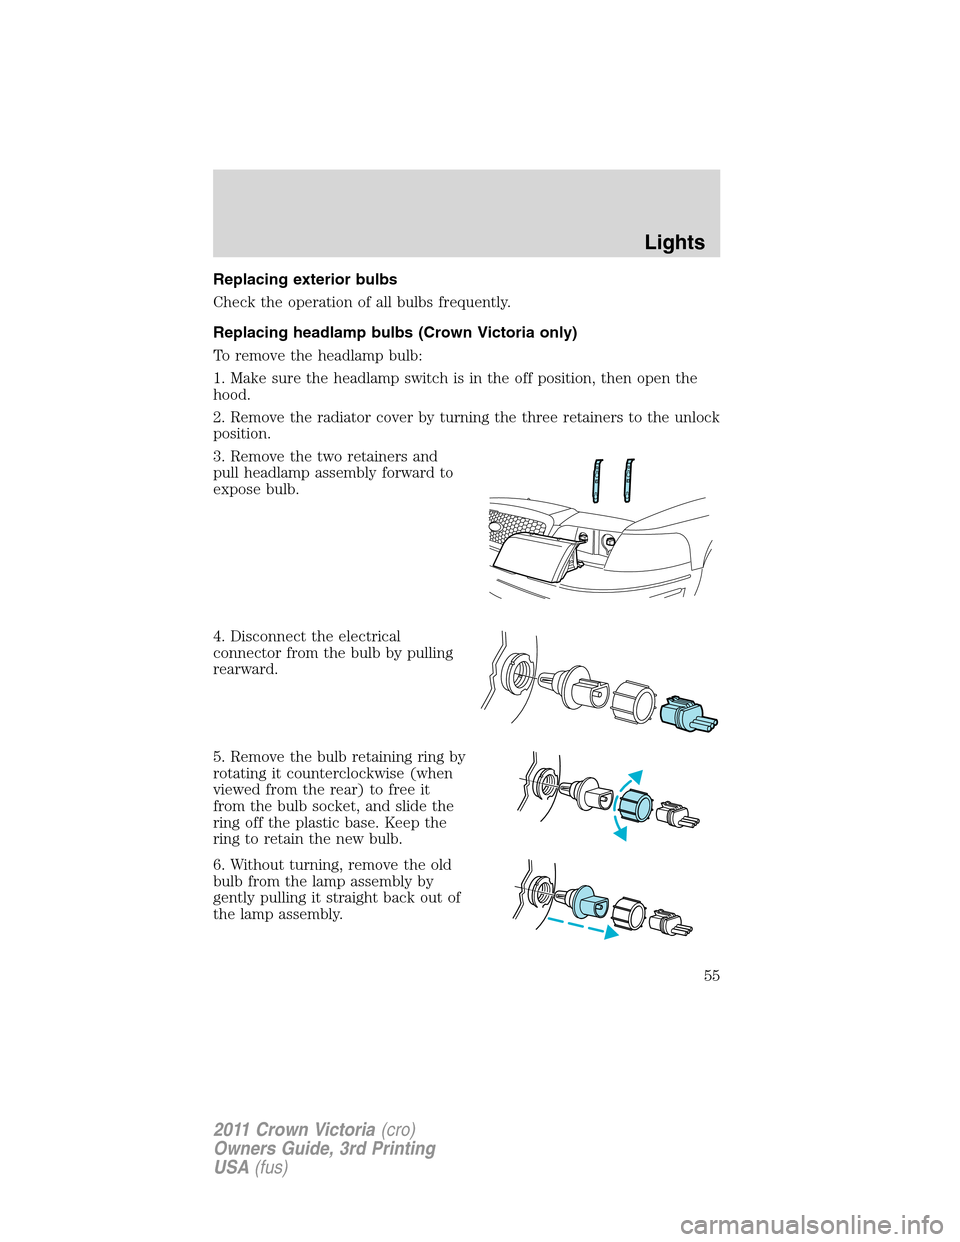
3. Remove the two retainers and
pull headlamp assembly forward to
expose bulb.
4. Disconnect the electrical
connector from the bulb by pulling
rearward.
5. Remove the bulb retaining ring by
rotating it counterclockwise (when
viewed from the rear) to free it
from the bulb socket, and slide the
ring off the plastic base. Keep the
ring to retain the new bulb.
6. Without turning, remove the old
bulb from the lamp assembly by
gently pulling it straight back out of
the lamp assembly.
Lights
55
2011 Crown Victoria(cro)
Owners Guide, 3rd Printing
USA(fus)
Page 56 of 333
To install the new bulb:
WARNING:Handle a halogen headlamp bulb carefully and keep
out of children’s reach. Grasp the bulb only by its plastic base
and do not touch the glass. The oil from your hand could cause the
bulb to break the next time the headlamps are operated.
Note:If the bulb is accidentally touched, it should be cleaned with
rubbing alcohol before being used.
1. With the flat side of the new bulb’s plastic base facing upward, insert
the glass end of the bulb into the lamp assembly. Turn the bulb left or
right to align the grooves in the plastic base with the tabs in the lamp
assembly. When the grooves are aligned, push the bulb into the lamp
assembly until the plastic base contacts the rear of the lamp assembly.
2. Install the bulb retaining ring over the plastic base until it contacts the
rear of the socket by rotating it clockwise until you feel a “stop.”
3. Connect the electrical connector into the rear of the plastic base until
it snaps, locking it into position.
4. Install the headlamp assembly with two retainers.
5. Install the radiator cover locking it in place with three retainers.
6. Turn the headlamps on and make sure they work properly. If the
headlamp was correctly aligned before you changed the bulb, you should
not need to align it again.
Replacing front parking/turn signal lamp bulbs
To remove the front parking/turn signal lamp bulbs:
1. Make sure headlamp switch is in the off position, then open the hood.
2. Remove the radiator cover by turning the three retainers to the unlock
position.
Lights
56
2011 Crown Victoria(cro)
Owners Guide, 3rd Printing
USA(fus)
Page 57 of 333
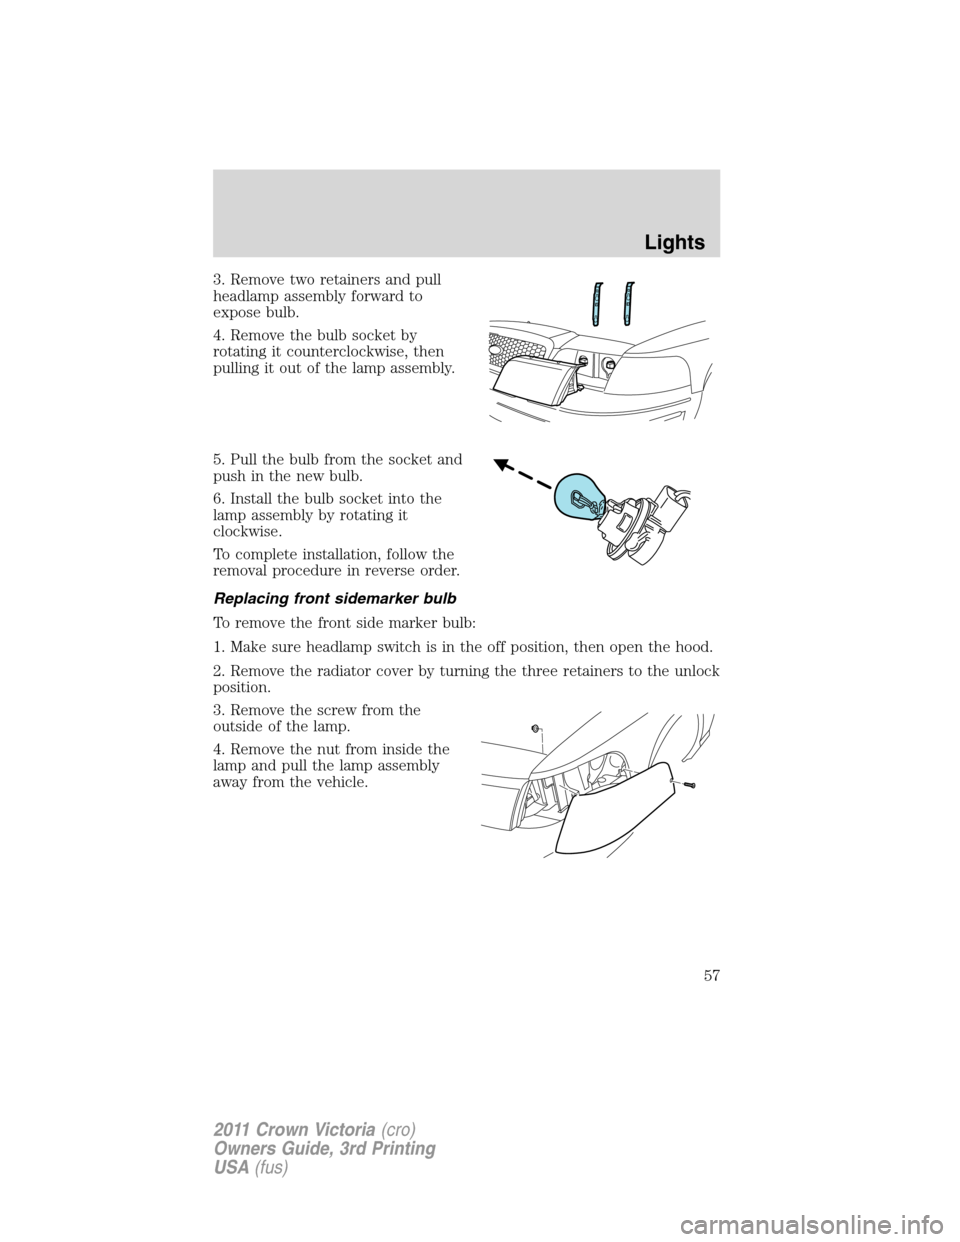
3. Remove two retainers and pull
headlamp assembly forward to
expose bulb.
4. Remove the bulb socket by
rotating it counterclockwise, then
pulling it out of the lamp assembly.
5. Pull the bulb from the socket and
push in the new bulb.
6. Install the bulb socket into the
lamp assembly by rotating it
clockwise.
To complete installation, follow the
removal procedure in reverse order.
Replacing front sidemarker bulb
To remove the front side marker bulb:
1. Make sure headlamp switch is in the off position, then open the hood.
2. Remove the radiator cover by turning the three retainers to the unlock
position.
3. Remove the screw from the
outside of the lamp.
4. Remove the nut from inside the
lamp and pull the lamp assembly
away from the vehicle.
Lights
57
2011 Crown Victoria(cro)
Owners Guide, 3rd Printing
USA(fus)
Page 58 of 333
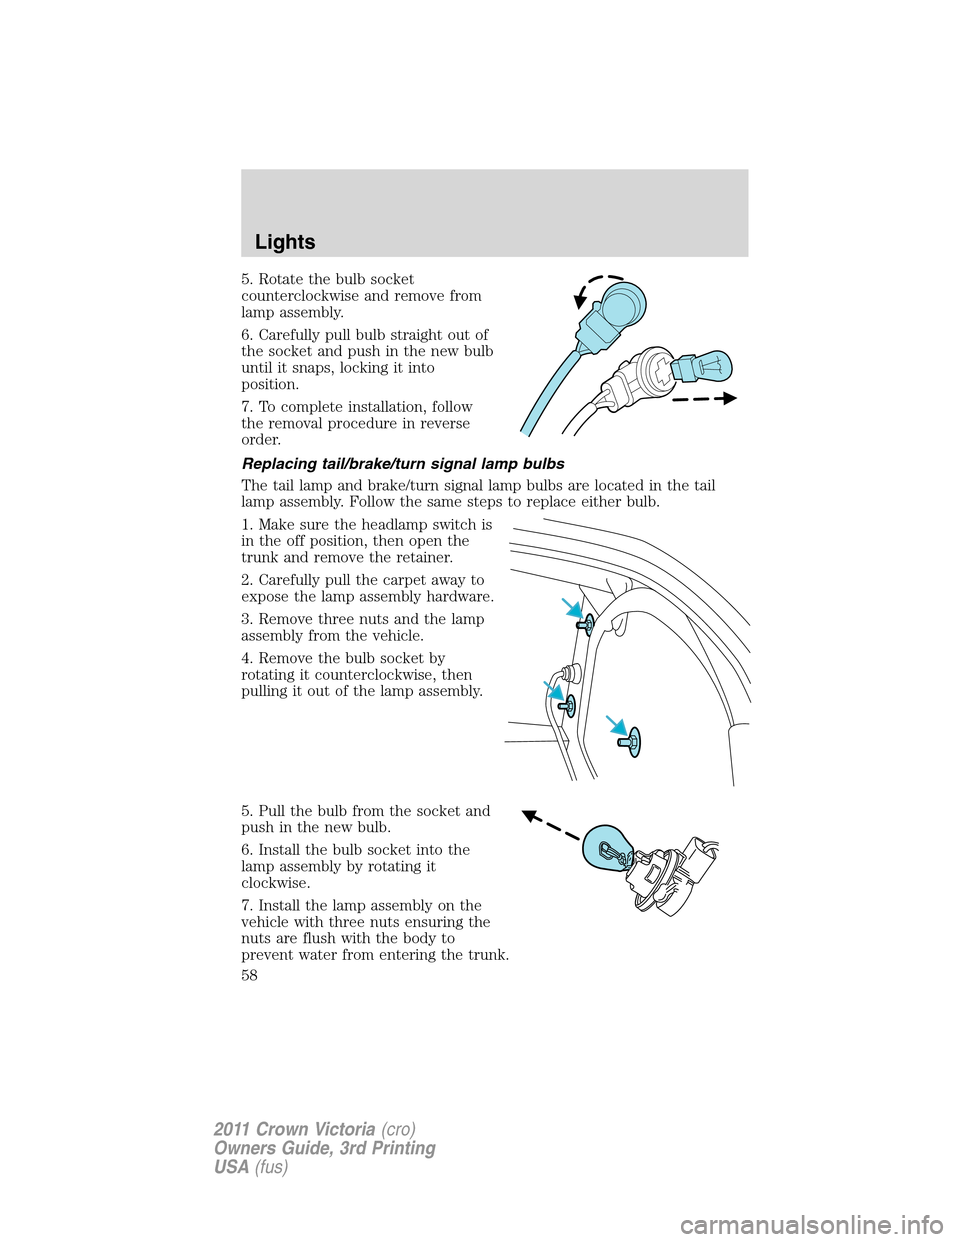
5. Rotate the bulb socket
counterclockwise and remove from
lamp assembly.
6. Carefully pull bulb straight out of
the socket and push in the new bulb
until it snaps, locking it into
position.
7. To complete installation, follow
the removal procedure in reverse
order.
Replacing tail/brake/turn signal lamp bulbs
The tail lamp and brake/turn signal lamp bulbs are located in the tail
lamp assembly. Follow the same steps to replace either bulb.
1. Make sure the headlamp switch is
in the off position, then open the
trunk and remove the retainer.
2. Carefully pull the carpet away to
expose the lamp assembly hardware.
3. Remove three nuts and the lamp
assembly from the vehicle.
4. Remove the bulb socket by
rotating it counterclockwise, then
pulling it out of the lamp assembly.
5. Pull the bulb from the socket and
push in the new bulb.
6. Install the bulb socket into the
lamp assembly by rotating it
clockwise.
7. Install the lamp assembly on the
vehicle with three nuts ensuring the
nuts are flush with the body to
prevent water from entering the trunk.
Lights
58
2011 Crown Victoria(cro)
Owners Guide, 3rd Printing
USA(fus)
Page 59 of 333
8. Carefully push the carpet back in to place and install the retainer.
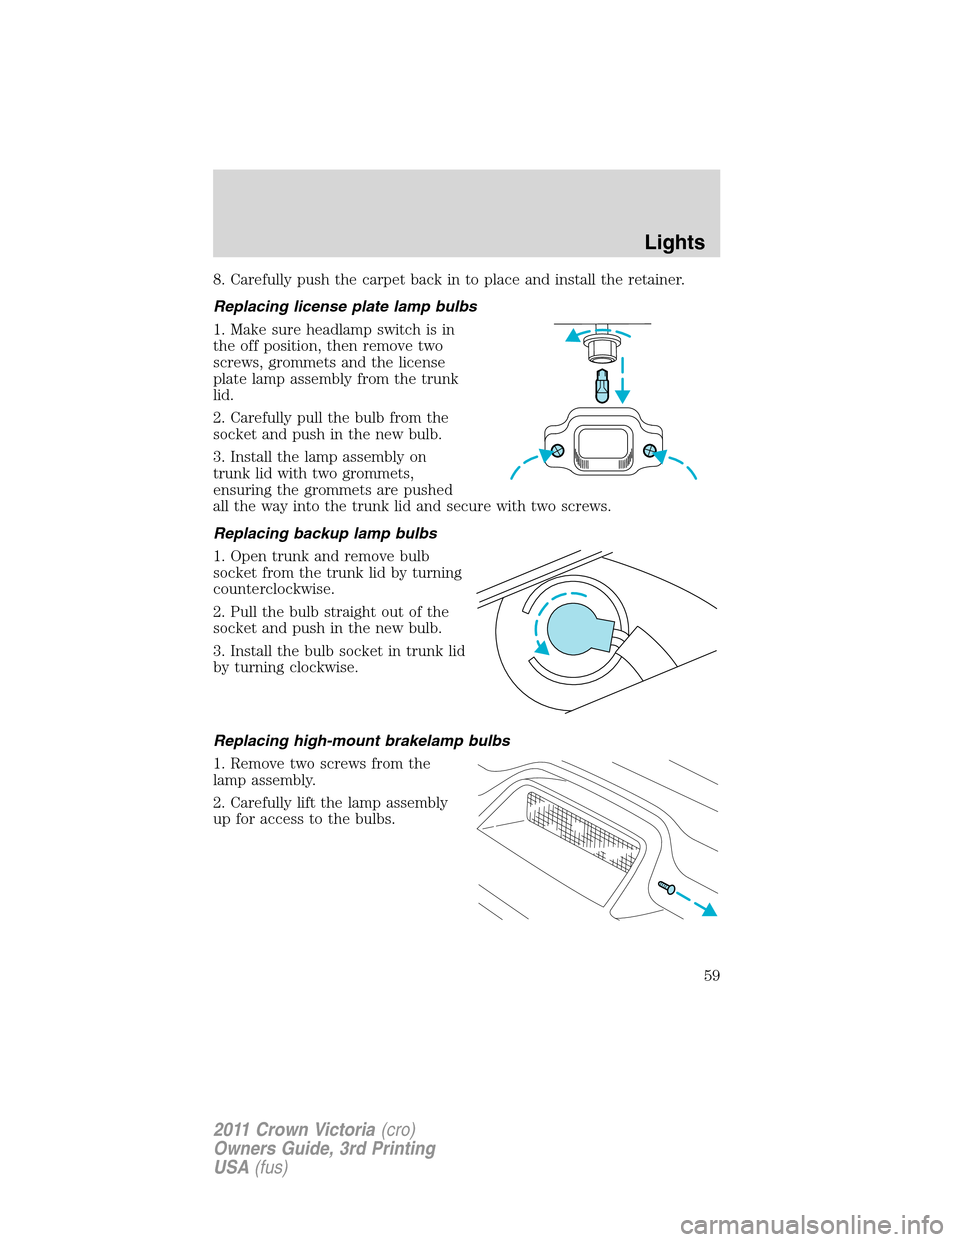
Replacing license plate lamp bulbs
1. Make sure headlamp switch is in
the off position, then remove two
screws, grommets and the license
plate lamp assembly from the trunk
lid.
2. Carefully pull the bulb from the
socket and push in the new bulb.
3. Install the lamp assembly on
trunk lid with two grommets,
ensuring the grommets are pushed
all the way into the trunk lid and secure with two screws.
Replacing backup lamp bulbs
1. Open trunk and remove bulb
socket from the trunk lid by turning
counterclockwise.
2. Pull the bulb straight out of the
socket and push in the new bulb.
3. Install the bulb socket in trunk lid
by turning clockwise.
Replacing high-mount brakelamp bulbs
1. Remove two screws from the
lamp assembly.
2. Carefully lift the lamp assembly
up for access to the bulbs.
Lights
59
2011 Crown Victoria(cro)
Owners Guide, 3rd Printing
USA(fus)
Page 60 of 333
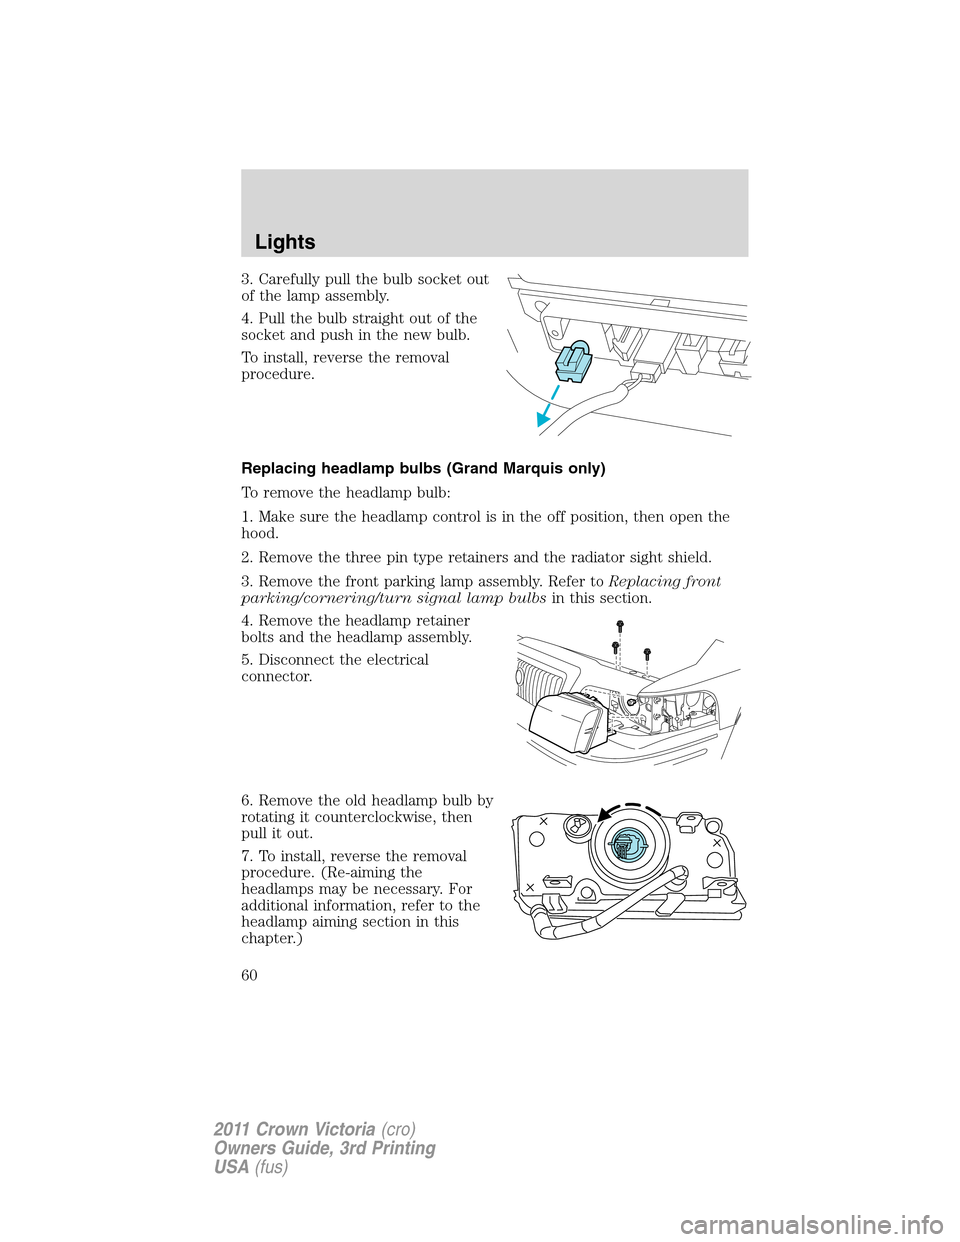
3. Carefully pull the bulb socket out
of the lamp assembly.
4. Pull the bulb straight out of the
socket and push in the new bulb.
To install, reverse the removal
procedure.
Replacing headlamp bulbs (Grand Marquis only)
To remove the headlamp bulb:
1. Make sure the headlamp control is in the off position, then open the
hood.
2. Remove the three pin type retainers and the radiator sight shield.
3. Remove the front parking lamp assembly. Refer toReplacing front
parking/cornering/turn signal lamp bulbsin this section.
4. Remove the headlamp retainer
bolts and the headlamp assembly.
5. Disconnect the electrical
connector.
6. Remove the old headlamp bulb by
rotating it counterclockwise, then
pull it out.
7. To install, reverse the removal
procedure. (Re-aiming the
headlamps may be necessary. For
additional information, refer to the
headlamp aiming section in this
chapter.)
Lights
60
2011 Crown Victoria(cro)
Owners Guide, 3rd Printing
USA(fus)
Page 61 of 333
WARNING:Handle a halogen headlamp bulb carefully and keep
out of children’s reach. Grasp the bulb only by its plastic base
and do not touch the glass. The oil from your hand could cause the
bulb to break the next time the headlamps are operated.
Note:If the bulb is accidentally touched, it should be cleaned with
rubbing alcohol before being used.
Note:The headlamp bulb should not be removed from the headlamp
until just before a replacement bulb is installed. Removing the bulb for
an extended period of time may affect headlamp bulb performance.
Contaminants may enter the headlamp where they can settle on the lens
and reflector. Never turn the headlamps on with the bulb removed.
Replacing front parking/cornering/turn signal lamp bulbs
To remove the parking/cornering/turn signal lamp bulbs:
1. Make sure the headlamp switch is in the off position, then open the
hood.
2. Remove the three pin type retainers and the radiator shield.
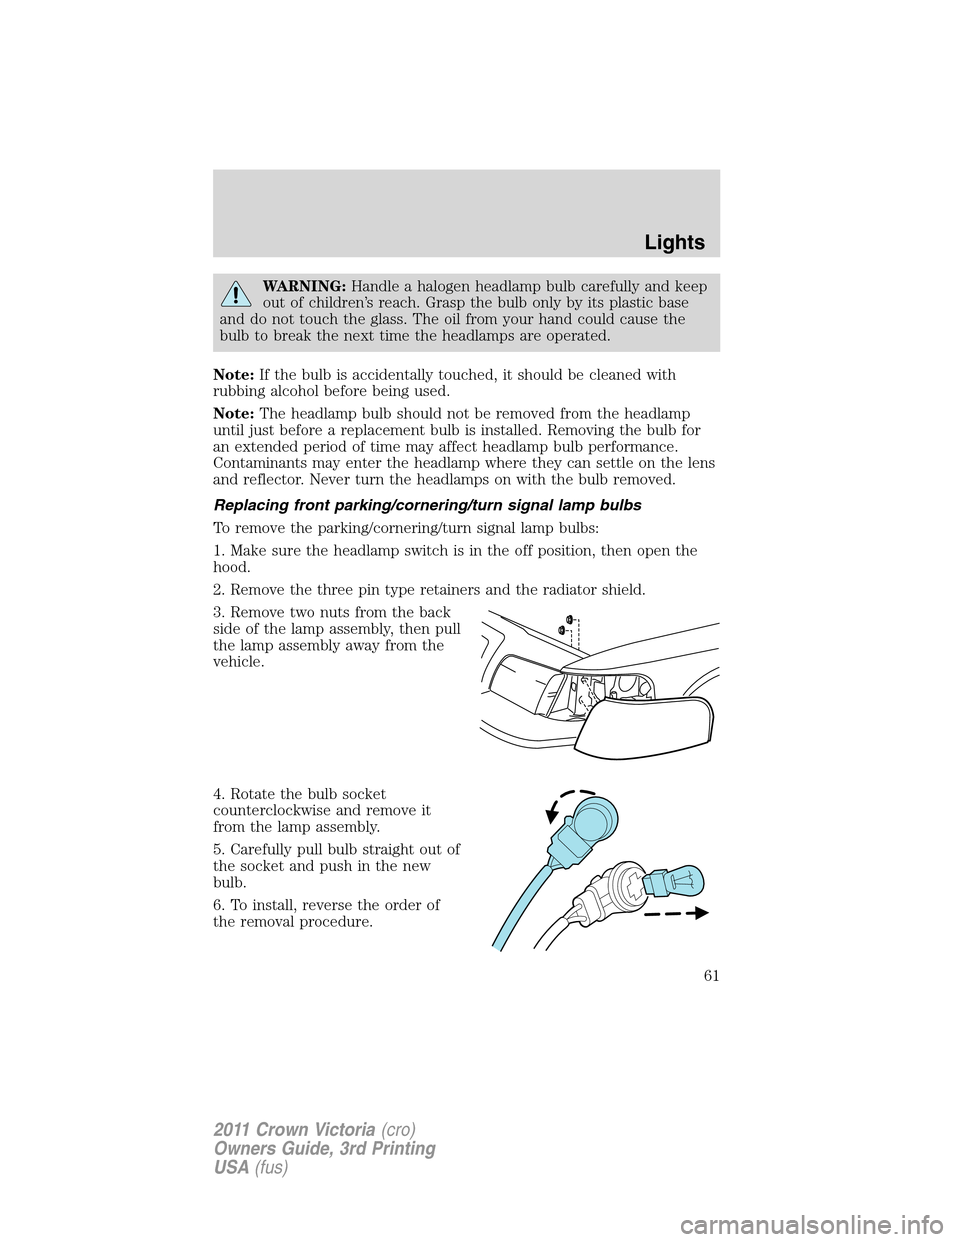
3. Remove two nuts from the back
side of the lamp assembly, then pull
the lamp assembly away from the
vehicle.
4. Rotate the bulb socket
counterclockwise and remove it
from the lamp assembly.
5. Carefully pull bulb straight out of
the socket and push in the new
bulb.
6. To install, reverse the order of
the removal procedure.
Lights
61
2011 Crown Victoria(cro)
Owners Guide, 3rd Printing
USA(fus)
Page 62 of 333
Note:The parking lamp/turn signal bulbs should not be removed from
the lamp until just before a replacement bulb is installed. Removing the
bulb for an extended period of time may affect headlamp bulb
performance. Contaminants may enter the headlamp where they can
settle on the lens and reflector. Never turn the lamps on with the bulb
removed.
Replacing tail/brake/turn signal lamp bulbs
The tail lamp, the brake lamp and the turn signal lamp bulbs are located
in the tail lamp assembly. Follow the same steps to replace either bulb.
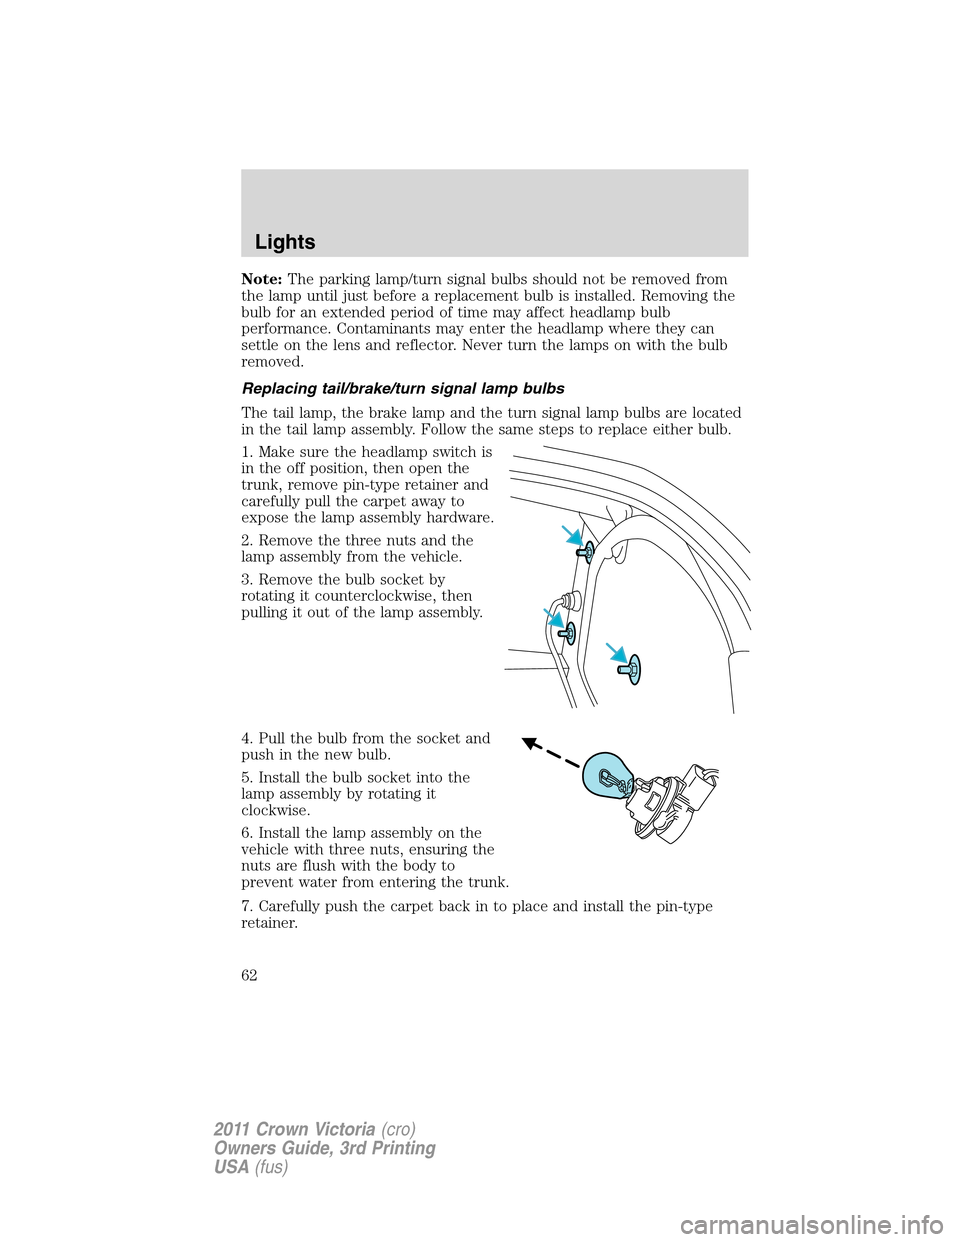
1. Make sure the headlamp switch is
in the off position, then open the
trunk, remove pin-type retainer and
carefully pull the carpet away to
expose the lamp assembly hardware.
2. Remove the three nuts and the
lamp assembly from the vehicle.
3. Remove the bulb socket by
rotating it counterclockwise, then
pulling it out of the lamp assembly.
4. Pull the bulb from the socket and
push in the new bulb.
5. Install the bulb socket into the
lamp assembly by rotating it
clockwise.
6. Install the lamp assembly on the
vehicle with three nuts, ensuring the
nuts are flush with the body to
prevent water from entering the trunk.
7. Carefully push the carpet back in to place and install the pin-type
retainer.
Lights
62
2011 Crown Victoria(cro)
Owners Guide, 3rd Printing
USA(fus)
Page 63 of 333
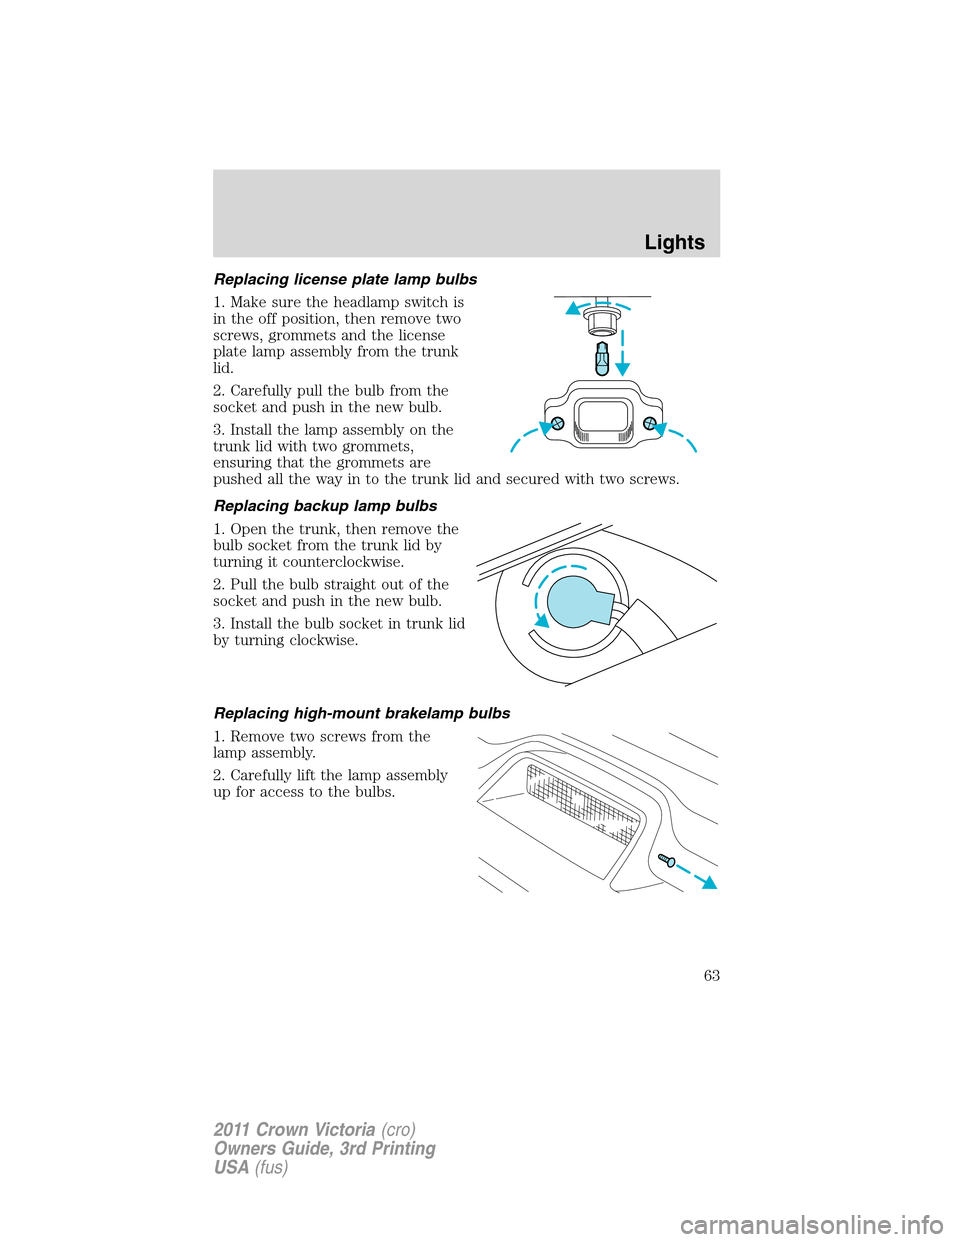
Replacing license plate lamp bulbs
1. Make sure the headlamp switch is
in the off position, then remove two
screws, grommets and the license
plate lamp assembly from the trunk
lid.
2. Carefully pull the bulb from the
socket and push in the new bulb.
3. Install the lamp assembly on the
trunk lid with two grommets,
ensuring that the grommets are
pushed all the way in to the trunk lid and secured with two screws.
Replacing backup lamp bulbs
1. Open the trunk, then remove the
bulb socket from the trunk lid by
turning it counterclockwise.
2. Pull the bulb straight out of the
socket and push in the new bulb.
3. Install the bulb socket in trunk lid
by turning clockwise.
Replacing high-mount brakelamp bulbs
1. Remove two screws from the
lamp assembly.
2. Carefully lift the lamp assembly
up for access to the bulbs.
Lights
63
2011 Crown Victoria(cro)
Owners Guide, 3rd Printing
USA(fus)
Page 69 of 333
INTERIOR MIRROR
The interior rear view mirror has two pivot points on the support arm
which lets you adjust the mirror up or down and from side to side.
WARNING:Do not adjust the mirror while the vehicle is in
motion.
Automatic dimming interior rear view mirror (if equipped)
The interior rear view mirror has an auto-dimming function. The
electronic day/night mirror will change from the normal (high reflective)
state to the non-glare (darkened) state when bright lights (glare) reach
the mirror. When the mirror detects bright light from behind the vehicle,
it will automatically adjust (darken) to minimize glare.
The mirror will automatically return to the normal state whenever the
vehicle is placed in R (Reverse) to ensure a bright clear view when
backing up.
Do not block the sensors on the front and back of the interior
rear view mirror since this may impair proper mirror
performance.
Note:A rear center passenger and/or raised rear center headrest (if
equipped) may also block the light from reaching the sensor.
Do not clean the housing or glass of any mirror with harsh
abrasives, fuel or other petroleum-based cleaning products.
EXTERIOR MIRRORS
Power side view mirrors
WARNING:Do not adjust the mirror while the vehicle is in
motion.
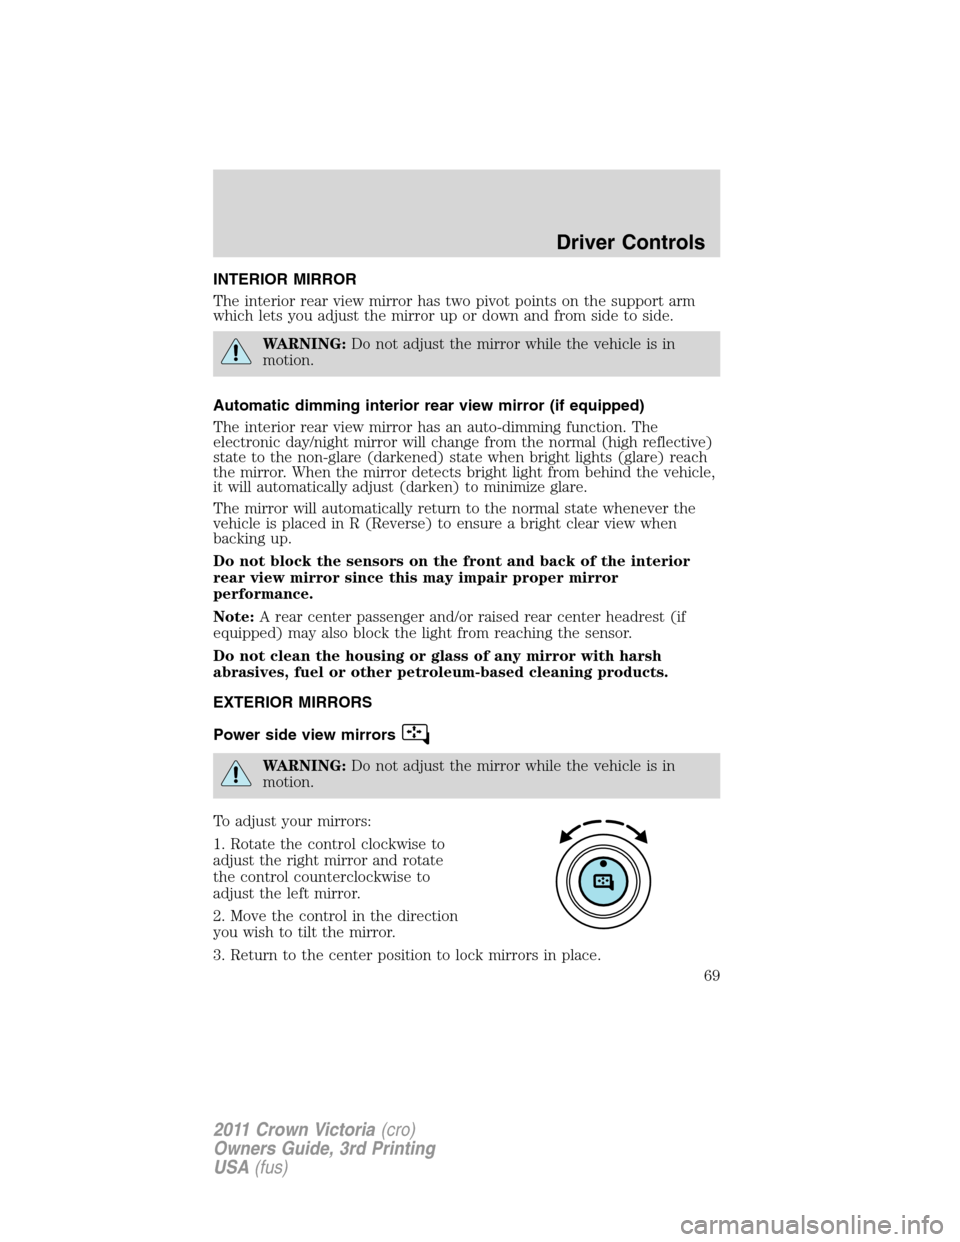
To adjust your mirrors:
1. Rotate the control clockwise to
adjust the right mirror and rotate
the control counterclockwise to
adjust the left mirror.
2. Move the control in the direction
you wish to tilt the mirror.
3. Return to the center position to lock mirrors in place.
Driver Controls
69
2011 Crown Victoria(cro)
Owners Guide, 3rd Printing
USA(fus)