check engine Mercury Grand Marquis 1999 s Owner's Guide
[x] Cancel search | Manufacturer: MERCURY, Model Year: 1999, Model line: Grand Marquis, Model: Mercury Grand Marquis 1999Pages: 200, PDF Size: 1.16 MB
Page 144 of 200
Use Ford Premium Engine Coolant E2FZ-19549±AA (in Oregon,
F5FZ-19549±CC, in Canada, Motorcraft CXC-10) or an equivalent
premium engine coolant that meets Ford specification ESE-M97B44±A.
DO NOT USE Ford Extended Life Engine Coolant
F6AZ-19544±AA, meeting Ford specification WSS-M97B44±D
(orange in color). Do not add recycled coolant to your vehicle.
Do not use alcohol or methanol antifreeze or any engine coolants mixed
with alcohol or methanol antifreeze. Do not use supplemental coolant
additives in your vehicle. These additives may harm your engine cooling
system. The use of an improper coolant may void the warranty of your
vehicle's engine cooling system.
Recycled engine coolant
Ford Motor Company recommends that Ford and Lincoln-Mercury
dealers use recycled engine coolant produced by Ford-approved
processes.
Not all coolant recycling processes produce coolant which meets Ford
specification ESE-M97B44±A, and use of such coolant may harm engine
and cooling system components.
Always dispose of used automotive fluids in a responsible manner.
Follow your community's regulations and standards for recycling and
disposing of automotive fluids.
Coolant refill capacity
To find out how much fluid your vehicle's cooling system can hold, refer
toRefill capacitiesin theCapacities and specificationschapter.
Have your dealer check the engine cooling system for leaks if you have
to add more than 1.0 liter (1.0 quart) of engine coolant per month.
Severe winter climate
If you drive in extremely cold climates (less than ±36ÉC [±34ÉF]), it may
be necessary to increase the coolant concentration above 50%. Refer to
the chart on the coolant container to ensure the coolant concentration in
your vehicle is such that the coolant will not freeze at the temperature
level in which you drive during winter months. Never increase the engine
coolant concentration above 60%. Leave a 50/50 mixture of engine
coolant and water in your vehicle year-round in non-extreme climates.
Maintenance and care
144
Page 145 of 200
What you should know about fail-safe cooling
If the engine coolant supply is depleted, this feature allows the vehicle to
be driven temporarily before incremental component damage is incurred.
The ªfail-safeº distance depends on ambient temperatures, vehicle load
and terrain.
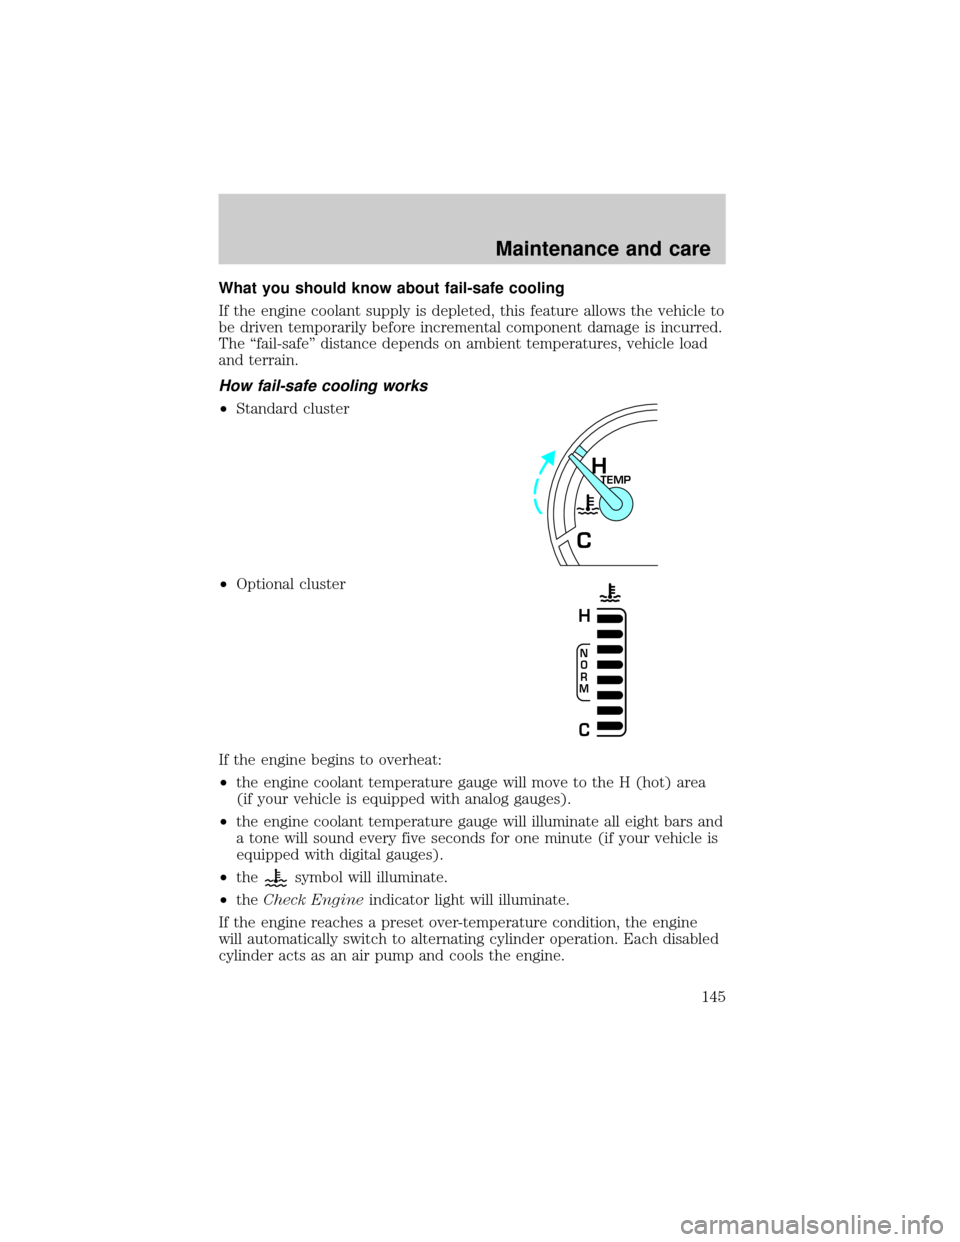
How fail-safe cooling works
²Standard cluster
²Optional cluster
If the engine begins to overheat:
²the engine coolant temperature gauge will move to the H (hot) area
(if your vehicle is equipped with analog gauges).
²the engine coolant temperature gauge will illuminate all eight bars and
a tone will sound every five seconds for one minute (if your vehicle is
equipped with digital gauges).
²the
symbol will illuminate.
²theCheck Engineindicator light will illuminate.
If the engine reaches a preset over-temperature condition, the engine
will automatically switch to alternating cylinder operation. Each disabled
cylinder acts as an air pump and cools the engine.
TEMPH
C
N
O
R
M
H
C
Maintenance and care
145
Page 146 of 200
When this occurs the vehicle will still operate, however:
²the engine power will be limited.
²the air conditioning system will be disabled.
Continued operation will increase the engine temperature:
²the
symbol will begin to flash.
²if your vehicle is equipped with digital gauges, the gauge bars will
flash and a tone will sound every five seconds for one minute.
²the engine will completely shut down, causing steering and braking
effort to increase.
Once the engine temperature cools, the engine can be re-started. Take
your vehicle to a service facility as soon as possible to minimize engine
damage.
When fail-safe mode is activated
You have limited engine power when in the fail-safe mode, so drive the
vehicle with caution. The vehicle will not be able to maintain high-speed
operation and the engine will run rough. Remember that the engine is
capable of completely shutting down automatically to prevent engine
damage, therefore:
1. Pull off the road as soon as safely possible and turn off the engine.
2. Arrange for the vehicle to be taken to a service facility.
3. If this is not possible, wait a short period for the engine to cool.
4. Check the coolant level and replenish if low.
Never remove the coolant reservoir cap while the engine is
running or hot.
5. Re-start the engine and take your vehicle to a service facility.
Driving the vehicle without repairing the engine problem
increases the chance of engine damage. Take your vehicle to a
service facility as soon as possible.
Maintenance and care
146
Page 147 of 200
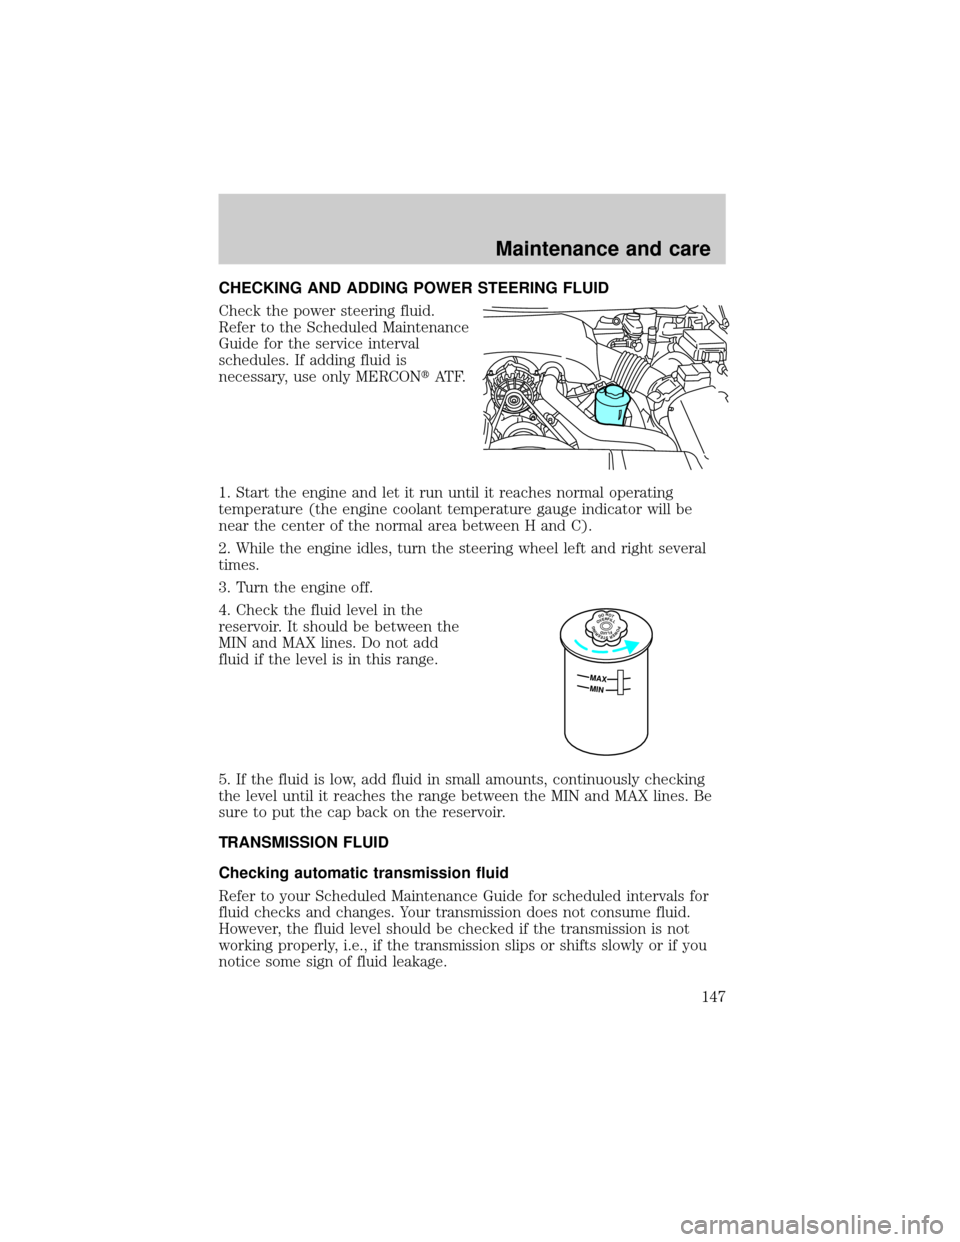
CHECKING AND ADDING POWER STEERING FLUID
Check the power steering fluid.
Refer to the Scheduled Maintenance
Guide for the service interval
schedules. If adding fluid is
necessary, use only MERCONtAT F.
1. Start the engine and let it run until it reaches normal operating
temperature (the engine coolant temperature gauge indicator will be
near the center of the normal area between H and C).
2. While the engine idles, turn the steering wheel left and right several
times.
3. Turn the engine off.
4. Check the fluid level in the
reservoir. It should be between the
MIN and MAX lines. Do not add
fluid if the level is in this range.
5. If the fluid is low, add fluid in small amounts, continuously checking
the level until it reaches the range between the MIN and MAX lines. Be
sure to put the cap back on the reservoir.
TRANSMISSION FLUID
Checking automatic transmission fluid
Refer to your Scheduled Maintenance Guide for scheduled intervals for
fluid checks and changes. Your transmission does not consume fluid.
However, the fluid level should be checked if the transmission is not
working properly, i.e., if the transmission slips or shifts slowly or if you
notice some sign of fluid leakage.
DONOTOVERFILLPOWERSTEERINGFLUID
MAX
MIN
Maintenance and care
147
Page 148 of 200

Automatic transmission fluid expands when warmed. To obtain an
accurate fluid check, drive the vehicle until it is at normal operating
temperature (approximately 30 km [20 miles]). If your vehicle has been
operated for an extended period at high speeds, in city traffic during hot
weather or pulling a trailer, the vehicle should be turned off for about 30
minutes to allow fluid to cool before checking.
1. Drive the vehicle 30 km (20 miles) or until it reaches normal operating
temperature.
2. Park the vehicle on a level surface and engage the parking brake.
3. With the parking brake engaged and your foot on the brake pedal,
start the engine and move the gearshift lever through all of the gear
ranges. Allow sufficient time for each gear to engage.
4. Latch the gearshift lever in P (Park) and leave the engine running.
5. Remove the dipstick, wiping it clean with a clean, dry lint free rag.
6. Install the dipstick making sure it is fully seated in the filler tube.
7. Remove the dipstick and inspect the fluid level. The fluid should be in
the designated area for normal operating temperature (H) or ambient
temperature (C).
Low fluid level
Do not drive the vehicle if the fluid
level is at the bottom of the dipstick
and the ambient temperature is
above 10ÉC (50ÉF).
Correct fluid level
The transmission fluid should be checked at normal operating
temperature 66ÉC-77ÉC (150ÉF-170ÉF) on a level surface. The normal
operating temperature can be reached after approximately 30 km
(20 miles) of driving.
You can check the fluid without driving if the ambient temperature is
above 10ÉC (50ÉF). However, if fluid is added at this time, an overfill
condition could result when the vehicle reaches normal operating
temperature.
The transmission fluid should be in
this range if at normal operating
temperature (66ÉC-77ÉC
[150ÉF-170ÉF]).
DON’T ADD
DON’T ADD
Maintenance and care
148
Page 159 of 200
splashed on the skin, promptly wash skin thoroughly with soap and
water. Consult a physician immediately if you experience an adverse
reaction.
Fuel Filler Cap
Your fuel tank filler cap has an indexed design with a one-eighth turn
on/off feature.
When fueling your vehicle:
1. Turn the engine off.
2. Carefully turn the filler cap counterclockwise 1/8 of a turn until it
stops.
3. Pull to remove the cap from the fuel filler pipe.
4. To install the cap, align the tabs on the cap with the notches on the
filler pipe.
5. Turn the filler cap clockwise 1/8 of a turn until it stops.
If the ªService Engine Soon/Check Engineº indicator comes on and stays
on when you start the engine, the fuel filler cap may not be properly
installed. Turn off the engine, remove the fuel filler cap and reinstall it
being careful to align the cap properly.
If you must replace the fuel filler cap, replace it with a genuine
Ford or Motorcraft part. The customer warranty may be void for
any damage to the fuel tank or fuel system if a genuine Ford or
Motorcraft fuel filler cap is not used.
The fuel system may be under pressure. If the fuel filler cap is
venting vapor or if you hear a hissing sound, wait until it stops
before completely removing the fuel filler cap. Otherwise, fuel may
spray out and injure you or others.
If you do not use the proper fuel filler cap, the pressure in the
fuel tank can damage the fuel system or cause it to work
improperly in a collision.
Choosing the right fuel
Use only UNLEADED FUEL. The use of leaded fuel is prohibited by law
and could damage your vehicle.
Maintenance and care
159
Page 161 of 200
Cleaner air
Ford approves the use of gasolines to improve air quality, including
reformulated gasolines that contain oxygenates up to 10% ethanol or
15% MTBE.
Running out of fuel
Avoid running out fuel because this situation may have an adverse affect
on powertrain components.
If you have run out of fuel:
²You may need to crank the engine several times before the system
starts to pump fuel from the tank to the engine.
²Your ªCheck Engineº light may come on. For more information on the
ªCheck Engineº light, refer to theInstrumentationchapter.
Fuel Filter
Your vehicle is equipped with a fuel filter that is mounted on the
underbody.
For fuel filter replacement, see your dealer or a qualified service
technician. Refer to the Scheduled Maintenance Guide for the
appropriate intervals for changing the fuel filter.
If you replace the fuel filter, replace it with an authorized
Motorcraft part. The customer warranty may be void for any
damage to the fuel system if an authorized Motorcraft fuel filter
is not used.
ESSENTIALS OF GOOD FUEL ECONOMY
Measuring techniques
Your best source of information about actual fuel economy is you, the
driver. You must gather information as accurately and consistently as
possible. Fuel expense, frequency of fillups or fuel gauge readings are
NOT accurate as a measure of fuel economy. We do not recommend
taking fuel economy measurements during the first 1 600 km (1 000
miles) of driving (engine break-in period). You will get a more accurate
measurement after 3 000 km±5 000 km (2 000 miles-3 000 miles).
The advertised fuel capacity of the fuel tank on your vehicle is equal to
the rated refill capacity of the fuel tank as listed in the Refill Capacities
chart in this ªOwner Guide.º The advertised capacity is the amount of
Maintenance and care
161
Page 164 of 200
²Use recommended engine oil. Refer toLubricant Specifications.
²Perform all regularly scheduled maintenance items. Follow the
recommended maintenance schedule and owner maintenance checks
found in your vehicle Scheduled Maintenance Guide.
Conditions
²Heavily loading a vehicle or towing a trailer may reduce fuel economy
at any speed.
²Carrying unnecessary weight may reduce fuel economy (approximately
2 km/h [1 mpg] is lost for every 180 kg [400 lb] of weight carried).
²Adding certain accessories to your vehicle (for example bug
deflectors, rollover/light bars, running boards, ski/luggage racks) may
reduce fuel economy.
²Use of fuel blended with alcohol may lower fuel economy.
²Fuel economy may decrease with lower temperatures during the first
12±16 km (8±10 miles) of driving.
²Driving on flat terrain offers improved fuel economy as compared to
driving over hilly terrain.
²Transmissions give their best fuel economy when operated in the top
cruise gear and with steady pressure on the gas pedal.
²Close windows for high speed driving.
EPA window sticker
Every new vehicle should have the EPA window sticker. Contact your
dealer if the window sticker is not supplied with your vehicle. The EPA
window sticker should be your guide for the fuel economy comparisons
with other vehicles.
It is important to note the box in the lower left corner of the window
sticker. These numbers represent the Range of Km/L (MPG) expected on
the vehicle, depending upon the driver's method of operation and
conditions.
EMISSION CONTROL SYSTEM
Your vehicle is equipped with various emission control components and a
catalytic converter which will enable your vehicle to comply with
applicable exhaust emission standards. To make sure that the catalytic
converter and other emission control components continue to work
properly:
Maintenance and care
164
Page 165 of 200
²Use only unleaded fuel.
²Avoid running out of fuel.
²Do not turn off the ignition while your vehicle is moving, especially at
high speeds.
²Have the items listed in your Scheduled Maintenance Guide performed
according to the specified schedule.
The scheduled maintenance items listed in the Scheduled Maintenance
Guide are essential to the life and performance of your vehicle and to its
emissions system.
If other than Ford, Motorcraft or Ford-authorized parts are used for
maintenance replacements or for service of components affecting
emission control, such non-Ford parts should be equivalent to genuine
Ford Motor Company parts in performance and durability.
Do not park, idle, or drive your vehicle in dry grass or other dry
ground cover. The emission system heats up the engine
compartment and exhaust system, which can start a fire.
Illumination of the charging system warning light,Check Engine
indicator light or the temperature warning light, fluid leaks, strange
odors, smoke or loss of oil pressure, could indicate that the emission
control system is not working properly.
Exhaust leaks may result in entry of harmful and potentially
lethal fumes into the passenger compartment.
Do not make any unauthorized changes to your vehicle or engine. By
law, vehicle owners and anyone who manufactures, repairs, services,
sells, leases, trades vehicles, or supervises a fleet of vehicles are not
permitted to intentionally remove an emission control device or prevent
it from working. Information about your vehicle's emission system is on
the Vehicle Emission Control Information Decal located on or near the
engine. This decal identifies engine displacement and gives some tune up
specifications.
Please consult your ªWarranty Guideº for complete emission warranty
information.
Maintenance and care
165
Page 166 of 200
Readiness for Inspection/Maintenance (I/M) testing
In some localities, it may be a legal requirement to pass an I/M test of
the on-board diagnostics system. If your ªCheck Engine/Service Engine
Soonº light is on, refer to the description in theWarning Lights and
Chimessection of theInstrumentationchapter. Your vehicle may not
pass the I/M test with the ªCheck Engine/Service Engine Soonº light on.
If the vehicle's powertrain system or its battery has just been serviced,
the on-board diagnostics system is reset to a ªnot ready for I/M testº
condition. To ready the on-board diagnostics system for I/M testing, a
minimum of 30 minutes of city and highway driving is necessary as
described below:
²First, at least 10 minutes of driving on an expressway or highway.
²Next, at least 20 minutes driving in stop-and-go, city-type traffic with
at least four idle periods.
Allow the vehicle to sit for at least eight hours without starting the
engine. Then, start the engine and complete the above driving cycle. The
engine must warm up to its normal operating temperature. Once started,
do not turn off the engine until the above driving cycle is complete.
EXTERIOR BULBS
Replacing exterior bulbs
Check the operation of the following lamps frequently:
²Headlamps
²Tail lamps
²Brakelamps
²High-mount brakelamp
²Turn signals
²Backup lamps
²License plate lamp
Do not remove lamp bulbs unless they will be replaced immediately. If a
bulb is removed for an extended period of time, contaminants may enter
the lamp housings and affect performance.
Maintenance and care
166