warning Mercury Grand Marquis 2001 s Owner's Guide
[x] Cancel search | Manufacturer: MERCURY, Model Year: 2001, Model line: Grand Marquis, Model: Mercury Grand Marquis 2001Pages: 240, PDF Size: 1.86 MB
Page 136 of 240
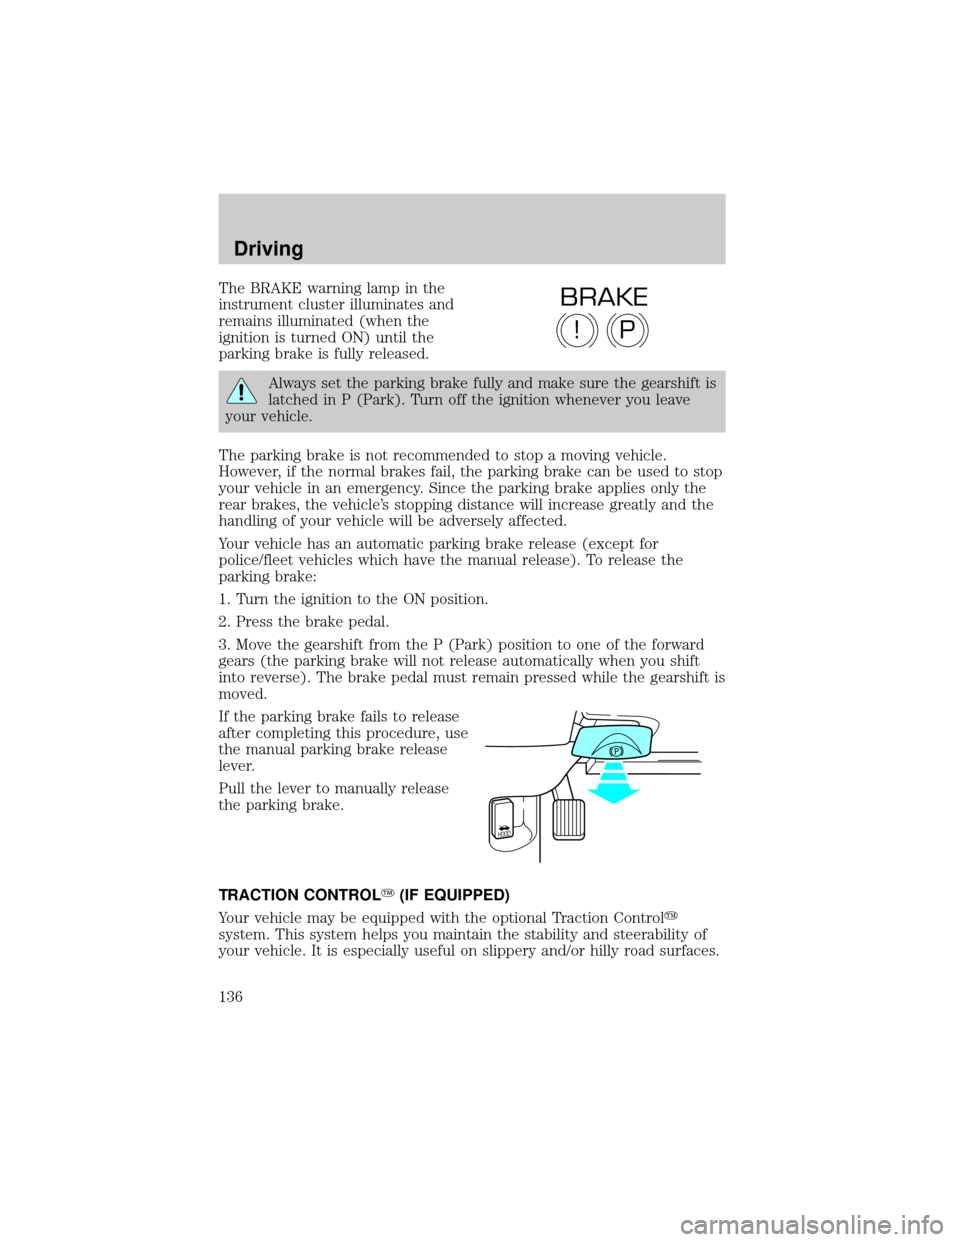
The BRAKE warning lamp in the
instrument cluster illuminates and
remains illuminated (when the
ignition is turned ON) until the
parking brake is fully released.
Always set the parking brake fully and make sure the gearshift is
latched in P (Park). Turn off the ignition whenever you leave
your vehicle.
The parking brake is not recommended to stop a moving vehicle.
However, if the normal brakes fail, the parking brake can be used to stop
your vehicle in an emergency. Since the parking brake applies only the
rear brakes, the vehicle's stopping distance will increase greatly and the
handling of your vehicle will be adversely affected.
Your vehicle has an automatic parking brake release (except for
police/fleet vehicles which have the manual release). To release the
parking brake:
1. Turn the ignition to the ON position.
2. Press the brake pedal.
3. Move the gearshift from the P (Park) position to one of the forward
gears (the parking brake will not release automatically when you shift
into reverse). The brake pedal must remain pressed while the gearshift is
moved.
If the parking brake fails to release
after completing this procedure, use
the manual parking brake release
lever.
Pull the lever to manually release
the parking brake.
TRACTION CONTROLY(IF EQUIPPED)
Your vehicle may be equipped with the optional Traction Controly
system. This system helps you maintain the stability and steerability of
your vehicle. It is especially useful on slippery and/or hilly road surfaces.
P!
BRAKE
HOOD
Driving
136
Page 139 of 240
This system keeps the rear of your vehicle at a constant level by
automatically adding air or releasing air from the springs.
If you exceed the load limit, the rear air suspension may not operate.
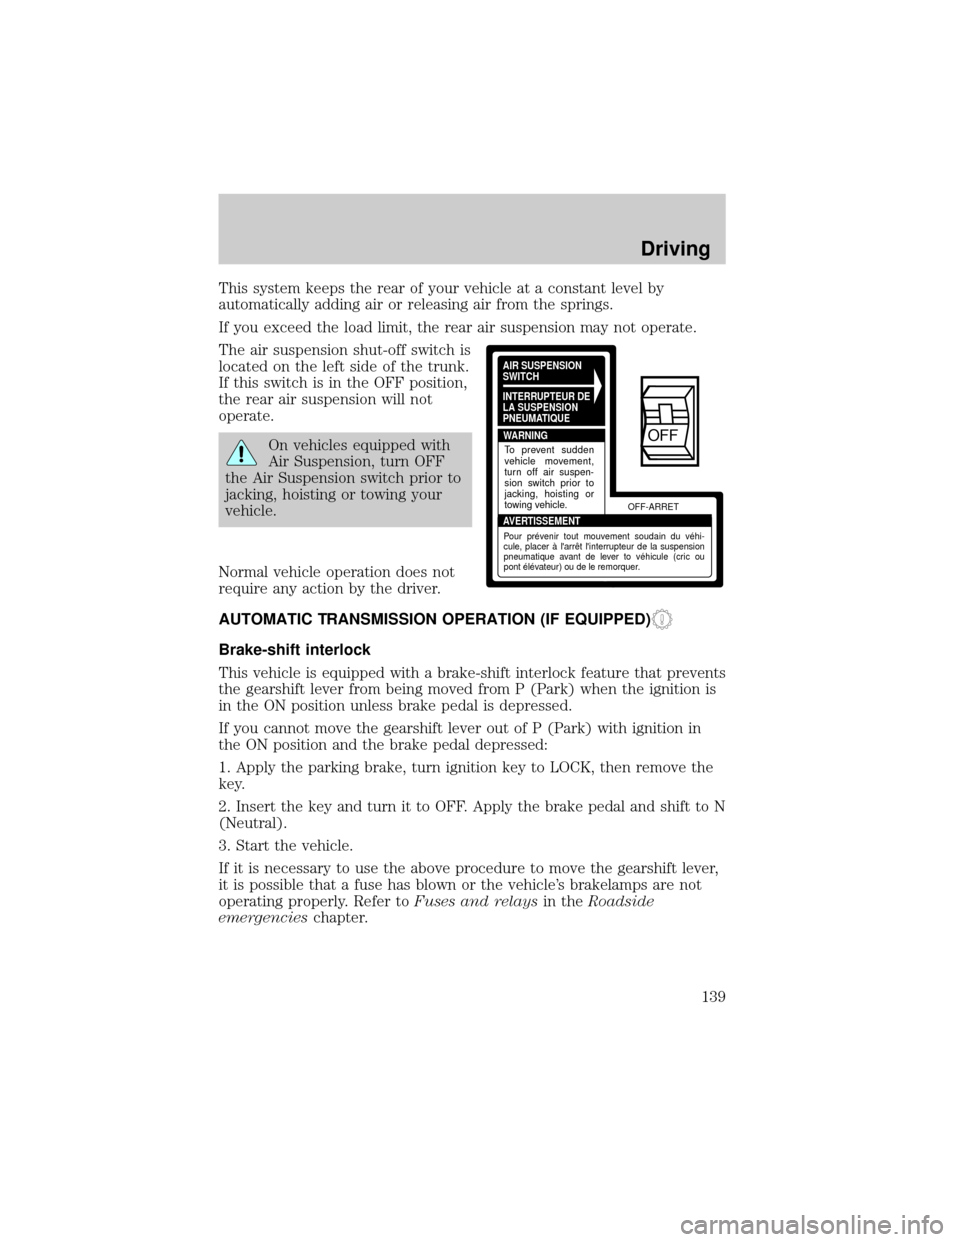
The air suspension shut-off switch is
located on the left side of the trunk.
If this switch is in the OFF position,
the rear air suspension will not
operate.
On vehicles equipped with
Air Suspension, turn OFF
the Air Suspension switch prior to
jacking, hoisting or towing your
vehicle.
Normal vehicle operation does not
require any action by the driver.
AUTOMATIC TRANSMISSION OPERATION (IF EQUIPPED)
Brake-shift interlock
This vehicle is equipped with a brake-shift interlock feature that prevents
the gearshift lever from being moved from P (Park) when the ignition is
in the ON position unless brake pedal is depressed.
If you cannot move the gearshift lever out of P (Park) with ignition in
the ON position and the brake pedal depressed:
1. Apply the parking brake, turn ignition key to LOCK, then remove the
key.
2. Insert the key and turn it to OFF. Apply the brake pedal and shift to N
(Neutral).
3. Start the vehicle.
If it is necessary to use the above procedure to move the gearshift lever,
it is possible that a fuse has blown or the vehicle's brakelamps are not
operating properly. Refer toFuses and relaysin theRoadside
emergencieschapter.
AIR SUSPENSION
SWITCH
INTERRUPTEUR DE
LA SUSPENSION
PNEUMATIQUE
WARNING
AVERTISSEMENTOFF-ARRET
To prevent sudden
vehicle movement,
turn off air suspen-
sion switch prior to
jacking, hoisting or
towing vehicle.
Pour prévenir tout mouvement soudain du véhi-
cule, placer à l'arrêt l'interrupteur de la suspension
pneumatique avant de lever to véhicule (cric ou
pont élévateur) ou de le remorquer.
OFF
Driving
139
Page 140 of 240
Do not drive your vehicle until you verify that the brakelamps
are working.
If your vehicle gets stuck in mud or snow it may be rocked out by
shifting from forward and reverse gears, stopping between shifts, in a
steady pattern. Press lightly on the accelerator in each gear.
Do not rock the vehicle if the engine is not at normal operating
temperature or damage to the transmission may occur.
Do not rock the vehicle for more than a few minutes or damage
to the transmission and tires may occur or the engine may
overheat.
Always set the parking brake fully and make sure the gearshift is
latched in P (Park). Turn off the ignition whenever you leave
your vehicle.
If the parking brake is fully released, but the brake warning lamp
remains illuminated, the brakes may not be working properly.
See your dealer or a qualified service technician.
Driving with a 4±speed automatic transmission
Understanding gearshift positions
To put your vehicle in gear, start the engine, depress the brake pedal,
then move gearshift lever out of P (Park).
Hold the brake pedal down while you move the gearshift lever
from P (Park) to another position. If you do not hold the brake
pedal down, your vehicle may move unexpectedly and injure someone.
Driving
140
Page 153 of 240
Passenger compartment fuse panel
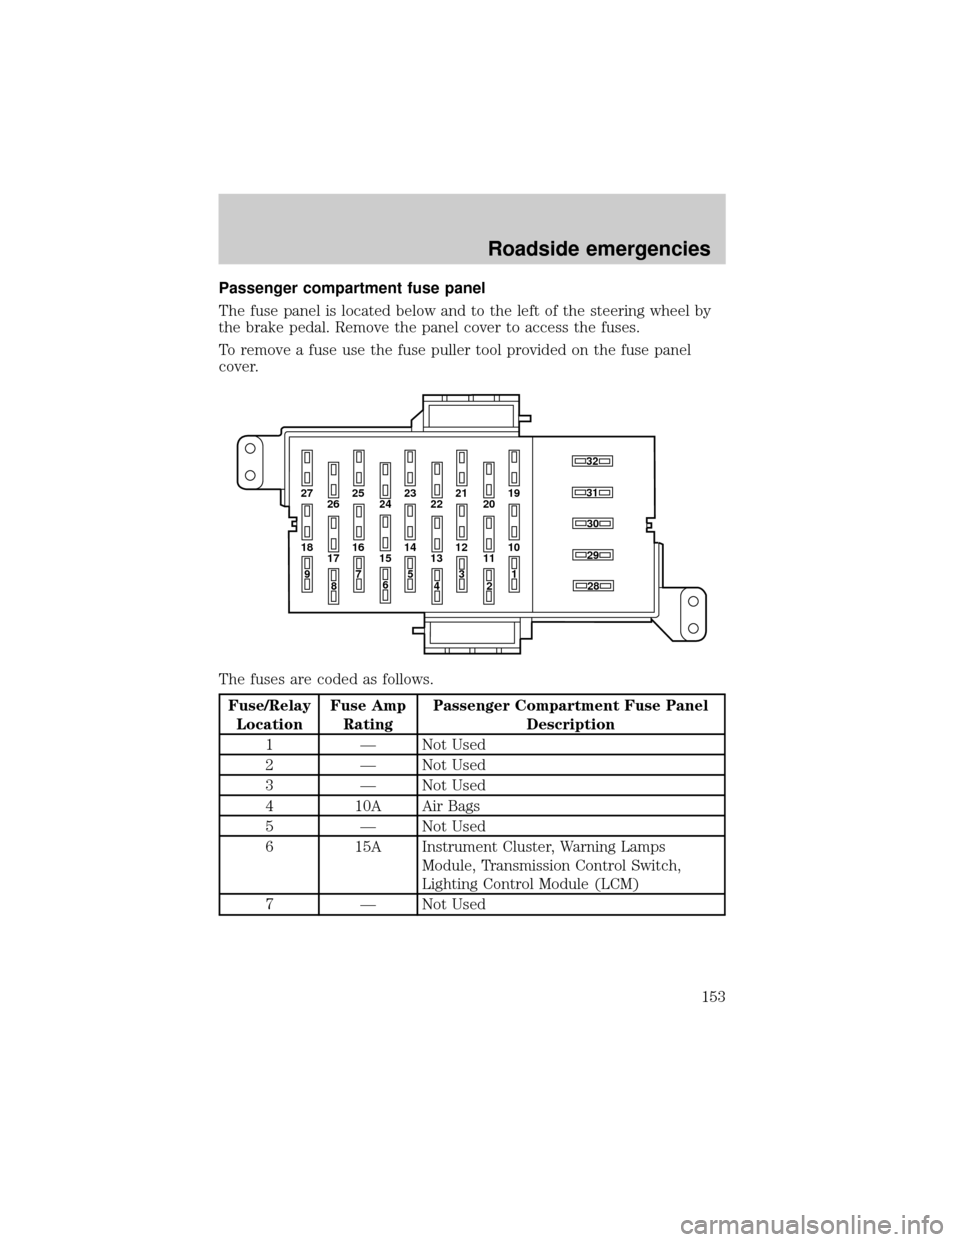
The fuse panel is located below and to the left of the steering wheel by
the brake pedal. Remove the panel cover to access the fuses.
To remove a fuse use the fuse puller tool provided on the fuse panel
cover.
The fuses are coded as follows.
Fuse/Relay
LocationFuse Amp
RatingPassenger Compartment Fuse Panel
Description
1 Ð Not Used
2 Ð Not Used
3 Ð Not Used
4 10A Air Bags
5 Ð Not Used
6 15A Instrument Cluster, Warning Lamps
Module, Transmission Control Switch,
Lighting Control Module (LCM)
7 Ð Not Used
27 25
26 2423 21
2219
20
18 16
17 1514 12
131030
32
31
28
29
11
97
8653
41
2
Roadside emergencies
153
Page 197 of 240
The flow of fuel through a fuel pump nozzle can produce static
electricity, which can cause a fire if fuel is pumped into an
ungrounded fuel container.
Use the following guidelines to avoid static build-up when filling an
ungrounded fuel container:
²Place approved fuel container on the ground.
²DO NOT fill a fuel container while it is in the vehicle (including the
cargo area).
²Keep the fuel pump nozzle in contact with the fuel container while
filling.
²DO NOT use a device that would hold the fuel pump handle in the fill
position.
Fuel Filler Cap
Your fuel tank filler cap has an indexed design with a 1/8 turn on/off
feature.
When fueling your vehicle:
1. Turn the engine off.
2. Carefully turn the filler cap counterclockwise 1/8 of a turn until it
stops.
3. Pull to remove the cap from the fuel filler pipe.
4. To install the cap, align the tabs on the cap with the notches on the
filler pipe.
5. Turn the filler cap clockwise 1/8 of a turn until it stops.
ªCheck Fuel Capº illuminates when the ignition is turned to the ON
position to ensure your bulb is working. When this light turns on, check
the fuel filler cap. Continuing to operate the vehicle with the Check Fuel
Cap light on, can activate the Service Engine Soon warning. When the
fuel filler cap is properly re-installed, the light(s) will turn off after a
period of normal driving.It may take a long period of time for the
system to detect an improperly installed fuel filler cap.
If you must replace the fuel filler cap, replace it with a fuel filler
cap that is designed for your vehicle. The customer warranty may
be void for any damage to the fuel tank or fuel system if the
correct genuine Ford or Motorcraft fuel filler cap is not used.
Maintenance and care
197
Page 204 of 240
Illumination of the ªCheck Engineº light, charging system warning light
or the temperature warning light, fluid leaks, strange odors, smoke or
loss of engine power, could indicate that the emission control system is
not working properly.
Exhaust leaks may result in entry of harmful and potentially
lethal fumes into the passenger compartment.
Do not make any unauthorized changes to your vehicle or engine. By
law, vehicle owners and anyone who manufactures, repairs, services,
sells, leases, trades vehicles, or supervises a fleet of vehicles are not
permitted to intentionally remove an emission control device or prevent
it from working. Information about your vehicle's emission system is on
the Vehicle Emission Control Information Decal located on or near the
engine. This decal identifies engine displacement and gives some tune up
specifications.
Please consult yourWarranty Guidefor complete emission warranty
information.
Readiness for Inspection/Maintenance (I/M) testing
In some localities, it may be a legal requirement to pass an I/M test of
the on-board diagnostics system. If your ªCheck Engine/Service Engine
Soonº light is on, refer to the description in theWarning lights and
chimessection of theInstrumentationchapter. Your vehicle may not
pass the I/M test with the ªCheck Engine/Service Engine Soonº light on.
If the vehicle's powertrain system or its battery has just been serviced,
the on-board diagnostics system is reset to a ªnot ready for I/M testº
condition. To ready the on-board diagnostics system for I/M testing, a
minimum of 30 minutes of city and highway driving is necessary as
described below:
²First, at least 10 minutes of driving on an expressway or highway.
²Next, at least 20 minutes driving in stop-and-go, city-type traffic with
at least four idle periods.
Allow the vehicle to sit for at least eight hours without starting the
engine. Then, start the engine and complete the above driving cycle. The
engine must warm up to its normal operating temperature. Once started,
do not turn off the engine until the above driving cycle is complete.
Maintenance and care
204
Page 234 of 240

A
Air bag supplemental restraint
system ........................................116
and child safety seats ............118
description ..............................116
disposal ....................................120
driver air bag ..........................118
indicator light ...................10, 120
operation .................................118
passenger air bag ...................118
Air cleaner filter ...............188, 216
Air conditioning ..........................29
automatic temperature
control system ..........................32
Air suspension ...........................138
description ..............................138
warning light .............................13
Antifreeze (see Engine
coolant) .....................................175
Anti-lock brake system
(see Brakes) ......................134±135
Audio system (see Radio) .........38
Automatic transmission
driving an automatic
overdrive .................................140
fluid, adding ............................183
fluid, checking ........................183
fluid, refill capacities ..............216
fluid, specification ..................219
Auxiliary power point ...........65, 83
Axle
lubricant specifications ..218±219
refill capacities ........................216
traction lok ..............................143B
Battery .......................................186
acid, treating emergencies .....186
charging system warning light..13
jumping a disabled battery ....162
maintenance-free ....................186
replacement, specifications ...216
servicing ..................................186
voltage gauge ............................21
Belt minder ...............................112
Brakes ........................................134
anti-lock ...........................134±135
anti-lock brake system
(ABS) warning light .........12, 135
brake warning light ..................12
fluid, checking and adding ....174
fluid, refill capacities ..............216
fluid, specifications .........218±219
lubricant specifications ..218±219
pedals (see Power adjustable
foot pedals) ...............................64
shift interlock ..........................139
Break-in period .............................3
C
Capacities for refilling fluids ....216
Cassette tape player ...................50
CD changer .................................60
Certification Label ....................221
Child safety restraints ..............121
child safety belts ....................121
Child safety seats ......................122
attaching with tether straps ..127
in front seat ............................124
in rear seat ......................124, 126
Cleaning your vehicle ...............210
Index
234
Page 236 of 240

lubrication
specifications ..................218±219
refill capacities ........................216
service points ..........................170
starting after a collision .........150
Engine block heater .................132
Engine oil ..................................171
change oil soon warning,
message center .......................171
checking and adding ..............171
dipstick ....................................171
filter, specifications ........173, 216
recommendations ...................173
refill capacities ........................216
specifications ..................218±219
Exhaust fumes ..........................133
F
Fail safe cooling ........................180
Floor mats ...................................84
Fluid capacities .........................216
Fuel ............................................195
calculating fuel economy .......200
cap .....................................10, 197
capacity ...................................216
choosing the right fuel ...........198
comparisons with EPA fuel
economy estimates .................203
detergent in fuel .....................199
filling your vehicle
with fuel ..................195, 197, 200
filter, specifications ........200, 216
fuel filler door override ............80
fuel filler door release ..............80
fuel pump shut-off switch .....150
gauge .........................................17
improving fuel economy ........200
low fuel warning light ................8
octane rating ...........198, 219±220quality ......................................199
running out of fuel .................199
safety information relating to
automotive fuels .....................195
Fuses ..................................152±153
G
Garage door opener ....................74
Gas cap (see Fuel cap) ......10, 197
Gas mileage (see Fuel
economy) ...................................200
Gauges .........................................17
battery voltage gauge ...............21
engine coolant temperature
gauge .........................................20
engine oil pressure gauge ........22
fuel gauge ..................................17
odometer ...................................19
speedometer .............................18
trip odometer ............................20
GAWR (Gross Axle Weight
Rating) .......................................143
definition .................................143
driving with a heavy load ......143
location ....................................143
GVWR (Gross Vehicle Weight
Rating) .......................................143
calculating ...............................143
definition .................................143
driving with a heavy load ......143
location ....................................143
H
Hazard flashers .........................150
Head restraints ...........................98
Headlamps ...................................27
aiming ......................................210
Index
236
Page 237 of 240

autolamp system .......................28
bulb specifications ..................209
daytime running lights .............27
flash to pass ..............................28
high beam ...........................12, 28
replacing bulbs .......................205
turning on and off ....................27
warning chime ..........................16
Heating ........................................29
heating and air conditioning
system .......................................29
HomeLink universal
transceiver (see Garage
door opener) ...................74, 76±77
Hood ..........................................169
I
Ignition .........................67, 219±220
Infant seats (see Safety seats)..122
Inspection/maintenance (I/M)
testing ........................................204
Instrument panel
cleaning ...................................214
cluster ..................................8, 215
lighting up panel and
interior .......................................27
location of components ..............8
J
Jack ............................................157
positioning ...............................157
storage .....................................157
Jump-starting your vehicle ......162
K
Keyless entry system .................93
autolock .....................................86keypad .......................................93
programming entry code .........94
Keys .......................................90±92
key in ignition chime ...............16
positions of the ignition ...........67
L
Lamps
autolamp system .......................28
bulb replacement
specifications chart ................209
cargo lamps ...............................27
daytime running light ...............27
headlamps .................................27
headlamps, flash to pass ..........28
instrument panel, dimming .....27
interior lamps ...................27, 209
replacing bulbs ...............205±209
Lane change indicator
(see Turn signal) ........................65
Lights, warning and indicator ......8
air bag ........................................10
air suspension ...........................13
anti-lock brakes (ABS) ....12, 135
brake ..........................................12
charging system ........................13
check engine ...............................9
fuel cap light .............................10
high beam .................................12
low coolant ................................11
low fuel ........................................8
oil pressure ...............................13
overdrive off ..............................14
safety belt .................................11
speed control ............................73
traction control active ..............14
turn signal indicator .................12
Load limits .................................143
GAWR ......................................143
Index
237
Page 238 of 240

GVWR ......................................143
trailer towing ..........................143
Locks
autolock .....................................86
childproof ..................................83
doors ..........................................82
Lubricant specifications ...218±219
Lumbar support, seats .............102
M
Message center ...........................22
reset button ..............................23
select button .............................23
Mirrors
automatic dimming rearview
mirror ........................................78
cleaning ...................................212
side view mirrors (power) .......83
Motorcraft parts ................200, 216
O
Octane rating ............................198
Odometer .....................................19
Oil (see Engine oil) ..................171
Overdrive .............................68, 141
P
Panic alarm feature, remote
entry system ................................88
Parking brake ............................135
Parts (see Motorcraft parts) ....216
Passenger Occupant
Classification Sensor .................104
Pedals (see Power adjustable
foot pedals) .................................64Power distribution box
(see Fuses) ...............................155
Power door locks ..................82, 86
Power steering ..........................138
fluid, checking and adding ....183
fluid, refill capacity ................216
fluid, specifications .........218±219
R
Radio ............................................38
Rear window defroster ...............38
Relays ................................152, 157
Remote entry system ...........84, 88
illuminated entry ......................88
locking/unlocking doors ...........85
opening the trunk .....................87
panic alarm ...............................88
replacement/additional
transmitters ...............................89
replacing the batteries .............88
S
Safety belts (see Safety
restraints) ............16, 102, 106±110
Safety defects, reporting ..........233
Safety restraints ........102, 106±110
belt minder .............................112
cleaning the safety belts..115, 215
extension assembly ................111
for adults .........................107±109
for children .....................120±121
lap belt ....................................110
Occupant Classification
Sensor ......................................104
warning light and
chime ...................11, 16, 111±112
Safety seats for children ..........122
Index
238