light Mercury Grand Marquis 2004 s User Guide
[x] Cancel search | Manufacturer: MERCURY, Model Year: 2004, Model line: Grand Marquis, Model: Mercury Grand Marquis 2004Pages: 240, PDF Size: 1.92 MB
Page 31 of 240

•Tighten very loose tapes by inserting a finger or pencil into the hole
and turning the hub.
•Remove loose labels before inserting tapes.
•Allow tapes which have been subjected to extreme heat, humidity or
cold to reach a moderate temperature before playing.
•Clean the cassette player head with a cassette cleaning cartridge after
10–12 hours of play to maintain good sound/operation.
Don’t:
•Expose tapes to direct sunlight, extreme humidity, heat or cold.
•Leave tapes in the cassette player for a long time when not being
played.
CD/CD PLAYER CARE
Do:
•Handle discs by their edges only. Never touch the playing surface.
•Inspect discs before playing. Clean only with an approved CD cleaner
and wipe from the center out.
Don’t:
•Expose discs to direct sunlight or heat sources for extended periods
of time.
•Insert more than one disc into each slot of the CD changer magazine.
•Clean using a circular motion.
CD units are designed to play commercially pressed 12 cm (4.75
in) audio compact discs only. Due to technical incompatibility,
certain recordable and re-recordable compact discs may not
function correctly when used in Ford CD players. Irregular
shaped CDs, CDs with a scratch protection film attached, and CDs
with homemade paper (adhesive) labels should not be inserted
into the CD player. The label may peel and cause the CD to
become jammed. It is recommended that homemade CDs be
identified with permanent felt tip marker rather than adhesive
labels. Ball point pens may damage CDs. Please contact your
dealer for further information.
AUDIO SYSTEM WARRANTY AND SERVICE
Refer to theWarranty Guidefor audio system warranty information. If
service is necessary, see your dealer or qualified technician.
2004 Grand Marquis(grn)
Owners Guide (post-2002-fmt)
USA English(fus)
Entertainment Systems
31
Page 36 of 240
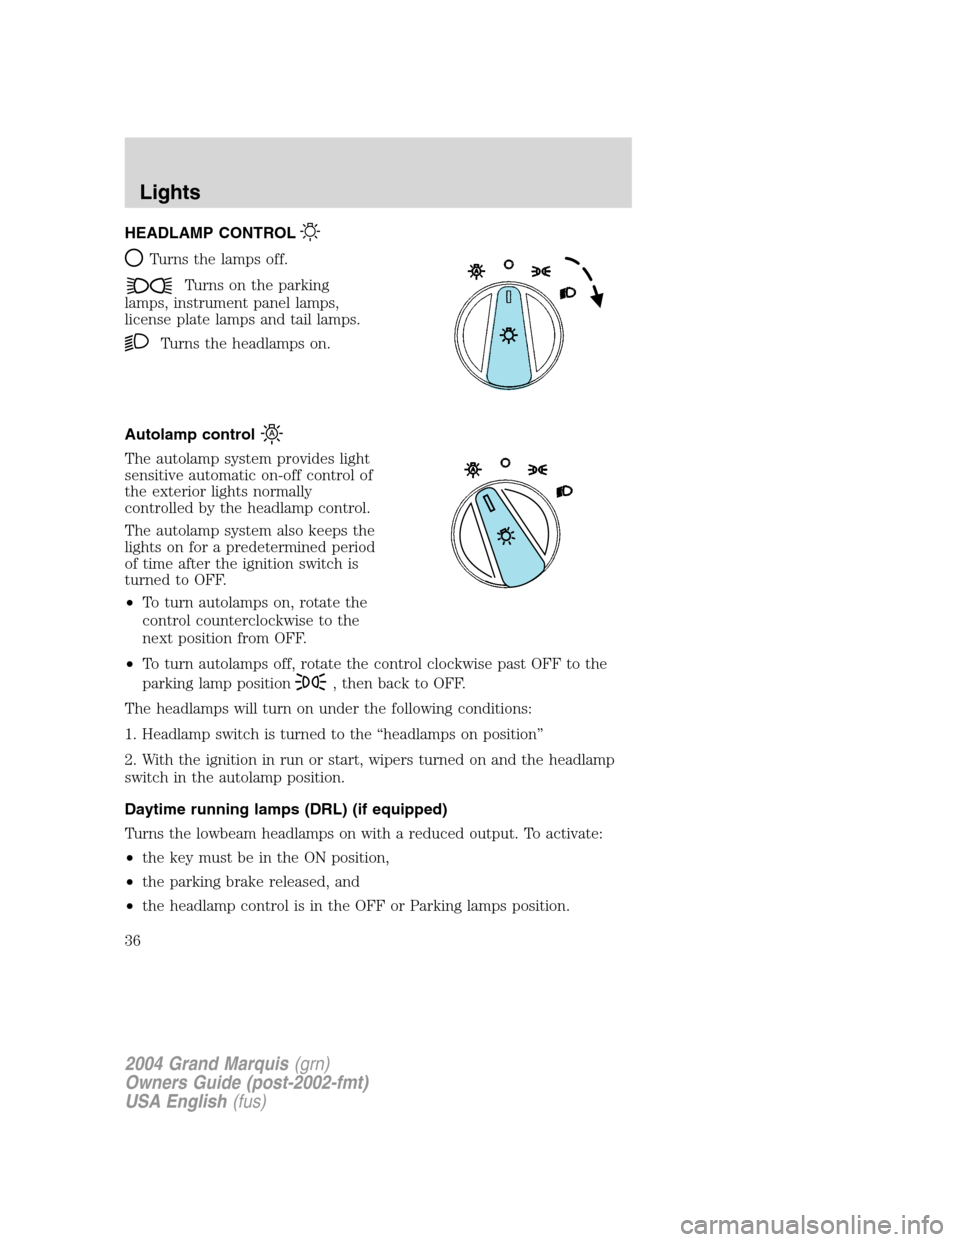
HEADLAMP CONTROL
Turns the lamps off.
Turns on the parking
lamps, instrument panel lamps,
license plate lamps and tail lamps.
Turns the headlamps on.
Autolamp control
The autolamp system provides light
sensitive automatic on-off control of
the exterior lights normally
controlled by the headlamp control.
The autolamp system also keeps the
lights on for a predetermined period
of time after the ignition switch is
turned to OFF.
•To turn autolamps on, rotate the
control counterclockwise to the
next position from OFF.
•To turn autolamps off, rotate the control clockwise past OFF to the
parking lamp position
, then back to OFF.
The headlamps will turn on under the following conditions:
1. Headlamp switch is turned to the“headlamps on position”
2. With the ignition in run or start, wipers turned on and the headlamp
switch in the autolamp position.
Daytime running lamps (DRL) (if equipped)
Turns the lowbeam headlamps on with a reduced output. To activate:
•the key must be in the ON position,
•the parking brake released, and
•the headlamp control is in the OFF or Parking lamps position.
2004 Grand Marquis(grn)
Owners Guide (post-2002-fmt)
USA English(fus)
Lights
Lights
36
Page 37 of 240
Always remember to turn on your headlamps at dusk or during
inclement weather. The Daytime Running Light (DRL) System
does not activate your tail lamps and generally may not provide
adequate lighting during these conditions. Failure to activate your
headlamps under these conditions may result in a collision.
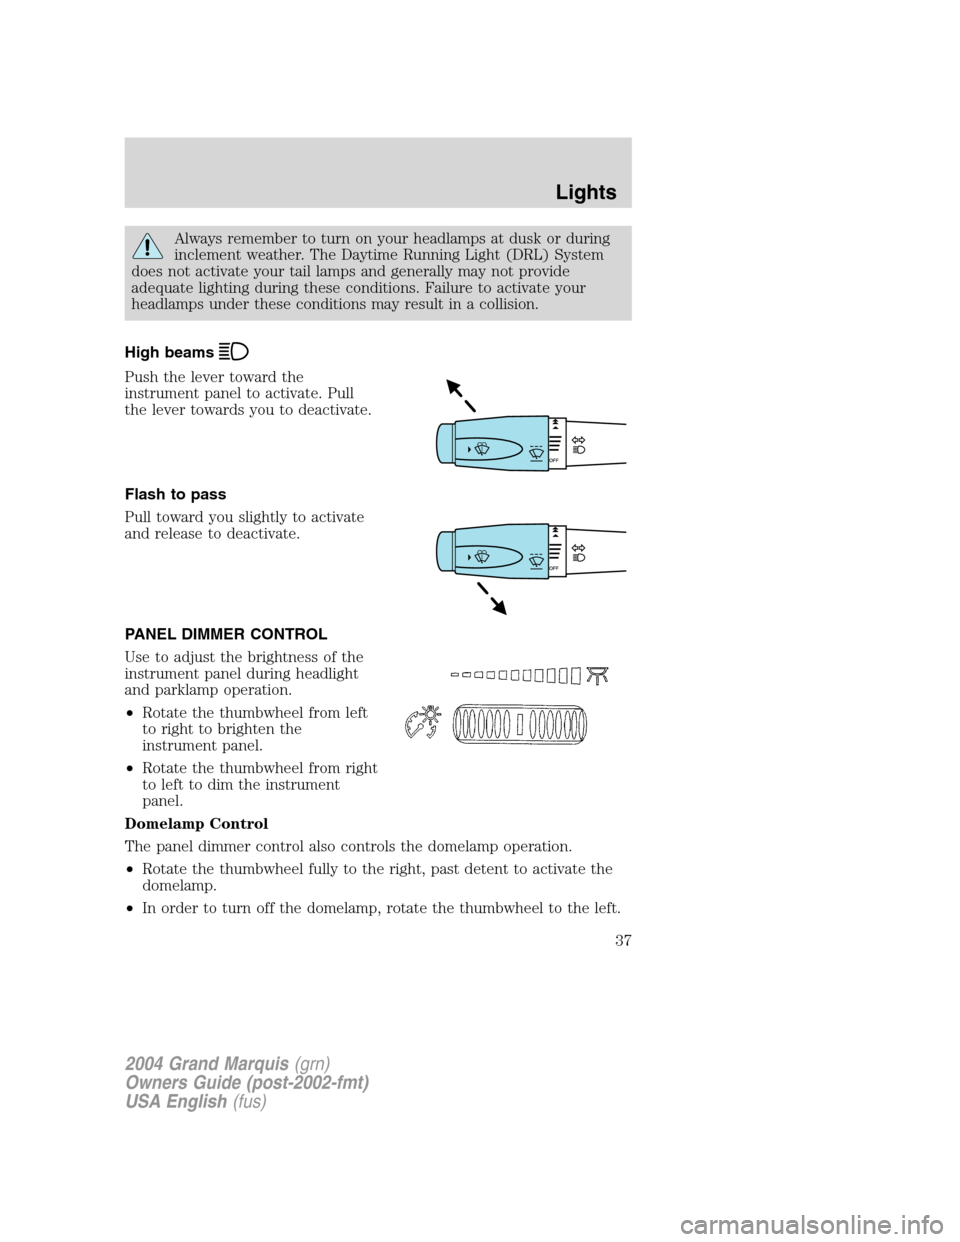
High beams
Push the lever toward the
instrument panel to activate. Pull
the lever towards you to deactivate.
Flash to pass
Pull toward you slightly to activate
and release to deactivate.
PANEL DIMMER CONTROL
Use to adjust the brightness of the
instrument panel during headlight
and parklamp operation.
•Rotate the thumbwheel from left
to right to brighten the
instrument panel.
•Rotate the thumbwheel from right
to left to dim the instrument
panel.
Domelamp Control
The panel dimmer control also controls the domelamp operation.
•Rotate the thumbwheel fully to the right, past detent to activate the
domelamp.
•In order to turn off the domelamp, rotate the thumbwheel to the left.
2004 Grand Marquis(grn)
Owners Guide (post-2002-fmt)
USA English(fus)
Lights
37
Page 38 of 240
AIMING THE HEADLAMPS
The headlamps on your vehicle are properly aimed at the assembly plant.
If your vehicle has been in an accident the alignment of your headlamps
should be checked by a qualified service technician.
Vertical aim adjustment
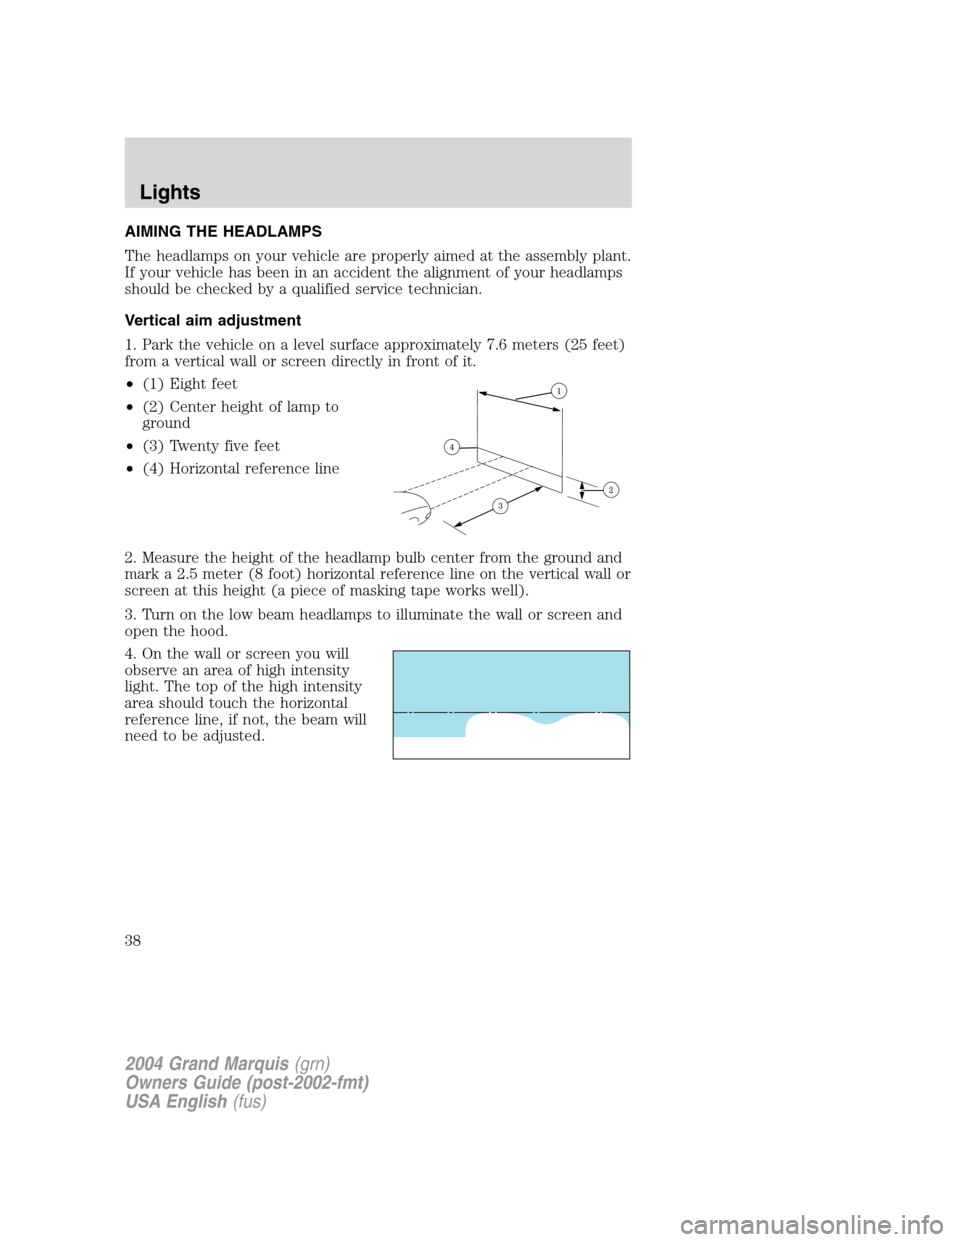
1. Park the vehicle on a level surface approximately 7.6 meters (25 feet)
from a vertical wall or screen directly in front of it.
•(1) Eight feet
•(2) Center height of lamp to
ground
•(3) Twenty five feet
•(4) Horizontal reference line
2. Measure the height of the headlamp bulb center from the ground and
mark a 2.5 meter (8 foot) horizontal reference line on the vertical wall or
screen at this height (a piece of masking tape works well).
3. Turn on the low beam headlamps to illuminate the wall or screen and
open the hood.
4. On the wall or screen you will
observe an area of high intensity
light. The top of the high intensity
area should touch the horizontal
reference line, if not, the beam will
need to be adjusted.
2004 Grand Marquis(grn)
Owners Guide (post-2002-fmt)
USA English(fus)
Lights
38
Page 39 of 240
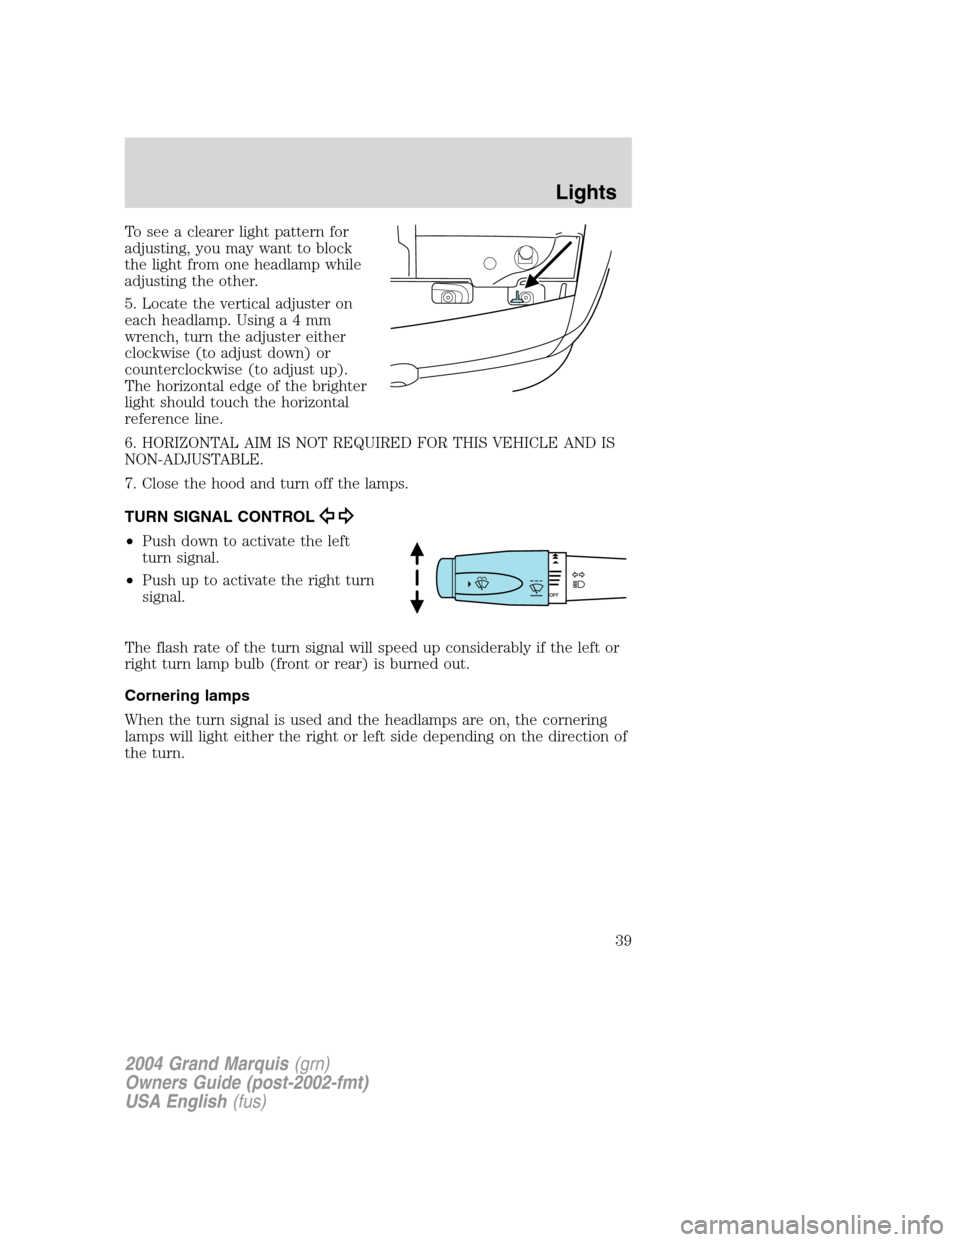
To see a clearer light pattern for
adjusting, you may want to block
the light from one headlamp while
adjusting the other.
5. Locate the vertical adjuster on
each headlamp. Usinga4mm
wrench, turn the adjuster either
clockwise (to adjust down) or
counterclockwise (to adjust up).
The horizontal edge of the brighter
light should touch the horizontal
reference line.
6. HORIZONTAL AIM IS NOT REQUIRED FOR THIS VEHICLE AND IS
NON-ADJUSTABLE.
7. Close the hood and turn off the lamps.
TURN SIGNAL CONTROL
•Push down to activate the left
turn signal.
•Push up to activate the right turn
signal.
The flash rate of the turn signal will speed up considerably if the left or
right turn lamp bulb (front or rear) is burned out.
Cornering lamps
When the turn signal is used and the headlamps are on, the cornering
lamps will light either the right or left side depending on the direction of
the turn.
2004 Grand Marquis(grn)
Owners Guide (post-2002-fmt)
USA English(fus)
Lights
39
Page 40 of 240
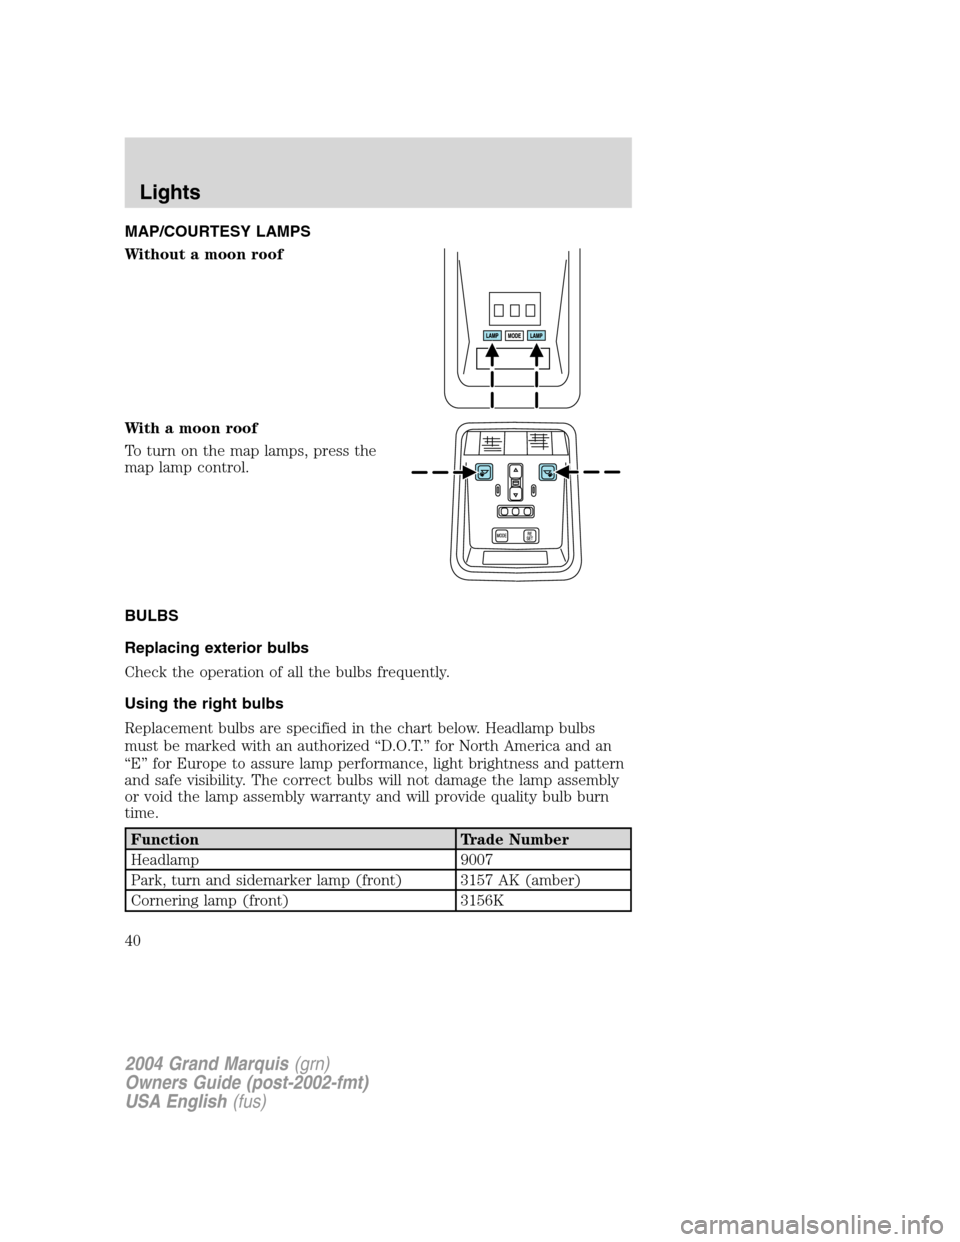
MAP/COURTESY LAMPS
Without a moon roof
With a moon roof
To turn on the map lamps, press the
map lamp control.
BULBS
Replacing exterior bulbs
Check the operation of all the bulbs frequently.
Using the right bulbs
Replacement bulbs are specified in the chart below. Headlamp bulbs
must be marked with an authorized“D.O.T.”for North America and an
“E”for Europe to assure lamp performance, light brightness and pattern
and safe visibility. The correct bulbs will not damage the lamp assembly
or void the lamp assembly warranty and will provide quality bulb burn
time.
Function Trade Number
Headlamp 9007
Park, turn and sidemarker lamp (front) 3157 AK (amber)
Cornering lamp (front) 3156K
2004 Grand Marquis(grn)
Owners Guide (post-2002-fmt)
USA English(fus)
Lights
40
Page 41 of 240
Function Trade Number
Tail, stop, turn and sidemarker lamp (rear) 3157K
Backup lamp 3156K
License plate lamp 168
High-mount brakelamp 912
Luggage compartment lamp 212-2
Dome lamp 906
Rear reading lamp 211-2
Map lamp 168
Illuminated visor mirror 7065
Dual floorwell lamp 906
Glove compartment 168
All replacement bulbs are clear in color except where noted.
To replace all instrument panel lights - see your dealer.
Replacing the interior bulbs
Check the operation of all bulbs frequently.
Replacing headlamp bulbs
To remove the headlamp bulb:
1. Make sure the headlamp control is in the OFF position, then open the
hood
2. Remove the three pin type retainers and the radiator sight shield.
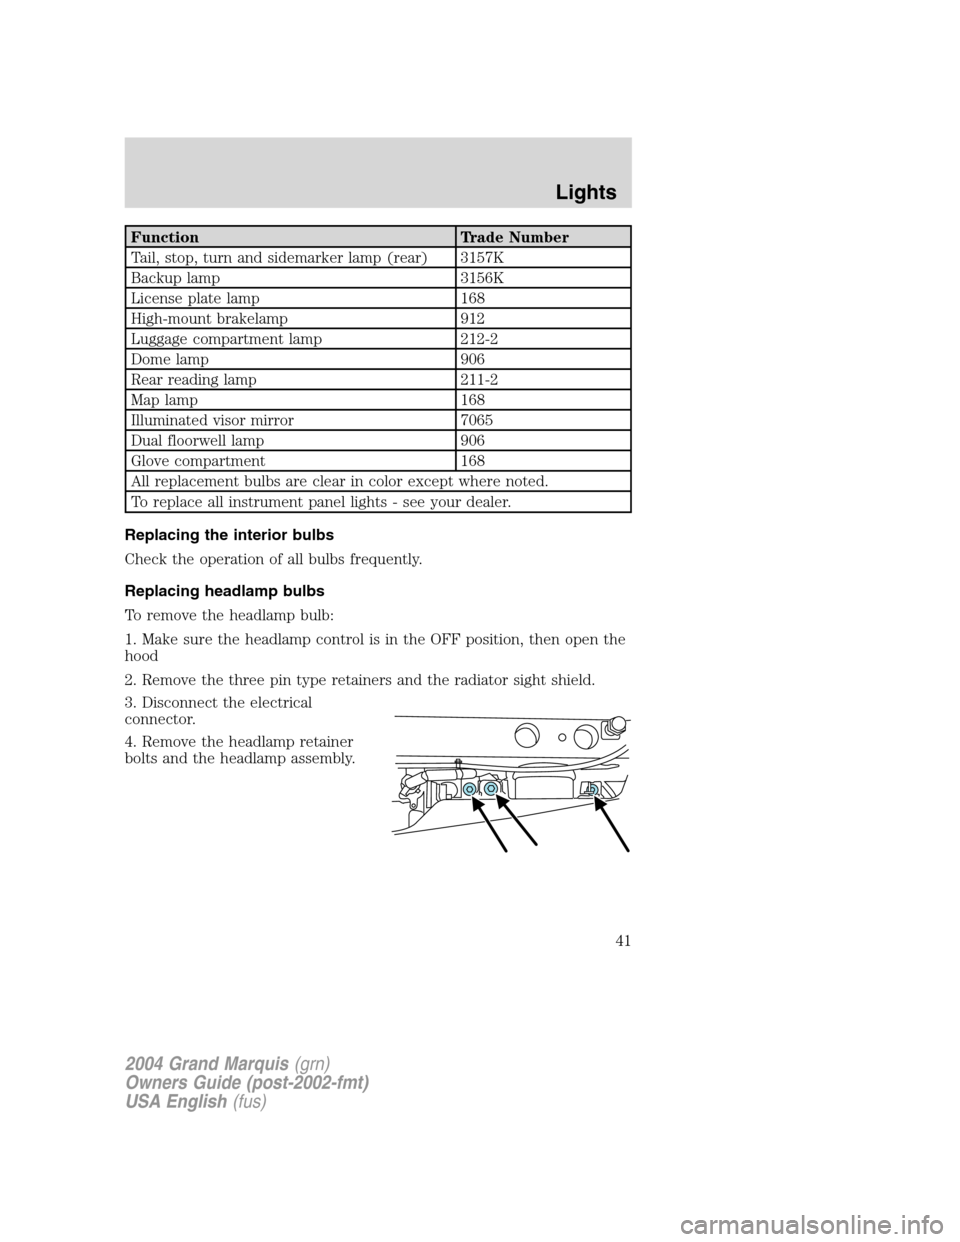
3. Disconnect the electrical
connector.
4. Remove the headlamp retainer
bolts and the headlamp assembly.
2004 Grand Marquis(grn)
Owners Guide (post-2002-fmt)
USA English(fus)
Lights
41
Page 42 of 240
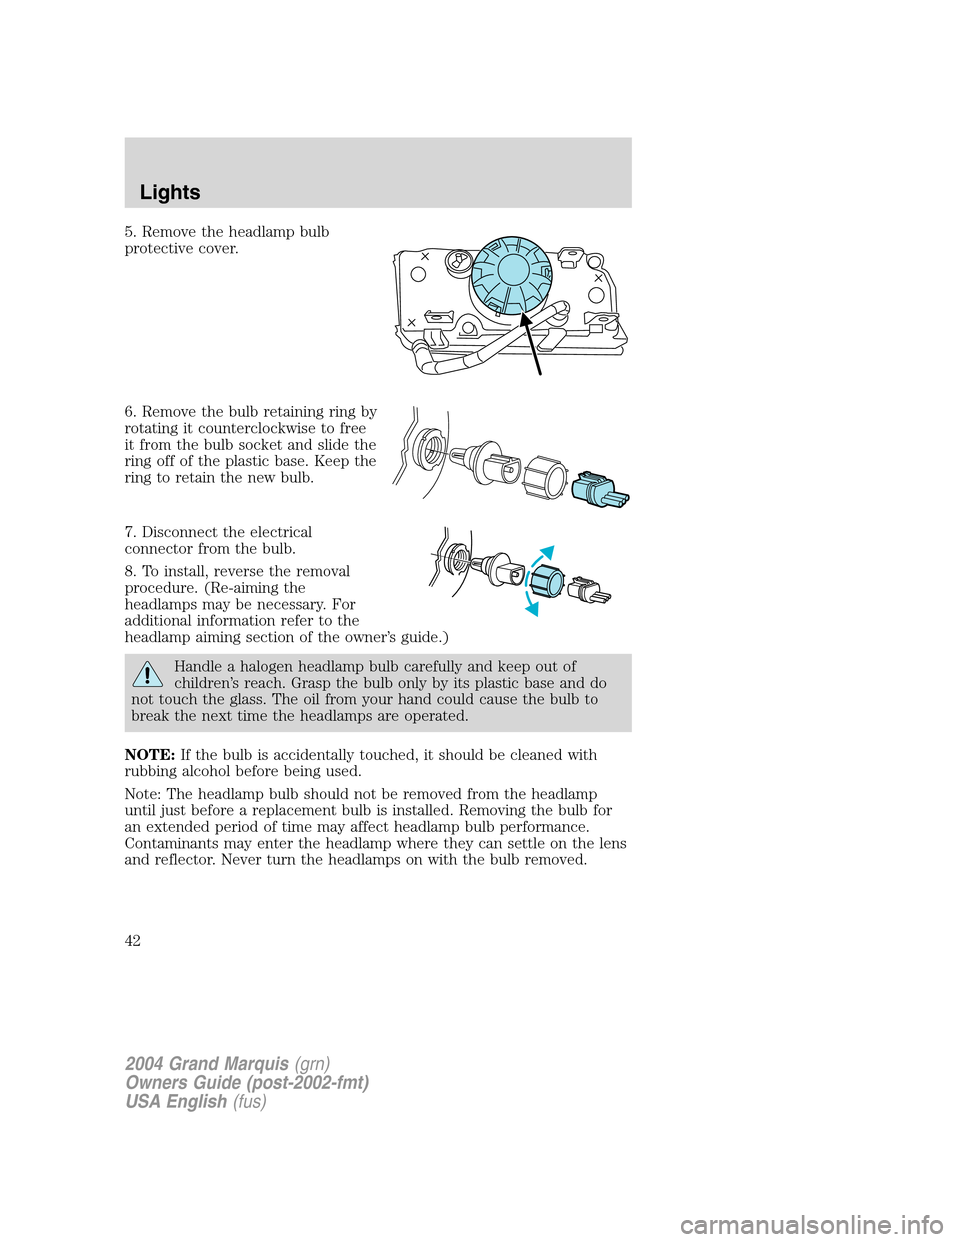
5. Remove the headlamp bulb
protective cover.
6. Remove the bulb retaining ring by
rotating it counterclockwise to free
it from the bulb socket and slide the
ring off of the plastic base. Keep the
ring to retain the new bulb.
7. Disconnect the electrical
connector from the bulb.
8. To install, reverse the removal
procedure. (Re-aiming the
headlamps may be necessary. For
additional information refer to the
headlamp aiming section of the owner’s guide.)
Handle a halogen headlamp bulb carefully and keep out of
children’s reach. Grasp the bulb only by its plastic base and do
not touch the glass. The oil from your hand could cause the bulb to
break the next time the headlamps are operated.
NOTE:If the bulb is accidentally touched, it should be cleaned with
rubbing alcohol before being used.
Note: The headlamp bulb should not be removed from the headlamp
until just before a replacement bulb is installed. Removing the bulb for
an extended period of time may affect headlamp bulb performance.
Contaminants may enter the headlamp where they can settle on the lens
and reflector. Never turn the headlamps on with the bulb removed.
2004 Grand Marquis(grn)
Owners Guide (post-2002-fmt)
USA English(fus)
Lights
42
Page 43 of 240
Replacing front parking/cornering/turn signal lamp bulbs
The park/turn/cornering lamp bulbs can be replaced with out removing
the headlamp assembly.
1. Make sure headlamp switch is in OFF position, then open the hood.
2. Remove the three pin type retainers and the radiator shield.
3. Loosen the parking lamp attachments, on the back side of the lamp,
and pull the lamp assembly forward.
4. Remove the bulb from the side turn lamp assembly.
5. Disconnect the electrical connector from the bulb and replace the
bulb.
Note: The parking lamp/turn signal bulbs should not be removed from
the lamp until just before a replacement bulb is installed. Removing the
bulb for an extended period of time may affect headlamp bulb
performance. Contaminants may enter the headlamp where they can
settle on the lens and reflector. Never turn the lamps on with the bulb
removed.
6. To install, reverse the order of the removal procedure.
Replacing tail lamp/brake/turn lamp bulbs
The tail lamp, the brake lamp and the turn signal lamp bulbs are located
in the tail lamp assembly. Follow the same steps to replace either bulb.
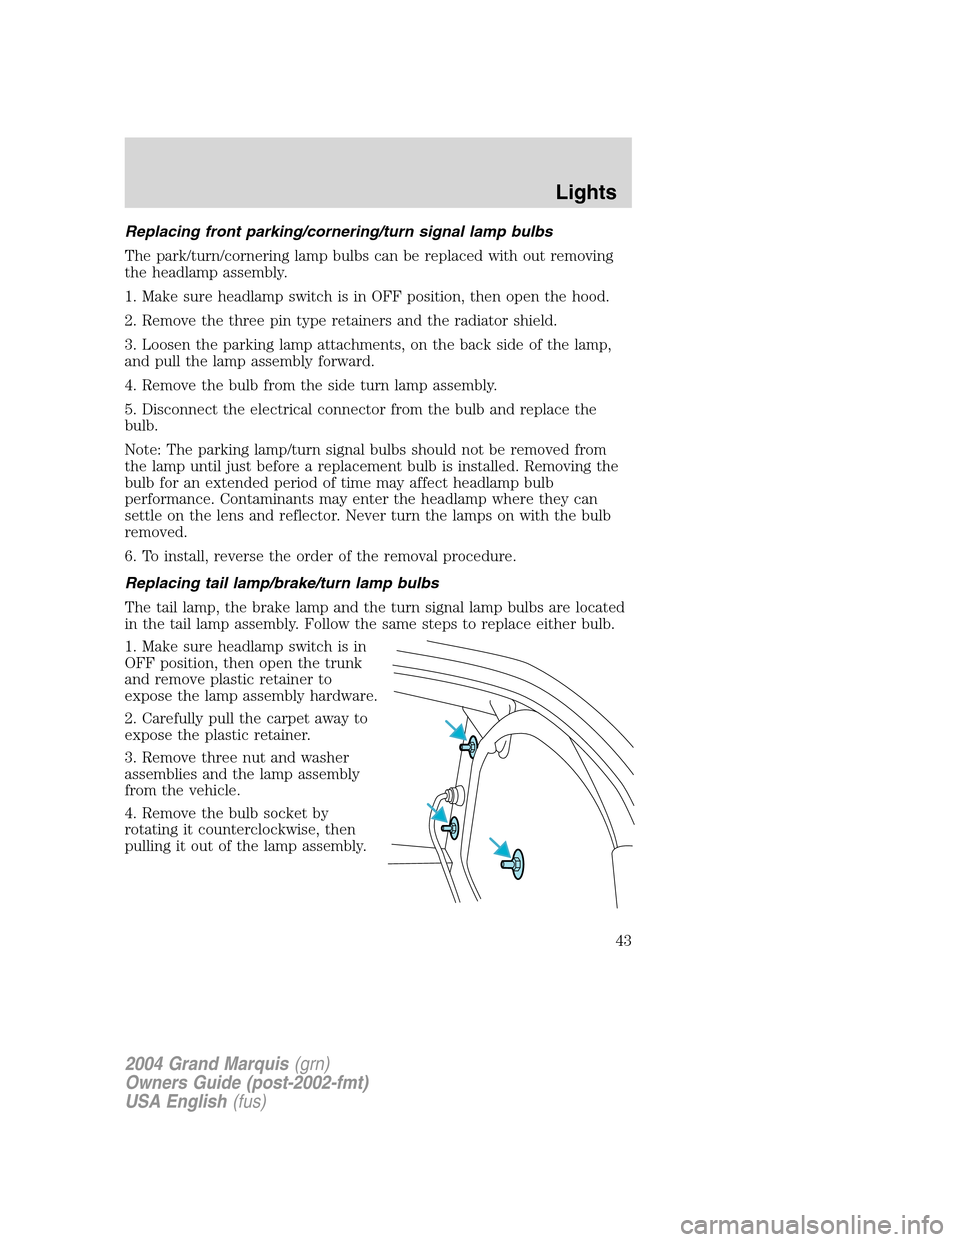
1. Make sure headlamp switch is in
OFF position, then open the trunk
and remove plastic retainer to
expose the lamp assembly hardware.
2. Carefully pull the carpet away to
expose the plastic retainer.
3. Remove three nut and washer
assemblies and the lamp assembly
from the vehicle.
4. Remove the bulb socket by
rotating it counterclockwise, then
pulling it out of the lamp assembly.
2004 Grand Marquis(grn)
Owners Guide (post-2002-fmt)
USA English(fus)
Lights
43
Page 44 of 240
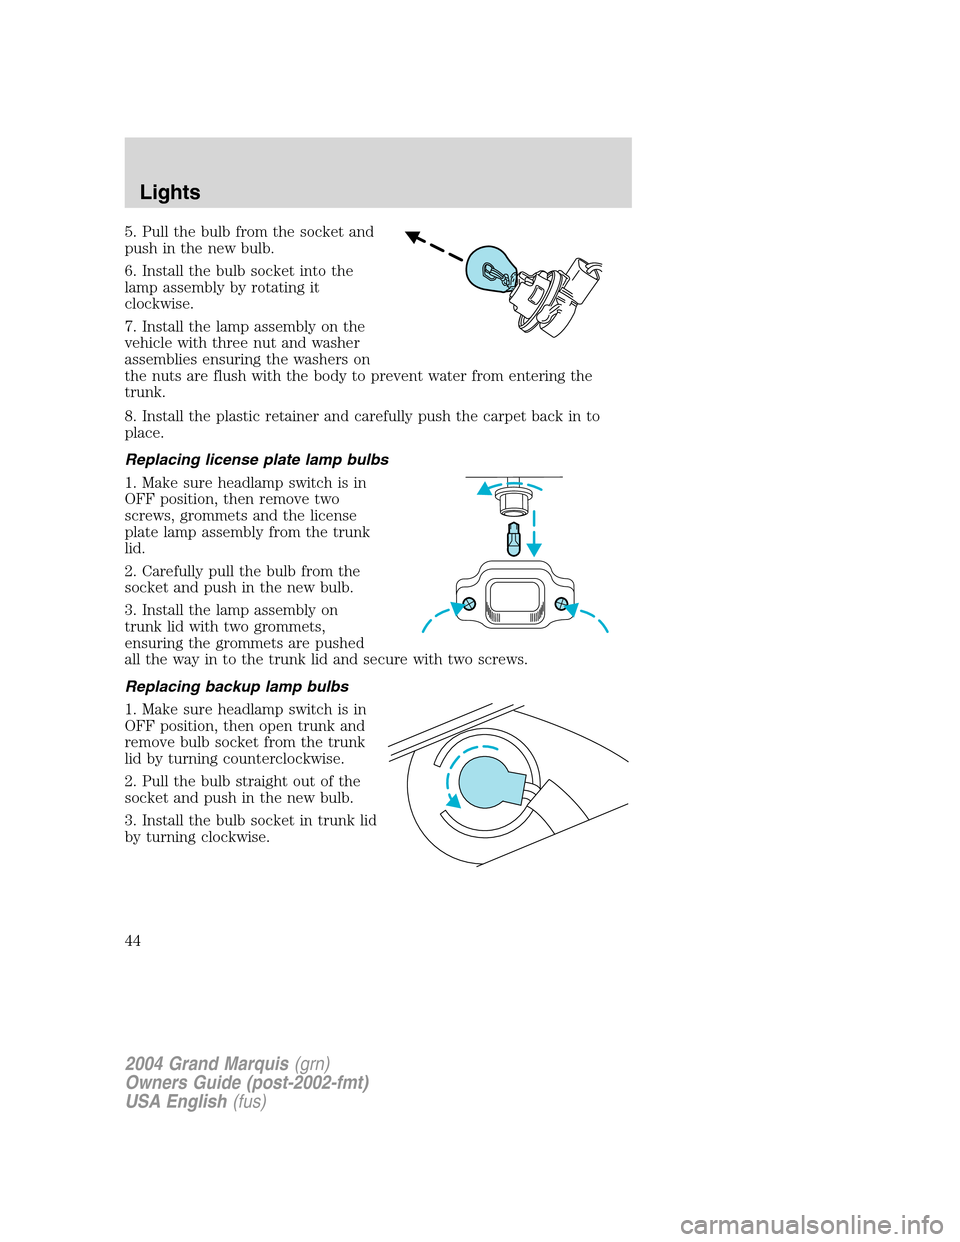
5. Pull the bulb from the socket and
push in the new bulb.
6. Install the bulb socket into the
lamp assembly by rotating it
clockwise.
7. Install the lamp assembly on the
vehicle with three nut and washer
assemblies ensuring the washers on
the nuts are flush with the body to prevent water from entering the
trunk.
8. Install the plastic retainer and carefully push the carpet back in to
place.
Replacing license plate lamp bulbs
1. Make sure headlamp switch is in
OFF position, then remove two
screws, grommets and the license
plate lamp assembly from the trunk
lid.
2. Carefully pull the bulb from the
socket and push in the new bulb.
3. Install the lamp assembly on
trunk lid with two grommets,
ensuring the grommets are pushed
all the way in to the trunk lid and secure with two screws.
Replacing backup lamp bulbs
1. Make sure headlamp switch is in
OFF position, then open trunk and
remove bulb socket from the trunk
lid by turning counterclockwise.
2. Pull the bulb straight out of the
socket and push in the new bulb.
3. Install the bulb socket in trunk lid
by turning clockwise.
2004 Grand Marquis(grn)
Owners Guide (post-2002-fmt)
USA English(fus)
Lights
44