steering Mercury Marauder 2003 s User Guide
[x] Cancel search | Manufacturer: MERCURY, Model Year: 2003, Model line: Marauder, Model: Mercury Marauder 2003Pages: 232, PDF Size: 2.29 MB
Page 127 of 232
Using ABS
²In an emergency or when maximum efficiency from the four-wheel
ABS is required, apply continuous force on the brake. The four wheel
ABS will be activated immediately, thus allowing you to retain full
steering control of your vehicle and, providing there is sufficient
space, will enable you to avoid obstacles and bring the vehicle to a
controlled stop.
²The anti-lock system does not reduce stopping distance. Always leave
enough room between your vehicle and the vehicle in front of you to
stop.
²We recommend that you familiarize yourself with this braking
technique. However, avoid taking any unnecessary risks.
ABS warning lampABS
TheABSwarning lamp in the instrument cluster momentarily illuminates
when the ignition is turned to the ON position. If the light does not
illuminate momentarily at start up, remains on or continues to flash, the
ABS needs to be serviced.
With the ABS light on, the anti-lock
brake system is disabled and normal
braking is still effective unless the
brake warning light also remains
illuminated with parking brake
released. (If your brake warning lamp illuminates, have your vehicle
serviced immediately.)
Parking brake
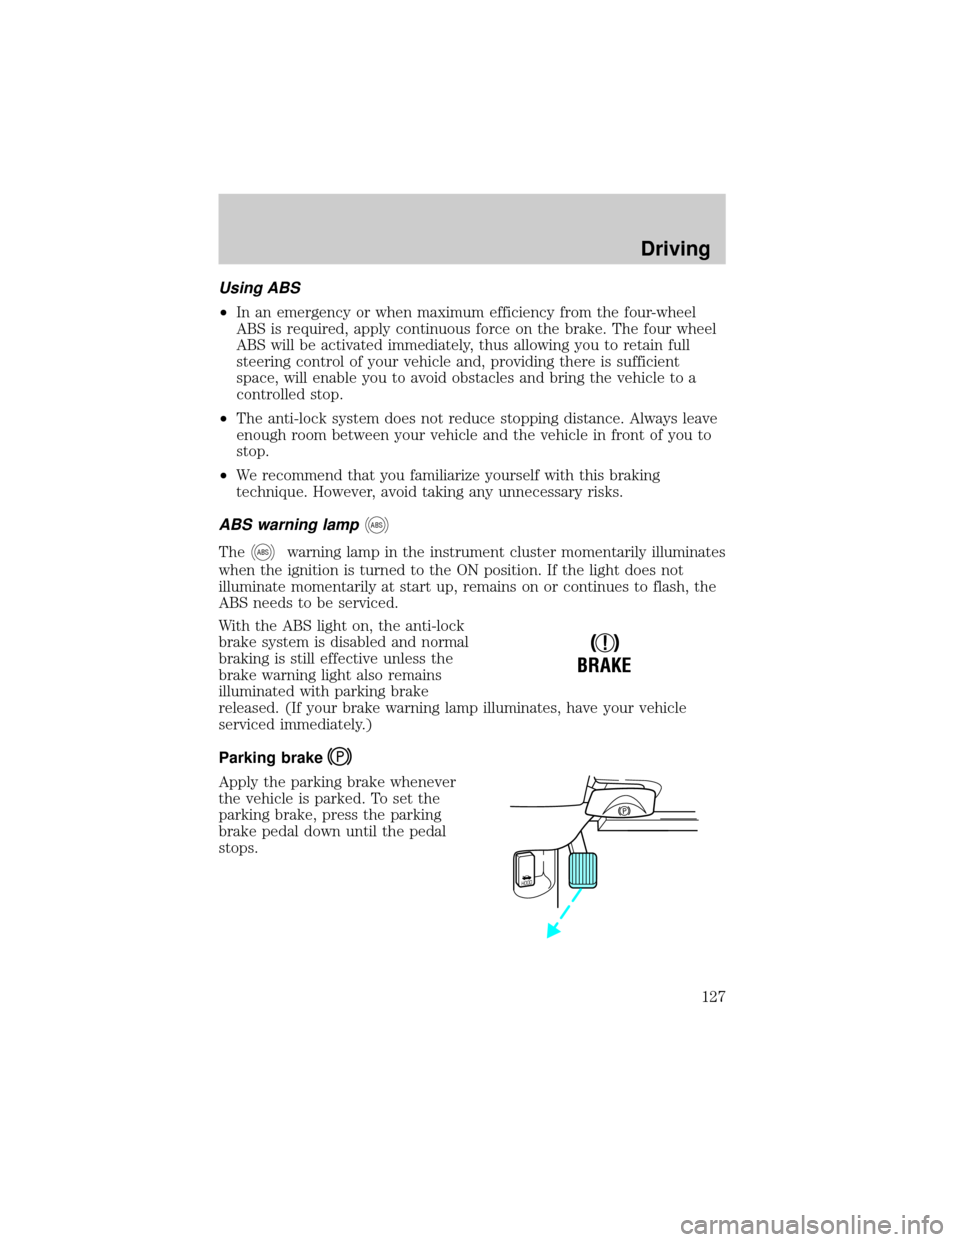
Apply the parking brake whenever
the vehicle is parked. To set the
parking brake, press the parking
brake pedal down until the pedal
stops.
!
BRAKE
HOOD
Driving
127
Page 129 of 232
Wheel-speed sensors allow excess rear wheel spin to be detected by the
Traction Controlyportion of the ABS computer. Any excessive wheel
spin is controlled by automatically applying and releasing the rear brakes
in conjunction with engine torque reductions. Engine torque reduction is
realized via the fully electronic spark and fuel injection systems. This
process is very sensitive to driving conditions and very fast acting. The
rear wheels ªsearchº for optimum traction several times a second and
adjustments are made accordingly.
The Traction Controlysystem will allow your vehicle to make better use
of available traction on slippery surfaces. The system is a driver aid
which makes your vehicle easier to handle primarily on snow and ice
covered roads.
During Traction Controlyoperation you may hear an electric motor type
of sound coming from the engine compartment and the engine will not
ªrev-upº when you push further on the accelerator. This is normal
system behavior.
If you should become stuck in snow
or ice or on a very slippery road
surface, try switching the Traction
Controlysystem off. This may allow
excess wheel spin to ªdigº the
vehicle out and enable a successful
ªrockingº maneuver.
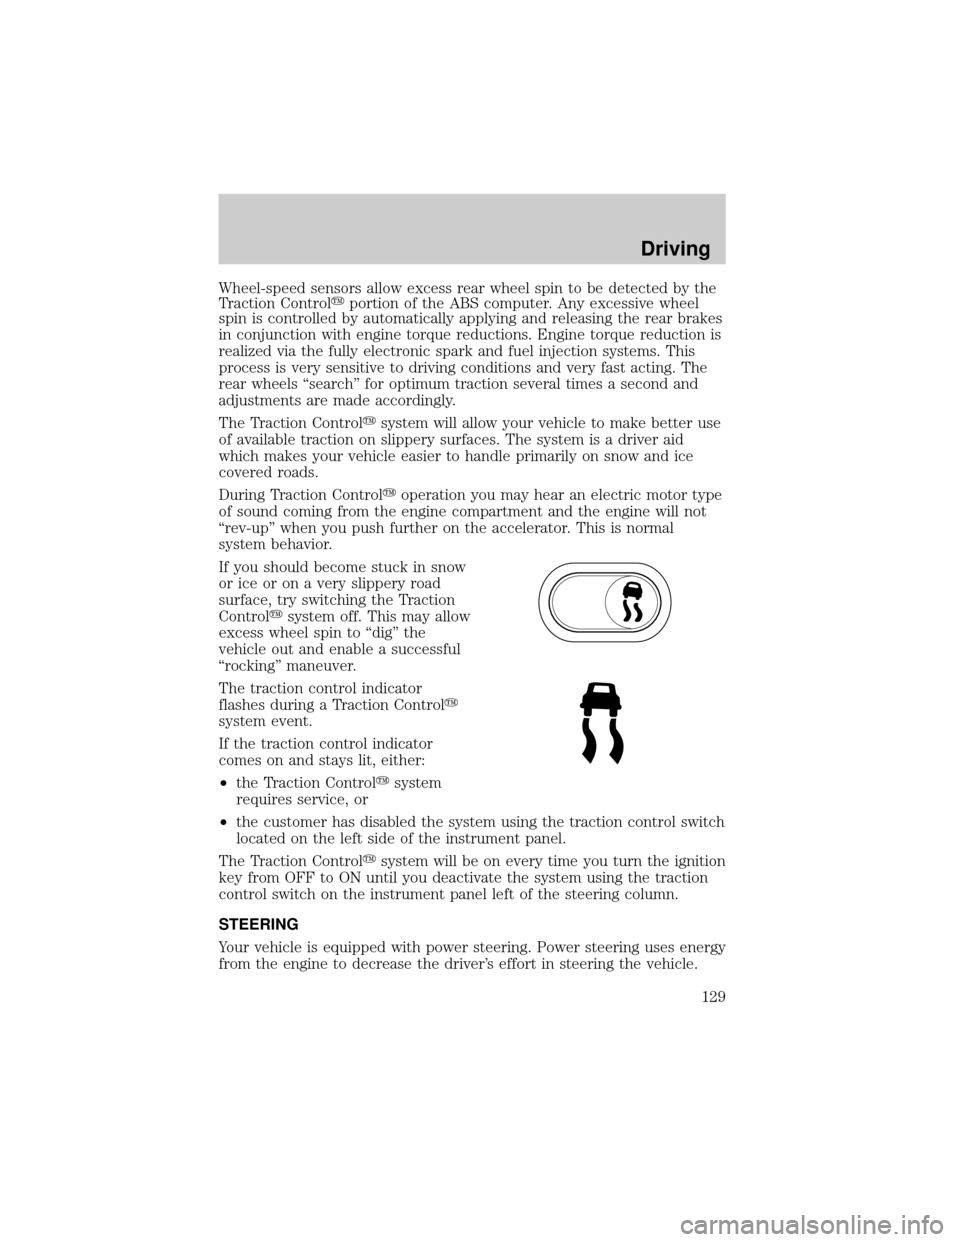
The traction control indicator
flashes during a Traction Controly
system event.
If the traction control indicator
comes on and stays lit, either:
²the Traction Controlysystem
requires service, or
²the customer has disabled the system using the traction control switch
located on the left side of the instrument panel.
The Traction Controlysystem will be on every time you turn the ignition
key from OFF to ON until you deactivate the system using the traction
control switch on the instrument panel left of the steering column.
STEERING
Your vehicle is equipped with power steering. Power steering uses energy
from the engine to decrease the driver's effort in steering the vehicle.
Driving
129
Page 130 of 232

To prevent damage to the power steering pump:
²Never hold the steering wheel to the extreme right or the extreme left
for more than a few seconds when the engine is running.
²Do not operate the vehicle with the power steering pump fluid level
below the MIN mark on the reservoir.
If the power steering system breaks down (or if the engine is turned
off), you can steer the vehicle manually, but it takes more effort.
If the steering wanders or pulls, check for:
²Underinflated tire(s) on any wheel(s)
²Uneven vehicle loading
²High crown in center of road
²High crosswinds
²Wheels out of alignment
²Loose or worn suspension components
Speed sensitive steering
The steering in your vehicle is speed sensitive. At high speeds, steering
assist will decrease to improve steering feel. At lower speeds,
maneuverability will be increased.
If the amount of effort required to steer your vehicle changes while
driving at a constant vehicle speed, have the power steering system
checked by your dealer or a qualified service technician.
AIR SUSPENSION SYSTEM
The air suspension system is designed to improve ride, handling and
general vehicle performance during:
²Certain road conditions
²Steering maneuvers
²Braking
²Accelerations
This system keeps the rear of your vehicle at a constant level by
automatically adding air or releasing air from the springs.
If you exceed the load limit, the rear air suspension may not operate.
Driving
130
Page 143 of 232
Canadian customers who require roadside assistance, call
1±800±665±2006.
If you need to arrange roadside assistance for yourself, Ford Motor
Company will reimburse a reasonable amount. To obtain reimbursement
information, U.S. Ford or Mercury vehicles customers call
1-800-241-3673; Lincoln vehicle customers call 1±800±521±4140.
Canadian customers who need to obtain reimbursement information, call
1±800±665±2006.
ROADSIDE COVERAGE BEYOND BASIC WARRANTY
In the United States, you may purchase additional roadside assistance
coverage beyond this period through the Ford Auto Club by contacting
your Ford or Lincoln Mercury dealer.
Similarly in Canada, for uninterrupted Roadside Assistance coverage, you
may purchase extended coverage prior to your Basic Warranty's Roadside
Assistance expiring. For more information and enrollment, contact
1±877±294±2582 or visit our website at www.ford.ca.
HAZARD FLASHER
Use only in an emergency to warn traffic of vehicle breakdown,
approaching danger, etc. The hazard flashers can be operated when the
ignition is off.
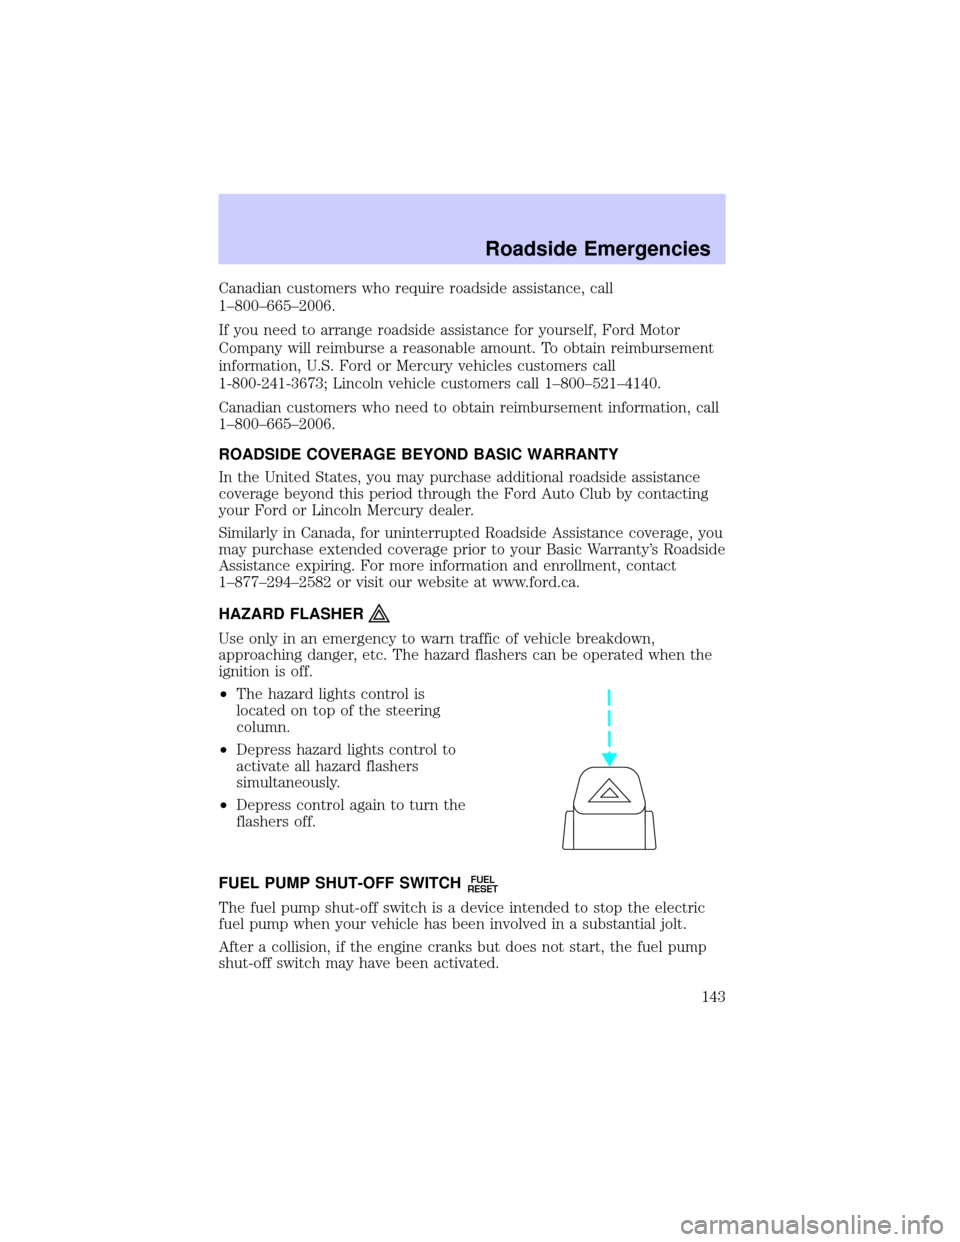
²The hazard lights control is
located on top of the steering
column.
²Depress hazard lights control to
activate all hazard flashers
simultaneously.
²Depress control again to turn the
flashers off.
FUEL PUMP SHUT-OFF SWITCH
FUEL
RESET
The fuel pump shut-off switch is a device intended to stop the electric
fuel pump when your vehicle has been involved in a substantial jolt.
After a collision, if the engine cranks but does not start, the fuel pump
shut-off switch may have been activated.
Roadside Emergencies
143
Page 145 of 232
Note:Always replace a fuse with one that has the specified amperage
rating. Using a fuse with a higher amperage rating can cause severe wire
damage and could start a fire.
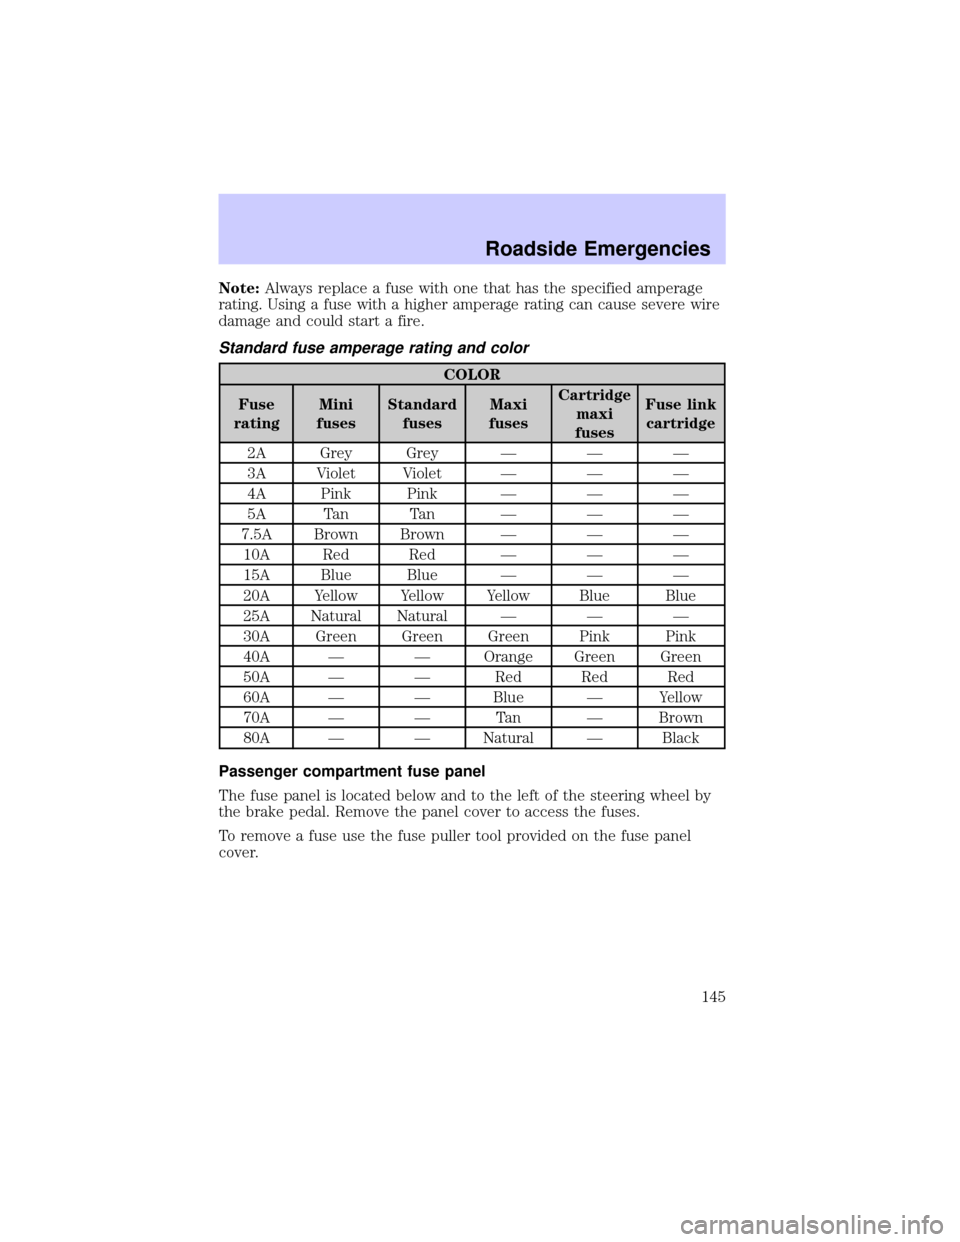
Standard fuse amperage rating and color
COLOR
Fuse
ratingMini
fusesStandard
fusesMaxi
fusesCartridge
maxi
fusesFuse link
cartridge
2A Grey Grey Ð Ð Ð
3A Violet Violet Ð Ð Ð
4A Pink Pink Ð Ð Ð
5A Tan Tan Ð Ð Ð
7.5A Brown Brown Ð Ð Ð
10A Red Red Ð Ð Ð
15A Blue Blue Ð Ð Ð
20A Yellow Yellow Yellow Blue Blue
25A Natural Natural Ð Ð Ð
30A Green Green Green Pink Pink
40A Ð Ð Orange Green Green
50A Ð Ð Red Red Red
60A Ð Ð Blue Ð Yellow
70A Ð Ð Tan Ð Brown
80A Ð Ð Natural Ð Black
Passenger compartment fuse panel
The fuse panel is located below and to the left of the steering wheel by
the brake pedal. Remove the panel cover to access the fuses.
To remove a fuse use the fuse puller tool provided on the fuse panel
cover.
Roadside Emergencies
145
Page 147 of 232
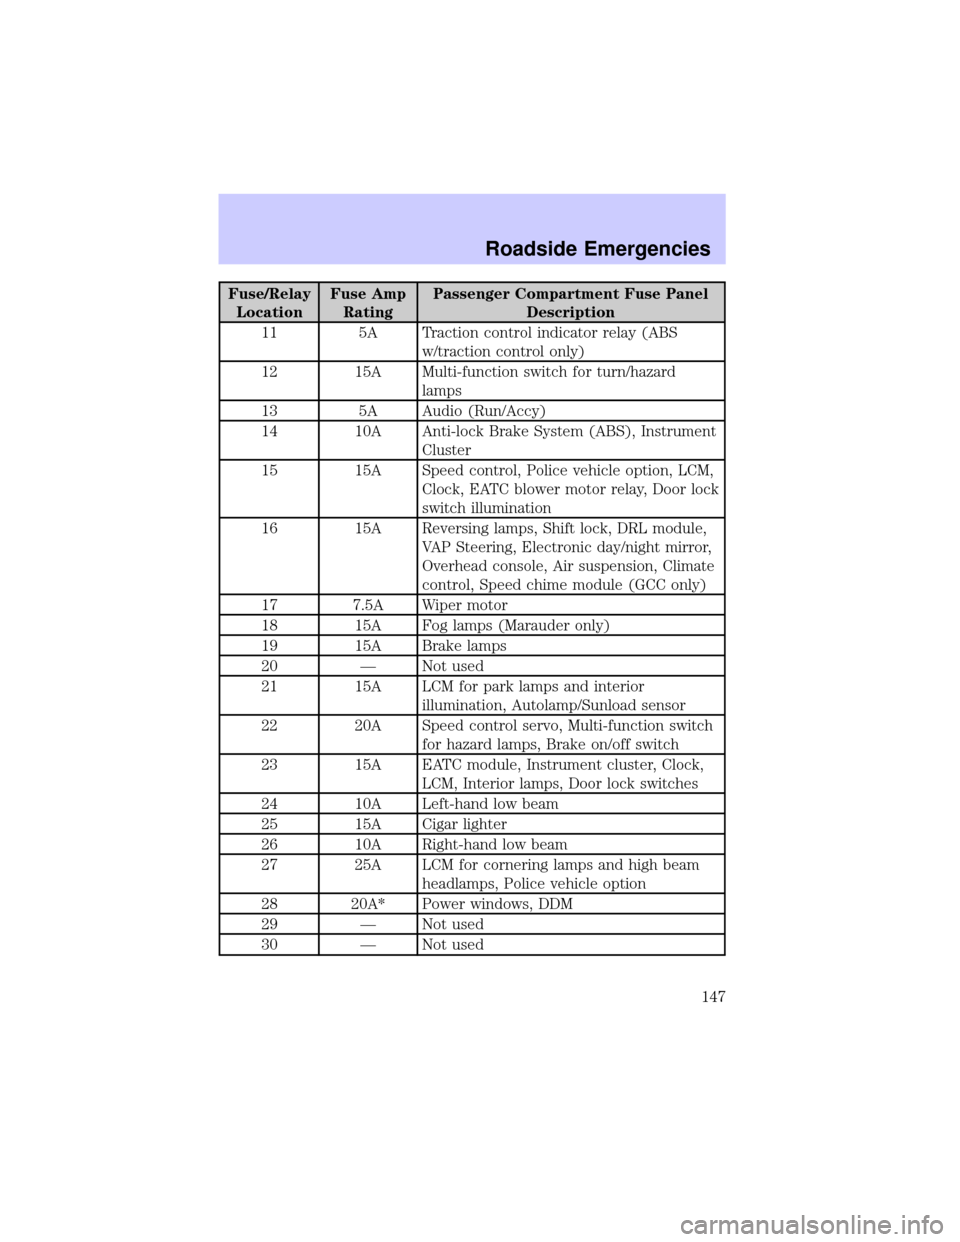
Fuse/Relay
LocationFuse Amp
RatingPassenger Compartment Fuse Panel
Description
11 5A Traction control indicator relay (ABS
w/traction control only)
12 15A Multi-function switch for turn/hazard
lamps
13 5A Audio (Run/Accy)
14 10A Anti-lock Brake System (ABS), Instrument
Cluster
15 15A Speed control, Police vehicle option, LCM,
Clock, EATC blower motor relay, Door lock
switch illumination
16 15A Reversing lamps, Shift lock, DRL module,
VAP Steering, Electronic day/night mirror,
Overhead console, Air suspension, Climate
control, Speed chime module (GCC only)
17 7.5A Wiper motor
18 15A Fog lamps (Marauder only)
19 15A Brake lamps
20 Ð Not used
21 15A LCM for park lamps and interior
illumination, Autolamp/Sunload sensor
22 20A Speed control servo, Multi-function switch
for hazard lamps, Brake on/off switch
23 15A EATC module, Instrument cluster, Clock,
LCM, Interior lamps, Door lock switches
24 10A Left-hand low beam
25 15A Cigar lighter
26 10A Right-hand low beam
27 25A LCM for cornering lamps and high beam
headlamps, Police vehicle option
28 20A* Power windows, DDM
29 Ð Not used
30 Ð Not used
Roadside Emergencies
147
Page 150 of 232
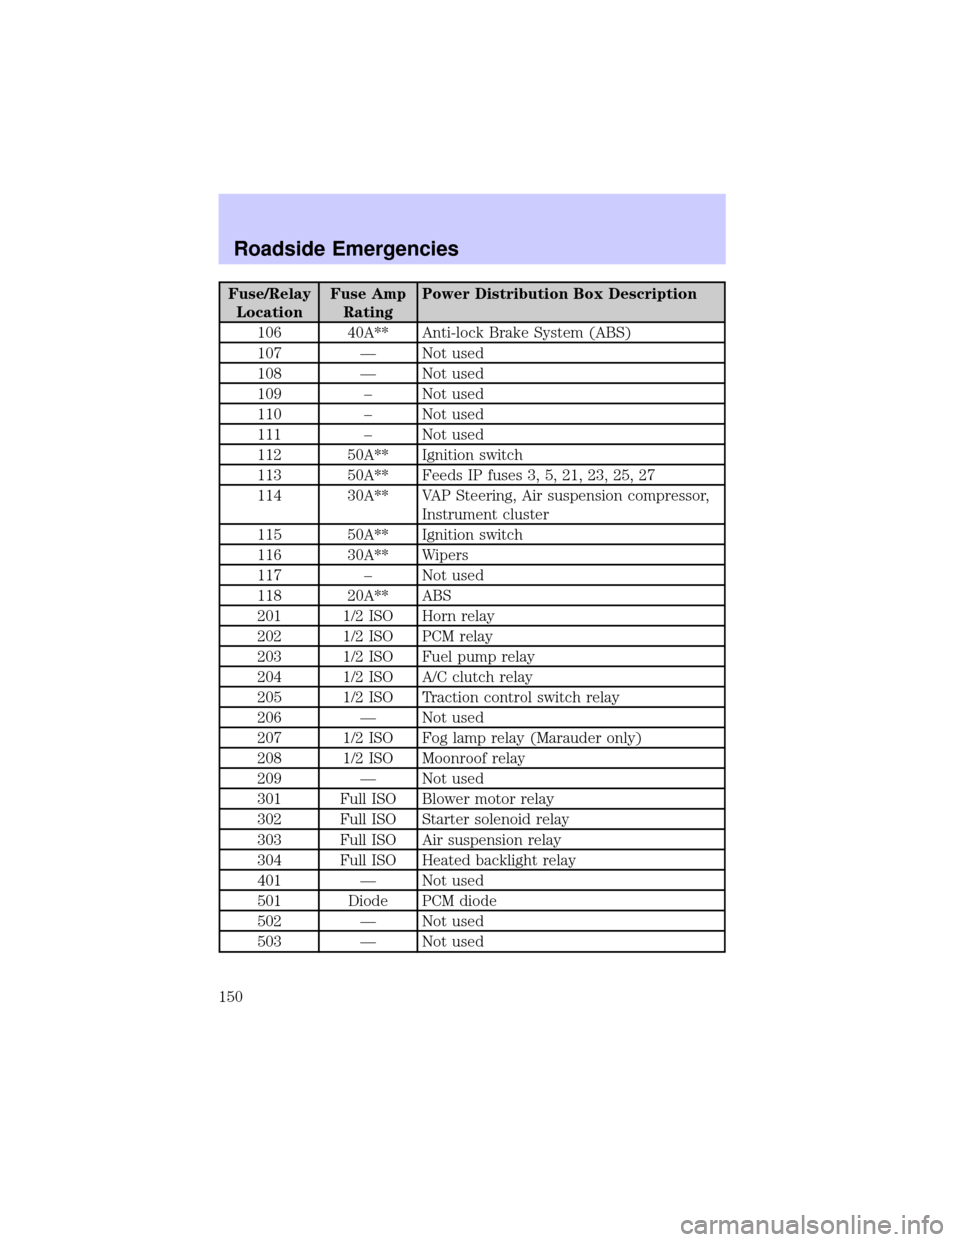
Fuse/Relay
LocationFuse Amp
RatingPower Distribution Box Description
106 40A** Anti-lock Brake System (ABS)
107 Ð Not used
108 Ð Not used
109 ± Not used
110 ± Not used
111 ± Not used
112 50A** Ignition switch
113 50A** Feeds IP fuses 3, 5, 21, 23, 25, 27
114 30A** VAP Steering, Air suspension compressor,
Instrument cluster
115 50A** Ignition switch
116 30A** Wipers
117 ± Not used
118 20A** ABS
201 1/2 ISO Horn relay
202 1/2 ISO PCM relay
203 1/2 ISO Fuel pump relay
204 1/2 ISO A/C clutch relay
205 1/2 ISO Traction control switch relay
206 Ð Not used
207 1/2 ISO Fog lamp relay (Marauder only)
208 1/2 ISO Moonroof relay
209 Ð Not used
301 Full ISO Blower motor relay
302 Full ISO Starter solenoid relay
303 Full ISO Air suspension relay
304 Full ISO Heated backlight relay
401 Ð Not used
501 Diode PCM diode
502 Ð Not used
503 Ð Not used
Roadside Emergencies
150
Page 151 of 232
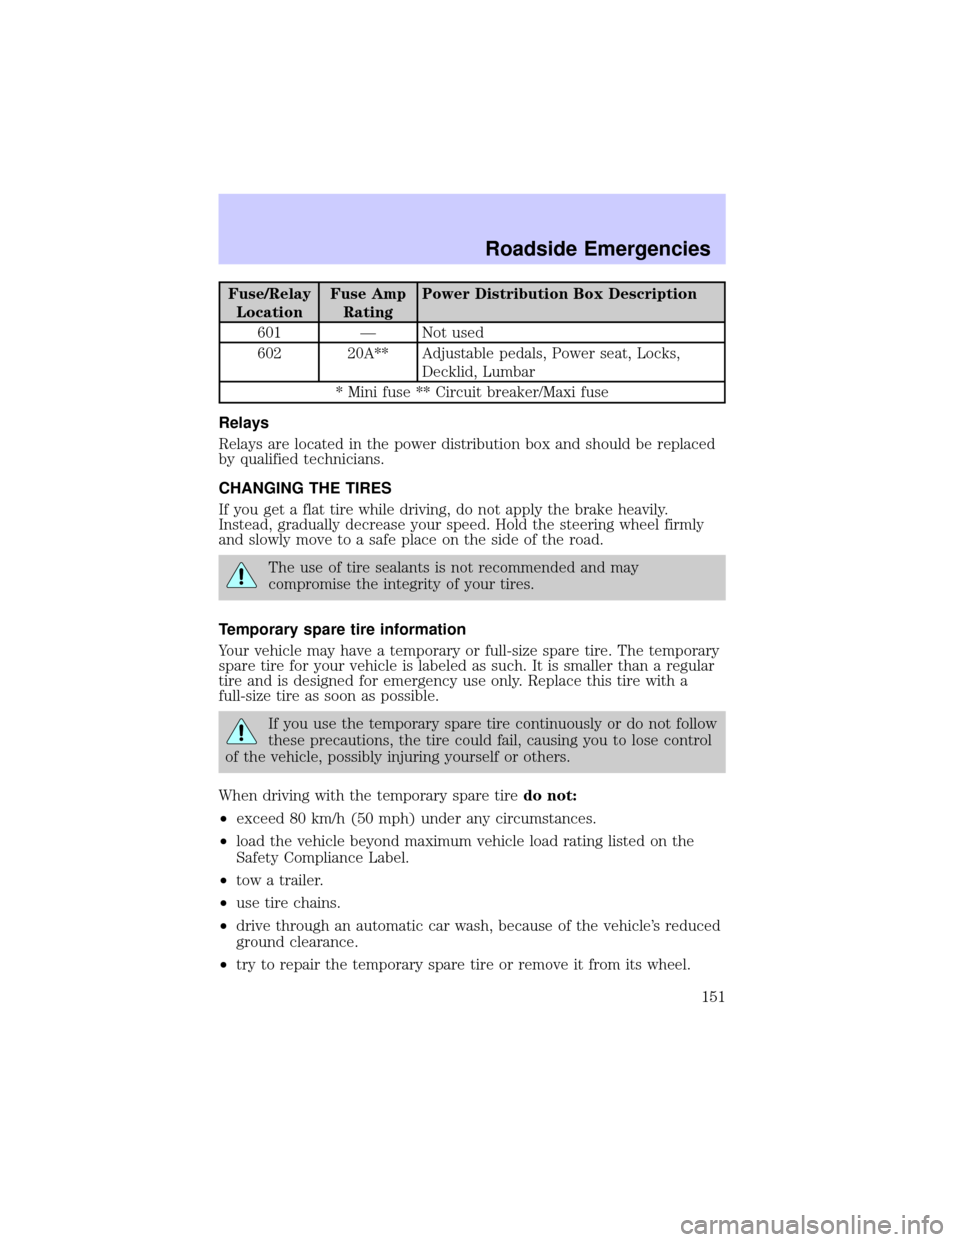
Fuse/Relay
LocationFuse Amp
RatingPower Distribution Box Description
601 Ð Not used
602 20A** Adjustable pedals, Power seat, Locks,
Decklid, Lumbar
* Mini fuse ** Circuit breaker/Maxi fuse
Relays
Relays are located in the power distribution box and should be replaced
by qualified technicians.
CHANGING THE TIRES
If you get a flat tire while driving, do not apply the brake heavily.
Instead, gradually decrease your speed. Hold the steering wheel firmly
and slowly move to a safe place on the side of the road.
The use of tire sealants is not recommended and may
compromise the integrity of your tires.
Temporary spare tire information
Your vehicle may have a temporary or full-size spare tire. The temporary
spare tire for your vehicle is labeled as such. It is smaller than a regular
tire and is designed for emergency use only. Replace this tire with a
full-size tire as soon as possible.
If you use the temporary spare tire continuously or do not follow
these precautions, the tire could fail, causing you to lose control
of the vehicle, possibly injuring yourself or others.
When driving with the temporary spare tiredo not:
²exceed 80 km/h (50 mph) under any circumstances.
²load the vehicle beyond maximum vehicle load rating listed on the
Safety Compliance Label.
²tow a trailer.
²use tire chains.
²drive through an automatic car wash, because of the vehicle's reduced
ground clearance.
²try to repair the temporary spare tire or remove it from its wheel.
Roadside Emergencies
151
Page 176 of 232

WINDOWS AND WIPER BLADES
The windshield, rear window and wiper blades should be cleaned
regularly. If the wiper does not wipe properly, substances on the
windshield, rear window or the wiper blades may be the cause. These
may include hot wax treatments used by commercial car washes, tree
sap, or other organic contamination. To clean these items, please follow
these tips:
²The windshield or rear window may be cleaned with a non-abrasive
cleaner such as Motorcraft Ultra Clear Spray Glass Cleaner (ZC-23),
available from your dealer.
²Do not use abrasives, as they may cause scratches.
²Do not use fuel, kerosene, or paint thinner to clean any parts.
²Wiper blades can be cleaned with isopropyl (rubbing) alcohol or
windshield washer solution. Be sure to replace wiper blades when they
appear worn or do not function properly.
INSTRUMENT PANEL AND CLUSTER LENS
Clean the instrument panel with a damp cloth, then dry with a dry cloth.
²Avoid cleaners or polish that increase the gloss of the upper portion of
the instrument panel. The dull finish in this area helps protect the
driver from undesirable windshield reflection.
Do not use chemical solvents or strong detergents when cleaning
the steering wheel or instrument panel to avoid contamination of
the air bag system.
²Be certain to wash or wipe your hands clean if you have been in
contact with certain products such as insect repellent and suntan
lotion in order to avoid possible damage to the painted surfaces.
INTERIOR TRIM
²Clean the interior trim areas with a damp cloth, then dry by wiping
with a dry, soft, clean cloth.
²Do not use household or glass cleaners as these may damage the
finish.
Cleaning
176
Page 181 of 232
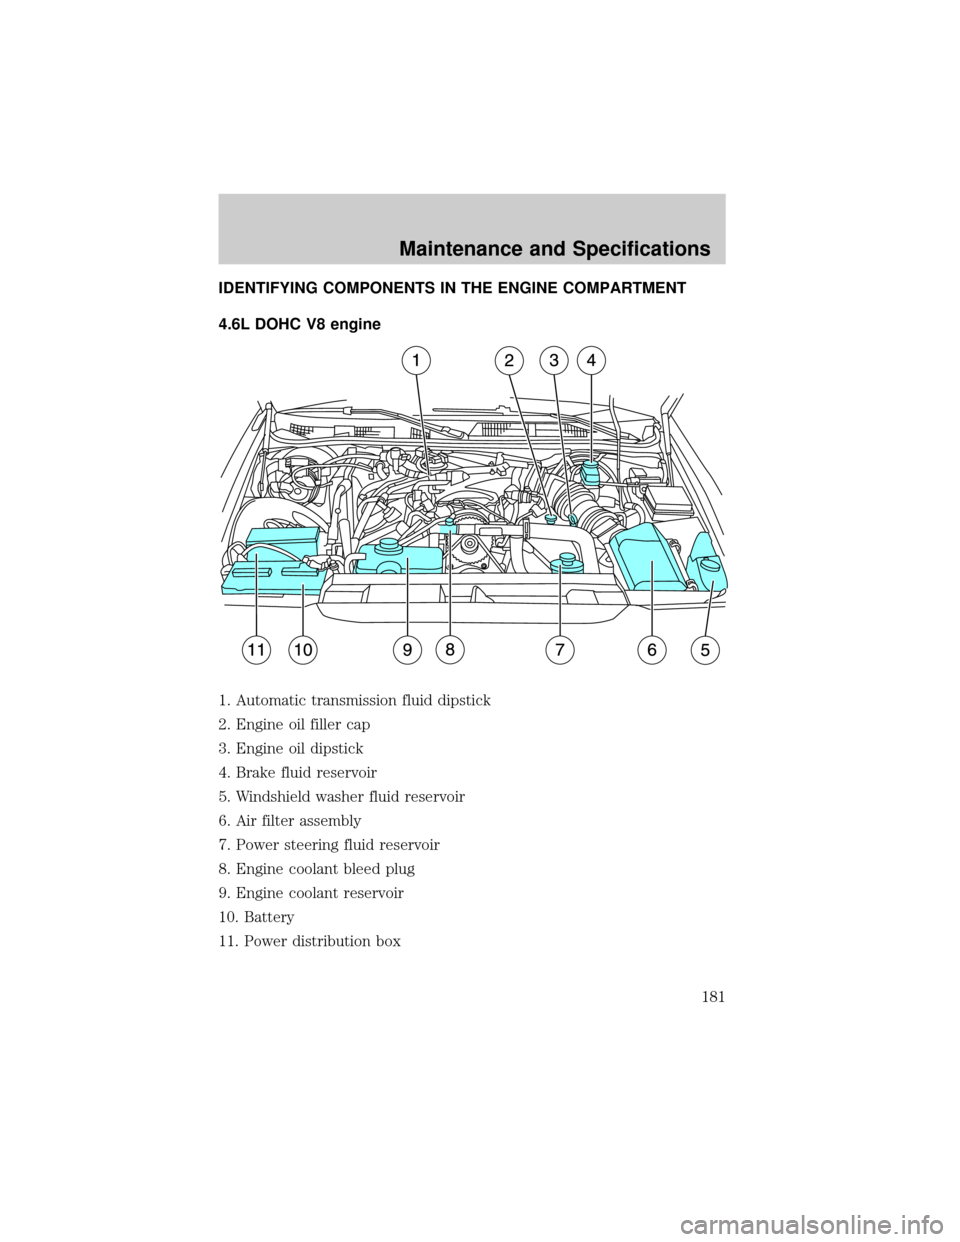
IDENTIFYING COMPONENTS IN THE ENGINE COMPARTMENT
4.6L DOHC V8 engine
1. Automatic transmission fluid dipstick
2. Engine oil filler cap
3. Engine oil dipstick
4. Brake fluid reservoir
5. Windshield washer fluid reservoir
6. Air filter assembly
7. Power steering fluid reservoir
8. Engine coolant bleed plug
9. Engine coolant reservoir
10. Battery
11. Power distribution box
Maintenance and Specifications
181