ECO mode Mercury Marauder 2003 Owner's Manuals
[x] Cancel search | Manufacturer: MERCURY, Model Year: 2003, Model line: Marauder, Model: Mercury Marauder 2003Pages: 232, PDF Size: 2.29 MB
Page 31 of 232

If your changer does not work, it may be that:
²A disc is already loaded where you want to insert a disc.
²The disc is inserted with the label surface downward.
²The disc is dusty or defective.
²The player's internal temperature is above 60ÉC (140ÉF). Allow the
player to cool down before operating.
²A disc with format and dimensions not within industry standards is
inserted.
CLEANING COMPACT DISCS
Inspect all discs for contamination before playing. If necessary, clean
discs only with an approved CD cleaner and wipe from the center out to
the edge. Do not use circular motion.
CD AND CD CHANGER CARE
²Handle discs by their edges only. Never touch the playing surface.
²Do not expose discs to direct sunlight or heat sources for extended
periods of time.
²Do not insert more than one disc into each slot of the CD changer
magazine.
CD units are designed to play commercially pressed 12 cm (4.75
in) audio compact discs only. Due to technical incompatibility,
certain recordable and re-recordable compact discs may not
function correctly when used in Ford CD players. Irregular
shaped CDs, CDs with a scratch protection film attached, and CDs
with homemade paper (adhesive) labels should not be inserted
into the CD player. The label may peel and cause the CD to
become jammed. It is recommended that homemade CDs be
identified with permanent felt tip marker rather than adhesive
labels. Ball point pens may damage CDs. Please contact your
dealer for further information.
CLEANING CASSETTE PLAYER (IF EQUIPPED)
Clean the tape player head with a cassette cleaning cartridge after 10 to
12 hours of play in order to maintain the best sound and operation.
CASSETTE AND CASSETTE PLAYER CARE
²Use only cassettes that are 90 minutes long or less.
²Do not expose tapes to direct sunlight, high humidity, extreme heat or
extreme cold. Allow tapes that may have been exposed to extreme
temperatures to reach a moderate temperature before playing.
Entertainment Systems
31
Page 35 of 232
If a manual override function is selected while the outside temperature is
displayed, the new function will be displayed for four seconds after it is
changed, then the outside temperature will return to the window along
with the override selection.
The outside temperature reading is most accurate when the vehicle is
moving. Higher readings may be obtained when the vehicle is not
moving. The readings that you get may not agree with temperatures
given on the radio due to differences in vehicle and station locations.
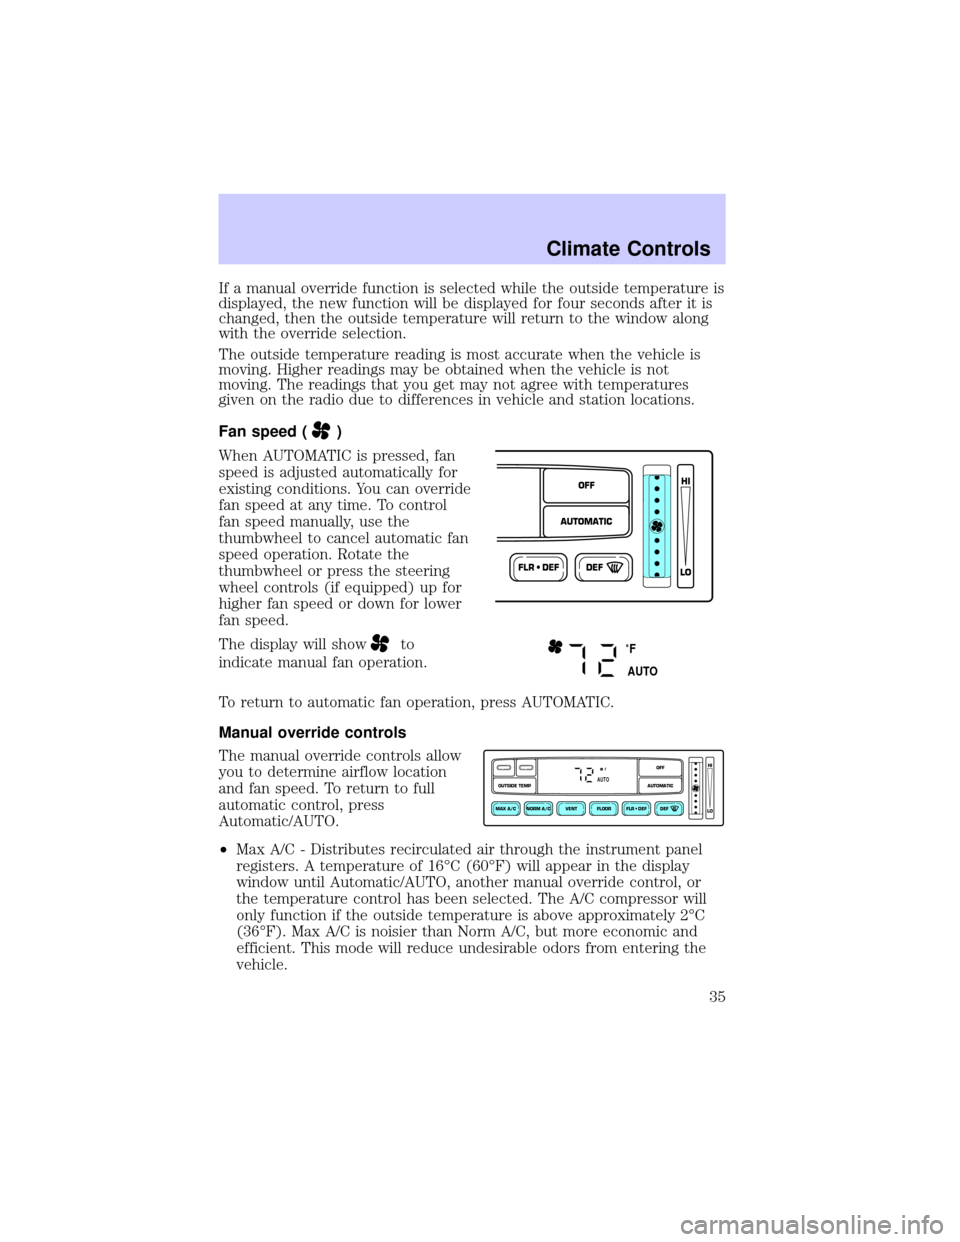
Fan speed (
)
When AUTOMATIC is pressed, fan
speed is adjusted automatically for
existing conditions. You can override
fan speed at any time. To control
fan speed manually, use the
thumbwheel to cancel automatic fan
speed operation. Rotate the
thumbwheel or press the steering
wheel controls (if equipped) up for
higher fan speed or down for lower
fan speed.
The display will show
to
indicate manual fan operation.
To return to automatic fan operation, press AUTOMATIC.
Manual override controls
The manual override controls allow
you to determine airflow location
and fan speed. To return to full
automatic control, press
Automatic/AUTO.
²Max A/C - Distributes recirculated air through the instrument panel
registers. A temperature of 16ÉC (60ÉF) will appear in the display
window until Automatic/AUTO, another manual override control, or
the temperature control has been selected. The A/C compressor will
only function if the outside temperature is above approximately 2ÉC
(36ÉF). Max A/C is noisier than Norm A/C, but more economic and
efficient. This mode will reduce undesirable odors from entering the
vehicle.
FLR • DEFDEF
HI
LO
AUTOMATICOFF
˚F
AUTO
NORM A/CVENT FLOOR FLR • DEF DEF
HI
LO
MAX A/C
OUTSIDE TEMP AUTOMATICOFF
FAUTO
Climate Controls
35
Page 36 of 232

²Norm A/C- Distributes outside air through the instrument panel
registers. The A/C compressor will only function if the outside
temperature is above approximately 2ÉC (36ÉF). Norm A/C is more
quiet than Max A/C, but not as economic and efficient.
²Vent-Distributes outside air through the instrument panel registers.
The air cannot be cooled below the outside temperature.
²Floor- Distributes outside air through the floor ducts. The air cannot
be cooled below the outside temperature.
²Floor & Defrost - Distributes outside air through the windshield
defroster ducts, floor ducts and the side window demisters. The A/C
compressor will operate automatically if the outside temperature is
above approximately 2ÉC (36ÉF). The air distributed through the floor
ducts will be slightly warmer than that sent to the windshield
defroster ducts and the side window demisters.
²Defrost - Distributes outside air through the windshield defroster
ducts and the side window demisters. The A/C compressor will
operate automatically if the outside temperature is above
approximately 2ÉC (36ÉF). This mode will clear ice and fog from the
windshield.
Operating tips
²To reduce fogging under humid weather conditions, place the climate
control system in Defrost and Rear Defrost (if equipped) mode before
driving.
²To reduce humidity buildup inside the vehicle: Do not drive with the
climate control system in Off mode. Do not drive with the climate
control system in Max A/C mode (if equipped).
²Under normal weather conditions, do not leave your vehicle in Max
A/C (if equipped), recirculation control (if equipped) or Off mode
when turning off the ignition.
²Under snowy or dirty weather conditions, leave your vehicle in Max
A/C (if equipped), recirculation control (if equipped), or Off mode
when turning off the ignition.
²Remove any snow, ice or leaves from the exterior base of the
windshield.
²To increase the efficiency of the A/C (if equipped), drive with the
windows slightly open for 2±3 minutes or until the vehicle has been
ªairedº out.
²Do not place objects under the front seat or over the defroster ducts.
They may reduce visibility, fall into the ducts, or degrade the
performance of your climate control system.
Climate Controls
36
Page 52 of 232
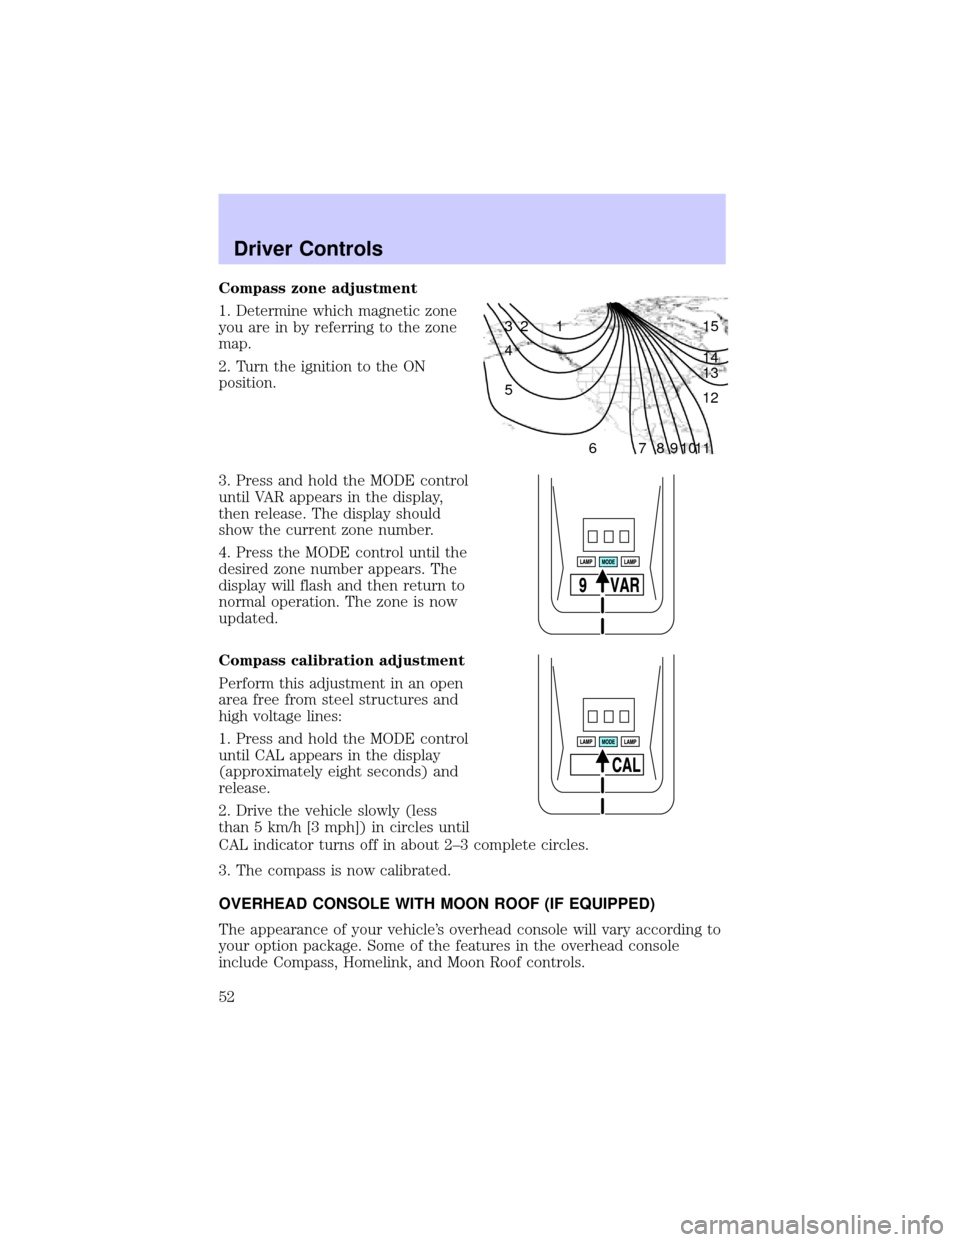
Compass zone adjustment
1. Determine which magnetic zone
you are in by referring to the zone
map.
2. Turn the ignition to the ON
position.
3. Press and hold the MODE control
until VAR appears in the display,
then release. The display should
show the current zone number.
4. Press the MODE control until the
desired zone number appears. The
display will flash and then return to
normal operation. The zone is now
updated.
Compass calibration adjustment
Perform this adjustment in an open
area free from steel structures and
high voltage lines:
1. Press and hold the MODE control
until CAL appears in the display
(approximately eight seconds) and
release.
2. Drive the vehicle slowly (less
than 5 km/h [3 mph]) in circles until
CAL indicator turns off in about 2±3 complete circles.
3. The compass is now calibrated.
OVERHEAD CONSOLE WITH MOON ROOF (IF EQUIPPED)
The appearance of your vehicle's overhead console will vary according to
your option package. Some of the features in the overhead console
include Compass, Homelink, and Moon Roof controls.
1 2 3
4
5
6 7 8 9 101112 13 14 15
Driver Controls
52
Page 54 of 232
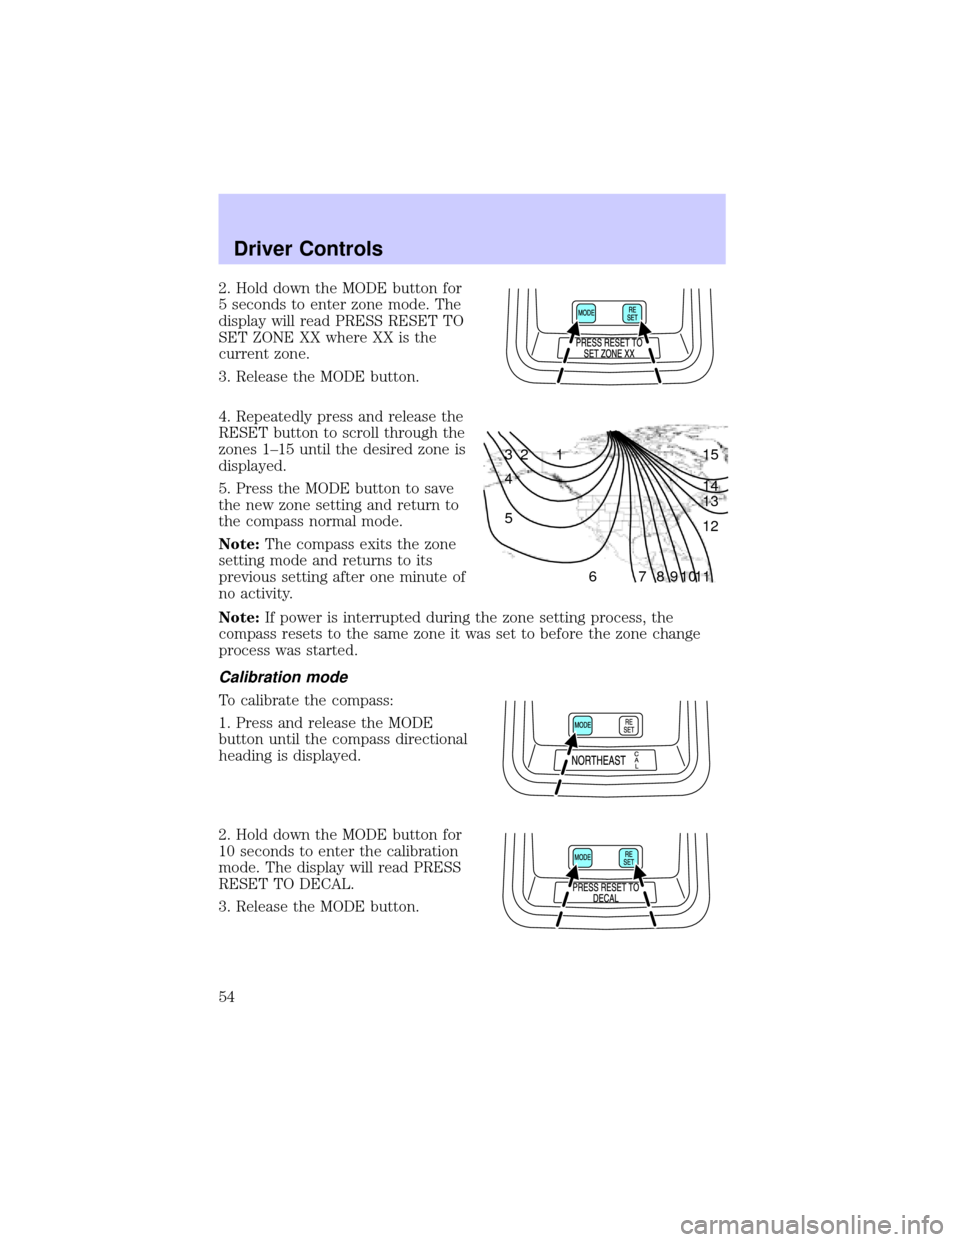
2. Hold down the MODE button for
5 seconds to enter zone mode. The
display will read PRESS RESET TO
SET ZONE XX where XX is the
current zone.
3. Release the MODE button.
4. Repeatedly press and release the
RESET button to scroll through the
zones 1±15 until the desired zone is
displayed.
5. Press the MODE button to save
the new zone setting and return to
the compass normal mode.
Note:The compass exits the zone
setting mode and returns to its
previous setting after one minute of
no activity.
Note:If power is interrupted during the zone setting process, the
compass resets to the same zone it was set to before the zone change
process was started.
Calibration mode
To calibrate the compass:
1. Press and release the MODE
button until the compass directional
heading is displayed.
2. Hold down the MODE button for
10 seconds to enter the calibration
mode. The display will read PRESS
RESET TO DECAL.
3. Release the MODE button.
1 2 3
4
5
6 7 8 9 101112 13 14 15
Driver Controls
54
Page 55 of 232
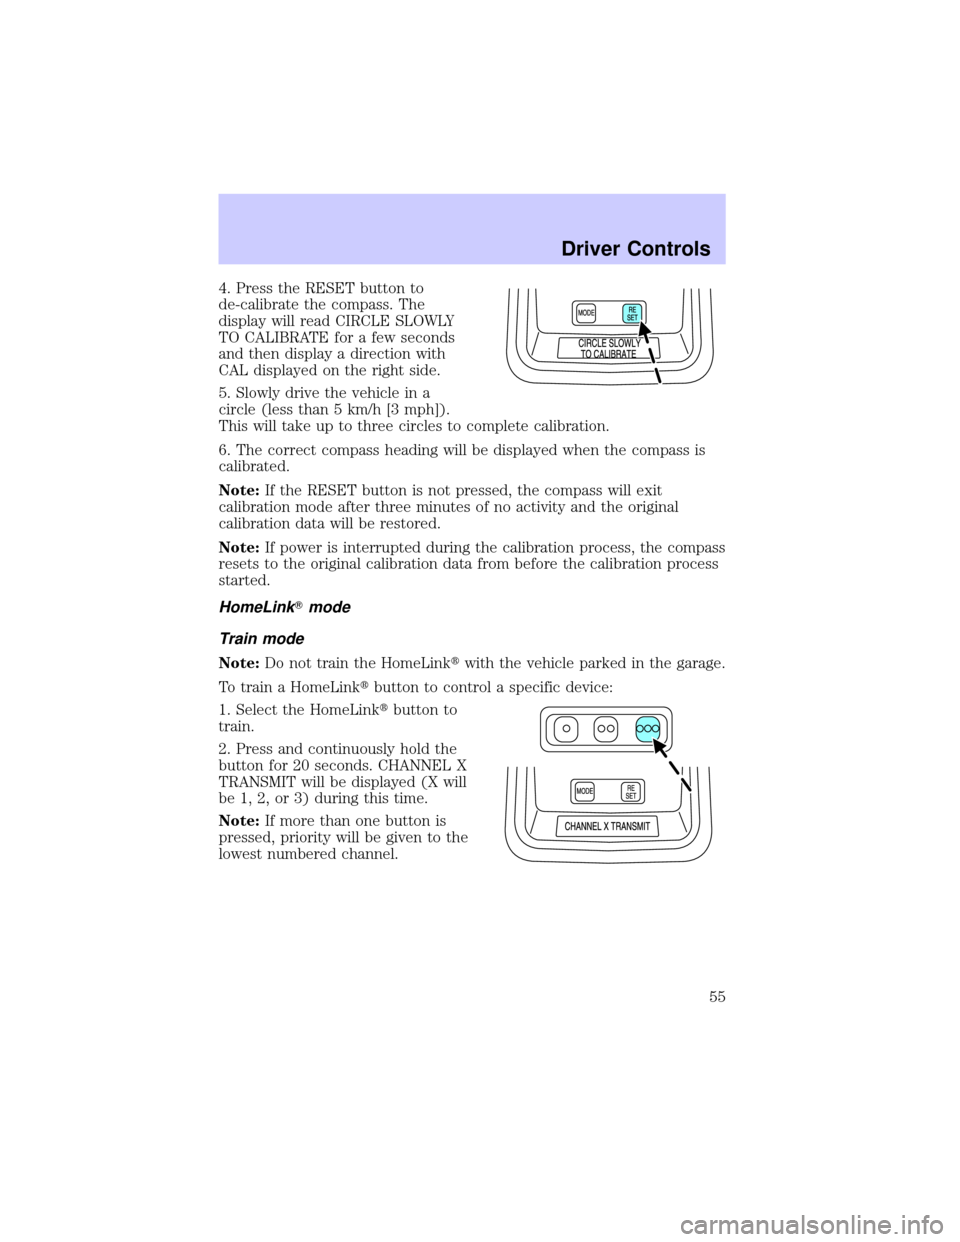
4. Press the RESET button to
de-calibrate the compass. The
display will read CIRCLE SLOWLY
TO CALIBRATE for a few seconds
and then display a direction with
CAL displayed on the right side.
5. Slowly drive the vehicle in a
circle (less than 5 km/h [3 mph]).
This will take up to three circles to complete calibration.
6. The correct compass heading will be displayed when the compass is
calibrated.
Note:If the RESET button is not pressed, the compass will exit
calibration mode after three minutes of no activity and the original
calibration data will be restored.
Note:If power is interrupted during the calibration process, the compass
resets to the original calibration data from before the calibration process
started.
HomeLinkTmode
Train mode
Note:Do not train the HomeLinktwith the vehicle parked in the garage.
To train a HomeLinktbutton to control a specific device:
1. Select the HomeLinktbutton to
train.
2. Press and continuously hold the
button for 20 seconds. CHANNEL X
TRANSMIT will be displayed (X will
be 1, 2, or 3) during this time.
Note:If more than one button is
pressed, priority will be given to the
lowest numbered channel.
Driver Controls
55
Page 56 of 232
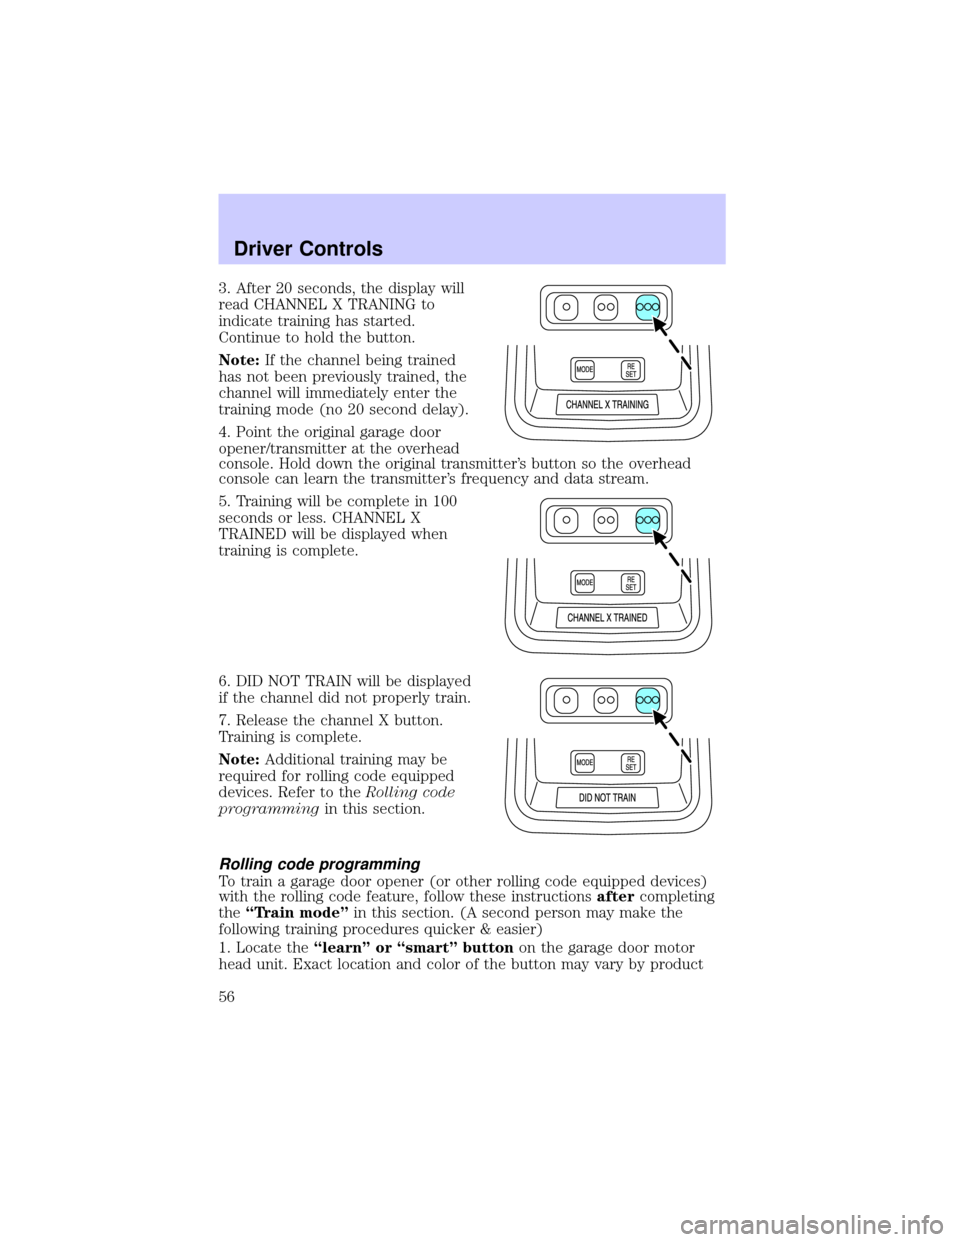
3. After 20 seconds, the display will
read CHANNEL X TRANING to
indicate training has started.
Continue to hold the button.
Note:If the channel being trained
has not been previously trained, the
channel will immediately enter the
training mode (no 20 second delay).
4. Point the original garage door
opener/transmitter at the overhead
console. Hold down the original transmitter's button so the overhead
console can learn the transmitter's frequency and data stream.
5. Training will be complete in 100
seconds or less. CHANNEL X
TRAINED will be displayed when
training is complete.
6. DID NOT TRAIN will be displayed
if the channel did not properly train.
7. Release the channel X button.
Training is complete.
Note:Additional training may be
required for rolling code equipped
devices. Refer to theRolling code
programmingin this section.
Rolling code programming
To train a garage door opener (or other rolling code equipped devices)
with the rolling code feature, follow these instructionsaftercompleting
theªTrain modeºin this section. (A second person may make the
following training procedures quicker & easier)
1. Locate theªlearnº or ªsmartº buttonon the garage door motor
head unit. Exact location and color of the button may vary by product
Driver Controls
56
Page 57 of 232
brand. If there is difficulty locating the ªlearnº or ªsmartº button refer to
the device's owner manual or contact HomeLinktat1±800±355±3515or
on the Internet atwww.homelink.com.
2. Press and release the ªlearnº or ªsmartº button on the garage door
motor head unit.
Note:Following step 2, there are 30 seconds in which to initiate step 3.
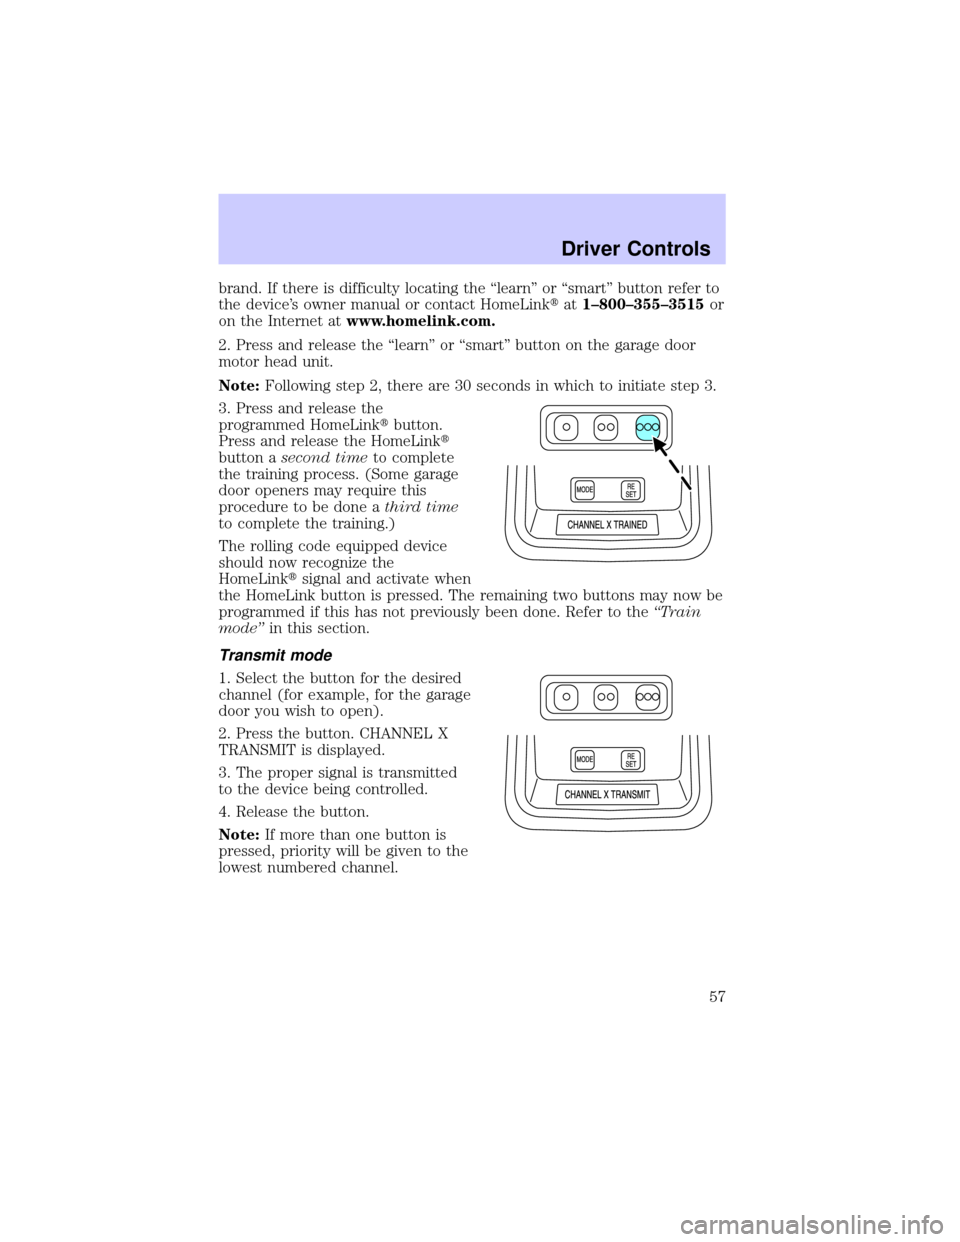
3. Press and release the
programmed HomeLinktbutton.
Press and release the HomeLinkt
button asecond timeto complete
the training process. (Some garage
door openers may require this
procedure to be done athird time
to complete the training.)
The rolling code equipped device
should now recognize the
HomeLinktsignal and activate when
the HomeLink button is pressed. The remaining two buttons may now be
programmed if this has not previously been done. Refer to theªTrain
modeºin this section.
Transmit mode
1. Select the button for the desired
channel (for example, for the garage
door you wish to open).
2. Press the button. CHANNEL X
TRANSMIT is displayed.
3. The proper signal is transmitted
to the device being controlled.
4. Release the button.
Note:If more than one button is
pressed, priority will be given to the
lowest numbered channel.
Driver Controls
57
Page 58 of 232
Erase mode
To erase all three HomeLinktchannel codes:
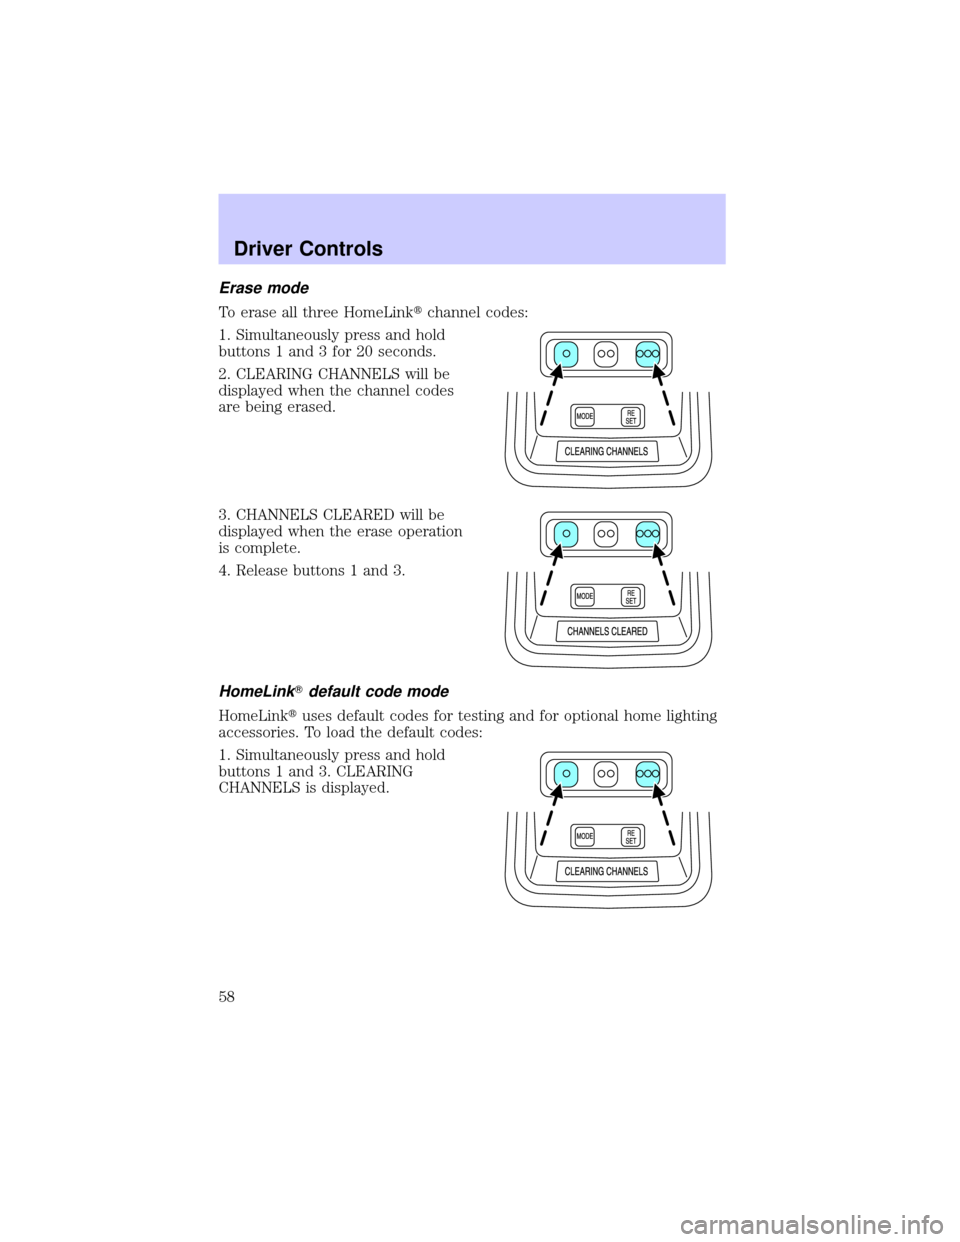
1. Simultaneously press and hold
buttons 1 and 3 for 20 seconds.
2. CLEARING CHANNELS will be
displayed when the channel codes
are being erased.
3. CHANNELS CLEARED will be
displayed when the erase operation
is complete.
4. Release buttons 1 and 3.
HomeLinkTdefault code mode
HomeLinktuses default codes for testing and for optional home lighting
accessories. To load the default codes:
1. Simultaneously press and hold
buttons 1 and 3. CLEARING
CHANNELS is displayed.
Driver Controls
58
Page 59 of 232
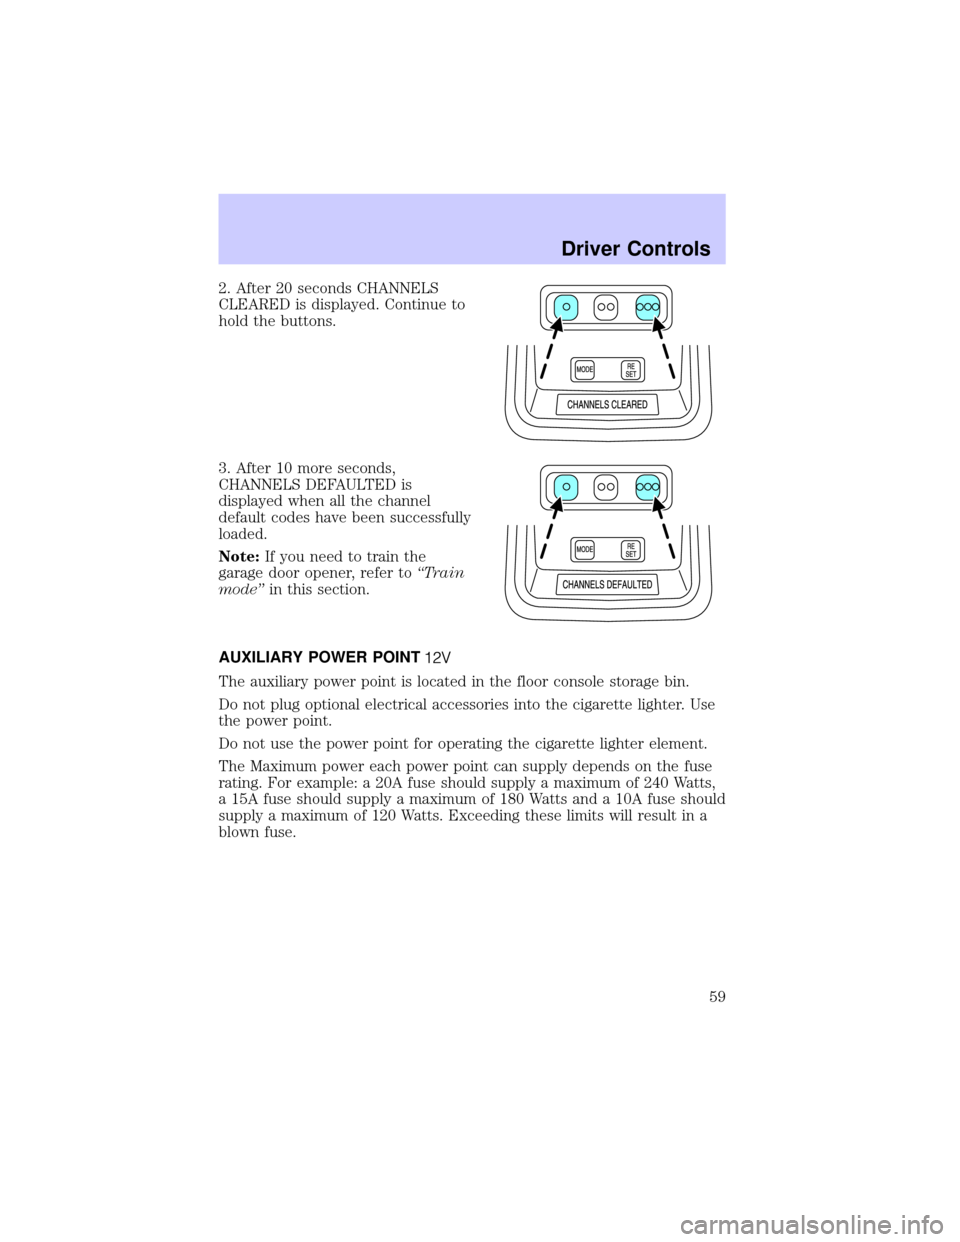
2. After 20 seconds CHANNELS
CLEARED is displayed. Continue to
hold the buttons.
3. After 10 more seconds,
CHANNELS DEFAULTED is
displayed when all the channel
default codes have been successfully
loaded.
Note:If you need to train the
garage door opener, refer toªTrain
modeºin this section.
AUXILIARY POWER POINT
The auxiliary power point is located in the floor console storage bin.
Do not plug optional electrical accessories into the cigarette lighter. Use
the power point.
Do not use the power point for operating the cigarette lighter element.
The Maximum power each power point can supply depends on the fuse
rating. For example: a 20A fuse should supply a maximum of 240 Watts,
a 15A fuse should supply a maximum of 180 Watts and a 10A fuse should
supply a maximum of 120 Watts. Exceeding these limits will result in a
blown fuse.
Driver Controls
59