steering Mercury Marauder 2004 s User Guide
[x] Cancel search | Manufacturer: MERCURY, Model Year: 2004, Model line: Marauder, Model: Mercury Marauder 2004Pages: 224, PDF Size: 3.21 MB
Page 117 of 224
If the power steering system breaks down (or if the engine is turned
off), you can steer the vehicle manually, but it takes more effort.
If the steering wanders or pulls, check for:
²an improperly inflated tire
²uneven tire wear
²loose or worn suspension components
²loose or worn steering components
²improper steering alignment
Speed sensitive steering
The steering in your vehicle is speed sensitive. At high speeds, steering
assist will decrease to improve steering feel. At lower speeds,
maneuverability will be increased.
If the amount of effort required to steer your vehicle changes while
driving at a constant vehicle speed, have the power steering system
checked by your dealer or a qualified service technician.
AIR SUSPENSION SYSTEM
The air suspension system is designed to improve ride, handling and
general vehicle performance during:
²Certain road conditions
²Steering maneuvers
²Braking
²Accelerations
This system keeps the rear of your vehicle at a constant level by
automatically adding air or releasing air from the springs.
If you exceed the load limit, the rear air suspension may not operate.
2004 Marauder(mdr)
Owners Guide (post-2002-fmt)
USA English(fus)
Driving
117
Page 130 of 224

Canadian customers who require roadside assistance, call
1±800±665±2006.
If you need to arrange roadside assistance for yourself, Ford Motor
Company will reimburse a reasonable amount. To obtain reimbursement
information, U.S. Ford or Mercury vehicles customers call
1-800-241-3673; Lincoln vehicle customers call 1±800±521±4140.
Canadian customers who need to obtain reimbursement information, call
1±800±665±2006.
ROADSIDE COVERAGE BEYOND BASIC WARRANTY
In the United States, you may purchase additional roadside assistance
coverage beyond this period through the Ford Auto Club by contacting
your Ford or Lincoln Mercury dealer.
Similarly in Canada, for uninterrupted Roadside Assistance coverage, you
may purchase extended coverage prior to your Basic Warranty's Roadside
Assistance expiring. For more information and enrollment, contact
1±877±294±2582 or visit our website at www.ford.ca.
HAZARD FLASHER
Use only in an emergency to warn traffic of vehicle breakdown,
approaching danger, etc. The hazard flashers can be operated when the
ignition is off.
²The hazard lights control is
located on top of the steering
column.
²Depress hazard lights control to
activate all hazard flashers
simultaneously.
²Depress control again to turn the
flashers off.
FUEL PUMP SHUT-OFF SWITCH
FUEL
RESET
The fuel pump shut-off switch is a device intended to stop the electric
fuel pump when your vehicle has been involved in a substantial jolt.
After a collision, if the engine cranks but does not start, the fuel pump
shut-off switch may have been activated.
2004 Marauder(mdr)
Owners Guide (post-2002-fmt)
USA English(fus)
Roadside Emergencies
130
Page 132 of 224
Note:Always replace a fuse with one that has the specified amperage
rating. Using a fuse with a higher amperage rating can cause severe wire
damage and could start a fire.
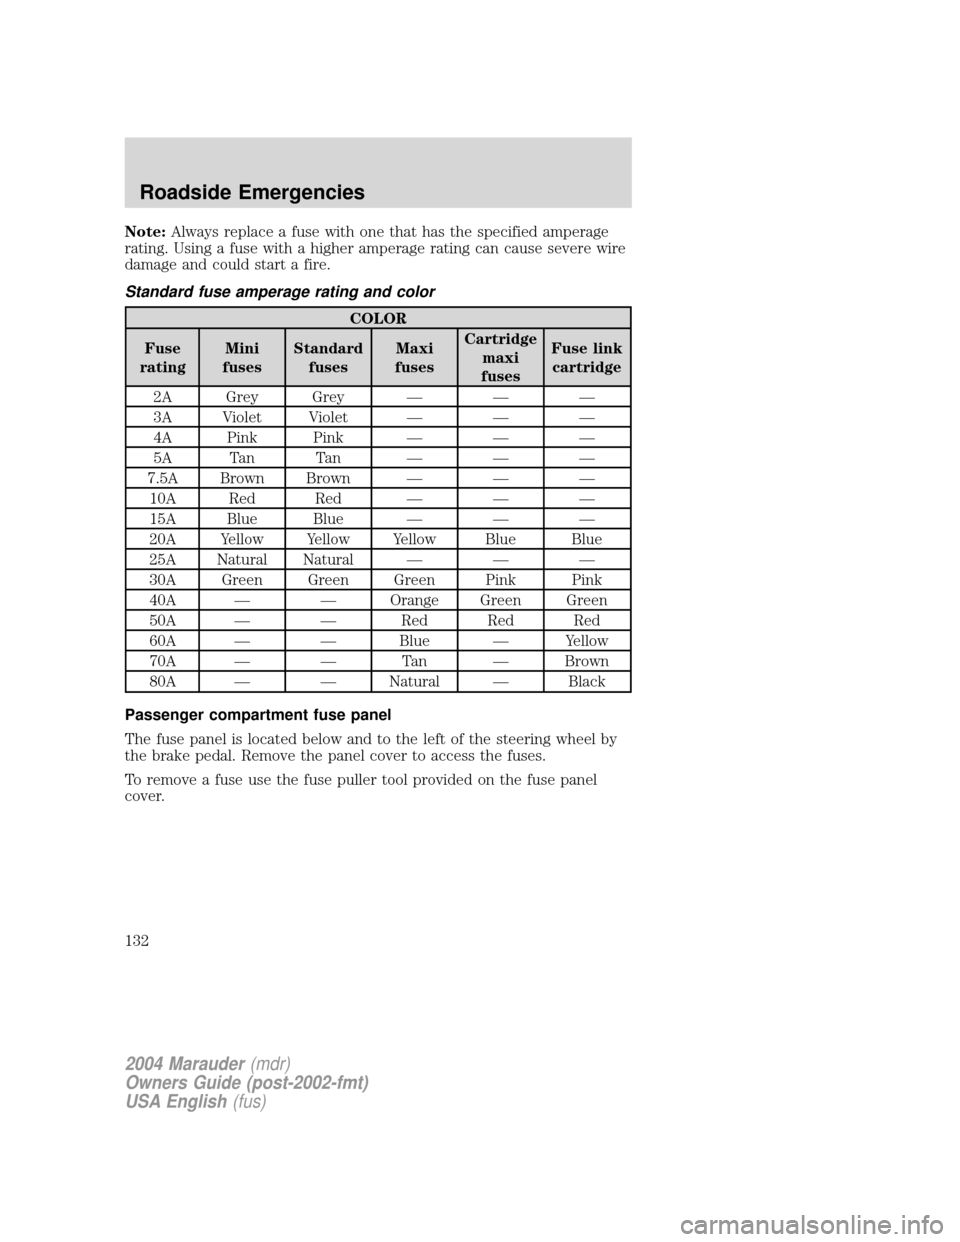
Standard fuse amperage rating and color
COLOR
Fuse
ratingMini
fusesStandard
fusesMaxi
fusesCartridge
maxi
fusesFuse link
cartridge
2A Grey Grey Ð Ð Ð
3A Violet Violet Ð Ð Ð
4A Pink Pink Ð Ð Ð
5A Tan Tan Ð Ð Ð
7.5A Brown Brown Ð Ð Ð
10A Red Red Ð Ð Ð
15A Blue Blue Ð Ð Ð
20A Yellow Yellow Yellow Blue Blue
25A Natural Natural Ð Ð Ð
30A Green Green Green Pink Pink
40A Ð Ð Orange Green Green
50A Ð Ð Red Red Red
60A Ð Ð Blue Ð Yellow
70A Ð Ð Tan Ð Brown
80A Ð Ð Natural Ð Black
Passenger compartment fuse panel
The fuse panel is located below and to the left of the steering wheel by
the brake pedal. Remove the panel cover to access the fuses.
To remove a fuse use the fuse puller tool provided on the fuse panel
cover.
2004 Marauder(mdr)
Owners Guide (post-2002-fmt)
USA English(fus)
Roadside Emergencies
132
Page 134 of 224
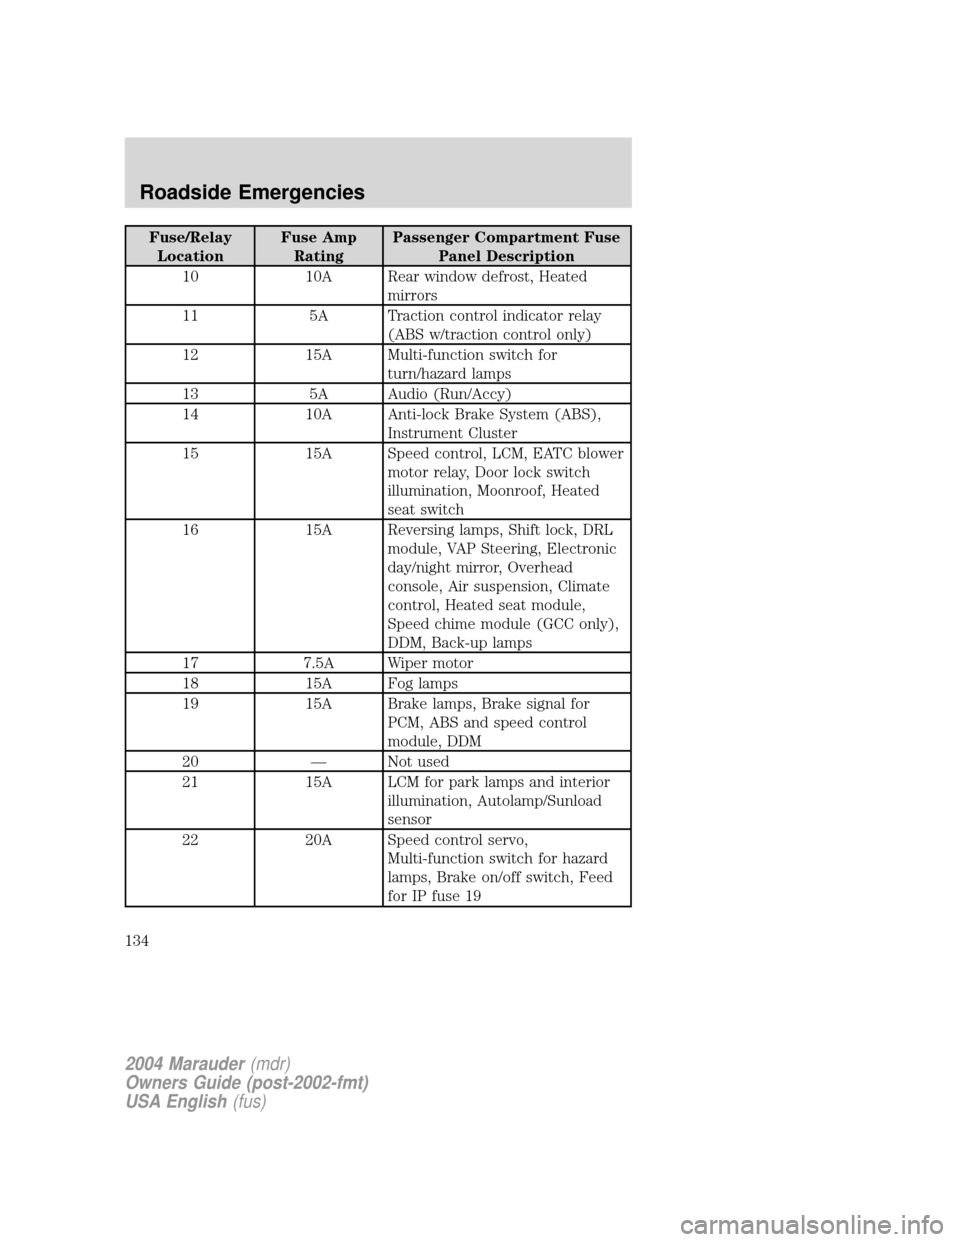
Fuse/Relay
LocationFuse Amp
RatingPassenger Compartment Fuse
Panel Description
10 10A Rear window defrost, Heated
mirrors
11 5A Traction control indicator relay
(ABS w/traction control only)
12 15A Multi-function switch for
turn/hazard lamps
13 5A Audio (Run/Accy)
14 10A Anti-lock Brake System (ABS),
Instrument Cluster
15 15A Speed control, LCM, EATC blower
motor relay, Door lock switch
illumination, Moonroof, Heated
seat switch
16 15A Reversing lamps, Shift lock, DRL
module, VAP Steering, Electronic
day/night mirror, Overhead
console, Air suspension, Climate
control, Heated seat module,
Speed chime module (GCC only),
DDM, Back-up lamps
17 7.5A Wiper motor
18 15A Fog lamps
19 15A Brake lamps, Brake signal for
PCM, ABS and speed control
module, DDM
20 Ð Not used
21 15A LCM for park lamps and interior
illumination, Autolamp/Sunload
sensor
22 20A Speed control servo,
Multi-function switch for hazard
lamps, Brake on/off switch, Feed
for IP fuse 19
2004 Marauder(mdr)
Owners Guide (post-2002-fmt)
USA English(fus)
Roadside Emergencies
134
Page 137 of 224
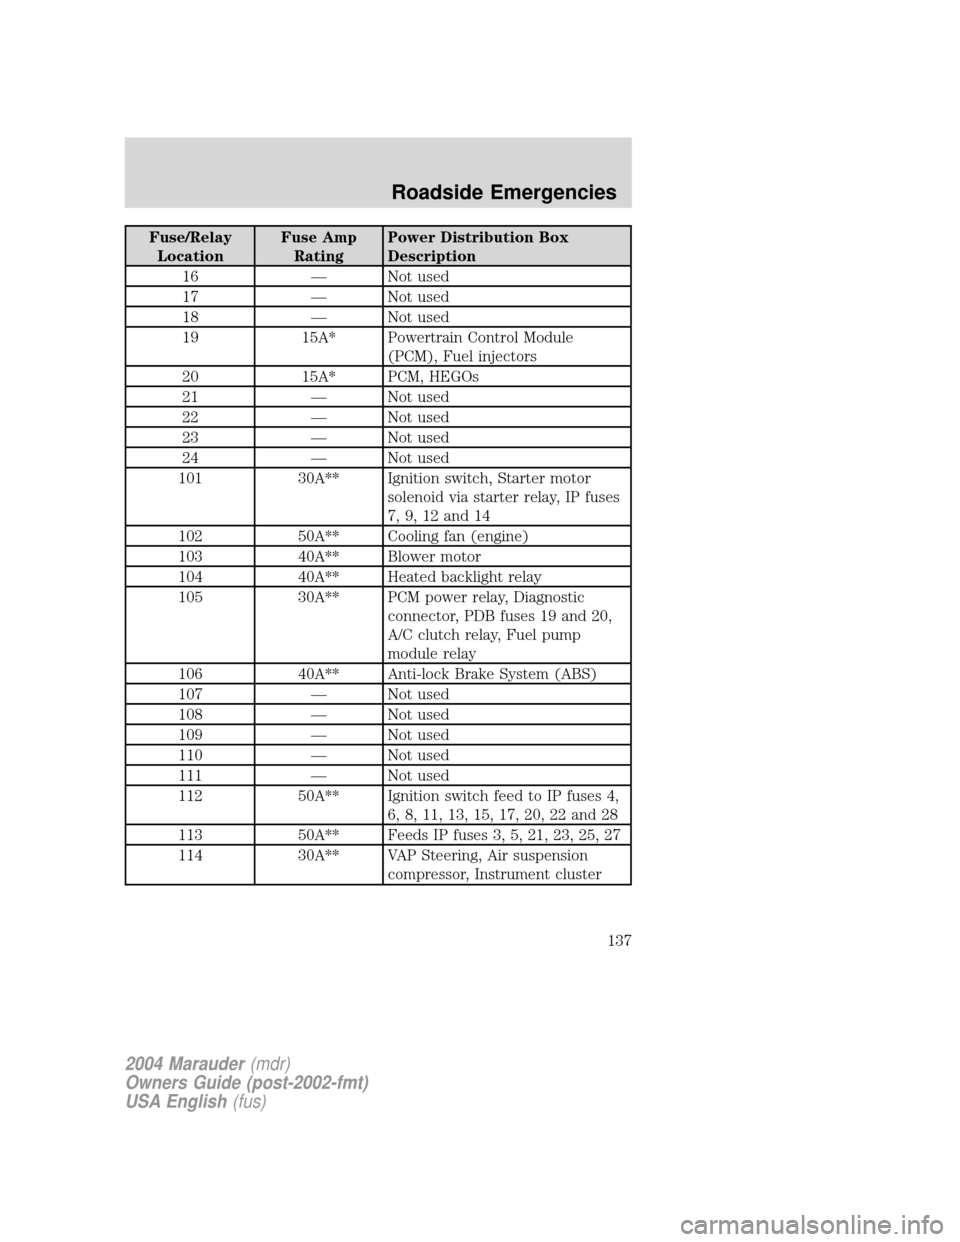
Fuse/Relay
LocationFuse Amp
RatingPower Distribution Box
Description
16 Ð Not used
17 Ð Not used
18 Ð Not used
19 15A* Powertrain Control Module
(PCM), Fuel injectors
20 15A* PCM, HEGOs
21 Ð Not used
22 Ð Not used
23 Ð Not used
24 Ð Not used
101 30A** Ignition switch, Starter motor
solenoid via starter relay, IP fuses
7, 9, 12 and 14
102 50A** Cooling fan (engine)
103 40A** Blower motor
104 40A** Heated backlight relay
105 30A** PCM power relay, Diagnostic
connector, PDB fuses 19 and 20,
A/C clutch relay, Fuel pump
module relay
106 40A** Anti-lock Brake System (ABS)
107 Ð Not used
108 Ð Not used
109 Ð Not used
110 Ð Not used
111 Ð Not used
112 50A** Ignition switch feed to IP fuses 4,
6, 8, 11, 13, 15, 17, 20, 22 and 28
113 50A** Feeds IP fuses 3, 5, 21, 23, 25, 27
114 30A** VAP Steering, Air suspension
compressor, Instrument cluster
2004 Marauder(mdr)
Owners Guide (post-2002-fmt)
USA English(fus)
Roadside Emergencies
137
Page 139 of 224
CHANGING THE TIRES
If you get a flat tire while driving, do not apply the brake heavily.
Instead, gradually decrease your speed. Hold the steering wheel firmly
and slowly move to a safe place on the side of the road.
The use of tire sealants is not recommended and may damage
your tires.
T-Type/Mini-Spare Tire Information
Your vehicle may be equipped with a T-type/mini-spare tire. This tire will
have the words9Temporary Use Only9molded into the tire sidewall. This
spare tire is considered9temporary9. Replace the T-type/mini-spare with
a tire of the same size, speed rating and load carrying capacity as the
other road tires as soon as possible.
When driving with the T-type/mini-spare tiredo not:
²Exceed 50 mph (80 km/h)
²Load the vehicle beyond maximum vehicle load rating listed on the
Safety Compliance Label
²Tow a trailer
²Use snow chains on the end of the vehicle with the T-type/mini spare
tire
²Use more than one T-type/mini spare tire at a time
²Use commercial car washing equipment
²Try to repair the T-type/mini spare tire
Use of a T-type/mini spare tire at any one wheel location can lead to
impairment of the following:
²Handling, stability and braking performance
²Comfort and noise
²Ground clearance and parking at curbs
²Winter weather driving capability
²Wet weather driving capability
Dissimilar spare tire/wheel information
Failure to follow these guidelines could result in an increased
risk of loss of vehicle control, injury or death.
2004 Marauder(mdr)
Owners Guide (post-2002-fmt)
USA English(fus)
Roadside Emergencies
139
Page 163 of 224
Do not use sharp objects, such as a razor blade, to clean the
inside of the rear window or to remove decals, as it may cause
damage to the rear window defroster's heated grid lines.
INSTRUMENT PANEL AND CLUSTER LENS
Clean the instrument panel with a damp cloth, then dry with a dry cloth.
²Avoid cleaners or polish that increase the gloss of the upper portion of
the instrument panel. The dull finish in this area helps protect the
driver from undesirable windshield reflection.
Do not use chemical solvents or strong detergents when cleaning
the steering wheel or instrument panel to avoid contamination of
the air bag system.
²Be certain to wash or wipe your hands clean if you have been in
contact with certain products such as insect repellent and suntan
lotion in order to avoid possible damage to the interior painted
surfaces.
INTERIOR TRIM
²Clean the interior trim areas with a damp cloth, then dry by wiping
with a dry, soft, clean cloth.
²Do not use household or glass cleaners as these may damage the
finish.
INTERIOR
For fabric, carpets, cloth seats, safety belts and seats equipped with side
air bags:
²Remove dust and loose dirt with a vacuum cleaner.
²Remove light stains and soil with Motorcraft Extra Strength
Upholstery Cleaner (ZC-41).
²If grease or tar is present on the material, spot-clean the area first
with Motorcraft Spot and Stain Remover (ZC-14).
²Never saturate the seat covers with cleaning solution.
²Do not use household cleaning products or glass cleaners, which can
stain and discolor the fabric and affect the flame retardant abilities of
the seat materials.
2004 Marauder(mdr)
Owners Guide (post-2002-fmt)
USA English(fus)
Cleaning
163
Page 168 of 224
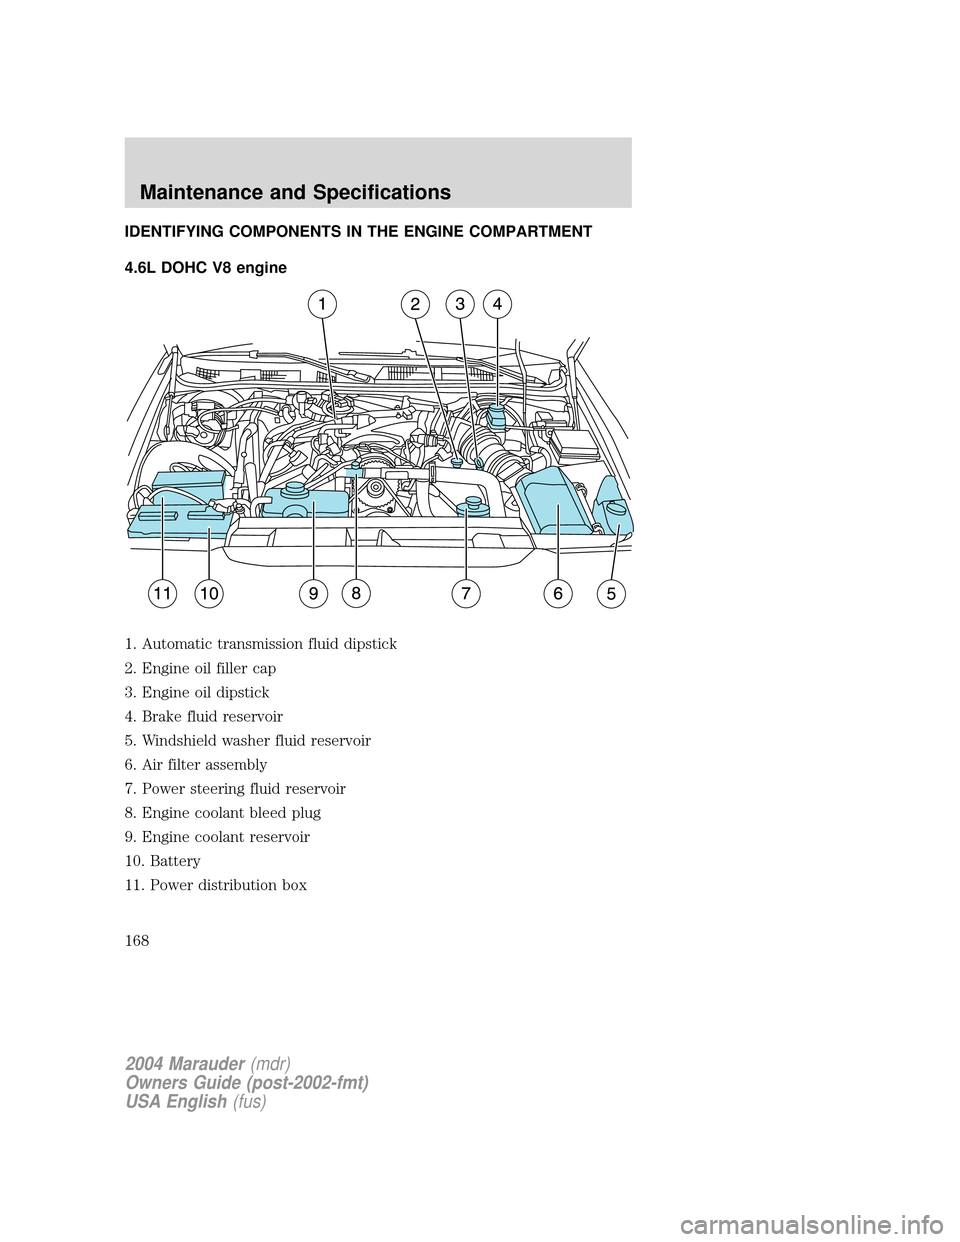
IDENTIFYING COMPONENTS IN THE ENGINE COMPARTMENT
4.6L DOHC V8 engine
1. Automatic transmission fluid dipstick
2. Engine oil filler cap
3. Engine oil dipstick
4. Brake fluid reservoir
5. Windshield washer fluid reservoir
6. Air filter assembly
7. Power steering fluid reservoir
8. Engine coolant bleed plug
9. Engine coolant reservoir
10. Battery
11. Power distribution box
2004 Marauder(mdr)
Owners Guide (post-2002-fmt)
USA English(fus)
Maintenance and Specifications
168
Page 190 of 224
These temporary malfunctions can be corrected by filling the fuel tank
with good quality fuel and/or properly tightening the fuel cap. After three
driving cycles without these or any other temporary malfunctions
present, theCheck engine/Service engine soonlight should turn off. (A
driving cycle consists of a cold engine startup followed by mixed
city/highway driving.) No additional vehicle service is required.
If theCheck engine/Service engine soonlight remains on, have your
vehicle serviced at the first available opportunity.
Readiness for Inspection/Maintenance (I/M) testing
In some localities, it may be a legal requirement to pass an I/M test of
the on-board diagnostics system. If yourCheck engine/Service engine
soonlight is on, refer to the description in theWarning lights and
chimessection of theInstrument Clusterchapter. Your vehicle may not
pass the I/M test with theCheck engine/Service engine soonlight on.
If the vehicle's powertrain system or its battery has just been serviced,
the on-board diagnostics system is reset to a ªnot ready for I/M testº
condition. To ready the on-board diagnostics system for I/M testing, a
minimum of 30 minutes of city and highway driving is necessary as
described below:
²First, at least 10 minutes of driving on an expressway or highway.
²Next, at least 20 minutes driving in stop-and-go, city-type traffic with
at least four idle periods.
Allow the vehicle to sit for at least eight hours without starting the
engine. Then, start the engine and complete the above driving cycle. The
engine must warm up to its normal operating temperature. Once started,
do not turn off the engine until the above driving cycle is complete.
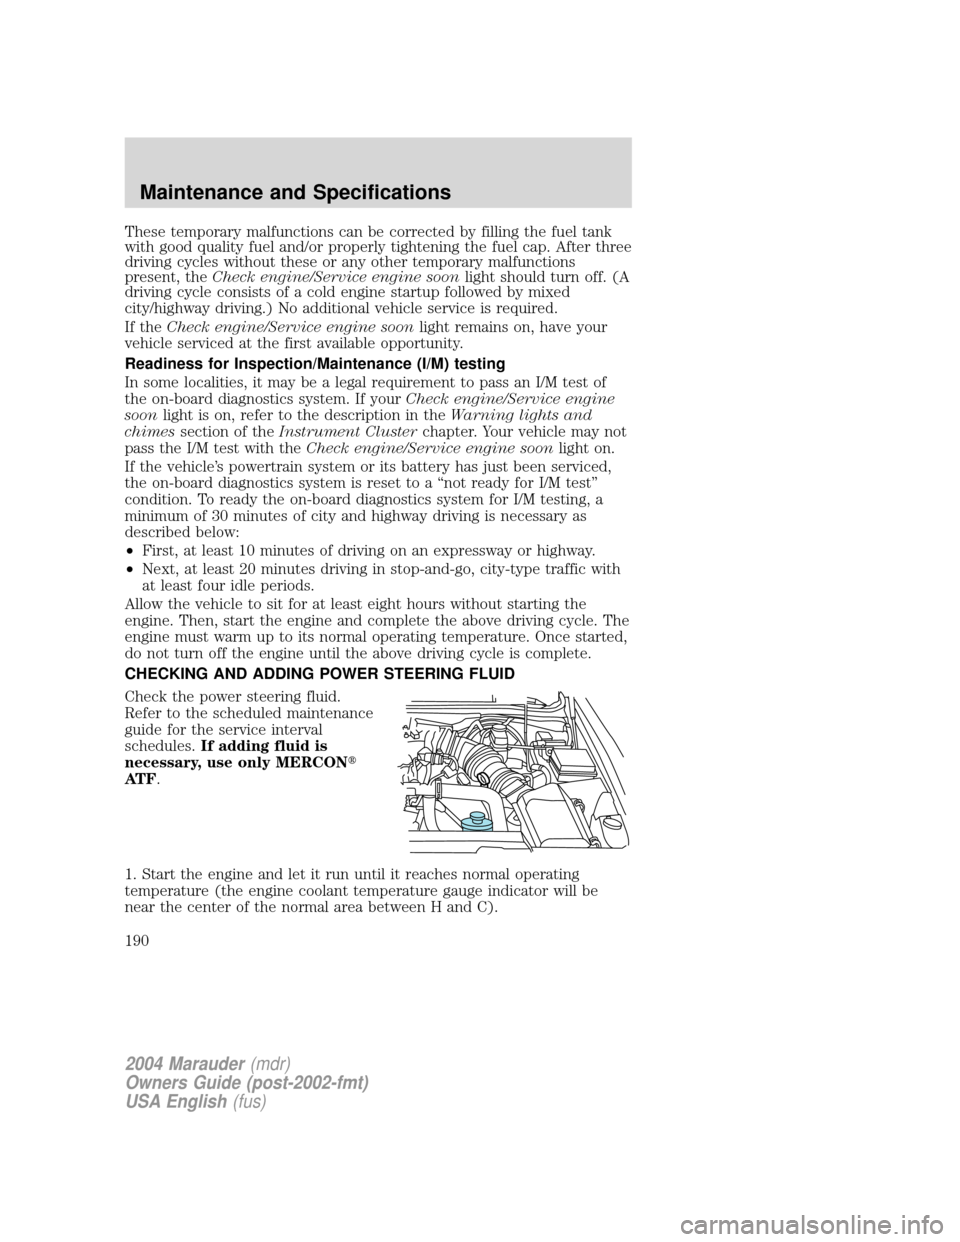
CHECKING AND ADDING POWER STEERING FLUID
Check the power steering fluid.
Refer to the scheduled maintenance
guide for the service interval
schedules.If adding fluid is
necessary, use only MERCONt
AT F.
1. Start the engine and let it run until it reaches normal operating
temperature (the engine coolant temperature gauge indicator will be
near the center of the normal area between H and C).
2004 Marauder(mdr)
Owners Guide (post-2002-fmt)
USA English(fus)
Maintenance and Specifications
190
Page 191 of 224
2. While the engine idles, turn the steering wheel left and right several
times.
3. Turn the engine off.
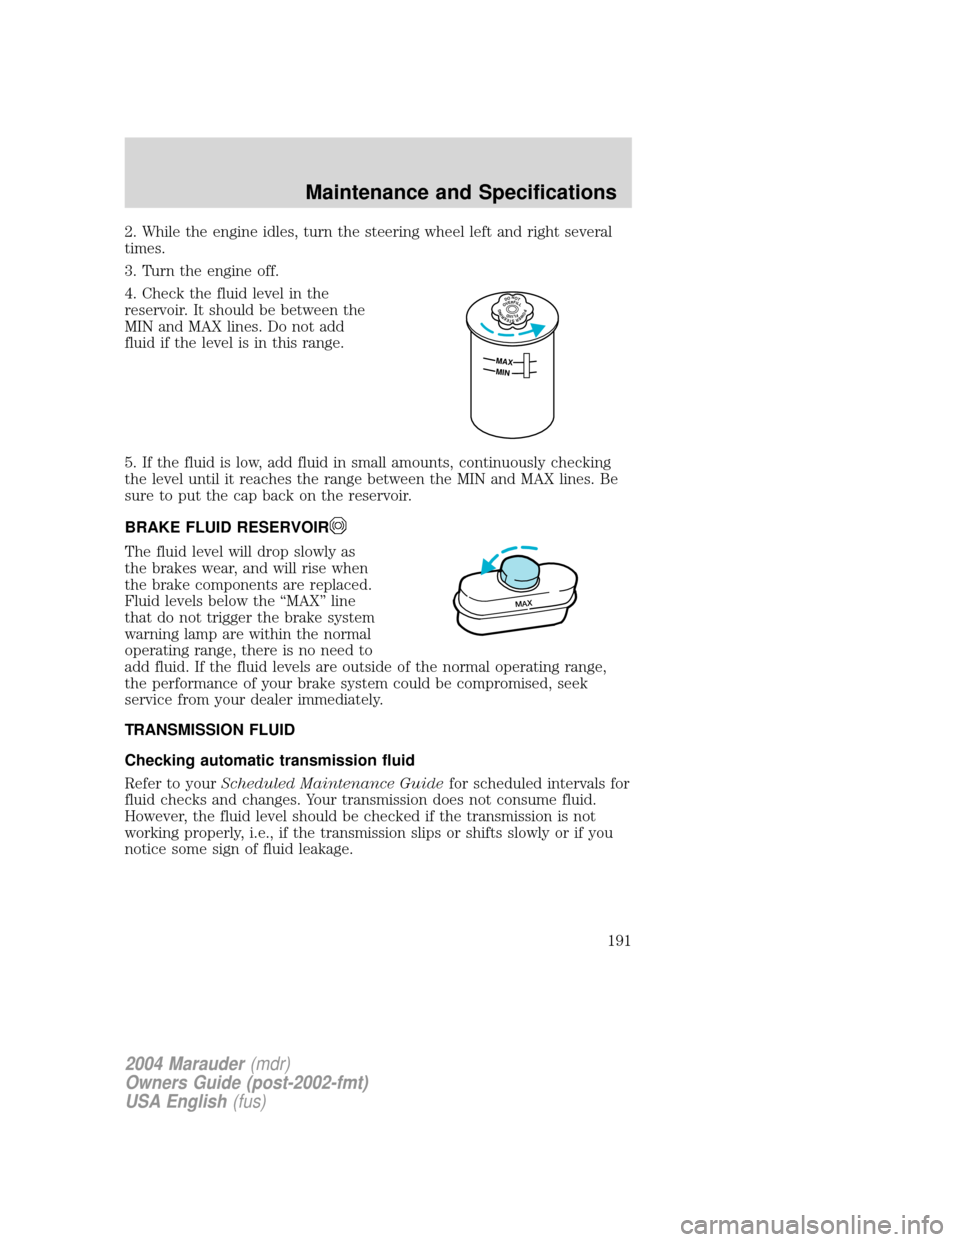
4. Check the fluid level in the
reservoir. It should be between the
MIN and MAX lines. Do not add
fluid if the level is in this range.
5. If the fluid is low, add fluid in small amounts, continuously checking
the level until it reaches the range between the MIN and MAX lines. Be
sure to put the cap back on the reservoir.
BRAKE FLUID RESERVOIR
The fluid level will drop slowly as
the brakes wear, and will rise when
the brake components are replaced.
Fluid levels below the ªMAXº line
that do not trigger the brake system
warning lamp are within the normal
operating range, there is no need to
add fluid. If the fluid levels are outside of the normal operating range,
the performance of your brake system could be compromised, seek
service from your dealer immediately.
TRANSMISSION FLUID
Checking automatic transmission fluid
Refer to yourScheduled Maintenance Guidefor scheduled intervals for
fluid checks and changes. Your transmission does not consume fluid.
However, the fluid level should be checked if the transmission is not
working properly, i.e., if the transmission slips or shifts slowly or if you
notice some sign of fluid leakage.
DONOTOVERFILLPOWERSTEERINGFLUID
MAX
MIN
MAX
2004 Marauder(mdr)
Owners Guide (post-2002-fmt)
USA English(fus)
Maintenance and Specifications
191