lock Mercury Marauder 2004 s Workshop Manual
[x] Cancel search | Manufacturer: MERCURY, Model Year: 2004, Model line: Marauder, Model: Mercury Marauder 2004Pages: 224, PDF Size: 3.21 MB
Page 134 of 224
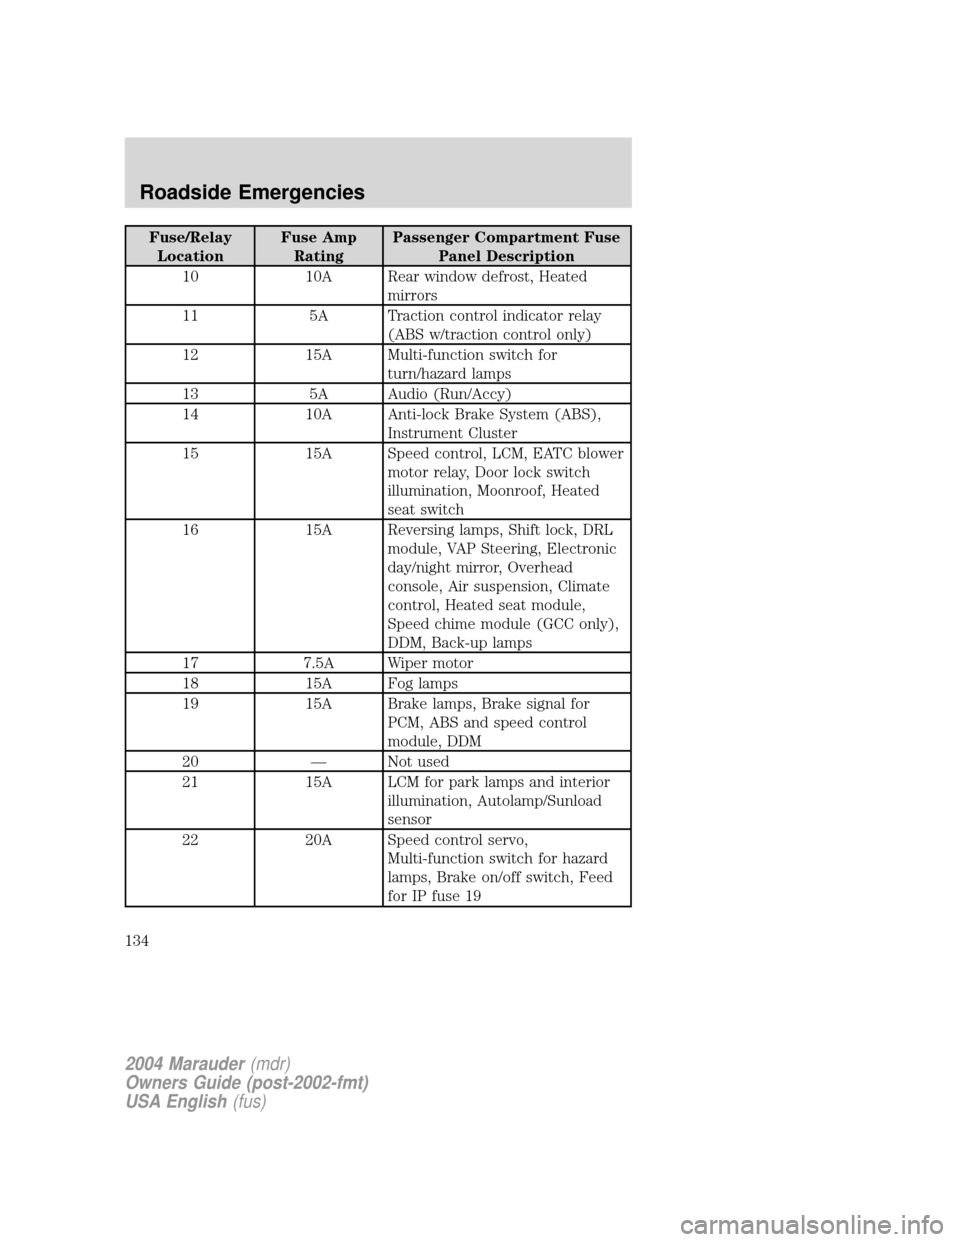
Fuse/Relay
LocationFuse Amp
RatingPassenger Compartment Fuse
Panel Description
10 10A Rear window defrost, Heated
mirrors
11 5A Traction control indicator relay
(ABS w/traction control only)
12 15A Multi-function switch for
turn/hazard lamps
13 5A Audio (Run/Accy)
14 10A Anti-lock Brake System (ABS),
Instrument Cluster
15 15A Speed control, LCM, EATC blower
motor relay, Door lock switch
illumination, Moonroof, Heated
seat switch
16 15A Reversing lamps, Shift lock, DRL
module, VAP Steering, Electronic
day/night mirror, Overhead
console, Air suspension, Climate
control, Heated seat module,
Speed chime module (GCC only),
DDM, Back-up lamps
17 7.5A Wiper motor
18 15A Fog lamps
19 15A Brake lamps, Brake signal for
PCM, ABS and speed control
module, DDM
20 Ð Not used
21 15A LCM for park lamps and interior
illumination, Autolamp/Sunload
sensor
22 20A Speed control servo,
Multi-function switch for hazard
lamps, Brake on/off switch, Feed
for IP fuse 19
2004 Marauder(mdr)
Owners Guide (post-2002-fmt)
USA English(fus)
Roadside Emergencies
134
Page 135 of 224
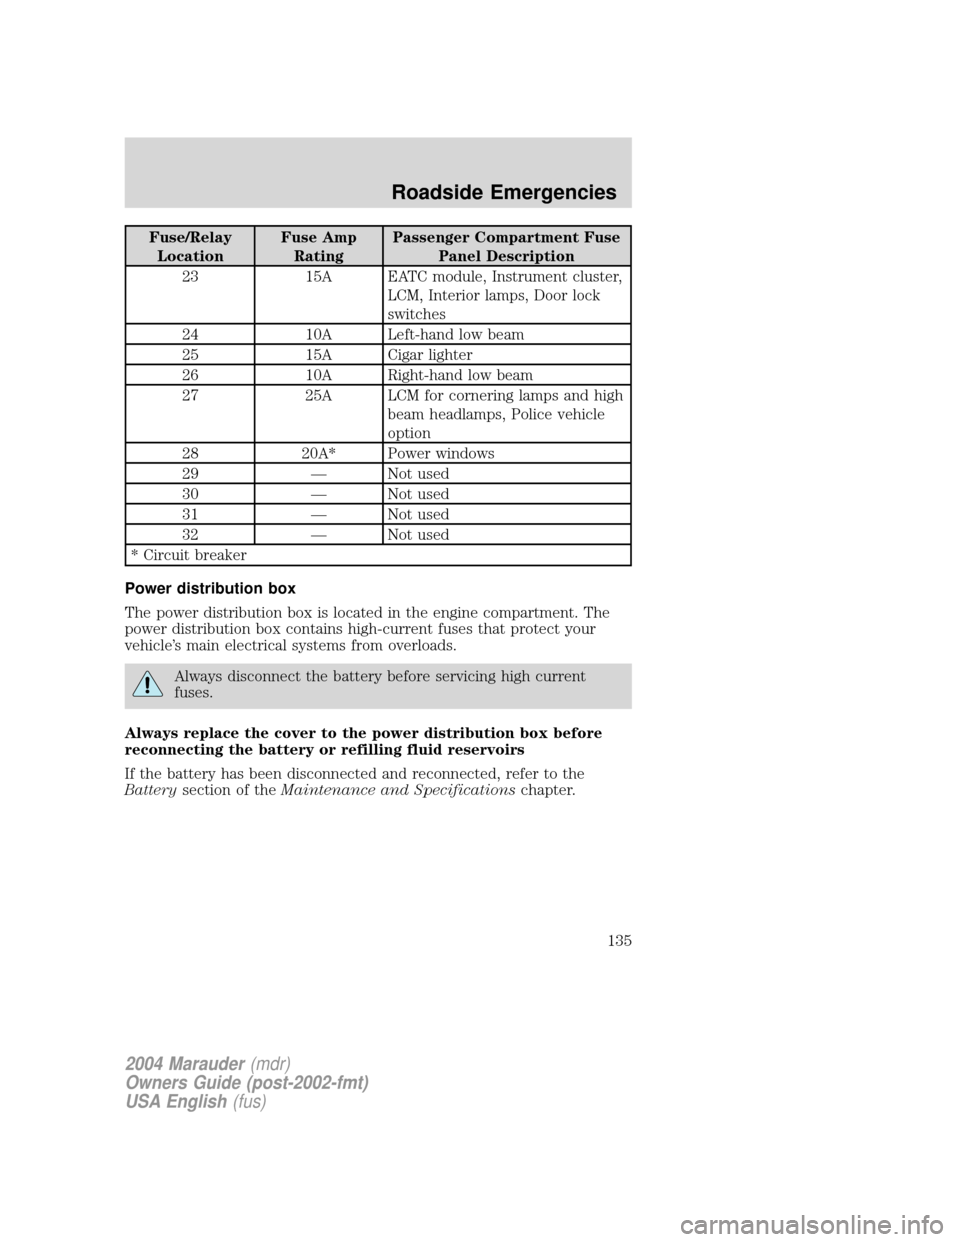
Fuse/Relay
LocationFuse Amp
RatingPassenger Compartment Fuse
Panel Description
23 15A EATC module, Instrument cluster,
LCM, Interior lamps, Door lock
switches
24 10A Left-hand low beam
25 15A Cigar lighter
26 10A Right-hand low beam
27 25A LCM for cornering lamps and high
beam headlamps, Police vehicle
option
28 20A* Power windows
29 Ð Not used
30 Ð Not used
31 Ð Not used
32 Ð Not used
* Circuit breaker
Power distribution box
The power distribution box is located in the engine compartment. The
power distribution box contains high-current fuses that protect your
vehicle's main electrical systems from overloads.
Always disconnect the battery before servicing high current
fuses.
Always replace the cover to the power distribution box before
reconnecting the battery or refilling fluid reservoirs
If the battery has been disconnected and reconnected, refer to the
Batterysection of theMaintenance and Specificationschapter.
2004 Marauder(mdr)
Owners Guide (post-2002-fmt)
USA English(fus)
Roadside Emergencies
135
Page 137 of 224
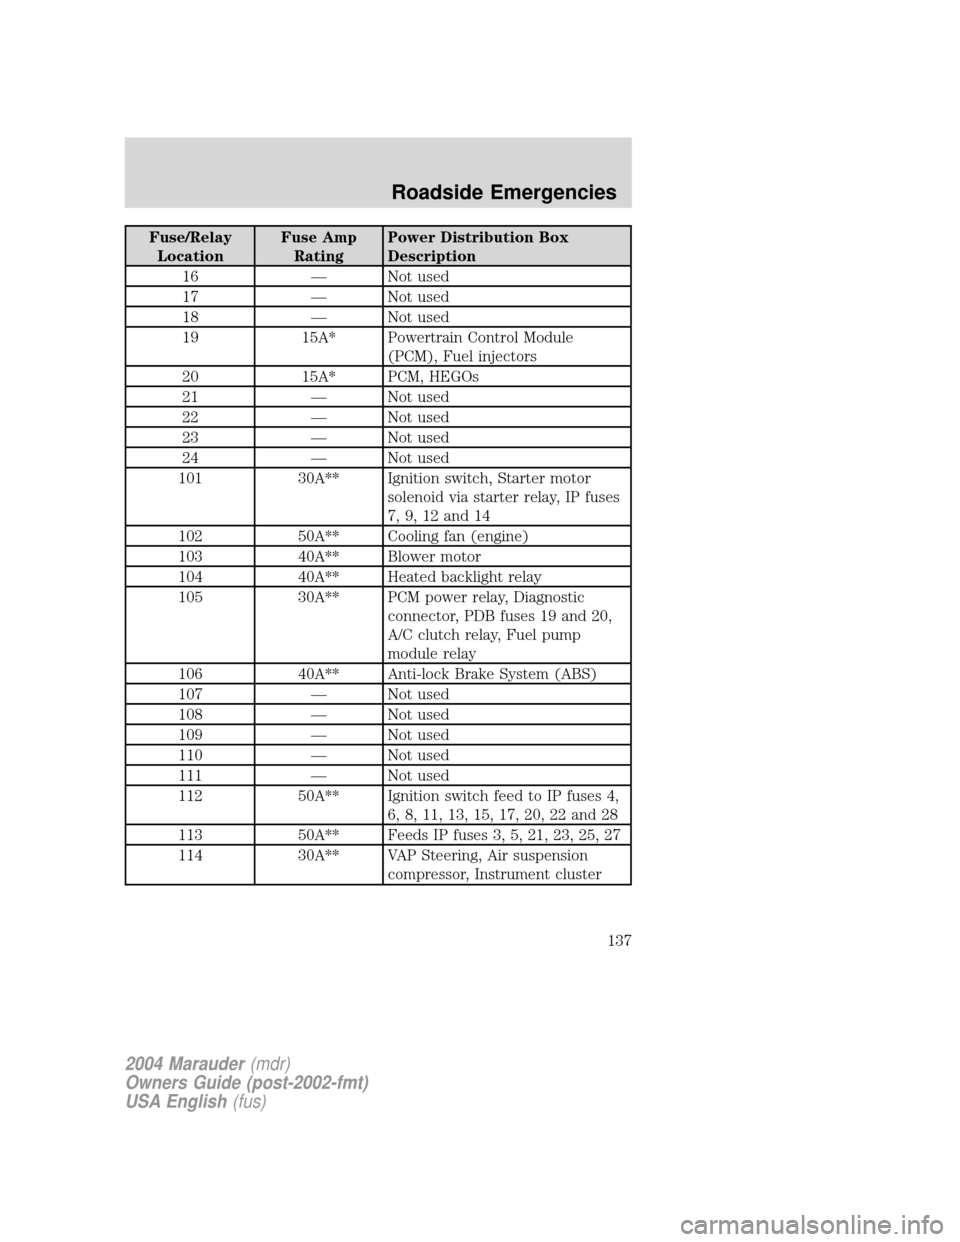
Fuse/Relay
LocationFuse Amp
RatingPower Distribution Box
Description
16 Ð Not used
17 Ð Not used
18 Ð Not used
19 15A* Powertrain Control Module
(PCM), Fuel injectors
20 15A* PCM, HEGOs
21 Ð Not used
22 Ð Not used
23 Ð Not used
24 Ð Not used
101 30A** Ignition switch, Starter motor
solenoid via starter relay, IP fuses
7, 9, 12 and 14
102 50A** Cooling fan (engine)
103 40A** Blower motor
104 40A** Heated backlight relay
105 30A** PCM power relay, Diagnostic
connector, PDB fuses 19 and 20,
A/C clutch relay, Fuel pump
module relay
106 40A** Anti-lock Brake System (ABS)
107 Ð Not used
108 Ð Not used
109 Ð Not used
110 Ð Not used
111 Ð Not used
112 50A** Ignition switch feed to IP fuses 4,
6, 8, 11, 13, 15, 17, 20, 22 and 28
113 50A** Feeds IP fuses 3, 5, 21, 23, 25, 27
114 30A** VAP Steering, Air suspension
compressor, Instrument cluster
2004 Marauder(mdr)
Owners Guide (post-2002-fmt)
USA English(fus)
Roadside Emergencies
137
Page 138 of 224
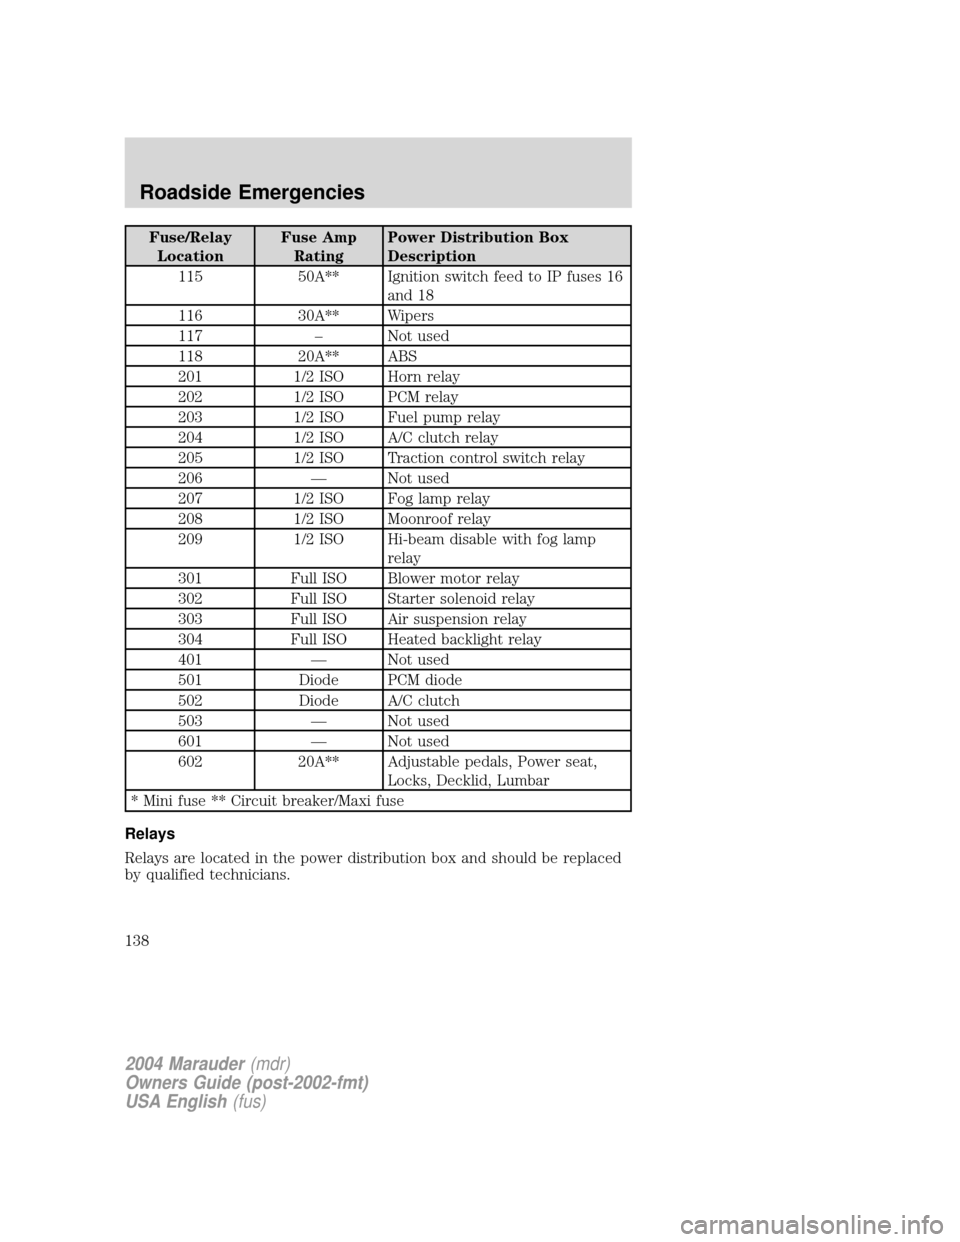
Fuse/Relay
LocationFuse Amp
RatingPower Distribution Box
Description
115 50A** Ignition switch feed to IP fuses 16
and 18
116 30A** Wipers
117 ± Not used
118 20A** ABS
201 1/2 ISO Horn relay
202 1/2 ISO PCM relay
203 1/2 ISO Fuel pump relay
204 1/2 ISO A/C clutch relay
205 1/2 ISO Traction control switch relay
206 Ð Not used
207 1/2 ISO Fog lamp relay
208 1/2 ISO Moonroof relay
209 1/2 ISO Hi-beam disable with fog lamp
relay
301 Full ISO Blower motor relay
302 Full ISO Starter solenoid relay
303 Full ISO Air suspension relay
304 Full ISO Heated backlight relay
401 Ð Not used
501 Diode PCM diode
502 Diode A/C clutch
503 Ð Not used
601 Ð Not used
602 20A** Adjustable pedals, Power seat,
Locks, Decklid, Lumbar
* Mini fuse ** Circuit breaker/Maxi fuse
Relays
Relays are located in the power distribution box and should be replaced
by qualified technicians.
2004 Marauder(mdr)
Owners Guide (post-2002-fmt)
USA English(fus)
Roadside Emergencies
138
Page 141 of 224
Tire change procedure
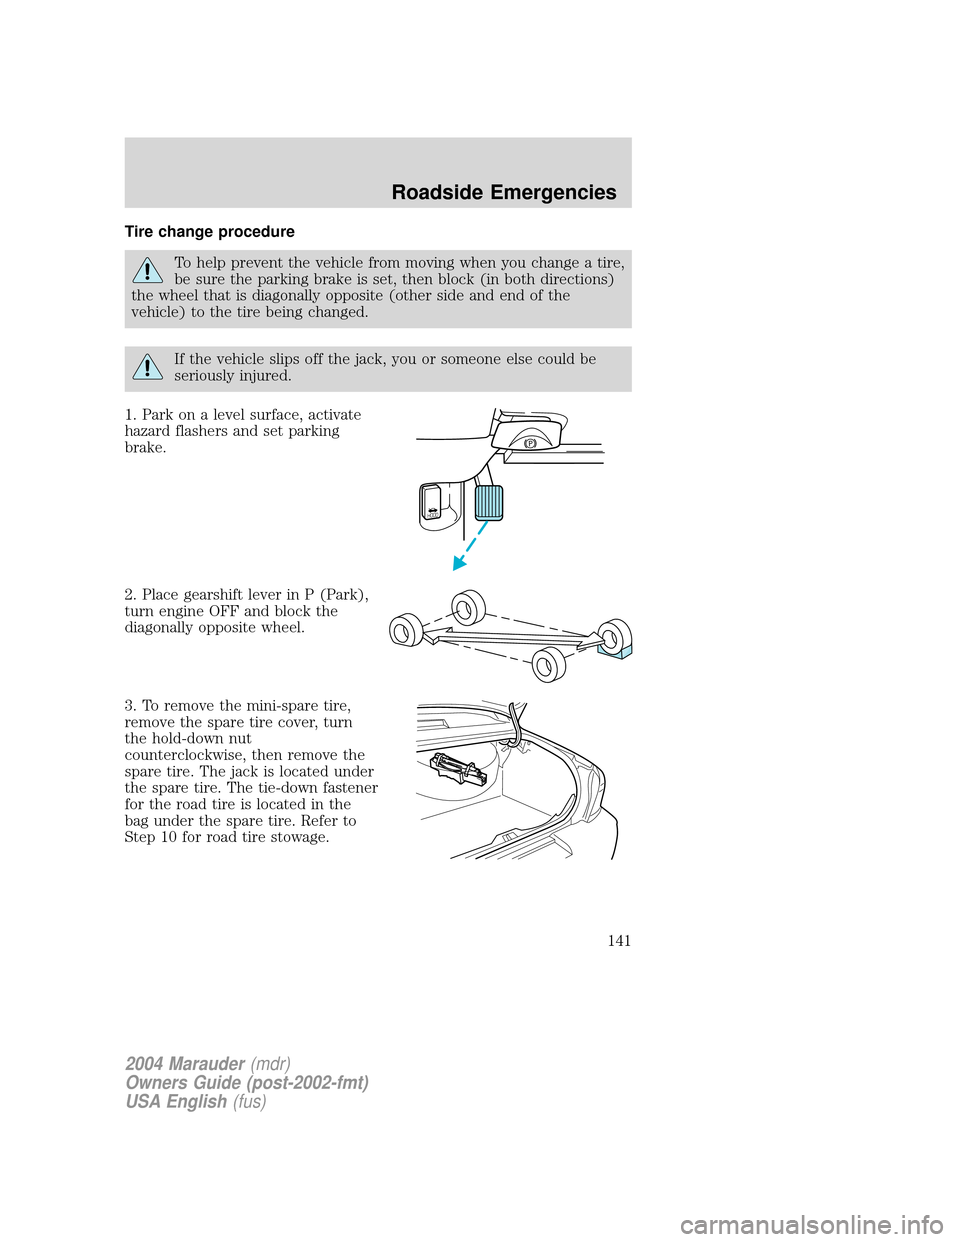
To help prevent the vehicle from moving when you change a tire,
be sure the parking brake is set, then block (in both directions)
the wheel that is diagonally opposite (other side and end of the
vehicle) to the tire being changed.
If the vehicle slips off the jack, you or someone else could be
seriously injured.
1. Park on a level surface, activate
hazard flashers and set parking
brake.
2. Place gearshift lever in P (Park),
turn engine OFF and block the
diagonally opposite wheel.
3. To remove the mini-spare tire,
remove the spare tire cover, turn
the hold-down nut
counterclockwise, then remove the
spare tire. The jack is located under
the spare tire. The tie-down fastener
for the road tire is located in the
bag under the spare tire. Refer to
Step 10 for road tire stowage.
HOOD
2004 Marauder(mdr)
Owners Guide (post-2002-fmt)
USA English(fus)
Roadside Emergencies
141
Page 142 of 224
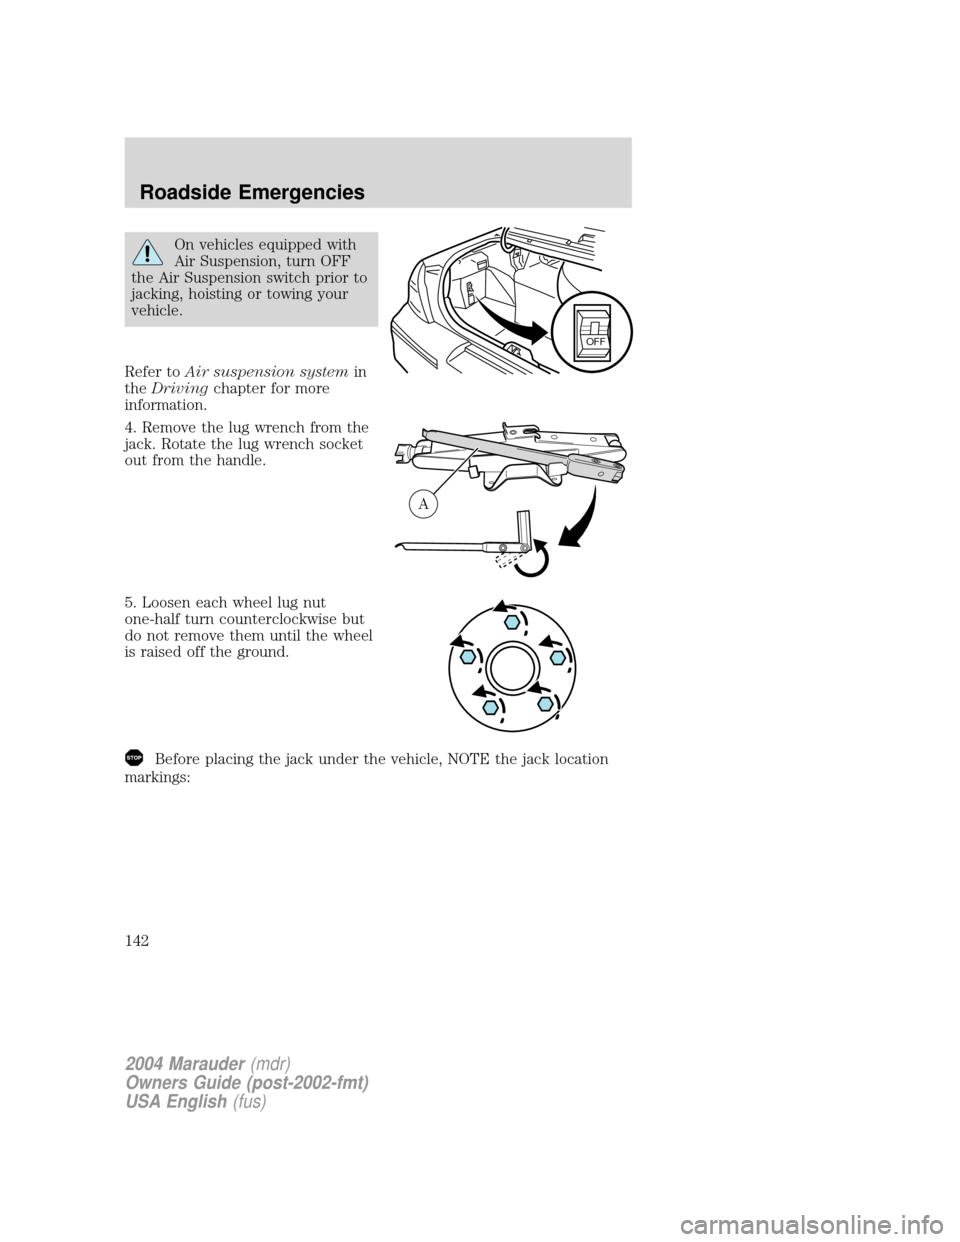
On vehicles equipped with
Air Suspension, turn OFF
the Air Suspension switch prior to
jacking, hoisting or towing your
vehicle.
Refer toAir suspension systemin
theDrivingchapter for more
information.
4. Remove the lug wrench from the
jack. Rotate the lug wrench socket
out from the handle.
5. Loosen each wheel lug nut
one-half turn counterclockwise but
do not remove them until the wheel
is raised off the ground.
Before placing the jack under the vehicle, NOTE the jack location
markings:
OFF
A
2004 Marauder(mdr)
Owners Guide (post-2002-fmt)
USA English(fus)
Roadside Emergencies
142
Page 143 of 224

JACK LOCATION-FRONT
The jack location markings can be
foundon the lower outer edge of
the body.
²Locate the jack locator mark (B -
circle) on the body (C) near the
tire you are changing, then place
the jack (D)under the frame
(A) of the vehiclealigning it
with the mark (B -circle).
JACK LOCATION-REAR
The jack location markings can be
foundon the lower outer edge of
the body.
²Locate the jack locator mark (B -
triangle) on the body (C) near
the tire you are changing, then
place the jack (D)under the
frame (A) of the vehicle
aligning it with the mark (B -
triangle).
²Position the jack according to the
following guides and turn the jack
handle clockwise until the wheel
is completely off the ground.
To lessen risk of personal injury, do not put any part of your
body under the vehicle while changing a tire. Do not start the
engine when your vehicle is on the jack. The jack is ONLY meant for
changing the tire.
A
D
B
C
2004 Marauder(mdr)
Owners Guide (post-2002-fmt)
USA English(fus)
Roadside Emergencies
143
Page 144 of 224
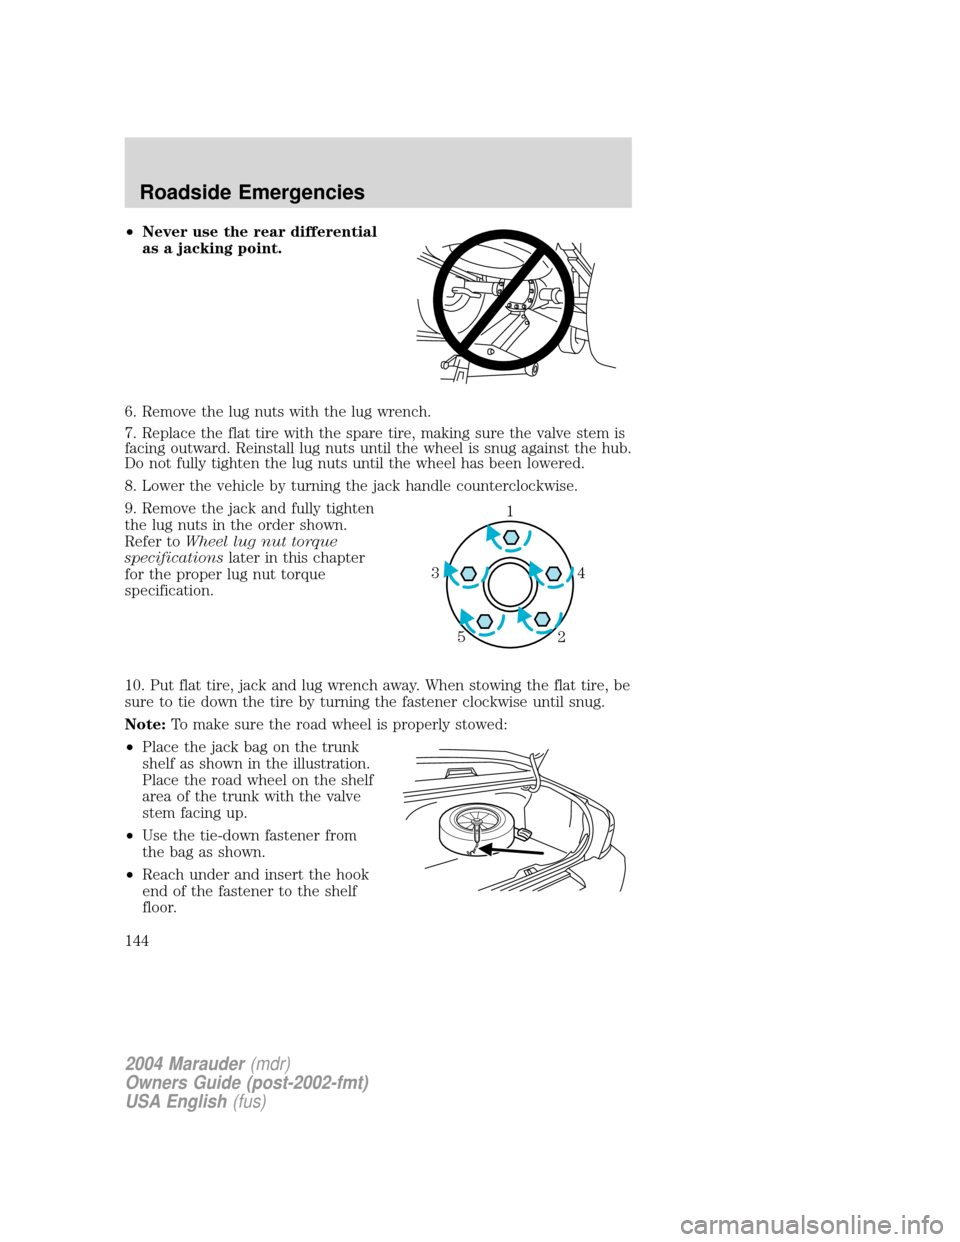
²Never use the rear differential
as a jacking point.
6. Remove the lug nuts with the lug wrench.
7. Replace the flat tire with the spare tire, making sure the valve stem is
facing outward. Reinstall lug nuts until the wheel is snug against the hub.
Do not fully tighten the lug nuts until the wheel has been lowered.
8. Lower the vehicle by turning the jack handle counterclockwise.
9. Remove the jack and fully tighten
the lug nuts in the order shown.
Refer toWheel lug nut torque
specificationslater in this chapter
for the proper lug nut torque
specification.
10. Put flat tire, jack and lug wrench away. When stowing the flat tire, be
sure to tie down the tire by turning the fastener clockwise until snug.
Note:To make sure the road wheel is properly stowed:
²Place the jack bag on the trunk
shelf as shown in the illustration.
Place the road wheel on the shelf
area of the trunk with the valve
stem facing up.
²Use the tie-down fastener from
the bag as shown.
²Reach under and insert the hook
end of the fastener to the shelf
floor.
1
4 3
2 5
2004 Marauder(mdr)
Owners Guide (post-2002-fmt)
USA English(fus)
Roadside Emergencies
144
Page 145 of 224
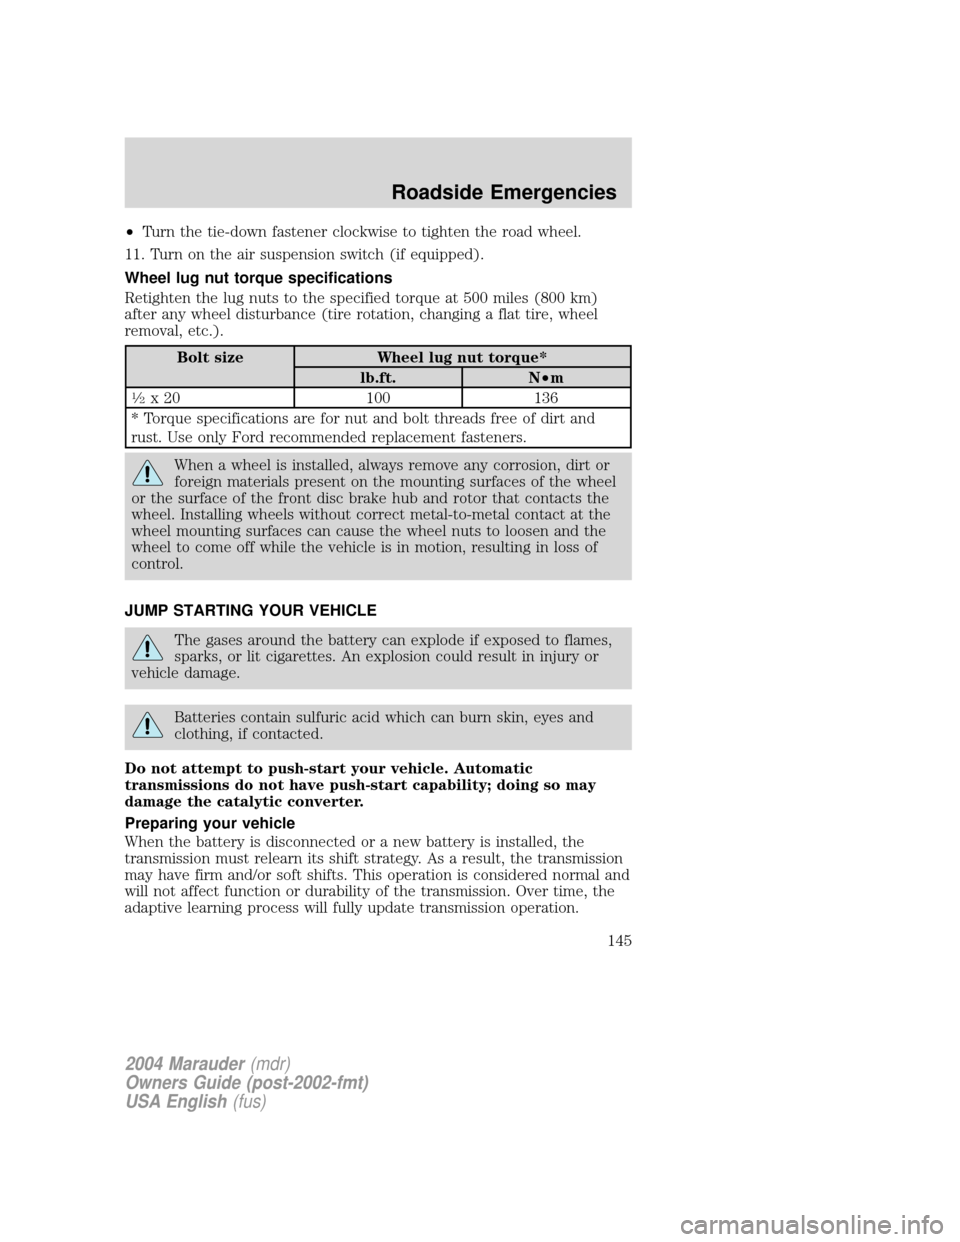
²Turn the tie-down fastener clockwise to tighten the road wheel.
11. Turn on the air suspension switch (if equipped).
Wheel lug nut torque specifications
Retighten the lug nuts to the specified torque at 500 miles (800 km)
after any wheel disturbance (tire rotation, changing a flat tire, wheel
removal, etc.).
Bolt size Wheel lug nut torque*
lb.ft. N²m
1¤2x 20 100 136
* Torque specifications are for nut and bolt threads free of dirt and
rust. Use only Ford recommended replacement fasteners.
When a wheel is installed, always remove any corrosion, dirt or
foreign materials present on the mounting surfaces of the wheel
or the surface of the front disc brake hub and rotor that contacts the
wheel. Installing wheels without correct metal-to-metal contact at the
wheel mounting surfaces can cause the wheel nuts to loosen and the
wheel to come off while the vehicle is in motion, resulting in loss of
control.
JUMP STARTING YOUR VEHICLE
The gases around the battery can explode if exposed to flames,
sparks, or lit cigarettes. An explosion could result in injury or
vehicle damage.
Batteries contain sulfuric acid which can burn skin, eyes and
clothing, if contacted.
Do not attempt to push-start your vehicle. Automatic
transmissions do not have push-start capability; doing so may
damage the catalytic converter.
Preparing your vehicle
When the battery is disconnected or a new battery is installed, the
transmission must relearn its shift strategy. As a result, the transmission
may have firm and/or soft shifts. This operation is considered normal and
will not affect function or durability of the transmission. Over time, the
adaptive learning process will fully update transmission operation.
2004 Marauder(mdr)
Owners Guide (post-2002-fmt)
USA English(fus)
Roadside Emergencies
145
Page 161 of 224
²Remove particles such as bird droppings, tree sap, insect deposits, tar
spots, road salt and industrial fallout before repairing paint chips.
²Always read the instructions before using the products.
ALUMINUM WHEELS AND WHEEL COVERS
Aluminum wheels and wheel covers are coated with a clearcoat paint
finish. In order to maintain their shine:
²Clean weekly with Motorcraft Wheel and Tire Cleaner (ZC-37±A),
which is available from your dealer. Heavy dirt and brake dust
accumulation may require agitation with a sponge. Rinse thoroughly
with a strong stream of water.
²Never apply any cleaning chemical to hot or warm wheel rims or
covers.
²Some automatic car washes may cause damage to the finish on your
wheel rims or covers. Chemical-strength cleaners, or cleaning
chemicals, in combination with brush agitation to remove brake dust
and dirt, could wear away the clearcoat finish over time.
²Do not use hydrofluoric acid-based or high caustic-based wheel
cleaners, steel wool, fuels or strong household detergent.
²To remove tar and grease, use Motorcraft Bug and Tar Remover
(ZC-42), available from your dealer.
Stainless steel exhaust tips
²Wash the vehicle first, using cool or lukewarm water and a neutral Ph
shampoo, such as Motorcraft Detail Wash (ZC-3±A).
²Use Custom Brite Metal Cleaner (ZC-15), available from your dealer.
Apply the product as you would a wax; allow the cleaner to dry for a
few minutes, then wipe off the haze with a clean, dry rag.
ENGINE
Engines are more efficient when they are clean because grease and dirt
buildup keep the engine warmer than normal. When washing:
²Take care when using a power washer to clean the engine. The
high-pressure fluid could penetrate the sealed parts and cause
damage.
²Do not spray a hot engine with cold water to avoid cracking the
engine block or other engine components.
²Spray Motorcraft Engine Shampoo and Degreaser (ZC-20) on all parts
that require cleaning and pressure rinse clean.
2004 Marauder(mdr)
Owners Guide (post-2002-fmt)
USA English(fus)
Cleaning
161