lights Mercury Marauder 2004 Owner's Manuals
[x] Cancel search | Manufacturer: MERCURY, Model Year: 2004, Model line: Marauder, Model: Mercury Marauder 2004Pages: 224, PDF Size: 3.21 MB
Page 1 of 224
Introduction 4
Instrument Cluster 10
Warning and control lights 10
Gauges 13
Entertainment Systems 17
AM/FM stereo cassette with CD 17
CD changer 21
Climate Controls 24
Electronic automatic temperature control 24
Rear window defroster 26
Lights 27
Headlamps 27
Turn signal control 31
Bulb replacement 32
Driver Controls 38
Windshield wiper/washer control 38
Steering wheel adjustment 39
Power windows 48
Mirrors 49
Speed control 50
Locks and Security 60
Keys 60
Locks 60
Anti-theft system 62
Table of Contents
1
Page 10 of 224
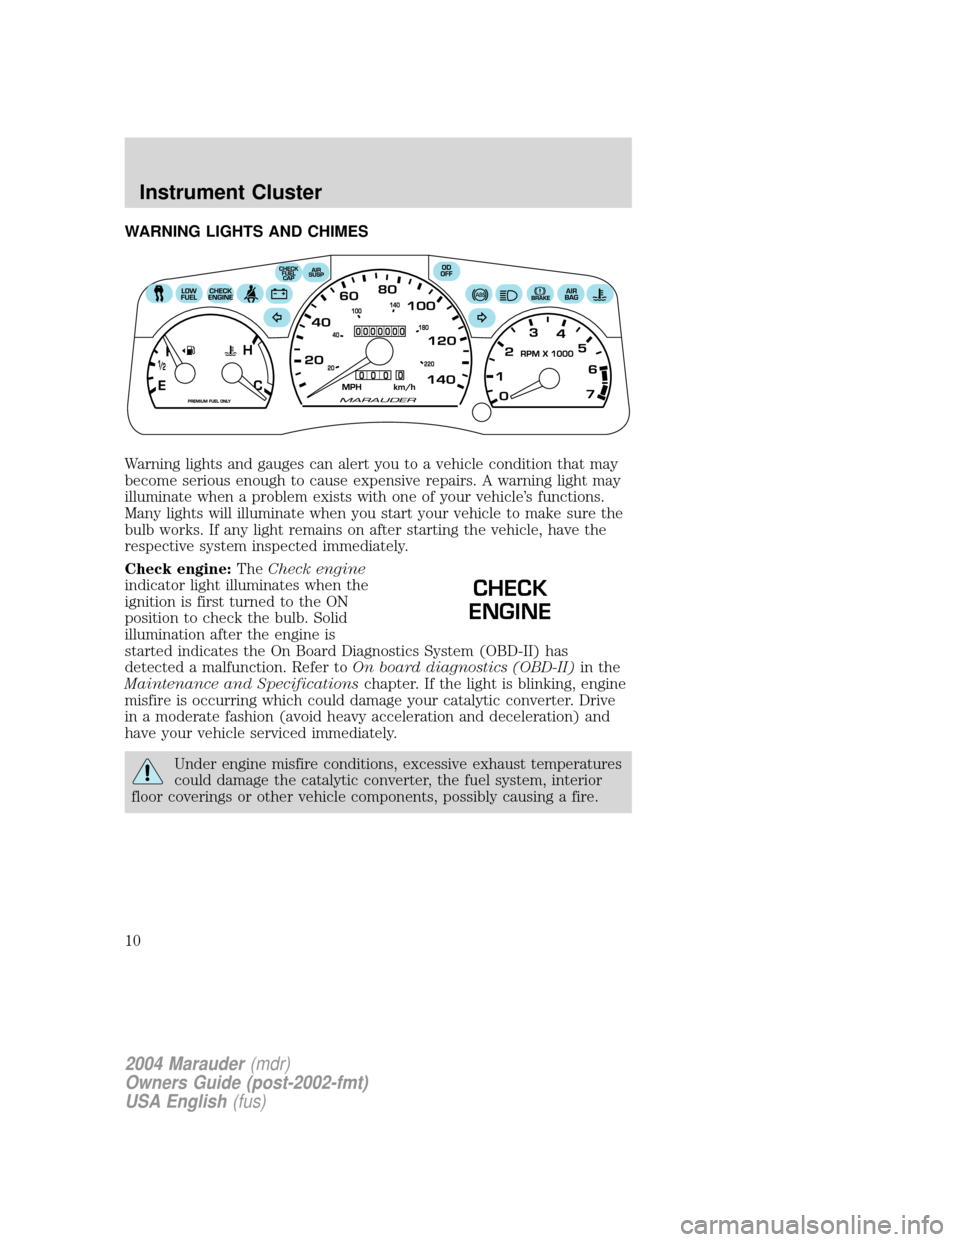
WARNING LIGHTS AND CHIMES
Warning lights and gauges can alert you to a vehicle condition that may
become serious enough to cause expensive repairs. A warning light may
illuminate when a problem exists with one of your vehicle's functions.
Many lights will illuminate when you start your vehicle to make sure the
bulb works. If any light remains on after starting the vehicle, have the
respective system inspected immediately.
Check engine:TheCheck engine
indicator light illuminates when the
ignition is first turned to the ON
position to check the bulb. Solid
illumination after the engine is
started indicates the On Board Diagnostics System (OBD-II) has
detected a malfunction. Refer toOn board diagnostics (OBD-II)in the
Maintenance and Specificationschapter. If the light is blinking, engine
misfire is occurring which could damage your catalytic converter. Drive
in a moderate fashion (avoid heavy acceleration and deceleration) and
have your vehicle serviced immediately.
Under engine misfire conditions, excessive exhaust temperatures
could damage the catalytic converter, the fuel system, interior
floor coverings or other vehicle components, possibly causing a fire.
CHECK
ENGINE
2004 Marauder(mdr)
Owners Guide (post-2002-fmt)
USA English(fus)
Instrument Cluster
Instrument Cluster
10
Page 13 of 224
Turn signal:Illuminates when the
left or right turn signal or the
hazard lights are turned on. If the
indicators stay on or flash faster, check for a burned out bulb.
High beams:Illuminates when the
high beam headlamps are turned on.
Headlamps on warning chime:Sounds when the headlamps or parking
lamps are on, the ignition is off (the key is not in the ignition) and the
driver's door is opened.
Key-in-ignition warning chime:Sounds when the key is left in the
ignition in the OFF/LOCK or ACCESSORY position and the driver's door
is opened.
GAUGES
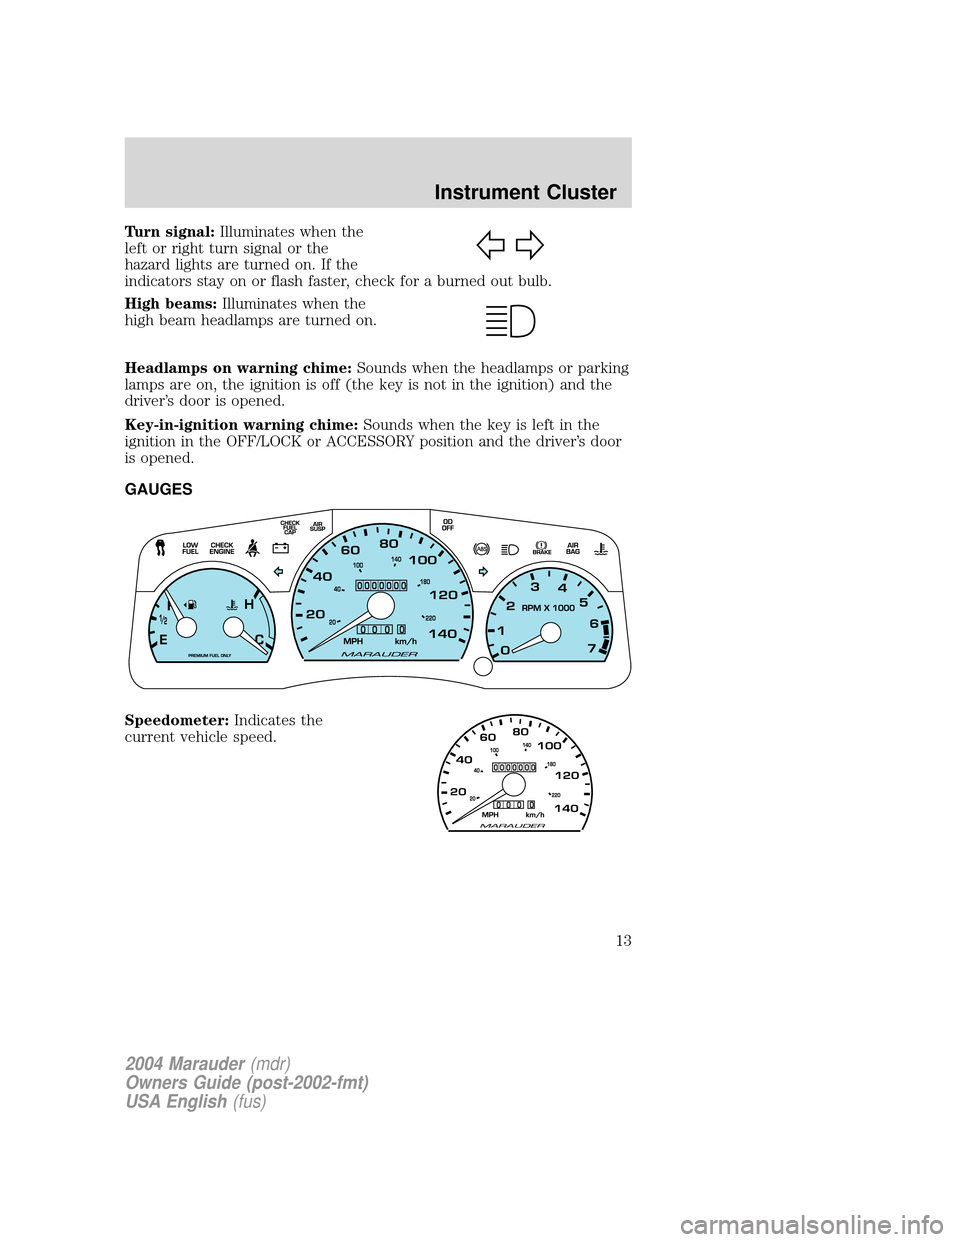
Speedometer:Indicates the
current vehicle speed.
2004 Marauder(mdr)
Owners Guide (post-2002-fmt)
USA English(fus)
Instrument Cluster
13
Page 22 of 224
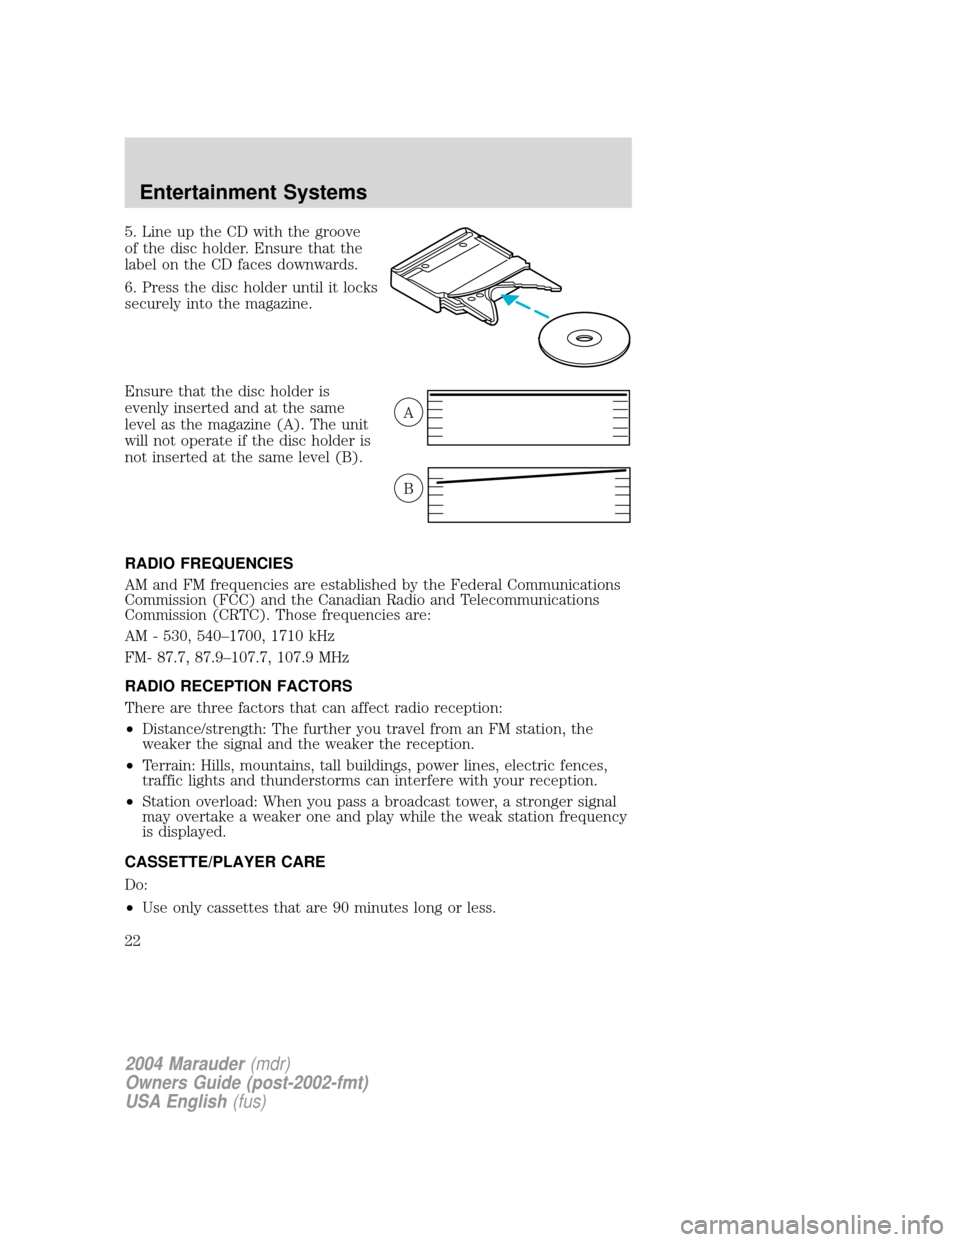
5. Line up the CD with the groove
of the disc holder. Ensure that the
label on the CD faces downwards.
6. Press the disc holder until it locks
securely into the magazine.
Ensure that the disc holder is
evenly inserted and at the same
level as the magazine (A). The unit
will not operate if the disc holder is
not inserted at the same level (B).
RADIO FREQUENCIES
AM and FM frequencies are established by the Federal Communications
Commission (FCC) and the Canadian Radio and Telecommunications
Commission (CRTC). Those frequencies are:
AM - 530, 540±1700, 1710 kHz
FM- 87.7, 87.9±107.7, 107.9 MHz
RADIO RECEPTION FACTORS
There are three factors that can affect radio reception:
²Distance/strength: The further you travel from an FM station, the
weaker the signal and the weaker the reception.
²Terrain: Hills, mountains, tall buildings, power lines, electric fences,
traffic lights and thunderstorms can interfere with your reception.
²Station overload: When you pass a broadcast tower, a stronger signal
may overtake a weaker one and play while the weak station frequency
is displayed.
CASSETTE/PLAYER CARE
Do:
²Use only cassettes that are 90 minutes long or less.
A
B
2004 Marauder(mdr)
Owners Guide (post-2002-fmt)
USA English(fus)
Entertainment Systems
22
Page 27 of 224
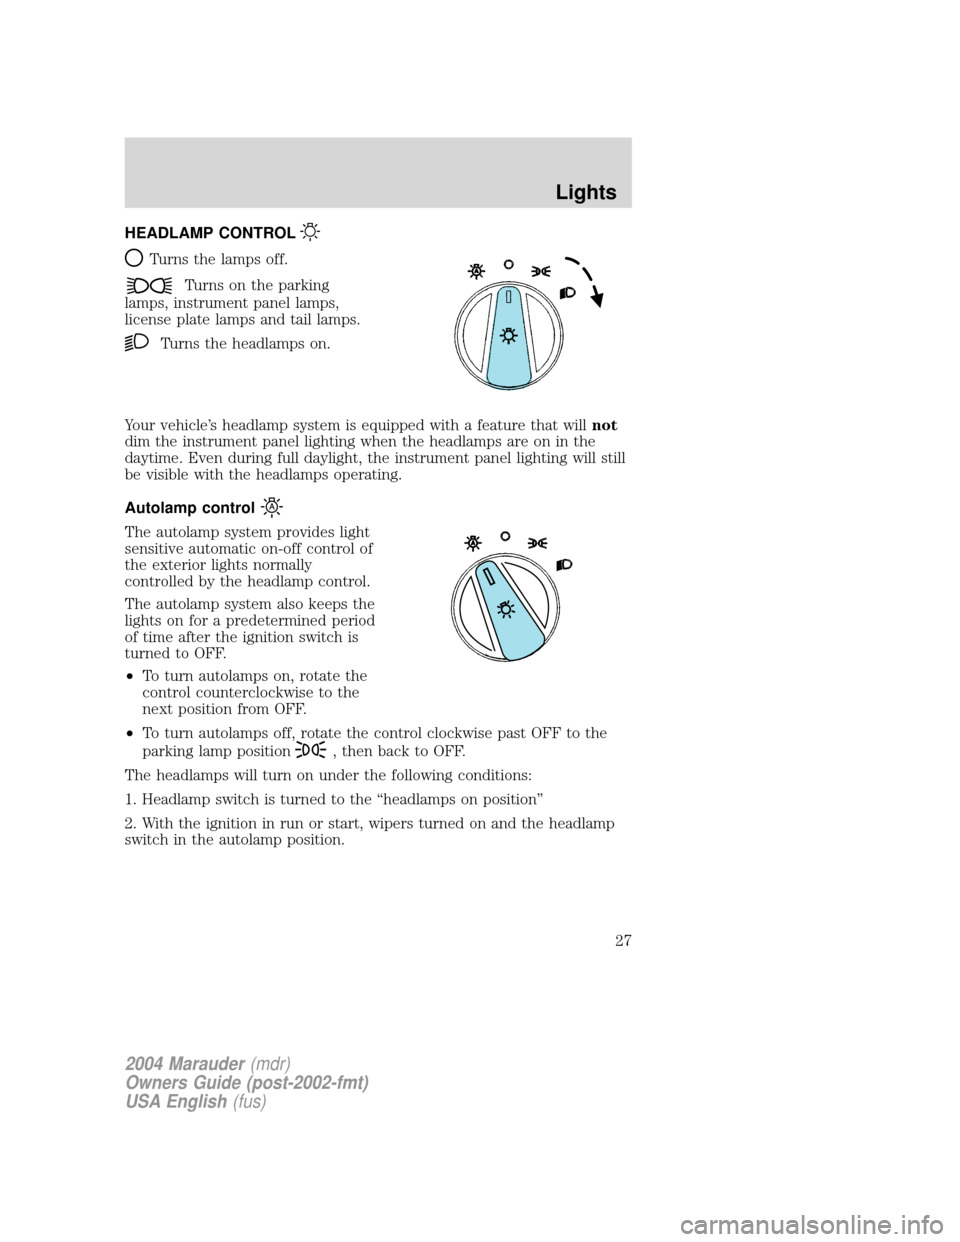
HEADLAMP CONTROL
Turns the lamps off.
Turns on the parking
lamps, instrument panel lamps,
license plate lamps and tail lamps.
Turns the headlamps on.
Your vehicle's headlamp system is equipped with a feature that willnot
dim the instrument panel lighting when the headlamps are on in the
daytime. Even during full daylight, the instrument panel lighting will still
be visible with the headlamps operating.
Autolamp control
The autolamp system provides light
sensitive automatic on-off control of
the exterior lights normally
controlled by the headlamp control.
The autolamp system also keeps the
lights on for a predetermined period
of time after the ignition switch is
turned to OFF.
²To turn autolamps on, rotate the
control counterclockwise to the
next position from OFF.
²To turn autolamps off, rotate the control clockwise past OFF to the
parking lamp position
, then back to OFF.
The headlamps will turn on under the following conditions:
1. Headlamp switch is turned to the ªheadlamps on positionº
2. With the ignition in run or start, wipers turned on and the headlamp
switch in the autolamp position.
2004 Marauder(mdr)
Owners Guide (post-2002-fmt)
USA English(fus)
Lights
Lights
27
Page 28 of 224
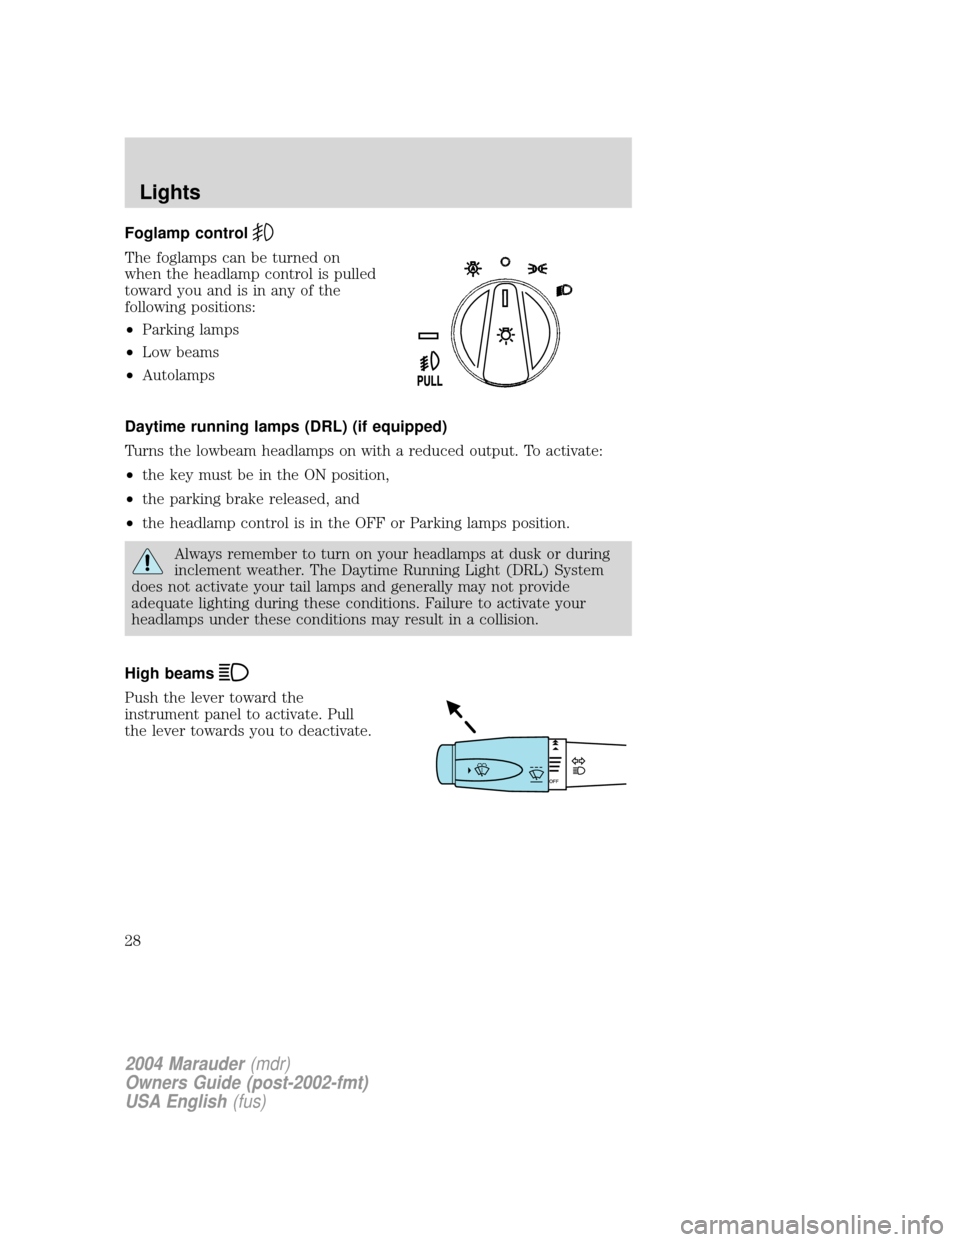
Foglamp control
The foglamps can be turned on
when the headlamp control is pulled
toward you and is in any of the
following positions:
²Parking lamps
²Low beams
²Autolamps
Daytime running lamps (DRL) (if equipped)
Turns the lowbeam headlamps on with a reduced output. To activate:
²the key must be in the ON position,
²the parking brake released, and
²the headlamp control is in the OFF or Parking lamps position.
Always remember to turn on your headlamps at dusk or during
inclement weather. The Daytime Running Light (DRL) System
does not activate your tail lamps and generally may not provide
adequate lighting during these conditions. Failure to activate your
headlamps under these conditions may result in a collision.
High beams
Push the lever toward the
instrument panel to activate. Pull
the lever towards you to deactivate.
2004 Marauder(mdr)
Owners Guide (post-2002-fmt)
USA English(fus)
Lights
28
Page 29 of 224
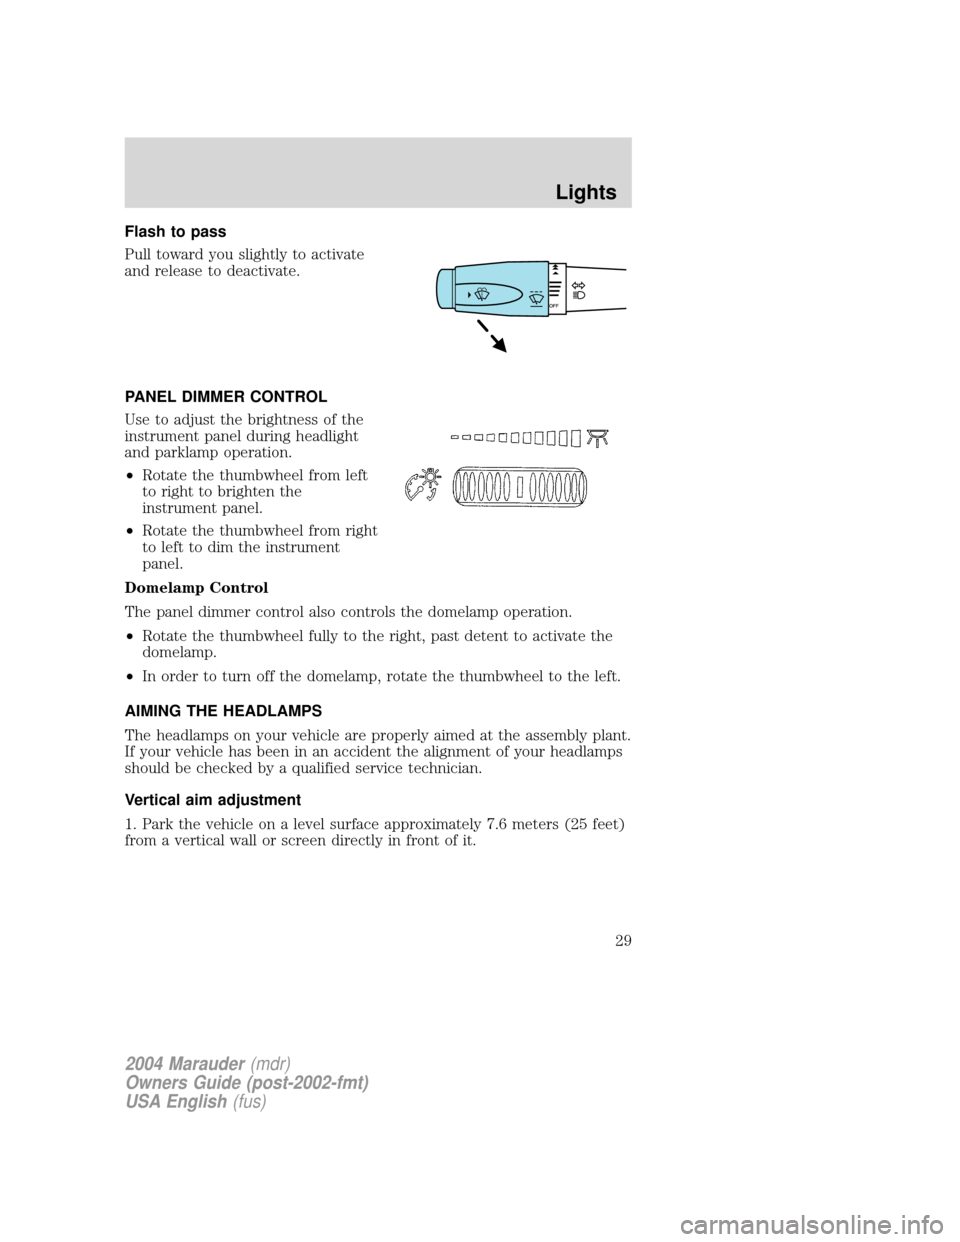
Flash to pass
Pull toward you slightly to activate
and release to deactivate.
PANEL DIMMER CONTROL
Use to adjust the brightness of the
instrument panel during headlight
and parklamp operation.
²Rotate the thumbwheel from left
to right to brighten the
instrument panel.
²Rotate the thumbwheel from right
to left to dim the instrument
panel.
Domelamp Control
The panel dimmer control also controls the domelamp operation.
²Rotate the thumbwheel fully to the right, past detent to activate the
domelamp.
²In order to turn off the domelamp, rotate the thumbwheel to the left.
AIMING THE HEADLAMPS
The headlamps on your vehicle are properly aimed at the assembly plant.
If your vehicle has been in an accident the alignment of your headlamps
should be checked by a qualified service technician.
Vertical aim adjustment
1. Park the vehicle on a level surface approximately 7.6 meters (25 feet)
from a vertical wall or screen directly in front of it.
2004 Marauder(mdr)
Owners Guide (post-2002-fmt)
USA English(fus)
Lights
29
Page 30 of 224
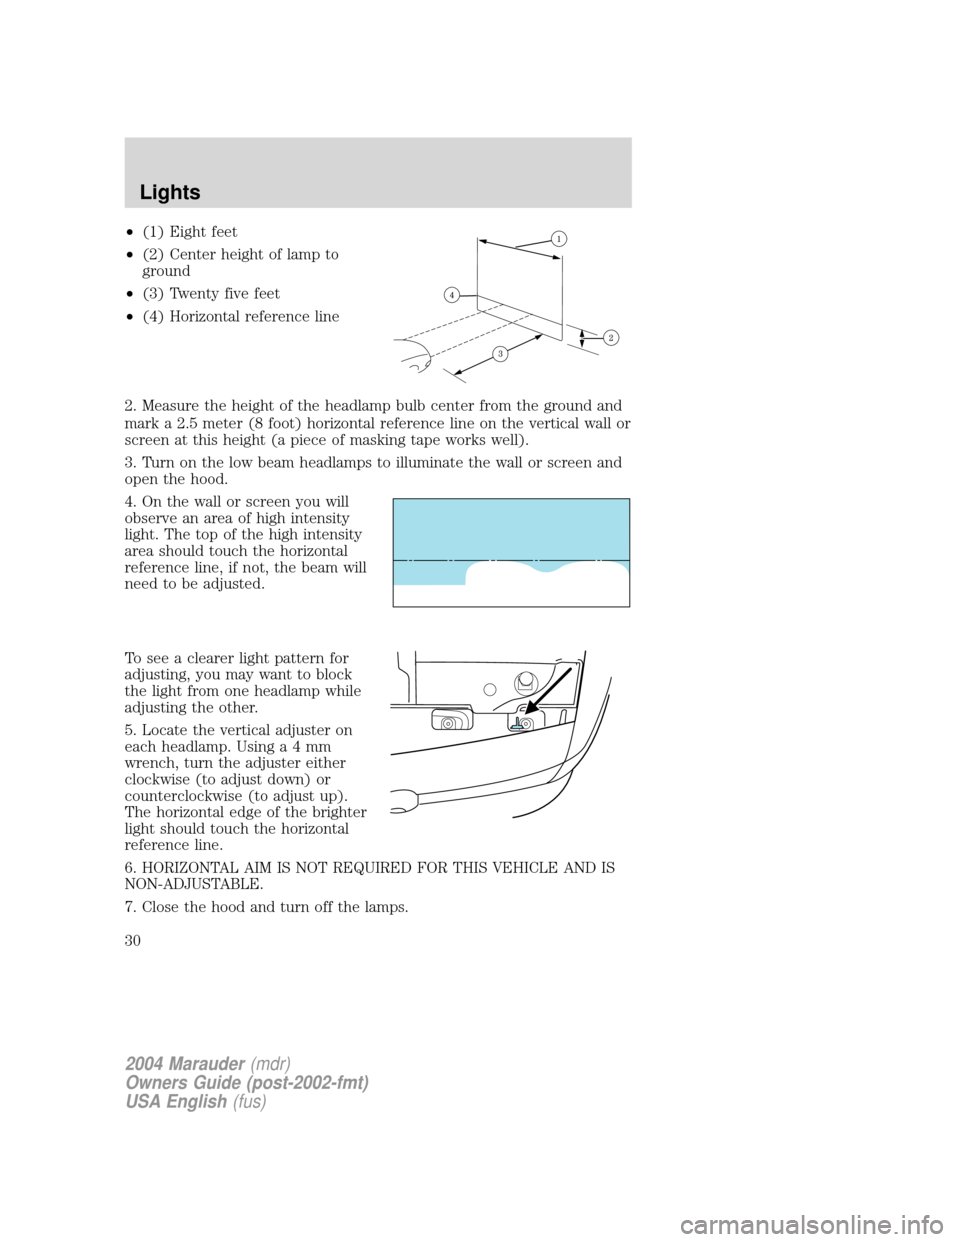
²(1) Eight feet
²(2) Center height of lamp to
ground
²(3) Twenty five feet
²(4) Horizontal reference line
2. Measure the height of the headlamp bulb center from the ground and
mark a 2.5 meter (8 foot) horizontal reference line on the vertical wall or
screen at this height (a piece of masking tape works well).
3. Turn on the low beam headlamps to illuminate the wall or screen and
open the hood.
4. On the wall or screen you will
observe an area of high intensity
light. The top of the high intensity
area should touch the horizontal
reference line, if not, the beam will
need to be adjusted.
To see a clearer light pattern for
adjusting, you may want to block
the light from one headlamp while
adjusting the other.
5. Locate the vertical adjuster on
each headlamp. Usinga4mm
wrench, turn the adjuster either
clockwise (to adjust down) or
counterclockwise (to adjust up).
The horizontal edge of the brighter
light should touch the horizontal
reference line.
6. HORIZONTAL AIM IS NOT REQUIRED FOR THIS VEHICLE AND IS
NON-ADJUSTABLE.
7. Close the hood and turn off the lamps.
2004 Marauder(mdr)
Owners Guide (post-2002-fmt)
USA English(fus)
Lights
30
Page 31 of 224
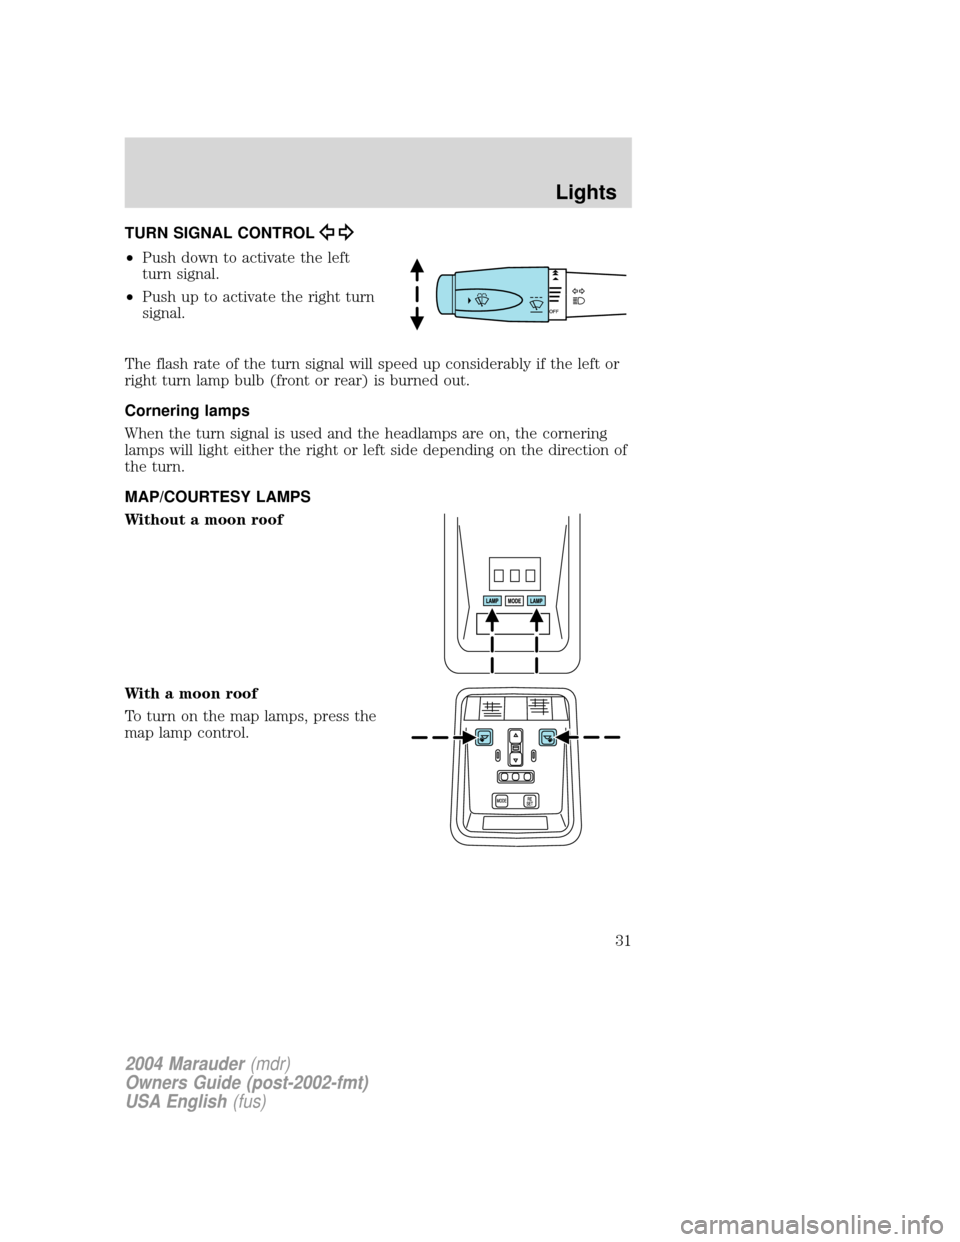
TURN SIGNAL CONTROL
²Push down to activate the left
turn signal.
²Push up to activate the right turn
signal.
The flash rate of the turn signal will speed up considerably if the left or
right turn lamp bulb (front or rear) is burned out.
Cornering lamps
When the turn signal is used and the headlamps are on, the cornering
lamps will light either the right or left side depending on the direction of
the turn.
MAP/COURTESY LAMPS
Without a moon roof
With a moon roof
To turn on the map lamps, press the
map lamp control.
2004 Marauder(mdr)
Owners Guide (post-2002-fmt)
USA English(fus)
Lights
31
Page 32 of 224
BULBS
Replacing exterior bulbs
Check the operation of all the bulbs frequently.
Using the right bulbs
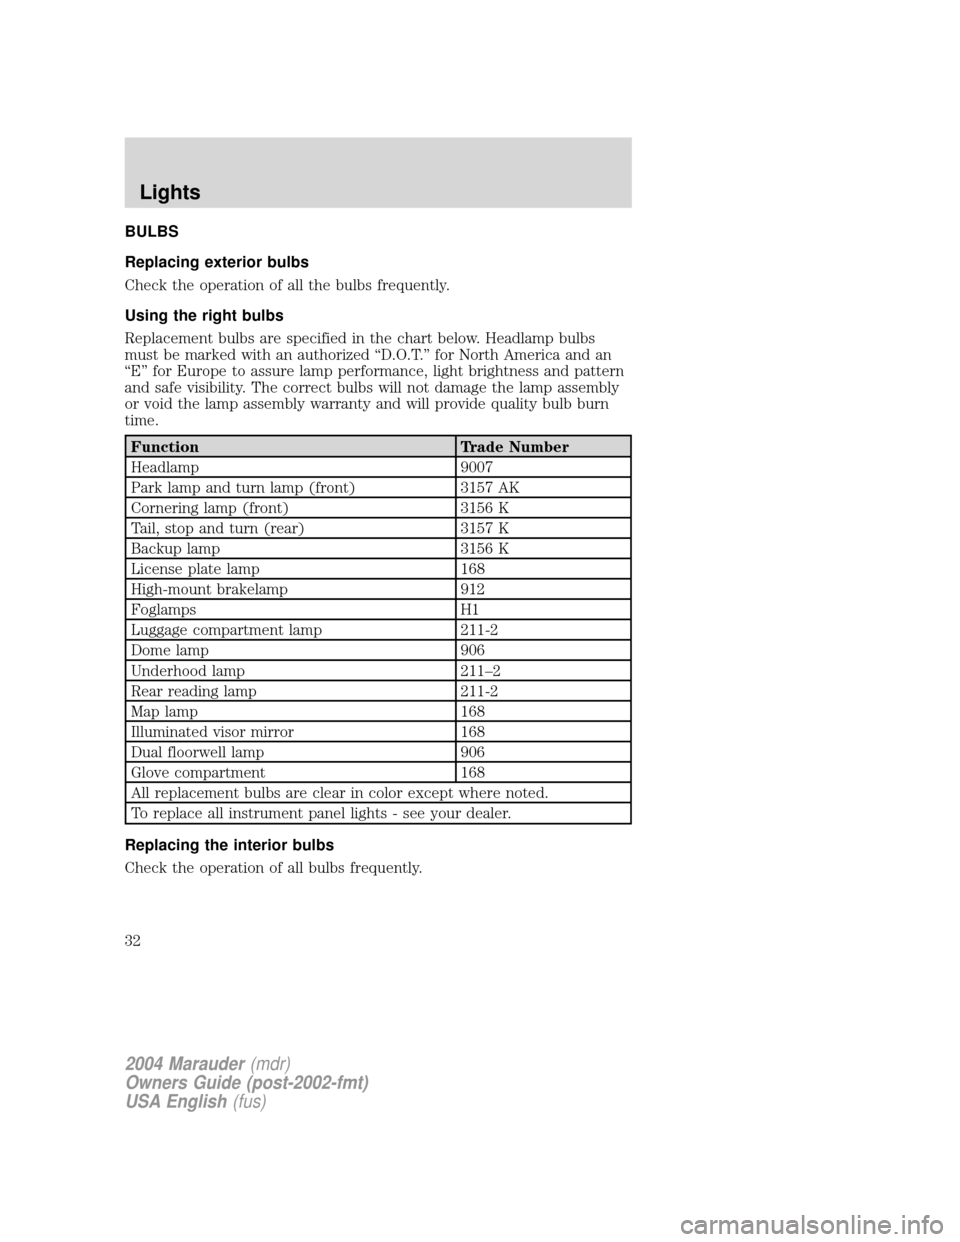
Replacement bulbs are specified in the chart below. Headlamp bulbs
must be marked with an authorized ªD.O.T.º for North America and an
ªEº for Europe to assure lamp performance, light brightness and pattern
and safe visibility. The correct bulbs will not damage the lamp assembly
or void the lamp assembly warranty and will provide quality bulb burn
time.
Function Trade Number
Headlamp 9007
Park lamp and turn lamp (front) 3157 AK
Cornering lamp (front) 3156 K
Tail, stop and turn (rear) 3157 K
Backup lamp 3156 K
License plate lamp 168
High-mount brakelamp 912
Foglamps H1
Luggage compartment lamp 211-2
Dome lamp 906
Underhood lamp 211±2
Rear reading lamp 211-2
Map lamp 168
Illuminated visor mirror 168
Dual floorwell lamp 906
Glove compartment 168
All replacement bulbs are clear in color except where noted.
To replace all instrument panel lights - see your dealer.
Replacing the interior bulbs
Check the operation of all bulbs frequently.
2004 Marauder(mdr)
Owners Guide (post-2002-fmt)
USA English(fus)
Lights
32