ground Mercury Mariner 2010 s User Guide
[x] Cancel search | Manufacturer: MERCURY, Model Year: 2010, Model line: Mariner, Model: Mercury Mariner 2010Pages: 339, PDF Size: 2.71 MB
Page 237 of 339

Driving off-road with truck and utility vehicles
4WD vehicles are specially equipped for driving on sand, snow, mud and
rough terrain and have operating characteristics that are somewhat
different from conventional vehicles, both on and off the road.
How your vehicle differs from other vehicles
Truck and utility vehicles can differ from some other vehicles. Your
vehicle may be higher to allow it to travel over rough terrain without
getting hung up or damaging underbody components.
The differences that make your vehicle so versatile also make it handle
differently than an ordinary passenger car.
Maintain steering wheel control at all times, especially in rough terrain.
Since sudden changes in terrain can result in abrupt steering wheel
motion, make sure you grip the steering wheel from the outside. Do not
grip the spokes.
Drive cautiously to avoid vehicle damage from concealed objects such as
rocks and stumps.
You should either know the terrain or examine maps of the area before
driving. Map out your route before driving in the area. To maintain
steering and braking control of your vehicle, you must have all four
wheels on the ground and they must be rolling, not sliding or spinning.
Basic operating principles
•Drive slower in strong crosswinds which can affect the normal steering
characteristics of your vehicle.
•Be extremely careful when driving on pavement made slippery by
loose sand, water, gravel, snow or ice.
If your vehicle goes off the edge of the pavement
•If your vehicle goes off the edge of the pavement, slow down, but
avoid severe brake application, ease the vehicle back onto the
pavement only after reducing your speed. Do not turn the steering
wheel too sharply while returning to the road surface.
•It may be safer to stay on the apron or shoulder of the road and slow
down gradually before returning to the pavement. You may lose
control if you do not slow down or if you turn the steering wheel too
sharply or abruptly.
Driving
237
2010 Mariner(mrn)
Owners Guide, 2nd Printing
USA(fus)
Page 255 of 339

Use of one of the dissimilar spare tires listed above at any one wheel
location can lead to impairment of the following:
•Handling, stability and braking performance
•Comfort and noise
•Ground clearance and parking at curbs
•Winter weather driving capability
•Wet weather driving capability
3.Full-size dissimilar spare without label on wheel
When driving with the full-size dissimilar spare tire/wheel,do not:
•Exceed 70 mph (113 km/h)
•Use more than one dissimilar spare tire/wheel at a time
•Use commercial car washing equipment
•Use snow chains on the end of the vehicle with the dissimilar spare
tire/wheel
The usage of a full-size dissimilar spare tire/wheel can lead to
impairment of the following:
•Handling, stability and braking performance
•Comfort and noise
•Ground clearance and parking at curbs
•Winter weather driving capability
•Wet weather driving capability
•All-Wheel driving capability (if applicable)
•Load leveling adjustment (if applicable)
When driving with the full-size dissimilar spare tire/wheel additional
caution should be given to:
•Towing a trailer
•Driving vehicles equipped with a camper body
•Driving vehicles with a load on the cargo rack
Drive cautiously when using a full-size dissimilar spare tire/wheel and
seek service as soon as possible.
Roadside Emergencies
255
2010 Mariner(mrn)
Owners Guide, 2nd Printing
USA(fus)
Page 258 of 339

5. Use the lug wrench to remove the
lug nut from the spare tire tether.
6. If not replacing the spare or flat
tire to the underbody storage area,
raise winch up into the installed
position.
7. Use the attached fastener strap
(2) to tie the tether end to the
winch actuator shaft (if equipped).
Tire change procedure
WARNING:When one of the front wheels is off the ground, the
transmission alone will not prevent the vehicle from moving or
slipping off the jack, even if the vehicle is in P (Park).
WARNING:To help prevent the vehicle from moving when you
change a tire, be sure the parking brake is set, then block (in
both directions) the wheel that is diagonally opposite (other side and
end of the vehicle) to the tire being changed.
WARNING:If the vehicle slips off the jack, you or someone else
could be seriously injured.
Roadside Emergencies
258
2010 Mariner(mrn)
Owners Guide, 2nd Printing
USA(fus)
Page 259 of 339

WARNING:Do not attempt to change a tire on the side of the
vehicle close to moving traffic. Pull far enough off the road to
avoid the danger of being hit when operating the jack or changing the
wheel.
Note:Passengers should not remain in the vehicle when the vehicle is
being jacked.
1. Block the diagonally opposite
wheel.
2. Loosen each wheel lug nut
one-half turn counterclockwise but
do not remove them until the wheel
is raised off the ground.
Roadside Emergencies
259
2010 Mariner(mrn)
Owners Guide, 2nd Printing
USA(fus)
Page 261 of 339

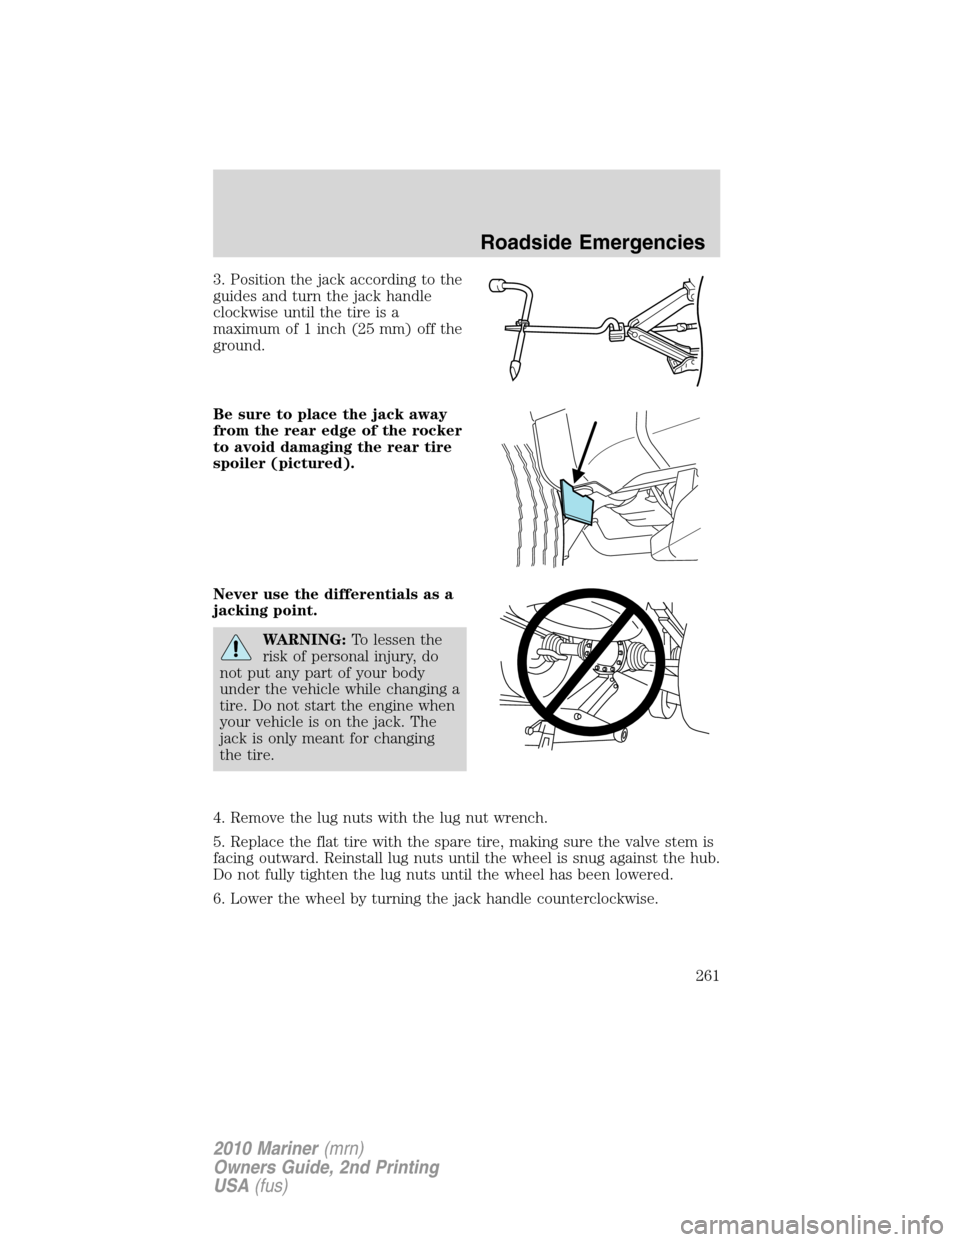
3. Position the jack according to the
guides and turn the jack handle
clockwise until the tire is a
maximum of 1 inch (25 mm) off the
ground.
Be sure to place the jack away
from the rear edge of the rocker
to avoid damaging the rear tire
spoiler (pictured).
Never use the differentials as a
jacking point.
WARNING:To lessen the
risk of personal injury, do
not put any part of your body
under the vehicle while changing a
tire. Do not start the engine when
your vehicle is on the jack. The
jack is only meant for changing
the tire.
4. Remove the lug nuts with the lug nut wrench.
5. Replace the flat tire with the spare tire, making sure the valve stem is
facing outward. Reinstall lug nuts until the wheel is snug against the hub.
Do not fully tighten the lug nuts until the wheel has been lowered.
6. Lower the wheel by turning the jack handle counterclockwise.
Roadside Emergencies
261
2010 Mariner(mrn)
Owners Guide, 2nd Printing
USA(fus)
Page 263 of 339

1. Place tire on end with valve stem
facing rearward, away from vehicle.
2. Place tether into bolt holes in
wheel and attach lug nut using lug
wrench.
3. Lay the tire on the ground with the valve stem facing down. If your
vehicle is equipped with aluminum wheels, remove the wheel ornament.
4. Slide the wheel partially under the vehicle and install the retainer
through the center of the wheel.
5. Turn the jack handle clockwise until the tire is raised to its original
position underneath the vehicle. The effort to turn the jack handle
increases significantly as the tire contacts the frame. The spare tire
carrier will ratchet when the tire is in the fully stowed position. The
spare tire carrier has a built-in ratchet feature that will not allow you to
overtighten. If the spare tire carrier ratchets with very little effort, take
the vehicle to your authorized dealer for assistance at your earliest
convenience.If your vehicle is equipped with a trailer hitch, guide
the tire with one hand; keep the rear of the tire tilted down until
the tire clears the bumper.
6. Check that the tire lies flat against the frame assembly. Push against
the tire to make sure it is tightly seated under the vehicle. Loosen and
retighten, if necessary. Failure to properly stow the spare tire may result
in failure of the winch cable and loss of the spare tire.(Make sure that
the tire does not contact the bumper.)
7. Repeat this tightness check procedure (every six months, per
scheduled maintenance information),when servicing the spare tire
pressure or at any time that the spare tire is disturbed through service of
other components.
WHEEL LUG NUT TORQUE SPECIFICATIONS
Retighten the lug nuts to the specified torque at 500 miles (800 km)
after any wheel disturbance (tire rotation, changing a flat tire, wheel
removal, etc.).
Roadside Emergencies
263
2010 Mariner(mrn)
Owners Guide, 2nd Printing
USA(fus)
Page 265 of 339

WARNING:Do not insert the nozzle of portable fuel containers
or aftermarket funnels into the Easy Fuel™ system. This could
damage the fuel system and its seal, and may cause fuel to run onto
the ground instead of filling the tank, all of which could result in
serious personal injury.
JUMP STARTING
WARNING:The gases around the battery can explode if
exposed to flames, sparks, or lit cigarettes. An explosion could
result in injury or vehicle damage.
WARNING:Batteries contain sulfuric acid which can burn skin,
eyes and clothing, if contacted.
Do not attempt to push-start your automatic transmission
vehicle. Automatic transmissions do not have push-start
capability. Attempting to push-start a vehicle with an automatic
transmission may cause transmission damage.
Preparing your vehicle
When the battery is disconnected or a new battery is installed, the
automatic transmission must relearn its shift strategy. As a result, the
transmission may have firm and/or soft shifts. This operation is
considered normal and will not affect function or durability of the
transmission. Over time, the adaptive learning process will fully update
transmission operation.
1.Use only a 12–volt supply to start your vehicle.
2. Do not disconnect the battery of the disabled vehicle as this could
damage the vehicle’s electrical system.
3. Park the booster vehicle close to the hood of the disabled vehicle
making sure the two vehiclesdo nottouch. Set the parking brake on
both vehicles and stay clear of the engine cooling fan and other moving
parts.
4. Check all battery terminals and remove any excessive corrosion before
you attach the battery cables. Ensure that vent caps are tight and level.
5. Turn the heater fan on in both vehicles to protect from any electrical
surges. Turn all other accessories off.
Roadside Emergencies
265
2010 Mariner(mrn)
Owners Guide, 2nd Printing
USA(fus)
Page 267 of 339

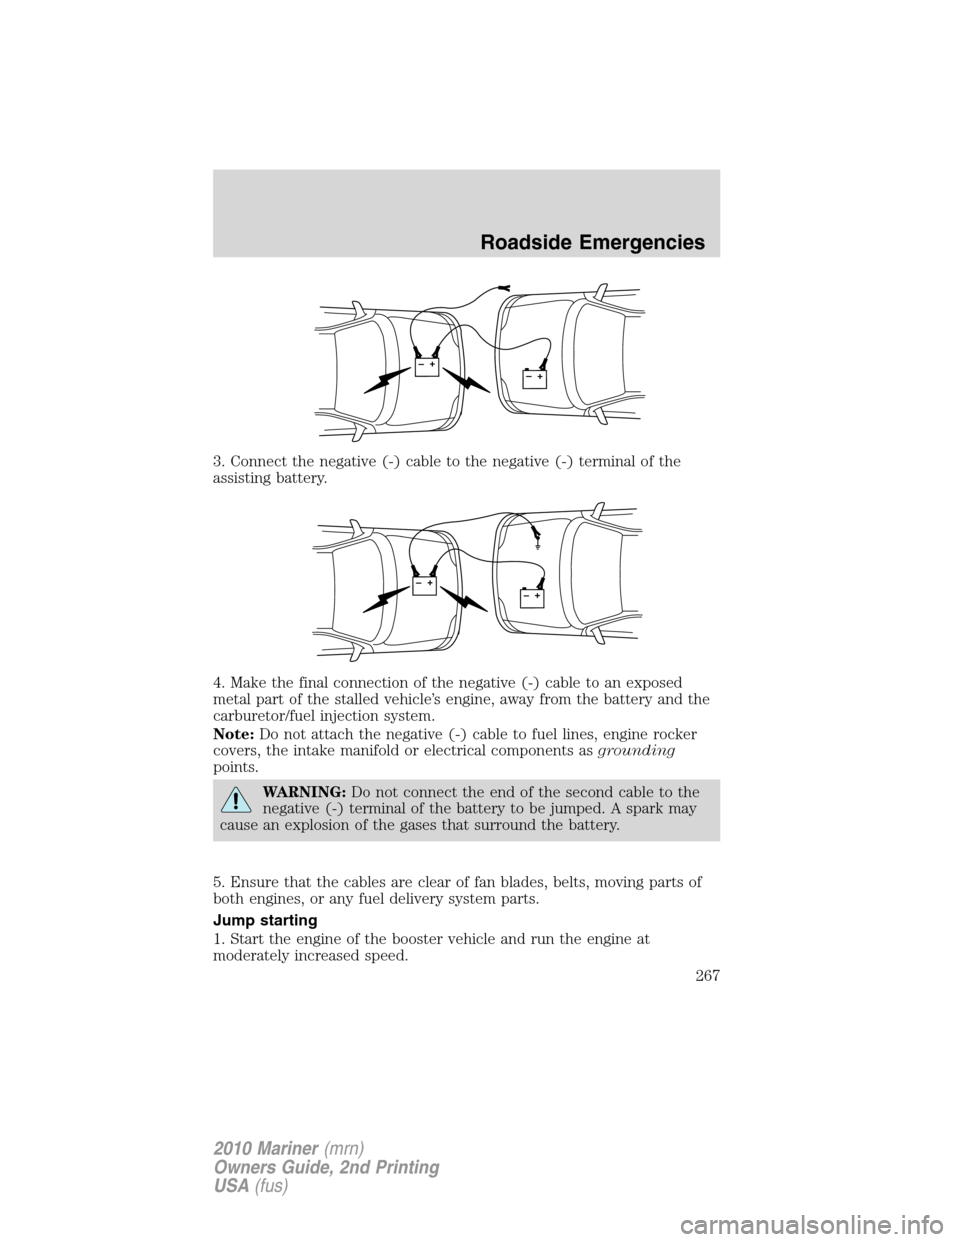
3. Connect the negative (-) cable to the negative (-) terminal of the
assisting battery.
4. Make the final connection of the negative (-) cable to an exposed
metal part of the stalled vehicle’s engine, away from the battery and the
carburetor/fuel injection system.
Note:Do not attach the negative (-) cable to fuel lines, engine rocker
covers, the intake manifold or electrical components asgrounding
points.
WARNING:Do not connect the end of the second cable to the
negative (-) terminal of the battery to be jumped. A spark may
cause an explosion of the gases that surround the battery.
5. Ensure that the cables are clear of fan blades, belts, moving parts of
both engines, or any fuel delivery system parts.
Jump starting
1. Start the engine of the booster vehicle and run the engine at
moderately increased speed.
+–+–
+–+–
Roadside Emergencies
267
2010 Mariner(mrn)
Owners Guide, 2nd Printing
USA(fus)
Page 268 of 339

2. Start the engine of the disabled vehicle.
3. Once the disabled vehicle has been started, run both engines for an
additional three minutes before disconnecting the jumper cables.
Removing the jumper cables
Remove the jumper cables in the reverse order that they were
connected.
1. Remove the jumper cable from thegroundmetal surface.
Note:In the illustrations,lightning boltsare used to designate the
assisting (boosting) battery.
2. Remove the jumper cable on the negative (-) connection of the
booster vehicle’s battery.
+–+–
+–+–
Roadside Emergencies
268
2010 Mariner(mrn)
Owners Guide, 2nd Printing
USA(fus)
Page 270 of 339

WRECKER TOWING
If you need to have your vehicle towed, contact a professional towing
service or, if you are a member of a roadside assistance program, your
roadside assistance service provider.
It is recommended that your vehicle be towed with a wheel lift and
dollies or flatbed equipment. Do not tow with a slingbelt. Ford Motor
Company has not approved a slingbelt towing procedure.
On FWD vehicles, if your vehicle is to be towed from the front, ensure
proper wheel lift equipment is used to raise the front wheels off the
ground. The rear wheels can be left on the ground when towed in this
fashion.
If your vehicle is to be towed from the rear using wheel lift equipment, it
isrequiredthat the front wheels (drive wheels) be placed on a dolly to
prevent damage to the transmission.
On 4WD vehicles, it isrequiredthat your vehicle be towed with a wheel
lift and dollies or flatbed equipment with all the wheels off the ground to
prevent damage to the automatic transmission, 4WD system or vehicle.
Roadside Emergencies
270
2010 Mariner(mrn)
Owners Guide, 2nd Printing
USA(fus)