specifications Mercury Milan 2008 s User Guide
[x] Cancel search | Manufacturer: MERCURY, Model Year: 2008, Model line: Milan, Model: Mercury Milan 2008Pages: 304, PDF Size: 2.83 MB
Page 224 of 304
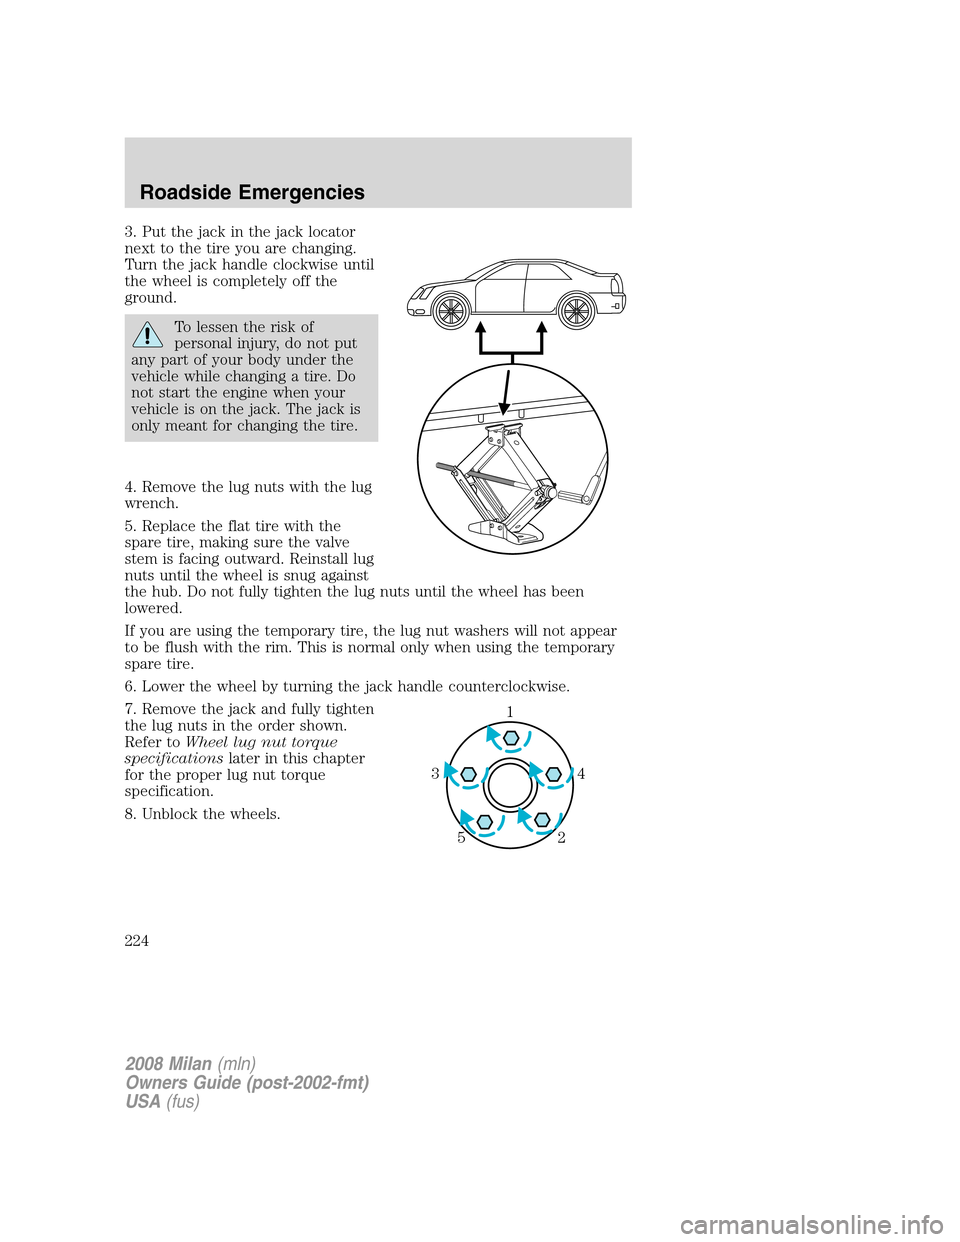
3. Put the jack in the jack locator
next to the tire you are changing.
Turn the jack handle clockwise until
the wheel is completely off the
ground.
To lessen the risk of
personal injury, do not put
any part of your body under the
vehicle while changing a tire. Do
not start the engine when your
vehicle is on the jack. The jack is
only meant for changing the tire.
4. Remove the lug nuts with the lug
wrench.
5. Replace the flat tire with the
spare tire, making sure the valve
stem is facing outward. Reinstall lug
nuts until the wheel is snug against
the hub. Do not fully tighten the lug nuts until the wheel has been
lowered.
If you are using the temporary tire, the lug nut washers will not appear
to be flush with the rim. This is normal only when using the temporary
spare tire.
6. Lower the wheel by turning the jack handle counterclockwise.
7. Remove the jack and fully tighten
the lug nuts in the order shown.
Refer toWheel lug nut torque
specificationslater in this chapter
for the proper lug nut torque
specification.
8. Unblock the wheels.
1
4 3
2 5
2008 Milan(mln)
Owners Guide (post-2002-fmt)
USA(fus)
Roadside Emergencies
224
Page 225 of 304
Stowing the wheel and jack
1. Fully collapse the jack and place it back in the storage area in the
trunk.
2. Replace the jack retention bolt to secure the jack.
3. Place the tire in the storage bin in the trunk.
4. Replace the cover plate and bolt.
•When storing a flat road tire, flip the cover plate over and use the long
bolt.
•When storing the temporary spare tire, replace the cover plate and
use the short bolt.
5. Secure the bolt using the lug wrench.
6. Insert the lug wrench and bolt in the tool bag and place over the jack.
7. Replace the carpeted load floor panel.
WHEEL LUG NUT TORQUE SPECIFICATIONS
Retighten the lug nuts to the specified torque at 500 miles (800 km)
after any wheel disturbance (tire rotation, changing a flat tire, wheel
removal, etc.).
Bolt size Wheel lug nut torque*
lb. ft. N•m
M12 x 1.5 100 135
* Torque specifications are for nut and bolt threads free of dirt and
rust. Use only Ford recommended replacement fasteners.
When a wheel is installed, always remove any corrosion, dirt or
foreign materials present on the mounting surfaces of the wheel
or the surface of the wheel hub, brake drum or brake disc that
contacts the wheel. Ensure that any fasteners that attach the rotor to
the hub are secured so they do not interfere with the mounting
surfaces of the wheel. Installing wheels without correct metal-to-metal
contact at the wheel mounting surfaces can cause the wheel nuts to
loosen and the wheel to come off while the vehicle is in motion,
resulting in loss of control.
2008 Milan(mln)
Owners Guide (post-2002-fmt)
USA(fus)
Roadside Emergencies
225
Page 246 of 304

Do not use cleaning solvents, bleach or dye on the vehicle’s
safety belts, as these actions may weaken the belt webbing.
Do not use chemical solvents or strong detergents when cleaning
the seat-mounted side airbag (vehicles equipped with
seat-mounted side airbags only). Such products could contaminate the
side airbag system and affect performance of the side airbag in a
collision.
LEATHER SEATS (IF EQUIPPED)
Your leather seating surfaces have a clear, protective coating over the
leather.
•To clean, use a soft cloth with Motorcraft Deluxe Leather and Vinyl
Cleaner (ZC-11-A). Dry the area with a soft cloth.
•To help maintain its resiliency and color, use the Motorcraft Deluxe
Leather Care Kit (ZC-11-D), available from your authorized dealer.
•Do not use household cleaning products, alcohol solutions, solvents or
cleaners intended for rubber, vinyl and plastics, or oil/petroleum-based
leather conditioners. These products may cause premature wearing of
the clear, protective coating.
Note:In some instances, color or dye transfer can occur when wet
clothing comes in contact with leather upholstery. If this occurs, the
leather should be cleaned immediately to avoid permanent staining.
UNDERBODY
Flush the complete underside of your vehicle frequently. Keep body and
door drain holes free from packed dirt.
FORD AND LINCOLN MERCURY CAR CARE PRODUCTS
Your Ford or Lincoln Mercury authorized dealer has many quality
products available to clean your vehicle and protect its finishes. These
quality products have been specifically engineered to fulfill your
automotive needs; they are custom designed to complement the style
and appearance of your vehicle. Each product is made from high quality
materials that meet or exceed rigid specifications. For best results, use
the following products or products of equivalent quality:
Motorcraft Bug and Tar Remover (ZC-42)
Motorcraft Car Wash (Canada only) (CXC-21)
2008 Milan(mln)
Owners Guide (post-2002-fmt)
USA(fus)
Cleaning
246
Page 248 of 304
SERVICE RECOMMENDATIONS
To help you service your vehicle, we providescheduled maintenance
informationwhich makes tracking routine service easy.
If your vehicle requires professional service, your authorized dealer can
provide the necessary parts and service. Check yourWarranty Guideto
find out which parts and services are covered.
Use only recommended fuels, lubricants, fluids and service parts
conforming to specifications. Motorcraft parts are designed and built to
provide the best performance in your vehicle.
PRECAUTIONS WHEN SERVICING YOUR VEHICLE
•Do not work on a hot engine.
•Make sure that nothing gets caught in moving parts.
•Do not work on a vehicle with the engine running in an enclosed
space, unless you are sure you have enough ventilation.
•Keep all open flames and other burning (cigarettes) material away
from the battery and all fuel related parts.
Working with the engine off
•Automatic transmission/transaxle:
1. Set the parking brake and shift to P (Park).
2. Turn off the engine and remove the key.
3. Block the wheels.
•Manual transmission/transaxle:
1. Set the parking brake, depress the clutch and place the gearshift in 1
(First).
2. Turn off the engine and remove the key.
3. Block the wheels.
Working with the engine on
•Automatic transmission:
1. Set the parking brake and shift to P (Park).
2. Block the wheels.
•Manual transmission:
1. Set the parking brake, depress the clutch and place the gearshift in N
(Neutral).
2008 Milan(mln)
Owners Guide (post-2002-fmt)
USA(fus)
Maintenance and Specifications
248
Page 249 of 304
2. Block the wheels.
To reduce the risk of vehicle damage and/or personal burn
injuries, do not start your engine with the air cleaner removed
and do not remove it while the engine is running.
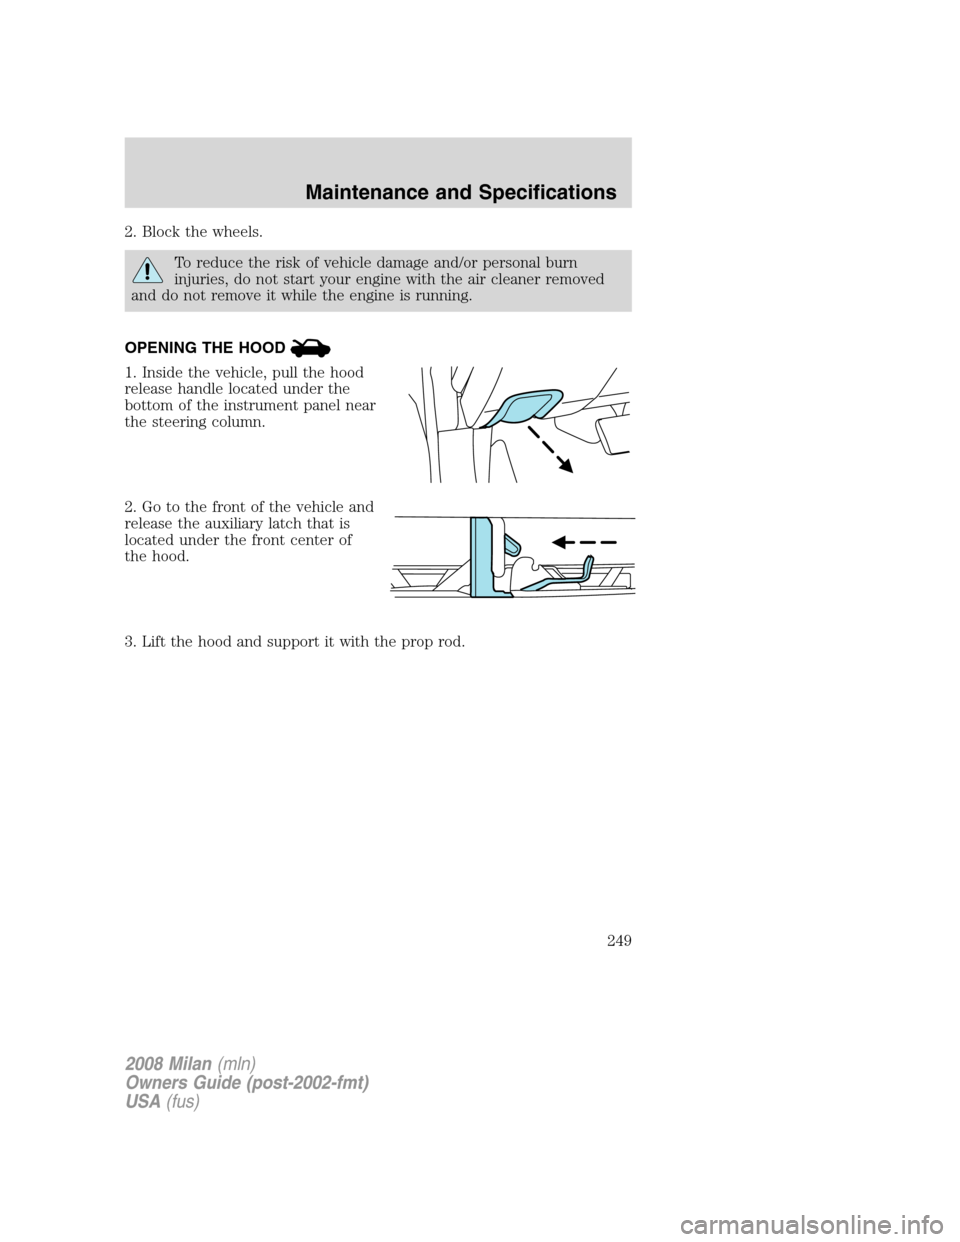
OPENING THE HOOD
1. Inside the vehicle, pull the hood
release handle located under the
bottom of the instrument panel near
the steering column.
2. Go to the front of the vehicle and
release the auxiliary latch that is
located under the front center of
the hood.
3. Lift the hood and support it with the prop rod.
2008 Milan(mln)
Owners Guide (post-2002-fmt)
USA(fus)
Maintenance and Specifications
249
Page 250 of 304
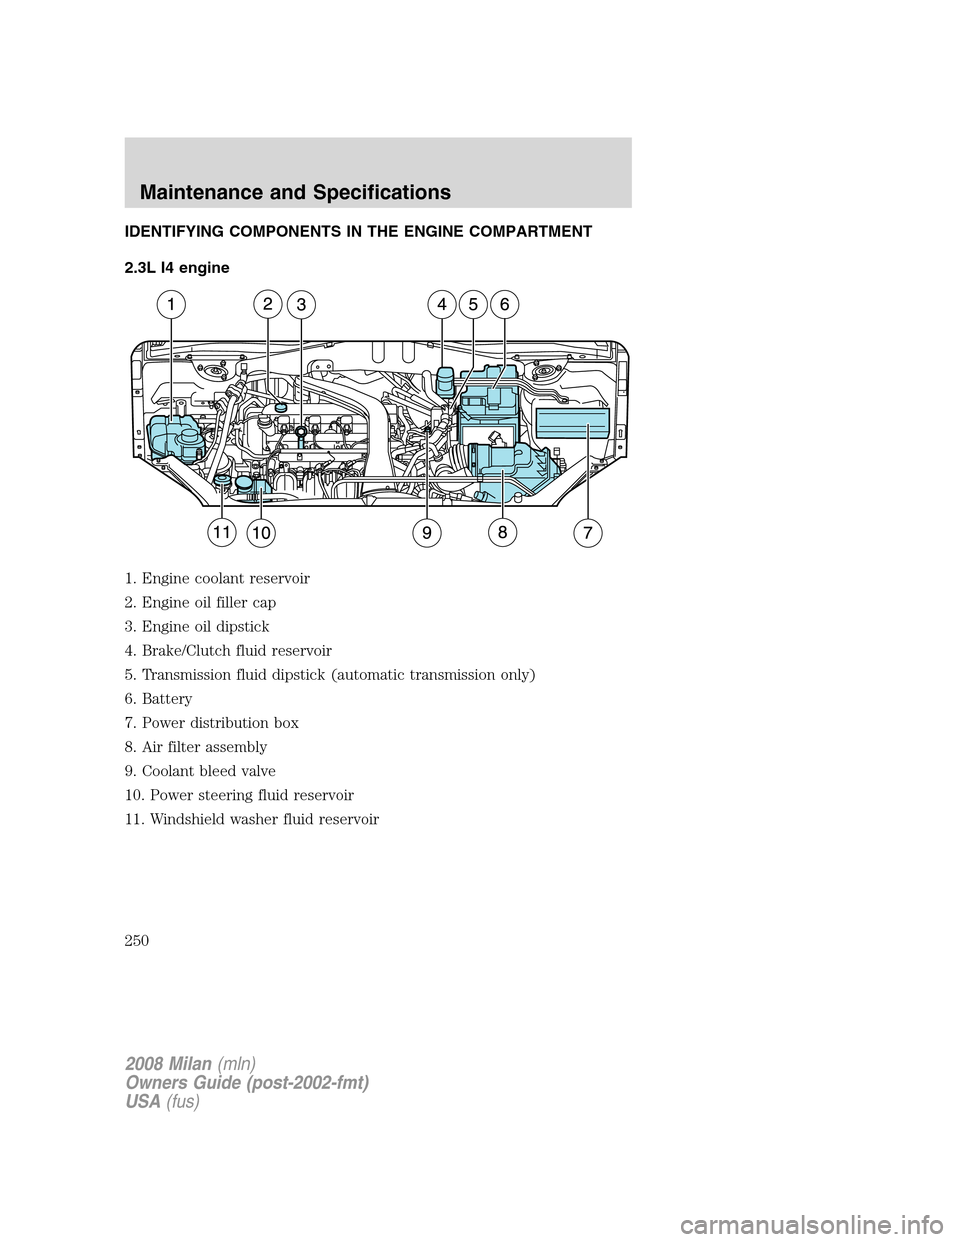
IDENTIFYING COMPONENTS IN THE ENGINE COMPARTMENT
2.3L I4 engine
1. Engine coolant reservoir
2. Engine oil filler cap
3. Engine oil dipstick
4. Brake/Clutch fluid reservoir
5. Transmission fluid dipstick (automatic transmission only)
6. Battery
7. Power distribution box
8. Air filter assembly
9. Coolant bleed valve
10. Power steering fluid reservoir
11. Windshield washer fluid reservoir
2008 Milan(mln)
Owners Guide (post-2002-fmt)
USA(fus)
Maintenance and Specifications
250
Page 251 of 304
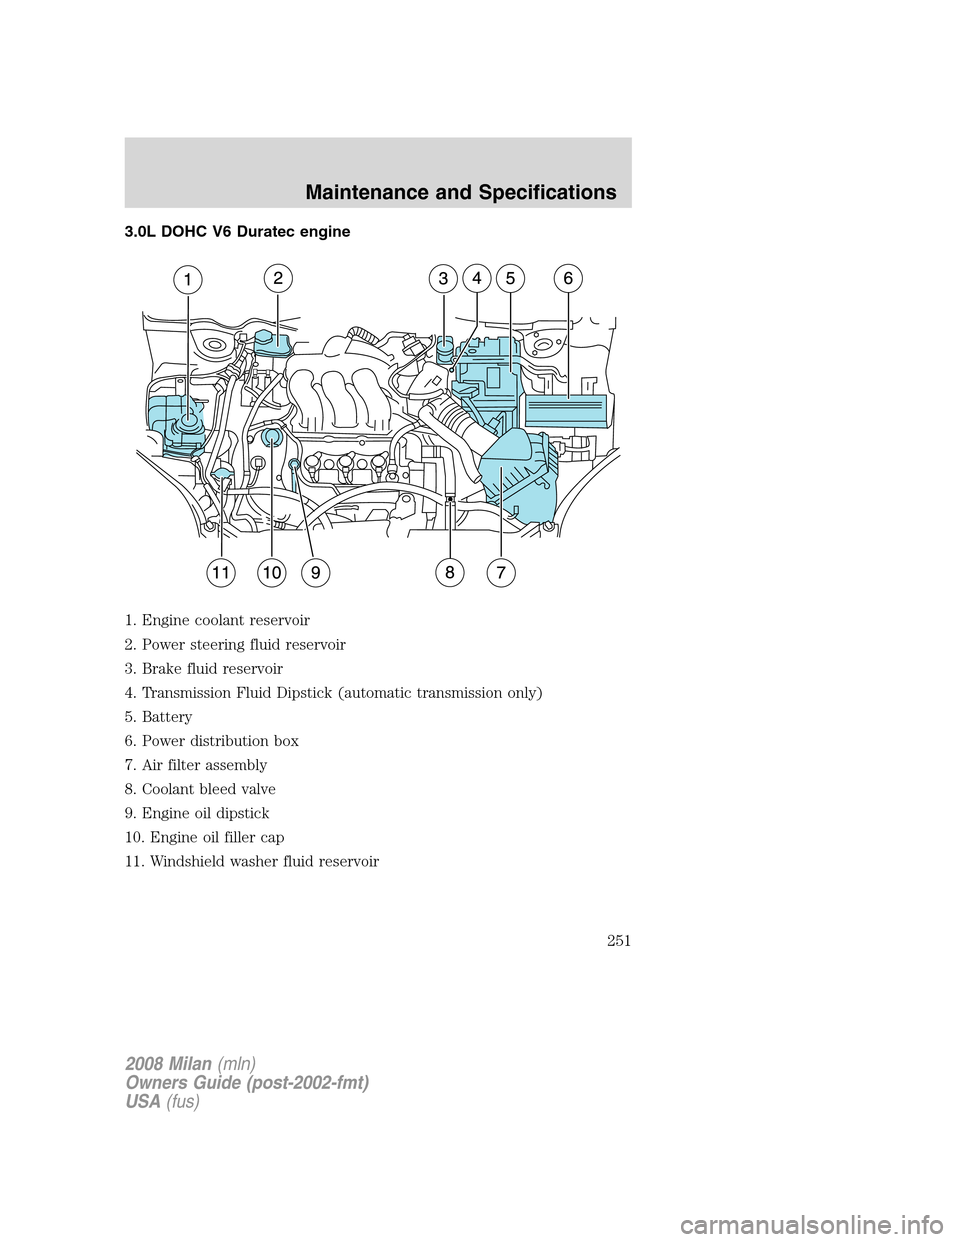
3.0L DOHC V6 Duratec engine
1. Engine coolant reservoir
2. Power steering fluid reservoir
3. Brake fluid reservoir
4. Transmission Fluid Dipstick (automatic transmission only)
5. Battery
6. Power distribution box
7. Air filter assembly
8. Coolant bleed valve
9. Engine oil dipstick
10. Engine oil filler cap
11. Windshield washer fluid reservoir
2008 Milan(mln)
Owners Guide (post-2002-fmt)
USA(fus)
Maintenance and Specifications
251
Page 252 of 304
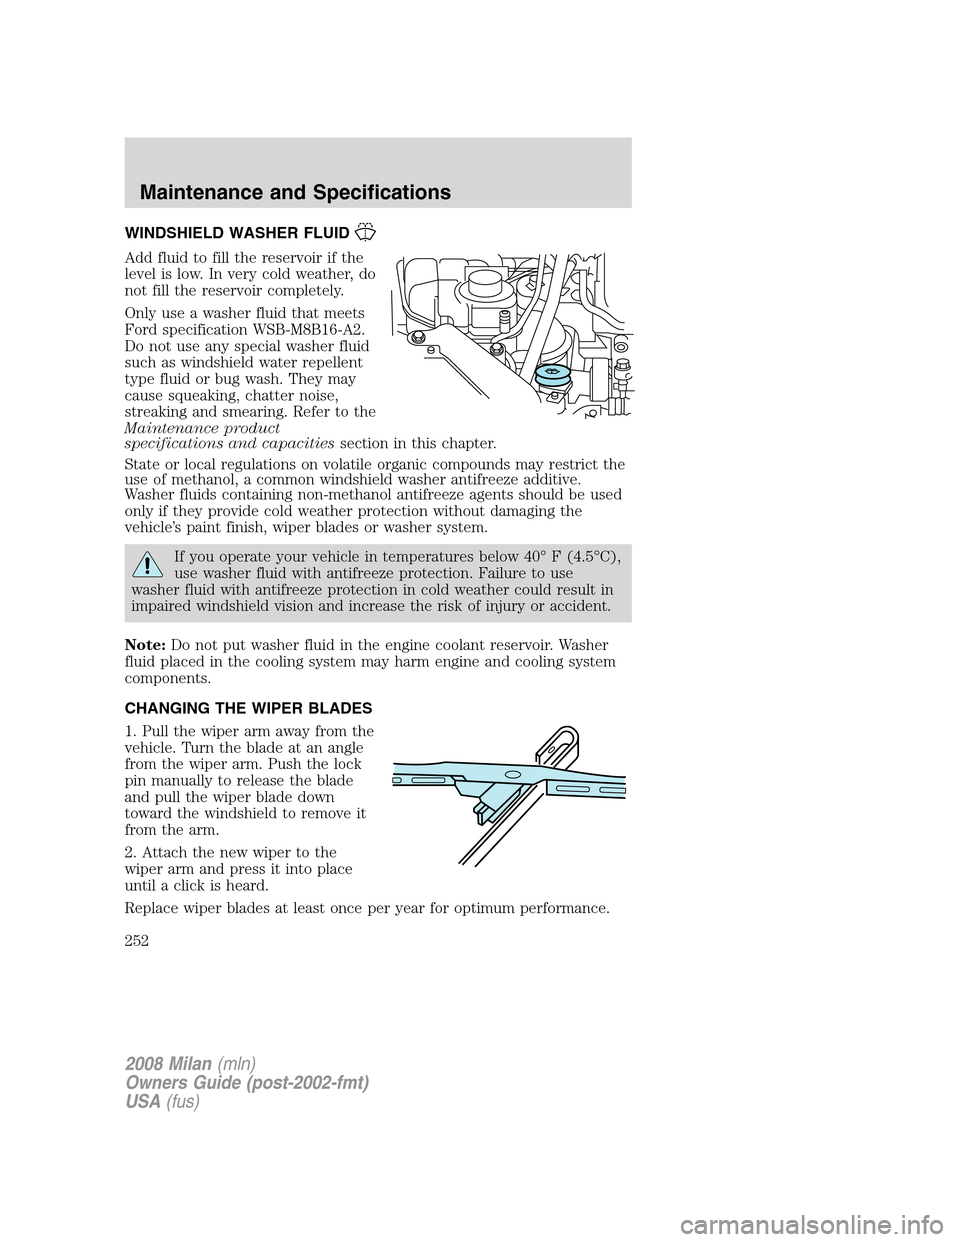
WINDSHIELD WASHER FLUID
Add fluid to fill the reservoir if the
level is low. In very cold weather, do
not fill the reservoir completely.
Only use a washer fluid that meets
Ford specification WSB-M8B16-A2.
Do not use any special washer fluid
such as windshield water repellent
type fluid or bug wash. They may
cause squeaking, chatter noise,
streaking and smearing. Refer to the
Maintenance product
specifications and capacitiessection in this chapter.
State or local regulations on volatile organic compounds may restrict the
use of methanol, a common windshield washer antifreeze additive.
Washer fluids containing non-methanol antifreeze agents should be used
only if they provide cold weather protection without damaging the
vehicle’s paint finish, wiper blades or washer system.
If you operate your vehicle in temperatures below 40° F (4.5°C),
use washer fluid with antifreeze protection. Failure to use
washer fluid with antifreeze protection in cold weather could result in
impaired windshield vision and increase the risk of injury or accident.
Note:Do not put washer fluid in the engine coolant reservoir. Washer
fluid placed in the cooling system may harm engine and cooling system
components.
CHANGING THE WIPER BLADES
1. Pull the wiper arm away from the
vehicle. Turn the blade at an angle
from the wiper arm. Push the lock
pin manually to release the blade
and pull the wiper blade down
toward the windshield to remove it
from the arm.
2. Attach the new wiper to the
wiper arm and press it into place
until a click is heard.
Replace wiper blades at least once per year for optimum performance.
2008 Milan(mln)
Owners Guide (post-2002-fmt)
USA(fus)
Maintenance and Specifications
252
Page 253 of 304
Poor wiper quality can be improved by cleaning the wiper blades and the
windshield, refer toWindows and wiper bladesin theCleaning
chapter.
To prolong the life of the wiper blades, it is highly recommended to
scrape off the ice on the windshield before turning on the wipers. The
layer of ice has many sharp edges and can damage the micro edge of the
wiper rubber element.
ENGINE OIL
Checking the engine oil
Refer to thescheduled maintenance informationfor the appropriate
intervals for checking the engine oil.
1. Make sure the vehicle is on level ground.
2. Turn the engine off and wait a few minutes for the oil to drain into the
oil pan.
3. Set the parking brake and ensure the gearshift is securely latched in P
(Park) (automatic transmissions) or 1 (First) (manual transmissions).
4. Open the hood. Protect yourself from engine heat.
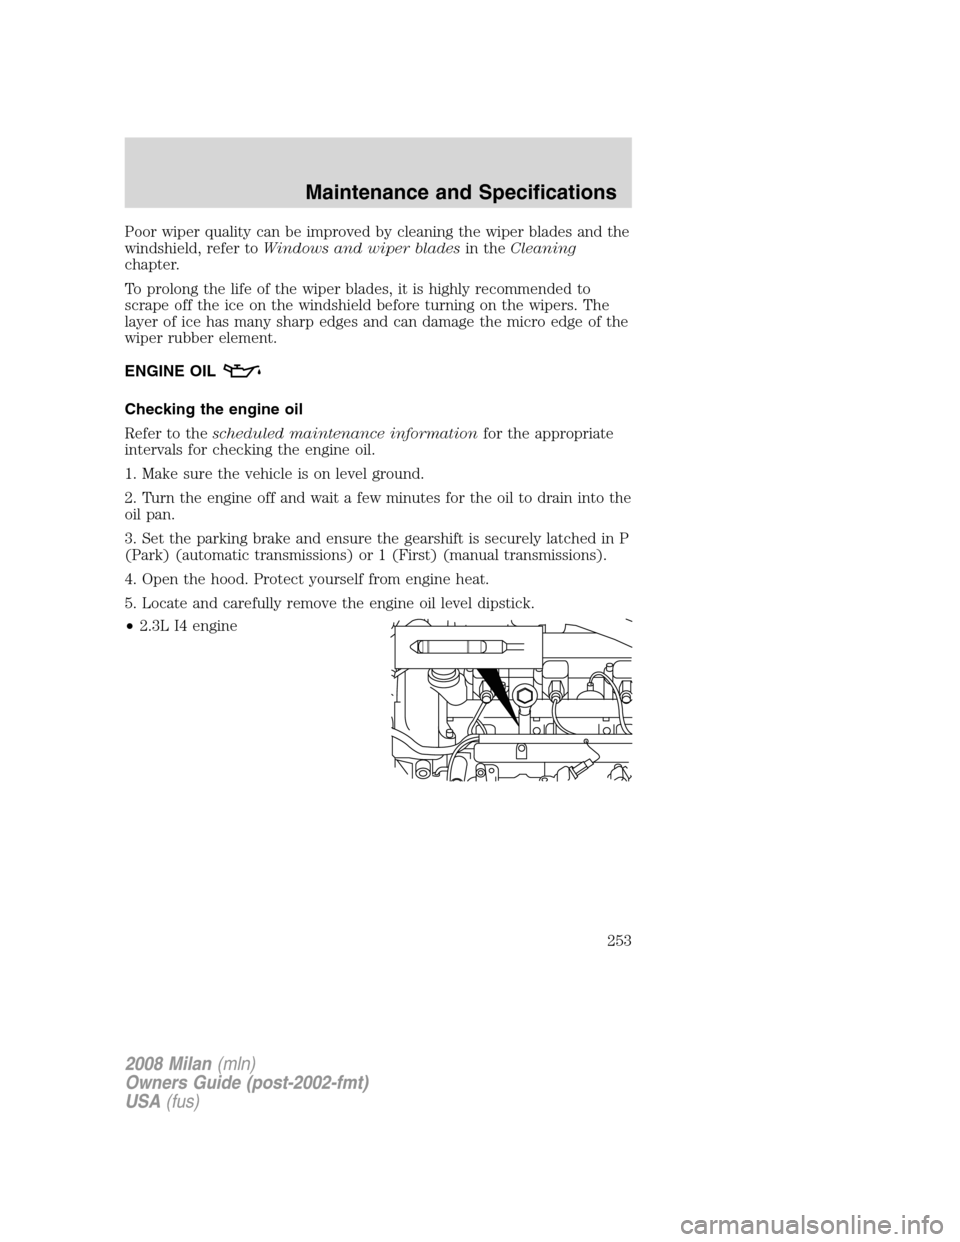
5. Locate and carefully remove the engine oil level dipstick.
•2.3L I4 engine
2008 Milan(mln)
Owners Guide (post-2002-fmt)
USA(fus)
Maintenance and Specifications
253
Page 254 of 304

•3.0L DOHC V6 Duratec engine
6. Wipe the dipstick clean. Insert the dipstick fully, then remove it again.
On 2.3L I4 engine, be sure the
notch in the dipstick flange is
aligned with the V on the engine
when reinserting it.
•2.3L I4 engine
•3.0L DOHC V6 Duratec engine
•If the oil level iswithin this range,the oil level is acceptable.DO
NOT ADD OIL.
2008 Milan(mln)
Owners Guide (post-2002-fmt)
USA(fus)
Maintenance and Specifications
254