Mercury Milan 2010 Owner's Manuals
Manufacturer: MERCURY, Model Year: 2010, Model line: Milan, Model: Mercury Milan 2010Pages: 330, PDF Size: 2.33 MB
Page 181 of 330

Information on “T” type tires
“T” type tires have some additional
information beyond those of “P”
type tires; these differences are
described below:
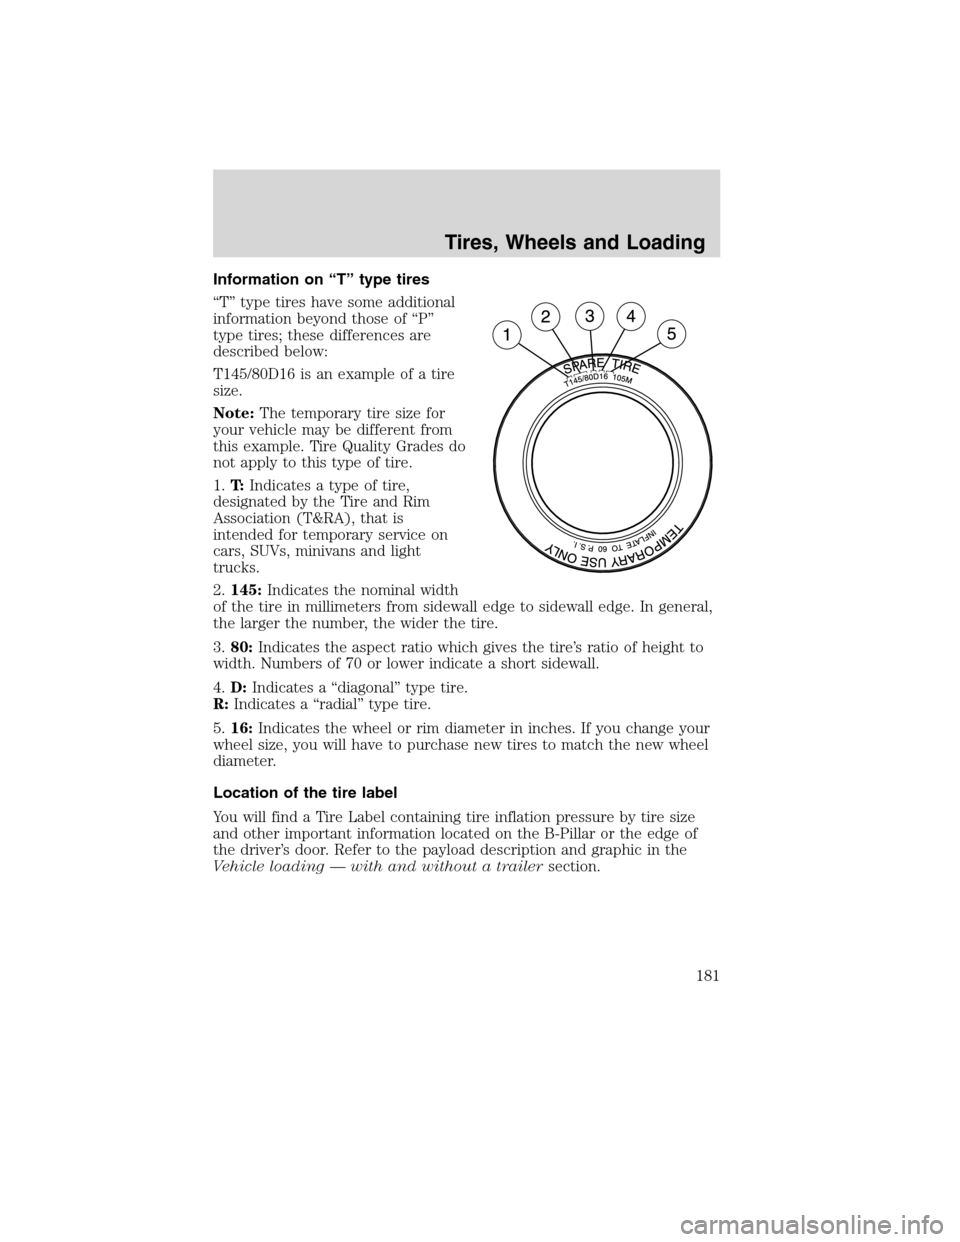
T145/80D16 is an example of a tire
size.
Note:The temporary tire size for
your vehicle may be different from
this example. Tire Quality Grades do
not apply to this type of tire.
1.T:Indicates a type of tire,
designated by the Tire and Rim
Association (T&RA), that is
intended for temporary service on
cars, SUVs, minivans and light
trucks.
2.145:Indicates the nominal width
of the tire in millimeters from sidewall edge to sidewall edge. In general,
the larger the number, the wider the tire.
3.80:Indicates the aspect ratio which gives the tire’s ratio of height to
width. Numbers of 70 or lower indicate a short sidewall.
4.D:Indicates a “diagonal” type tire.
R:Indicates a “radial” type tire.
5.16:Indicates the wheel or rim diameter in inches. If you change your
wheel size, you will have to purchase new tires to match the new wheel
diameter.
Location of the tire label
You will find a Tire Label containing tire inflation pressure by tire size
and other important information located on the B-Pillar or the edge of
the driver’s door. Refer to the payload description and graphic in the
Vehicle loading — with and without a trailersection.
Tires, Wheels and Loading
181
2010 Milan(mln)
Owners Guide, 3rd Printing
USA(fus)
Page 182 of 330

TIRE PRESSURE MONITORING SYSTEM (TPMS)
Each tire, including the spare (if
provided), should be checked
monthly when cold and inflated to
the inflation pressure recommended
by the vehicle manufacturer on the
vehicle placard or tire inflation pressure label. (If your vehicle has tires
of a different size than the size indicated on the vehicle placard or tire
inflation pressure label, you should determine the proper tire inflation
pressure for those tires.)
As an added safety feature, your vehicle has been equipped with a tire
pressure monitoring system (TPMS) that illuminates a low tire pressure
telltale when one or more of your tires is significantly under-inflated.
Accordingly, when the low tire pressure telltale illuminates, you should
stop and check your tires as soon as possible, and inflate them to the
proper pressure. Driving on a significantly under-inflated tire causes the
tire to overheat and can lead to tire failure. Under-inflation also reduces
fuel efficiency and tire tread life, and may affect the vehicle’s handling
and stopping ability.
Please note that the TPMS is not a substitute for proper tire
maintenance, and it is the driver’s responsibility to maintain correct tire
pressure, even if under-inflation has not reached the level to trigger
illumination of the TPMS low tire pressure telltale.
Your vehicle has also been equipped with a TPMS malfunction indicator
to indicate when the system is not operating properly. The TPMS
malfunction indicator is combined with the low tire pressure telltale.
When the system detects a malfunction, the telltale will flash for
approximately one minute and then remain continuously illuminated.
This sequence will continue upon subsequent vehicle start-ups as long as
the malfunction exists.
When the malfunction indicator is illuminated, the system may not be
able to detect or signal low tire pressure as intended. TPMS malfunctions
may occur for a variety of reasons, including the installation of
replacement or alternate tires or wheels on the vehicle that prevent the
TPMS from functioning properly. Always check the TPMS malfunction
telltale after replacing one or more tires or wheels on your vehicle to
ensure that the replacement or alternate tires and wheels allow the
TPMS to continue to function properly.
Tires, Wheels and Loading
182
2010 Milan(mln)
Owners Guide, 3rd Printing
USA(fus)
Page 183 of 330

The Tire Pressure Monitoring System complies with part 15 of the FCC
rules and with RSS-210 of Industry Canada. Operation is subject to the
following two conditions: (1) This device may not cause harmful
interference, and (2) This device must accept any interference received,
including interference that may cause undesired operation.
WARNING:The Tire Pressure Monitoring System is NOT a
substitute for manually checking tire pressure. The tire pressure
should be checked periodically (at least monthly) using a tire gauge,
seeInflating your tiresin this chapter. Failure to properly maintain
your tire pressure could increase the risk of tire failure, loss of control,
vehicle rollover and personal injury.
Changing tires with TPMS
Each road tire is equipped with
a tire pressure sensor located
inside the tire/wheel cavity. The
pressure sensor is attached to
the valve stem. The pressure
sensor is covered by the tire and
is not visible unless the tire is
removed. Care must be taken
when changing the tire to avoid
damaging the sensor.It is
recommended that you always have your tires serviced by an authorized
dealer.
The tire pressure should be checked periodically (at least monthly) using
an accurate tire gauge, refer toInflating your tiresin this chapter.
Tires, Wheels and Loading
183
2010 Milan(mln)
Owners Guide, 3rd Printing
USA(fus)
Page 184 of 330

Understanding your Tire Pressure Monitoring System (TPMS)
The Tire Pressure Monitoring System measures pressure in your four
road tires and sends the tire pressure readings to your vehicle. The Low
Tire Pressure Warning Lamp will turn ON if the tire pressure is
significantly low. Once the light is illuminated, your tires are under
inflated and need to be inflated to the manufacturer’s recommended tire
pressure. Even if the light turns ON and a short time later turns OFF,
your tire pressure still needs to be checked. Visit www.checkmytires.org
for additional information.
When your temporary spare tire is installed
When one of your road tires needs to be replaced with the temporary
spare, the TPMS system will continue to identify an issue to remind you
that the damaged road wheel/tire needs to be repaired and put back on
your vehicle.
To restore the full functionality of the Tire Pressure Monitoring System,
have the damaged road wheel/tire repaired and remounted on your
vehicle. For additional information, refer toChanging tires with TPMS
in this section.
When you believe your system is not operating properly
The main function of the Tire Pressure Monitoring System is to warn you
when your tires need air. It can also warn you in the event the system is
no longer capable of functioning as intended. Please refer to the
following chart for information concerning your Tire Pressure Monitoring
System:
Tires, Wheels and Loading
184
2010 Milan(mln)
Owners Guide, 3rd Printing
USA(fus)
Page 185 of 330

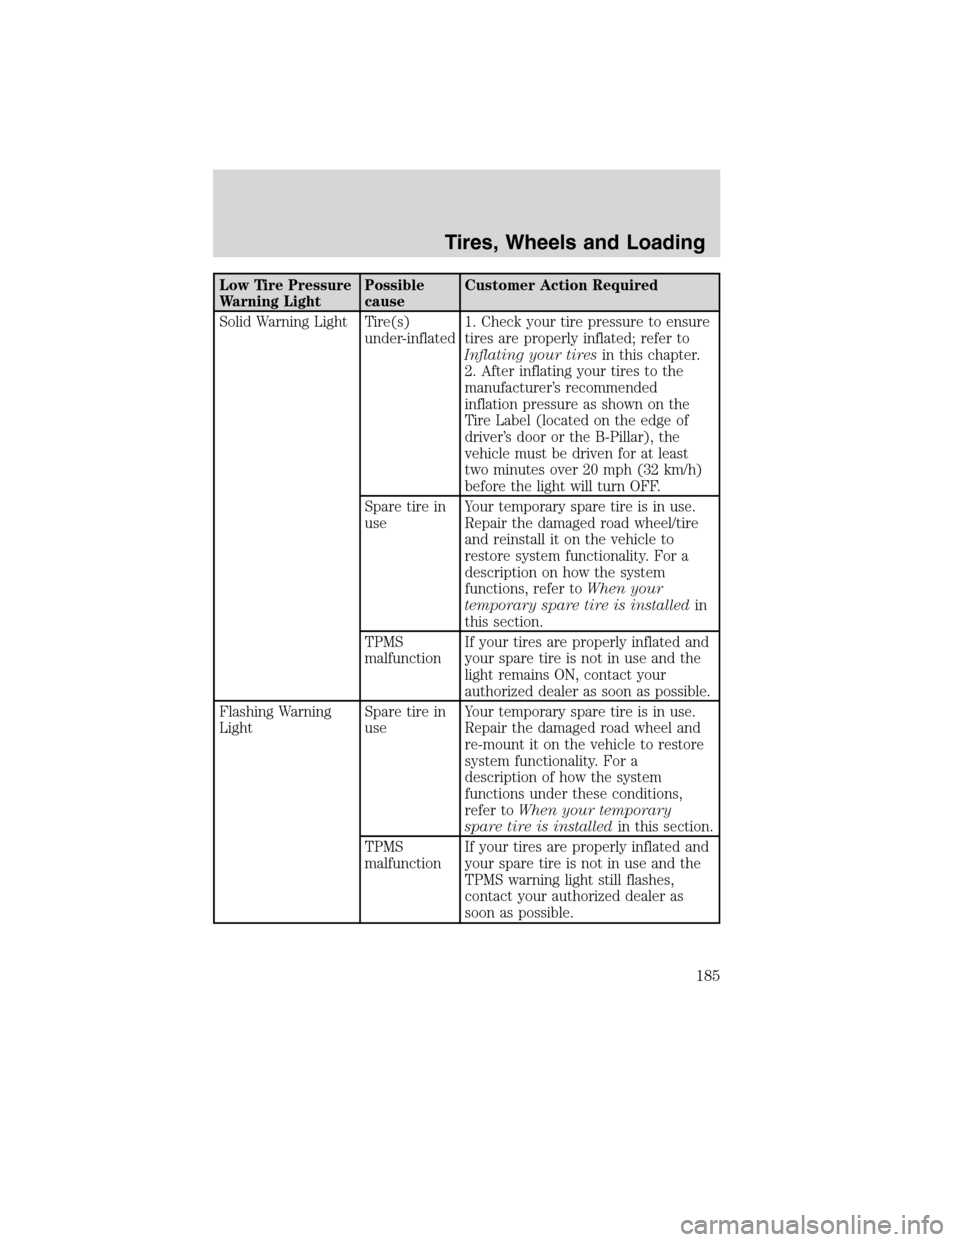
Low Tire Pressure
Warning LightPossible
causeCustomer Action Required
Solid Warning Light Tire(s)
under-inflated1. Check your tire pressure to ensure
tires are properly inflated; refer to
Inflating your tiresin this chapter.
2. After inflating your tires to the
manufacturer’s recommended
inflation pressure as shown on the
Tire Label (located on the edge of
driver’s door or the B-Pillar), the
vehicle must be driven for at least
two minutes over 20 mph (32 km/h)
before the light will turn OFF.
Spare tire in
useYour temporary spare tire is in use.
Repair the damaged road wheel/tire
and reinstall it on the vehicle to
restore system functionality. For a
description on how the system
functions, refer toWhen your
temporary spare tire is installedin
this section.
TPMS
malfunctionIf your tires are properly inflated and
your spare tire is not in use and the
light remains ON, contact your
authorized dealer as soon as possible.
Flashing Warning
LightSpare tire in
useYour temporary spare tire is in use.
Repair the damaged road wheel and
re-mount it on the vehicle to restore
system functionality. For a
description of how the system
functions under these conditions,
refer toWhen your temporary
spare tire is installedin this section.
TPMS
malfunctionIf your tires are properly inflated and
your spare tire is not in use and the
TPMS warning light still flashes,
contact your authorized dealer as
soon as possible.
Tires, Wheels and Loading
185
2010 Milan(mln)
Owners Guide, 3rd Printing
USA(fus)
Page 186 of 330

When inflating your tires
When putting air into your tires (such as at a gas station or in your
garage), the Tire Pressure Monitoring System may not respond
immediately to the air added to your tires.
It may take up to two minutes of driving over 20 mph (32 km/h) for the
light to turn OFF after you have filled your tires to the recommended
inflation pressure.
How temperature affects your tire pressure
The Tire Pressure Monitoring System (TPMS) monitors tire pressure in
each pneumatic tire. While driving in a normal manner, a typical
passenger tire inflation pressure may increase approximately 2 to 4 psi
(14 to 28 kPa) from a cold start situation. If the vehicle is stationary
over night with the outside temperature significantly lower than the
daytime temperature, the tire pressure may decrease approximately 3 psi
(21 kPa) for a drop of 30°F (17°C) in ambient temperature. This lower
pressure value may be detected by the TPMS as being significantly lower
than the recommended inflation pressure and activate the TPMS warning
for low tire pressure. If the low tire pressure warning light is ON, visually
check each tire to verify that no tire is flat. (If one or more tires are flat,
repair as necessary.) Check air pressure in the road tires. If any tire is
under-inflated, carefully drive the vehicle to the nearest location where
air can be added to the tires. Inflate all the tires to the recommended
inflation pressure.
SNOW TIRES AND CHAINS
WARNING:Snow tires must be the same size, load index, speed
rating as those originally provided by Ford. Use of any tire or
wheel not recommended by Ford can affect the safety and performance
of your vehicle, which could result in an increased risk of loss of vehicle
control, vehicle rollover, personal injury and death. Additionally, the use
of non-recommended tires and wheels could cause steering, suspension,
axle or transfer case/power transfer unit failure.
The tires on your vehicle have all weather treads to provide traction in
rain and snow. However, in some climates, you may need to use snow
tires and chains. If you need to use chains, it is recommended that steel
wheels (of the same size and specifications) be used, as chains may chip
aluminum wheels.
Tires, Wheels and Loading
186
2010 Milan(mln)
Owners Guide, 3rd Printing
USA(fus)
Page 187 of 330

Follow these guidelines when using snow tires and chains:
•Use only SAE class “S” cables or equivalent on the front axle for
P205/60R16 equipped vehicles. SAE class “S” chains or other
conventional link chains may cause damage to the vehicles wheel
house and/or body.
•
Do not install tire chains, cables, or optional traction devices on the rear
tires. This could cause damage to the vehicle’s wheel house or body.
•Do not use tire chains, cables, or optional traction devices with
optional P225/50R17 or P225/45R18 tires.
•Install cable chains securely, verifying that the cables do not touch any
wiring, brake lines or fuel lines.
•Drive cautiously. If you hear the cables rub or bang against your
vehicle, stop and re-tighten the cables. If this does not work, remove
the cables to prevent damage to your vehicle.
•If possible, avoid fully loading your vehicle.
•Remove the tire cables when they are no longer needed. Do not use
tire cables on dry roads.
•The suspension insulation and bumpers will help prevent vehicle
damage. Do not remove these components from your vehicle when
using snow tires and chains.
•Do not exceed 30 mph (48 km/h) with tire cables on your vehicle.
VEHICLE LOADING
This section will guide you in the proper loading of your vehicle to keep
your loaded vehicle weight within its design rating capability. Properly
loading your vehicle will provide maximum return of vehicle design
performance. Before loading your vehicle, familiarize yourself with the
following terms for determining your vehicle’s weight ratings from the
vehicle’s Tire Label or Safety Compliance Certification Label:
Base Curb Weight– is the weight of the vehicle including a full tank of
fuel and all standard equipment. It does not include passengers, cargo, or
optional equipment.
Vehicle Curb Weight– is the weight of your new vehicle when you
picked it up from your authorized dealer plus any aftermarket
equipment.
Tires, Wheels and Loading
187
2010 Milan(mln)
Owners Guide, 3rd Printing
USA(fus)
Page 188 of 330

Payload– is the combined weight of cargo and passengers that the
vehicle is carrying. The maximum payload for your vehicle can be found
on the Tire Label on the B-Pillar or the edge of the driver’s door
(vehicles exported outside the US and Canada may not have a Tire
Label). Look for“THE COMBINED WEIGHT OF OCCUPANTS AND
CARGO SHOULD NEVER EXCEED XXX kg OR XXX lb.”for
maximum payload. The payload listed on the Tire Label is the maximum
payload for the vehicle as built by the assembly plant. If any aftermarket
or authorized-dealer installed equipment has been installed on the
vehicle, the weight of the equipment must be subtracted from the
payload listed on the Tire Label in order to determine the new payload.
WARNING:The appropriate loading capacity of your vehicle can
be limited either by volume capacity (how much space is
available) or by payload capacity (how much weight the vehicle should
carry). Once you have reached the maximum payload of your vehicle,
do not add more cargo, even if there is space available. Overloading or
improperly loading your vehicle can contribute to loss of vehicle
control and vehicle rollover.
Tires, Wheels and Loading
188
2010 Milan(mln)
Owners Guide, 3rd Printing
USA(fus)
Page 189 of 330

Example only:
Cargo Weight– includes all weight added to the Base Curb Weight,
including cargo and optional equipment.
Tires, Wheels and Loading
189
2010 Milan(mln)
Owners Guide, 3rd Printing
USA(fus)
Page 190 of 330

GAW (Gross Axle Weight)– is the total weight placed on each axle
(front and rear) – including vehicle curb weight and all payload.
GAWR (Gross Axle Weight Rating)– is the maximum allowable
weight that can be carried by a single axle (front or rear).These
numbers are shown on the Safety Compliance Certification Label
located on the B-Pillar or the edge of the driver’s door. The total
load on each axle must never exceed its GAWR.
GVW (Gross Vehicle Weight)– is the Vehicle Curb Weight + cargo +
passengers.
GVWR (Gross Vehicle Weight Rating)– is the maximum allowable
weight of the fully loaded vehicle (including all options, equipment,
passengers and cargo).The GVWR is shown on the Safety
Compliance Certification Label located on the B-Pillar or the
edge of the driver’s door. The GVW must never exceed the GVWR.
Tires, Wheels and Loading
190
2010 Milan(mln)
Owners Guide, 3rd Printing
USA(fus)