light Mercury Milan Hybrid 2010 s Owners Manual
[x] Cancel search | Manufacturer: MERCURY, Model Year: 2010, Model line: Milan Hybrid, Model: Mercury Milan Hybrid 2010Pages: 329, PDF Size: 2.39 MB
Page 228 of 329
Note:The default setting for the rear camera delay is off. Push the
“Settings” button found on the navigation screen to set the rear camera
delay feature to on or off. Refer to theNavigation supplementfor more
information.
The camera lens for the camera system is located on the trunk. Keep the
lens clean so that the video image remains clear and undistorted. Clean
the lens with a soft, lint-free cloth and non-abrasive cleaner.
Note:If the camera system image is not clear or seems distorted, it may
be covered with water droplets, snow, mud or any other substance. If
this occurs, clean the camera lens before using the reverse camera
system.
WARNING:The camera system is a reverse aid supplement
device that still requires the driver to use it in conjunction with
the rear view mirror and the side mirrors for maximum coverage.
WARNING:Objects that are close to either corner of the
bumper or under the bumper, might not be seen on the screen
due to the limited coverage of the camera system.
WARNING:Backup as slow as possible since higher speeds
might limit your reaction time to stop the vehicle.
WARNING:Do not use the camera system with the trunk open.
If the back end of the vehicle is hit or damaged, then check with your
authorized dealer to have your rear video system checked for proper
coverage and operation.
Night time and dark area use
At night time or in dark areas, the camera system relies on the reverse
lamp lighting to produce an image. Therefore it is necessary that both
reverse lamps are operating in order to get a clear image in the dark. If
either of the lamps are not operating, stop using the camera system, at
least in the dark, until the lamp(s) are replaced and functioning.
2010 Milan Hybrid(hmv)
Owners Guide, 1st Printing
USA(fus)
Driving
228
Page 235 of 329
The following table lists possible causes and actions for this message
being displayed:
The surface of the left
or right radar is dirty or
obstructed in some wayClean the fascia area in front of the radar, either left
or right side, or remove obstruction.
The surface of the left
or right radar is not
dirty or obstructedDrive normally in traffic for a few minutes to allow the
radar to detect that it is no longer blocked. Note, the
vehicle must be in D (Drive) and a few vehicles must
pass so that the BLIS™ can clear a blocked state.
Heavy rainfall or heavy
snowfall is interfering
with the radar signalsNo action required by the driver. The system will
automatically go unblocked once the rainfall/snowfall
rate decreases or stops. Do not use BLIS™-CTA in
heavy rainfall or heavy snowfall.
Trailer tow false alerts
When towing a trailer the left and right sensor may detect the trailer
thus causing a false alert. It may be desirable to turn the BLIS™ system
off if the false alerts become annoying.
Day and night brightness
The BLIS™-CTA amber alert will automatically dim when the headlamp
switch is in PARK, ON, or AUTO ON and night time darkness has been
detected by the sun sensor.
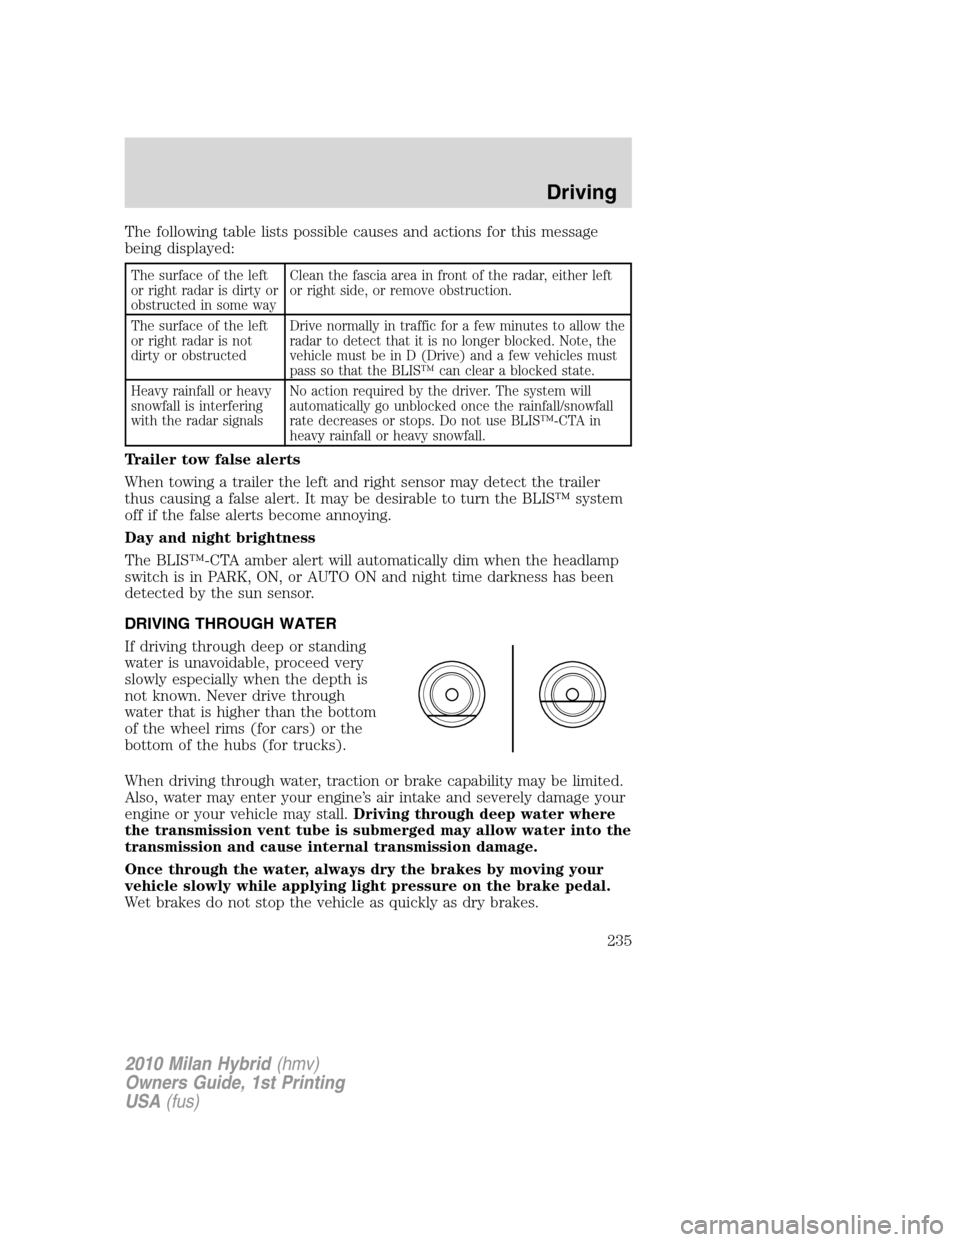
DRIVING THROUGH WATER
If driving through deep or standing
water is unavoidable, proceed very
slowly especially when the depth is
not known. Never drive through
water that is higher than the bottom
of the wheel rims (for cars) or the
bottom of the hubs (for trucks).
When driving through water, traction or brake capability may be limited.
Also, water may enter your engine’s air intake and severely damage your
engine or your vehicle may stall.Driving through deep water where
the transmission vent tube is submerged may allow water into the
transmission and cause internal transmission damage.
Once through the water, always dry the brakes by moving your
vehicle slowly while applying light pressure on the brake pedal.
Wet brakes do not stop the vehicle as quickly as dry brakes.
2010 Milan Hybrid(hmv)
Owners Guide, 1st Printing
USA(fus)
Driving
235
Page 240 of 329

The fuses are coded as follows.
Fuse/Relay
LocationFuse Amp
RatingProtected Circuits
1 30A Driver smart window motor
2 15A Brake on/off switch, Center
high-mount stop lamp
3 15A HEV battery fan
4 30A 110V Inverter
5 10A Keypad illumination, Brake shift
interlock
6 20A Turn signal lamps
7 10A Low beam headlamps (left)
8 10A Low beam headlamps (right)
9 15A Courtesy lights
10 15A Backlighting, Puddle lamps
2010 Milan Hybrid(hmv)
Owners Guide, 1st Printing
USA(fus)
Roadside Emergencies
240
Page 242 of 329
Fuse/Relay
LocationFuse Amp
RatingProtected Circuits
36 5A Passive Anti-Theft Sensor (PATS)
transceiver
37 10A Humidity sensor
38 20A Subwoofer amplifier
39 20A Radio
40 20A Not used (Spare)
41 15A Automatic dimming mirror, Moon
roof, Compass, Ambient lighting
42 10A Electronic power assist steering
43 10A Not used (Spare)
44 10A Fuel diode/Powertrain control
module
45 5A Heated backlight and blower relay
coil, Wiper washer
46 7.5A Occupant Classification Sensor
(OCS) module, Passenger airbag
off lamp
47 30A Circuit
BreakerPower windows
48 — Delayed accessory relay
Power distribution box
The power distribution box is located in the engine compartment. The
power distribution box contains high-current fuses that protect your
vehicle’s main electrical systems from overloads.
WARNING:Always disconnect the battery before servicing high
current fuses.
WARNING:To reduce risk of electrical shock, always replace
the cover to the Power Distribution Box before reconnecting the
battery or refilling fluid reservoirs.
If the battery has been disconnected and reconnected, refer to the
Batterysection of theMaintenance and Specificationschapter.
2010 Milan Hybrid(hmv)
Owners Guide, 1st Printing
USA(fus)
Roadside Emergencies
242
Page 246 of 329
Relay Location Relay Type Function
3 High Current
MicroBlower motor
4 High Current
MicroRear window defogger
5 High Current
MicroPowertrain control module
6 High Current
MicroVacuum pump cut-off
7 Solid State Vacuum pump
CHANGING THE TIRES
If you get a flat tire while driving, do not apply the brake heavily.
Instead, gradually decrease your speed. Hold the steering wheel firmly
and slowly move to a safe place on the side of the road.
Note:The tire pressure monitoring system (TPMS) indicator light will
illuminate when the spare tire is in use. To restore the full functionality
of the monitoring system, all road wheels equipped with tire pressure
monitoring sensors must be mounted on the vehicle.
Have a flat serviced by an authorized dealer in order to prevent damage
to the TPMS sensors, refer toTire pressure monitoring system
(TPMS)in theTires, Wheels and Loadingchapter. Replace the spare
tire with a road tire as soon as possible. During repairing or replacing of
the flat tire, have the authorized dealer inspect the TPMS sensor for
damage.
WARNING:The use of tire sealants may damage your Tire
Pressure Monitoring System and should not be used.
WARNING:Refer toTire pressure monitoring system (TPMS)
in theTires, Wheels and Loadingchapter for important
information. If the tire pressure monitor sensor becomes damaged, it
will no longer function.
2010 Milan Hybrid(hmv)
Owners Guide, 1st Printing
USA(fus)
Roadside Emergencies
246
Page 254 of 329
3. Park the booster vehicle close to the hood of the disabled vehicle
making sure the two vehiclesdo nottouch. Set the parking brake on
both vehicles and stay clear of the engine cooling fan and other moving
parts.
4. Check all battery terminals and remove any excessive corrosion before
you attach the battery cables. Ensure that vent caps are tight and level.
5. Turn the heater fan on in both vehicles to protect from any electrical
surges. Turn all other accessories off.
Connecting the jumper cables
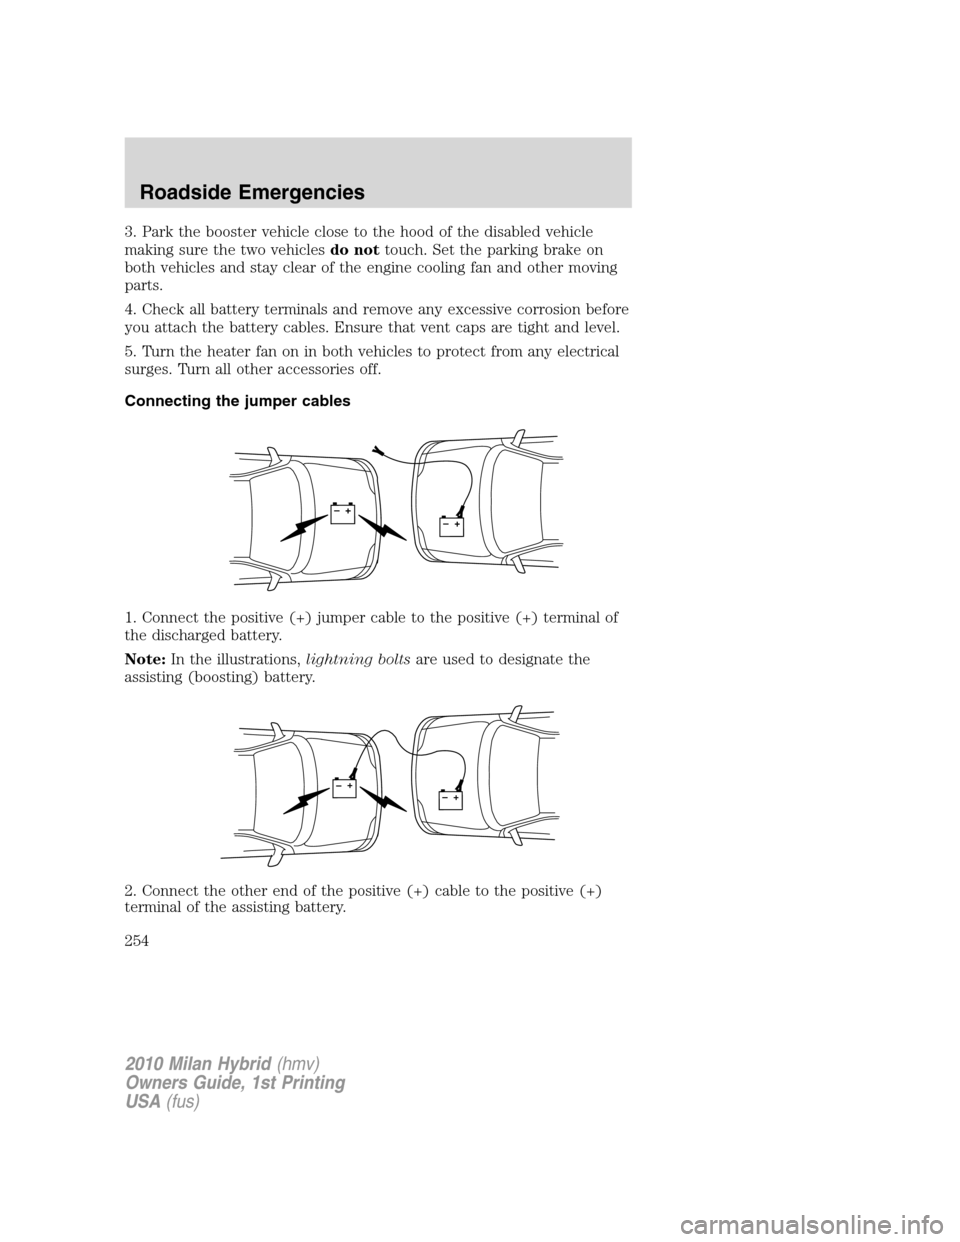
1. Connect the positive (+) jumper cable to the positive (+) terminal of
the discharged battery.
Note:In the illustrations,lightning boltsare used to designate the
assisting (boosting) battery.
2. Connect the other end of the positive (+) cable to the positive (+)
terminal of the assisting battery.
+–+–
+–+–
2010 Milan Hybrid(hmv)
Owners Guide, 1st Printing
USA(fus)
Roadside Emergencies
254
Page 256 of 329

Jump starting
1. Start the engine of the booster vehicle and run the engine at
moderately increased speed.
2. Start the engine of the disabled vehicle.
3. Once the disabled vehicle has been started, run both engines for an
additional three minutes before disconnecting the jumper cables.
Removing the jumper cables
Remove the jumper cables in the reverse order that they were
connected.
1. Remove the jumper cable from thegroundmetal surface.
Note:In the illustrations,lightning boltsare used to designate the
assisting (boosting) battery.
2. Remove the jumper cable on the negative (-) connection of the
booster vehicle’s battery.
+–+–
+–+–
2010 Milan Hybrid(hmv)
Owners Guide, 1st Printing
USA(fus)
Roadside Emergencies
256
Page 267 of 329

WASHING THE EXTERIOR
Wash your vehicle regularly with cool or lukewarm water and a neutral
pH shampoo, such as Motorcraft Detail Wash (ZC-3-A), which is available
from your authorized dealer.
•Never use strong household detergents or soap, such as dish washing
or laundry liquid. These products can discolor and spot painted
surfaces.
•Never wash a vehicle that is “hot to the touch” or during exposure to
strong, direct sunlight.
•Always use a clean sponge or car wash mitt with plenty of water for
best results.
•Dry the vehicle with a chamois or soft terry cloth towel in order to
eliminate water spotting.
•It is especially important to wash the vehicle regularly during the
winter months, as dirt and road salt are difficult to remove and cause
damage to the vehicle.
•Immediately remove items such as gasoline, diesel fuel, bird droppings
and insect deposits because they can cause damage to the vehicle’s
paintwork and trim over time. Use Motorcraft Bug and Tar Remover
(ZC-42) which is available from your authorized dealer.
•Remove any exterior accessories, such as antennas, before entering a
car wash.
•Suntan lotions and insect repellents can damage any painted
surface; if these substances come in contact with your vehicle,
wash off as soon as possible.
Exterior chrome
•Wash the vehicle first, using cool or lukewarm water and a neutral pH
shampoo, such as Motorcraft Detail Wash (ZC-3-A).
•Use Motorcraft Custom Bright Metal Cleaner (ZC-15), available from
your authorized dealer. Apply the product as you would a wax to
clean bumpers and other chrome parts; allow the cleaner to dry for a
few minutes, then wipe off the haze with a clean, dry rag.
•Never use abrasive materials such as steel wool or plastic pads
as they can scratch the chrome surface.
•After polishing chrome bumpers, apply a coating of Motorcraft
Premium Liquid Wax (ZC-53-A), available from your authorized dealer,
or an equivalent quality product to help protect from environmental
effects.
2010 Milan Hybrid(hmv)
Owners Guide, 1st Printing
USA(fus)
Cleaning
267
Page 269 of 329
ENGINE
Engines are more efficient when they are clean because grease and dirt
buildup keep the engine warmer than normal. When washing:
•Take care when using a power washer to clean the engine. The
high-pressure fluid could penetrate the sealed parts and cause
damage.
•Do not spray a hot engine with cold water to avoid cracking the
engine block or other engine components.
•Spray Motorcraft Engine Shampoo and Degreaser (ZC-20) on all parts
that require cleaning and pressure rinse clean. In Canada use
Motorcraft Engine Shampoo (CXC-66-A).
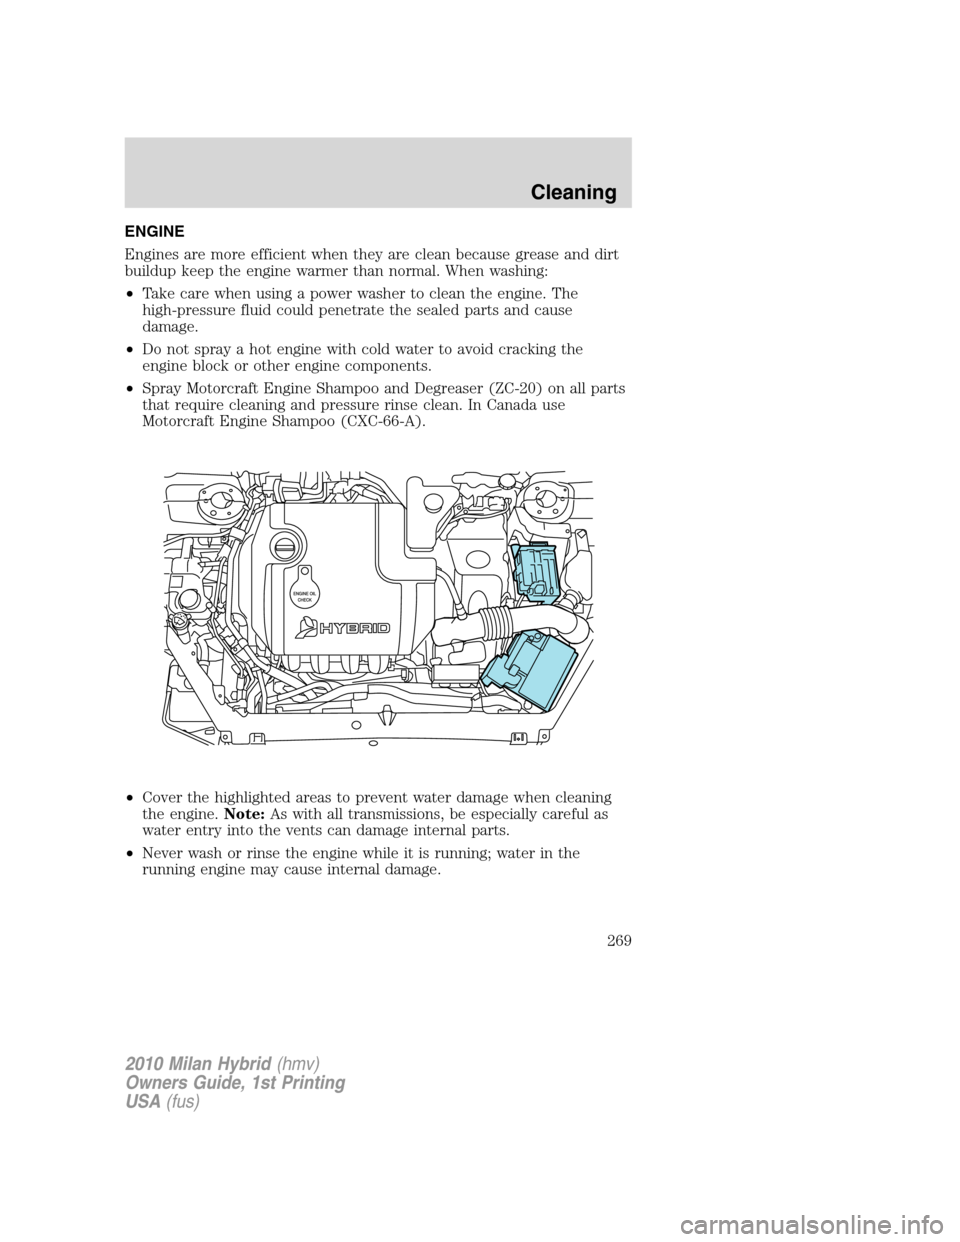
•Cover the highlighted areas to prevent water damage when cleaning
the engine.Note:As with all transmissions, be especially careful as
water entry into the vents can damage internal parts.
•Never wash or rinse the engine while it is running; water in the
running engine may cause internal damage.
2010 Milan Hybrid(hmv)
Owners Guide, 1st Printing
USA(fus)
Cleaning
269
Page 271 of 329
INSTRUMENT PANEL/INTERIOR TRIM AND CLUSTER LENS
Clean the instrument panel, interior trim areas and cluster lens with a
clean and damp white cotton cloth, then with a clean and dry white
cotton cloth.
•Avoid cleaners or polishes that increase the gloss of the upper portion
of the instrument panel. The dull finish in this area helps protect the
driver from undesirable windshield reflection.
•Be certain to wash or wipe your hands clean if you have been in
contact with certain products such as insect repellent and suntan
lotion in order to avoid possible damage to the interior painted
surfaces.
•Do not use household or glass cleaners as these may damage the
finish of the instrument panel, interior trim and cluster lens.
WARNING:Do not use chemical solvents or strong detergents
when cleaning the steering wheel or instrument panel to avoid
contamination of the airbag system.
If a staining liquid like coffee/juice has been spilled on the instrument
panel or on interior trim surfaces, clean as follows:
1. Wipe up spilled liquid using a clean, white, cotton cloth.
2. Wipe the surface with a damp, clean, white, cotton cloth. For more
thorough cleaning, use a mild soap and water solution. If the spot cannot
be completely cleaned by this method, the area may be cleaned using a
commercially available cleaning product designed for automotive
interiors.
3. If necessary, apply more soap and water solution or cleaning product
to a clean, white, cotton cloth and press the cloth onto the soiled
area–allow this to set at room temperature for 30 minutes.
4. Remove the soaked cloth, and if it is not soiled badly, use this cloth to
clean the area by using a rubbing motion for 60 seconds.
5. Following this, wipe area dry with a clean, white, cotton cloth.
INTERIOR
For fabric, carpets, cloth seats, safety belts and seats equipped with side
airbags:
•Remove dust and loose dirt with a vacuum cleaner.
•Remove light stains and soil with Motorcraft Professional Strength
Carpet & Upholstery Cleaner (ZC-54).
2010 Milan Hybrid(hmv)
Owners Guide, 1st Printing
USA(fus)
Cleaning
271