engine Mercury Monterey 2004 s Service Manual
[x] Cancel search | Manufacturer: MERCURY, Model Year: 2004, Model line: Monterey, Model: Mercury Monterey 2004Pages: 272, PDF Size: 4.29 MB
Page 185 of 272

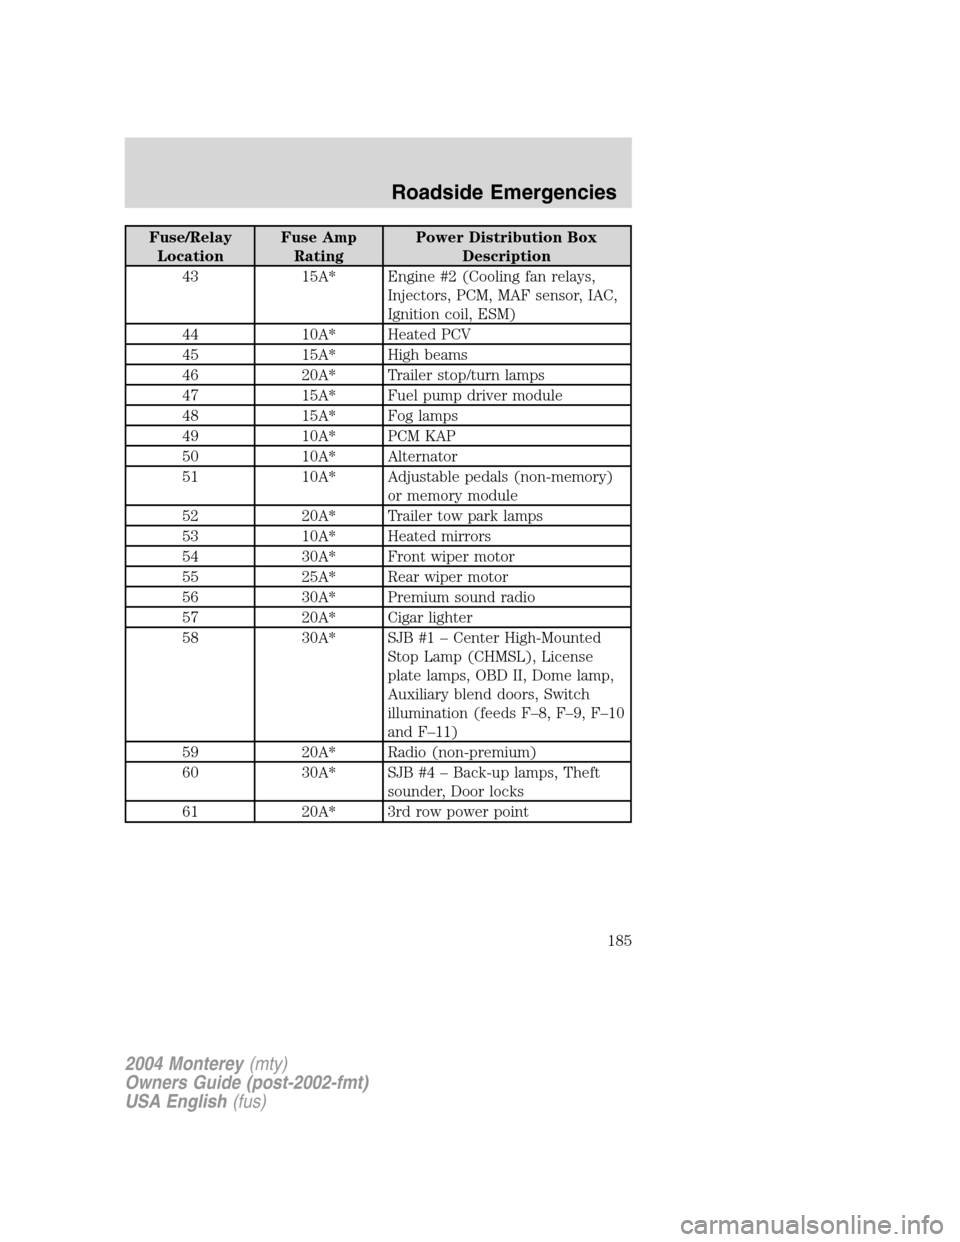
Fuse/Relay
LocationFuse Amp
RatingPower Distribution Box
Description
43 15A* Engine #2 (Cooling fan relays,
Injectors, PCM, MAF sensor, IAC,
Ignition coil, ESM)
44 10A* Heated PCV
45 15A* High beams
46 20A* Trailer stop/turn lamps
47 15A* Fuel pump driver module
48 15A* Fog lamps
49 10A* PCM KAP
50 10A* Alternator
51 10A* Adjustable pedals (non-memory)
or memory module
52 20A* Trailer tow park lamps
53 10A* Heated mirrors
54 30A* Front wiper motor
55 25A* Rear wiper motor
56 30A* Premium sound radio
57 20A* Cigar lighter
58 30A* SJB #1–Center High-Mounted
Stop Lamp (CHMSL), License
plate lamps, OBD II, Dome lamp,
Auxiliary blend doors, Switch
illumination (feeds F–8, F–9, F–10
and F–11)
59 20A* Radio (non-premium)
60 30A* SJB #4–Back-up lamps, Theft
sounder, Door locks
61 20A* 3rd row power point
2004 Monterey(mty)
Owners Guide (post-2002-fmt)
USA English(fus)
Roadside Emergencies
185
Page 190 of 272

If the vehicle slips off the jack, you or someone else could be
seriously injured.
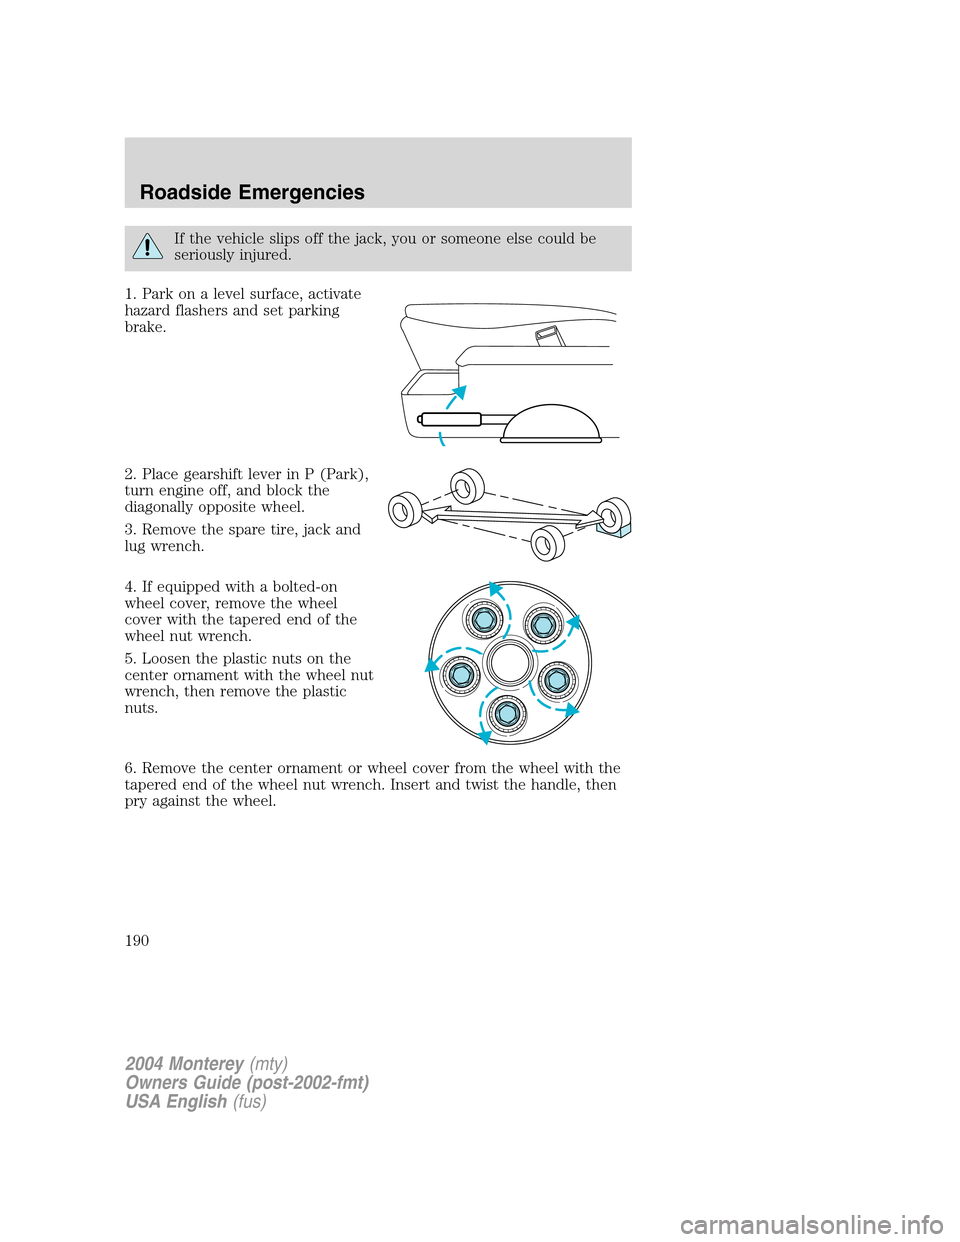
1. Park on a level surface, activate
hazard flashers and set parking
brake.
2. Place gearshift lever in P (Park),
turn engine off, and block the
diagonally opposite wheel.
3. Remove the spare tire, jack and
lug wrench.
4. If equipped with a bolted-on
wheel cover, remove the wheel
cover with the tapered end of the
wheel nut wrench.
5. Loosen the plastic nuts on the
center ornament with the wheel nut
wrench, then remove the plastic
nuts.
6. Remove the center ornament or wheel cover from the wheel with the
tapered end of the wheel nut wrench. Insert and twist the handle, then
pry against the wheel.
2004 Monterey(mty)
Owners Guide (post-2002-fmt)
USA English(fus)
Roadside Emergencies
190
Page 192 of 272

To lessen the risk of personal injury, do not put any part of your
body under the vehicle while changing a tire. Do not start the
engine when your vehicle is on the jack. The jack is only meant for
changing the tire.
10. Remove the lug nuts with the lug wrench.
11. Replace the flat tire with the spare tire, making sure the valve stem
is facing outward. Reinstall lug nuts until the wheel is snug against the
hub. Do not fully tighten the lug nuts until the wheel has been lowered.
12. Lower the wheel by turning the jack handle counterclockwise.
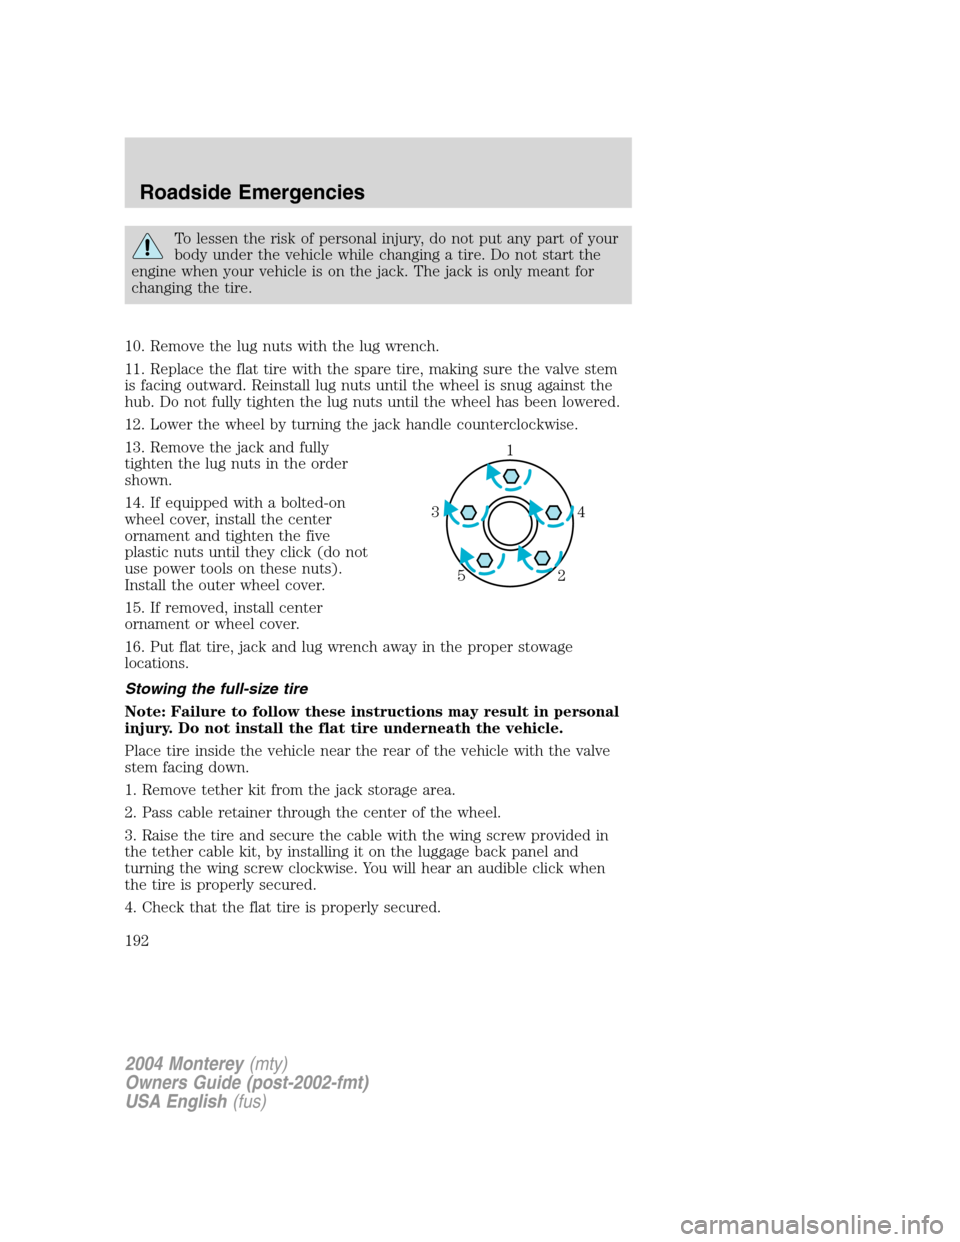
13. Remove the jack and fully
tighten the lug nuts in the order
shown.
14. If equipped with a bolted-on
wheel cover, install the center
ornament and tighten the five
plastic nuts until they click (do not
use power tools on these nuts).
Install the outer wheel cover.
15. If removed, install center
ornament or wheel cover.
16. Put flat tire, jack and lug wrench away in the proper stowage
locations.
Stowing the full-size tire
Note: Failure to follow these instructions may result in personal
injury. Do not install the flat tire underneath the vehicle.
Place tire inside the vehicle near the rear of the vehicle with the valve
stem facing down.
1. Remove tether kit from the jack storage area.
2. Pass cable retainer through the center of the wheel.
3. Raise the tire and secure the cable with the wing screw provided in
the tether cable kit, by installing it on the luggage back panel and
turning the wing screw clockwise. You will hear an audible click when
the tire is properly secured.
4. Check that the flat tire is properly secured.
1
4 3
2 5
2004 Monterey(mty)
Owners Guide (post-2002-fmt)
USA English(fus)
Roadside Emergencies
192
Page 195 of 272

Preparing your vehicle
When the battery is disconnected or a new battery is installed, the
transmission must relearn its shift strategy. As a result, the transmission
may have firm and/or soft shifts. This operation is considered normal and
will not affect function or durability of the transmission. Over time, the
adaptive learning process will fully update transmission operation.
1.Use only a 12–volt supply to start your vehicle.
2. Do not disconnect the battery of the disabled vehicle as this could
damage the vehicle’s electrical system.
3. Park the booster vehicle close to the hood of the disabled vehicle
making sure the two vehiclesdo nottouch. Set the parking brake on
both vehicles and stay clear of the engine cooling fan and other moving
parts.
4. Check all battery terminals and remove any excessive corrosion before
you attach the battery cables. Ensure that vent caps are tight and level.
5. Turn the heater fan on in both vehicles to protect any electrical
surges. Turn all other accessories off.
Connecting the jumper cables
1. Connect the positive (+) jumper cable to the positive (+) terminal of
the discharged battery.
Note:In the illustrations,lightning boltsare used to designate the
assisting (boosting) battery.
+–+–
2004 Monterey(mty)
Owners Guide (post-2002-fmt)
USA English(fus)
Roadside Emergencies
195
Page 197 of 272

4. Make the final connection of the negative (-) cable to an exposed
metal part of the stalled vehicle’s engine, away from the battery and the
carburetor/fuel injection system.Do notuse fuel lines, engine rocker
covers or the intake manifold asgroundingpoints.
Do not connect the end of the second cable to the negative (-)
terminal of the battery to be jumped. A spark may cause an
explosion of the gases that surround the battery.
5. Ensure that the cables are clear of fan blades, belts, moving parts of
both engines, or any fuel delivery system parts.
Jump starting
1. Start the engine of the booster vehicle and run the engine at
moderately increased speed.
2. Start the engine of the disabled vehicle.
3. Once the disabled vehicle has been started, run both engines for an
additional three minutes before disconnecting the jumper cables.
+–+–
2004 Monterey(mty)
Owners Guide (post-2002-fmt)
USA English(fus)
Roadside Emergencies
197
Page 199 of 272

3. Remove the jumper cable from the positive (+) terminal of the booster
vehicle’s battery.
4. Remove the jumper cable from the positive (+) terminal of the
disabled vehicle’s battery.
After the disabled vehicle has been started and the jumper cables
removed, allow it to idle for several minutes so the engine computer can
relearnits idle conditions.
+–+–
+–+–
2004 Monterey(mty)
Owners Guide (post-2002-fmt)
USA English(fus)
Roadside Emergencies
199
Page 207 of 272

In the CAMVAP program, impartial third-party arbitrators conduct
hearings at mutually convenient times and places in an informal
environment. These impartial arbitrators review the positions of the
parties, make decisions and, when appropriate, render awards to resolve
disputes. CAMVAP decisions are fast, fair, and final; the arbitrator’s
award is binding both to you and Ford of Canada.
CAMVAP services are available in all territories and provinces. For more
information, without charge or obligation, call your CAMVAP Provincial
Administrator directly at 1-800-207-0685.
GETTING ASSISTANCE OUTSIDE THE U.S. AND CANADA
Before exporting your vehicle to a foreign country, contact the
appropriate foreign embassy or consulate. These officials can inform you
of local vehicle registration regulations and where to find unleaded fuel.
If you cannot find unleaded fuel or can only get fuel with an anti-knock
index lower than is recommended for your vehicle, contact a district or
owner relations/customer relationship office.
The use of leaded fuel in your vehicle without proper conversion may
damage the effectiveness of your emission control system and may cause
engine knocking or serious engine damage. Ford Motor Company/Ford of
Canada is not responsible for any damage caused by use of improper
fuel.
In the United States, using leaded fuel may also result in difficulty
importing your vehicle back into the U.S.
If your vehicle must be serviced while you are traveling or living in
Central or South America, the Caribbean, or the Middle East, contact the
nearest Ford dealership. If the dealership cannot help you, write or call:
FORD MOTOR COMPANY
WORLDWIDE DIRECT MARKET OPERATIONS
1555 Fairlane Drive
Fairlane Business Park #3
Allen Park, Michigan 48101
U.S.A.
Telephone: (313) 594-4857
FAX: (313) 390-0804
If you are in another foreign country, contact the nearest Ford
dealership. If the dealership employees cannot help you, they can direct
you to the nearest Ford affiliate office.
If you buy your vehicle in North America and then relocate outside of
the U.S. or Canada, register your vehicle identification number (VIN) and
new address with Ford Motor Company Worldwide Direct Market
Operations.
2004 Monterey(mty)
Owners Guide (post-2002-fmt)
USA English(fus)
Customer Assistance
207
Page 211 of 272

sliding door. If necessary, clean the contacts with Motorcraft Bug and
Tar Remover (ZC-42) to remove any sealant. Do not use any abrasives
on the contact surfaces.
PAINT CHIPS
Your dealer has touch-up paint and sprays to match your vehicle’s color.
Take your color code (printed on a sticker in the driver’s door jam) to
your dealer to ensure you get the correct color.
•Remove particles such as bird droppings, tree sap, insect deposits, tar
spots, road salt and industrial fallout before repairing paint chips.
•Always read the instructions before using the products.
ALUMINUM WHEELS AND WHEEL COVERS
Aluminum wheels and wheel covers are coated with a clearcoat paint
finish. In order to maintain their shine:
•Clean weekly with Motorcraft Wheel and Tire Cleaner (ZC-37–A),
which is available from your dealer. Heavy dirt and brake dust
accumulation may require agitation with a sponge. Rinse thoroughly
with a strong stream of water.
•Never apply any cleaning chemical to hot or warm wheel rims or
covers.
•Some automatic car washes may cause damage to the finish on your
wheel rims or covers. Chemical-strength cleaners, or cleaning
chemicals, in combination with brush agitation to remove brake dust
and dirt, could wear away the clearcoat finish over time.
•Do not use hydrofluoric acid-based or high caustic-based wheel
cleaners, steel wool, fuels or strong household detergent.
•To remove tar and grease, use Motorcraft Bug and Tar Remover
(ZC-42), available from your dealer.
ENGINE
Engines are more efficient when they are clean because grease and dirt
buildup keep the engine warmer than normal. When washing:
•Take care when using a power washer to clean the engine. The
high-pressure fluid could penetrate the sealed parts and cause
damage.
•Do not spray a hot engine with cold water to avoid cracking the
engine block or other engine components.
2004 Monterey(mty)
Owners Guide (post-2002-fmt)
USA English(fus)
Cleaning
211
Page 212 of 272

•Spray Motorcraft Engine Shampoo and Degreaser (ZC-20) on all parts
that require cleaning and pressure rinse clean.
•Cover the highlighted areas to prevent water damage when cleaning
the engine.
•Never wash or rinse the engine while it is running; water in the
running engine may cause internal damage.
PLASTIC (NON-PAINTED) EXTERIOR PARTS
Use only approved products to clean plastic parts. These products are
available from your dealer.
•For routine cleaning, use Motorcraft Detail Wash (ZC-3–A).
•If tar or grease spots are present, use Motorcraft Bug and Tar
Remover (ZC-42).
WINDOWS AND WIPER BLADES
The windshield, rear and side windows and the wiper blades should be
cleaned regularly. If the wipers do not wipe properly, substances on the
vehicle’s glass or the wiper blades may be the cause. These may include
hot wax treatments used by commercial car washes, tree sap, or other
organic contamination. To clean these items, please follow these tips:
•The windshield, rear windows and side windows may be cleaned with
a non-abrasive cleaner such as Motorcraft Ultra Clear Spray Glass
Cleaner (ZC-23), available from your dealer.
•Do not use abrasives, as they may cause scratches.
2004 Monterey(mty)
Owners Guide (post-2002-fmt)
USA English(fus)
Cleaning
212
Page 214 of 272

Do not use cleaning solvents, bleach or dye on the vehicle’s
safety belts, as these actions may weaken the belt webbing.
Do not use chemical solvents or strong detergents when cleaning
the seat-mounted side air bag. Such products could contaminate
the side air bag system and affect performance of the side air bag in a
collision.
LEATHER SEATS (IF EQUIPPED)
Your leather seating surfaces have a clear, protective coating over the
leather.
•To clean, use a soft cloth with Motorcraft Deluxe Leather and Vinyl
Cleaner (ZC-11–A). Dry the area with a soft cloth.
•To help maintain its resiliency and color, use the Motorcraft Deluxe
Leather Care Kit (ZC-11–D), available from your authorized dealer.
•Do not use household cleaning products, alcohol solutions, solvents or
cleaners intended for rubber, vinyl and plastics, or oil/petroleum-based
leather conditioners. These products may cause premature wearing of
the clear, protective coating.
Note:In some instances, color or dye transfer can occur when wet
clothing comes in contact with leather upholstery. If this occurs, the
leather should be cleaned immediately to avoid permanent staining.
UNDERBODY
Flush the complete underside of your vehicle frequently. Keep body and
door drain holes free from packed dirt.
FORD, LINCOLN AND MERCURY CAR CARE PRODUCTS
Your Ford, Lincoln or Mercury dealer has many quality products available
to clean your vehicle and protect its finishes. These quality products
have been specifically engineered to fulfill your automotive needs; they
are custom designed to complement the style and appearance of your
vehicle. Each product is made from high quality materials that meet or
exceed rigid specifications. For best results, use the following products
or products of equivalent quality:
Motorcraft Custom Clearcoat Polish (ZC–8–A)
Motorcraft Custom Vinyl Protectant (not available in Canada) (ZC-40–A)
2004 Monterey(mty)
Owners Guide (post-2002-fmt)
USA English(fus)
Cleaning
214