climate control Mercury Monterey 2006 s User Guide
[x] Cancel search | Manufacturer: MERCURY, Model Year: 2006, Model line: Monterey, Model: Mercury Monterey 2006Pages: 320, PDF Size: 3.57 MB
Page 39 of 320

16.A/C:Press to activate/deactivate air conditioning. Use with
recirculated air to improve cooling performance and efficiency. Engages
automatically in AUTO,
, and.
17.REAR:Press to enable the control located in the rear seat. Press
again to turn the auxiliary system off.
18.
Recirculated air:Press to activate/deactivate air
recirculation in the vehicle cabin. Recirculated air may reduce the
amount of time to cool down the interior of the vehicle and may also
help reduce undesired odors from reaching the interior of the vehicle.
Recirculated air can be engaged manually in any airflow selection
except
. Recirculated air may turn off automatically in all airflow
selections.
Operating tips
•To reduce fog build up on the windshield during humid weather, place
the air flow selector in the
position.
•To reduce humidity build up inside the vehicle: do not drive with the
airflow selector in the OFF or with recirculated air engaged.
•Do not put objects under the front seats that will interfere with the
airflow to the back seats.
•Remove any snow, ice or leaves from the air intake area at the base of
the windshield.
•For maximum cooling performance (MAX A/C):
In AUTO mode, press AUTO control and set to desired temperature.
In manual override control, select
or, A/C and recirculated
air
and set the temperature to 60°F (16°C). Set the fan to the
highest speed initially, then adjust to maintain passenger comfort.
•To improve the A/C cool down, drive with the windows slightly open
for 2–3 minutes after starting the vehicle or until the vehicle has
“aired out.”
In extremely cold temperatures, to maximize overall heater performance
it is suggested to not operate the auxiliary system (if so equipped) until
the engine temperature gauge crosses into the normal operating range.
To aid in side window defogging/demisting in cold weather:
1. Select
.
2. Select A/C.
2006 Monterey(mty)
Owners Guide (post-2002-fmt)
USA(fus)
Climate Controls
39
Page 40 of 320

3. Adjust the temperature control to maintain comfort.
4. Set the fan to the highest speed.
5. Direct the outer instrument panel vents towards the side windows.
Do not place objects on top of the instrument panel as these
objects may become projectiles in a collision or sudden stop.
AUXILIARY CLIMATE CONTROL (IF EQUIPPED)
1.Fan speed:Turn to select the
desired fan speed.
2.Temperature/mode selection:
The distribution of air from the
overhead and floor registers is based
on the temperature selected. Turn
to select for comfort.
To use the rear climate controls,
ensure thatREARis pressed on the
main climate control face.
REAR WINDOW DEFROSTER
R
The rear defroster control is located on the climate control panel and
works to clear the rear window of fog and thin ice. If equipped, the
heated outside mirrors also operate with this control to remove snow,
mist and ice from the side mirrors.
Do not use razor blades or other sharp objects to clean the inside
of the rear window or to remove decals from the inside of the
rear window. This may cause damage to the heated grid lines and
will not be covered by your warranty.
CABIN AIR FILTER
Your vehicle is equipped with a cabin air filter. The cabin air filter
restricts the entry of airborne dust and pollen particles. The filter is
located just in front of the windshield under the cowl vent screen on the
passenger side of the vehicle.
For more information, or to replace the filter, see your authorized Ford
or Lincoln Mercury dealer.
2006 Monterey(mty)
Owners Guide (post-2002-fmt)
USA(fus)
Climate Controls
40
Page 86 of 320

PLG encounters an obstacle while opening, the PLG will stop when it
encounters a solid obstacle. Close the liftgate manually and remove the
obstruction. Normal operation can then be resumed.
Resetting the PLG:
The power liftgate may not operate properly if any of the following
conditions occur:
•a low voltage or dead battery
•disconnected battery
•the liftgate has been left open or unlatched for more than six (6)
hours
If any of these conditions occur, the PLG must be reset. To reset the
PLG:
1. Manually close and fully latch the liftgate.
2. Power open the liftgate by using the remote entry transmitter or
overhead console button.
3. Once the liftgate is fully open, close the liftgate using the power
switch on the liftgate, remote entry transmitter or overhead console
button.
Liftgate ajar signal
If the liftgate is not fully latched, you will receive a “LIFTGATE AJAR”
message on the instrument panel. If you see this message, check the
liftgate to ensure it is fully latched.
Make sure the liftgate is closed to prevent exhaust fumes from
being drawn into the vehicle. If you must drive with the liftgate
open, keep the climate control vents open so that fresh outside air
circulates through the vehicle.
2006 Monterey(mty)
Owners Guide (post-2002-fmt)
USA(fus)
Driver Controls
86
Page 95 of 320

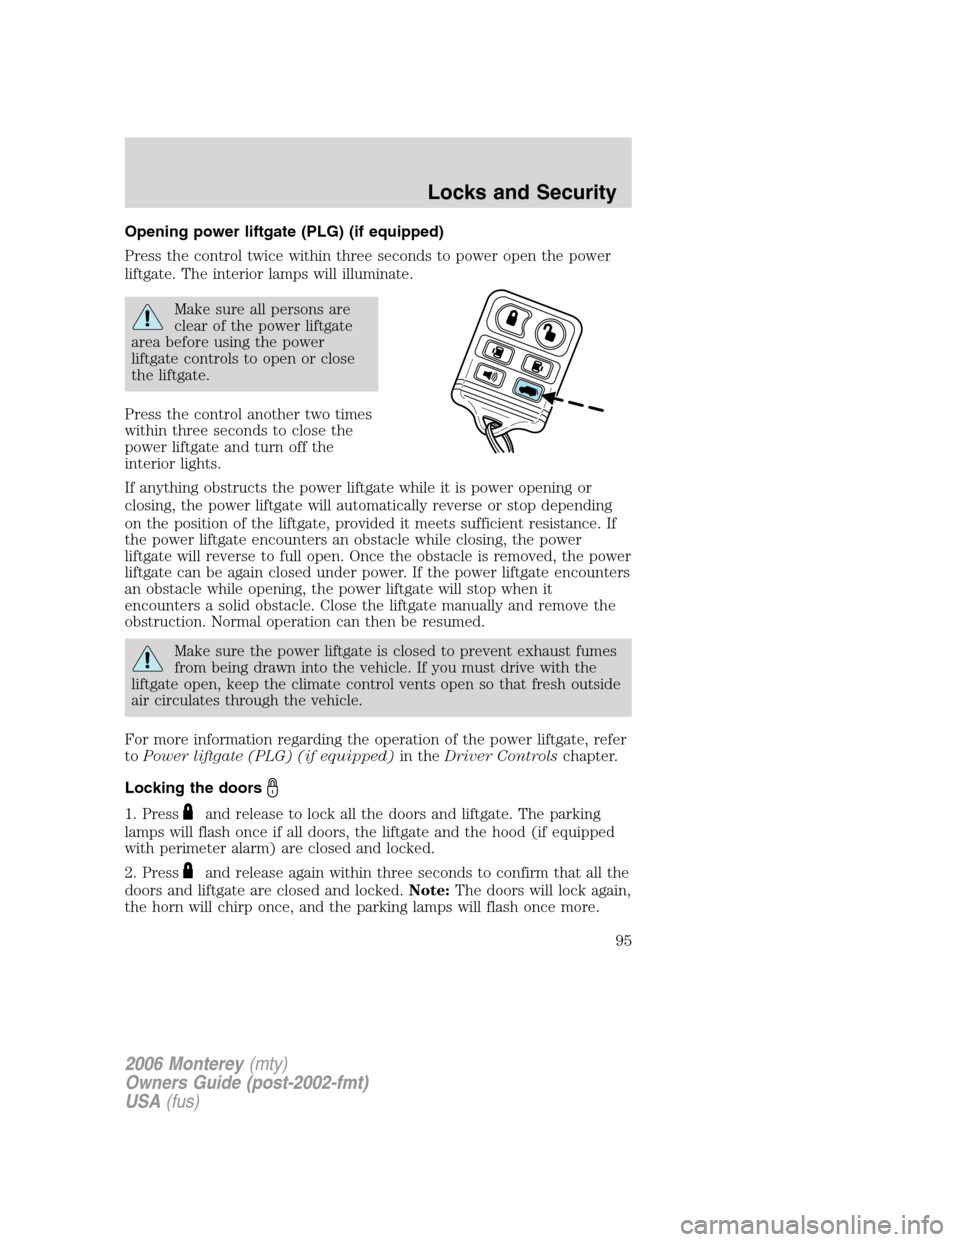
Opening power liftgate (PLG) (if equipped)
Press the control twice within three seconds to power open the power
liftgate. The interior lamps will illuminate.
Make sure all persons are
clear of the power liftgate
area before using the power
liftgate controls to open or close
the liftgate.
Press the control another two times
within three seconds to close the
power liftgate and turn off the
interior lights.
If anything obstructs the power liftgate while it is power opening or
closing, the power liftgate will automatically reverse or stop depending
on the position of the liftgate, provided it meets sufficient resistance. If
the power liftgate encounters an obstacle while closing, the power
liftgate will reverse to full open. Once the obstacle is removed, the power
liftgate can be again closed under power. If the power liftgate encounters
an obstacle while opening, the power liftgate will stop when it
encounters a solid obstacle. Close the liftgate manually and remove the
obstruction. Normal operation can then be resumed.
Make sure the power liftgate is closed to prevent exhaust fumes
from being drawn into the vehicle. If you must drive with the
liftgate open, keep the climate control vents open so that fresh outside
air circulates through the vehicle.
For more information regarding the operation of the power liftgate, refer
toPower liftgate (PLG) (if equipped)in theDriver Controlschapter.
Locking the doors
1. Pressand release to lock all the doors and liftgate. The parking
lamps will flash once if all doors, the liftgate and the hood (if equipped
with perimeter alarm) are closed and locked.
2. Press
and release again within three seconds to confirm that all the
doors and liftgate are closed and locked.Note:The doors will lock again,
the horn will chirp once, and the parking lamps will flash once more.
2006 Monterey(mty)
Owners Guide (post-2002-fmt)
USA(fus)
Locks and Security
95
Page 111 of 320

Press to raise or lower the front
portion of the seat cushion.
Press to raise or lower the rear
portion of the seat cushion.
Press the control to move the seat
forward, backward, up or down.
Heated seats (if equipped)
To operate the heated seats:
•Push the control located on the
climate control system panel once
to activate high heat.
•Push twice to activate low heat.
•Push a third time to deactivate.
The indicator light on the control will illuminate when activated.
The heating of the seat turns off after 10 minutes or when the vehicle is
turned off.
Heated/Cooled seats
•Push the appropriate control
located on the climate control
system panel once for maximum
heating (red) or cooling (blue) function.
2006 Monterey(mty)
Owners Guide (post-2002-fmt)
USA(fus)
Seating and Safety Restraints
111
Page 112 of 320

•Push again to operate the heated/cooled system at a lower level.
•Push again to deactivate.
The climate controlled seat system
includes an air filter that has to be
replaced periodically. Refer to the
scheduled maintenance
informationfor more information.
Do not run heated/cooled system
with the filter removed.
The heat / cool function turns off
after 30 minutes or when vehicle is
turned off
Using the manual lumbar support (if equipped)
The lumbar control is located on the
inboard side of the seat under the
armrest.
Rotate the control to change the
firmness of the lumbar support.
Memory seats/sideview mirrors/adjustable pedals (if equipped)
This system allows automatic
positioning of the driver seat,
outside rearview mirrors, and
adjustable pedals to two
programmable positions.
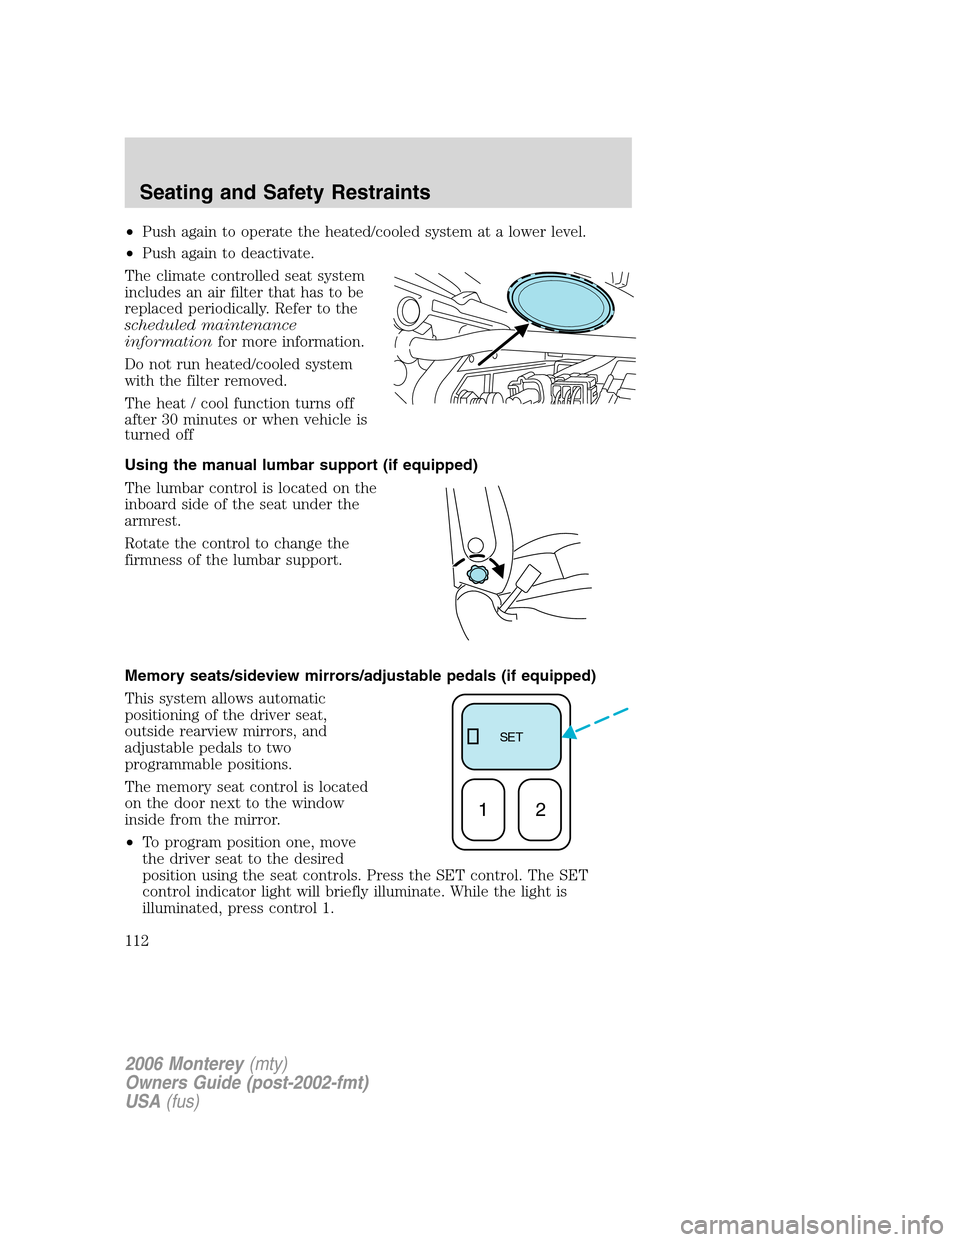
The memory seat control is located
on the door next to the window
inside from the mirror.
•To program position one, move
the driver seat to the desired
position using the seat controls. Press the SET control. The SET
control indicator light will briefly illuminate. While the light is
illuminated, press control 1.
SE T
12
2006 Monterey(mty)
Owners Guide (post-2002-fmt)
USA(fus)
Seating and Safety Restraints
112
Page 179 of 320

INFORMATION ABOUT UNIFORM TIRE QUALITY GRADING
New vehicles are fitted with tires
that have a rating on them called
Tire Quality Grades. The Quality
grades can be found where
applicable on the tire sidewall
between tread shoulder and
maximum section width. For
example:
•Treadwear 200 Traction AA Temperature A
These Tire Quality Grades are determined by standards that the United
States Department of Transportation has set.
Tire Quality Grades apply to new pneumatic tires for use on passenger
cars. They do not apply to deep tread, winter-type snow tires,
space-saver or temporary use spare tires, tires with nominal rim
diameters of 10 to 12 inches or limited production tires as defined in
Title 49 Code of Federal Regulations Part 575.104(c)(2).
U.S. Department of Transportation-Tire quality grades:The U.S.
Department of Transportation requires Ford Motor Company to give you
the following information about tire grades exactly as the government
has written it.
Treadwear
The treadwear grade is a comparative rating based on the wear rate of
the tire when tested under controlled conditions on a specified
government test course. For example, a tire graded 150 would wear one
and one-half (1 1/2) times as well on the government course as a tire
graded 100. The relative performance of tires depends upon the actual
conditions of their use, however, and may depart significantly from the
norm due to variations in driving habits, service practices, and
differences in road characteristics and climate.
Traction AA A B C
The traction grades, from highest to lowest are AA, A, B, and C. The
grades represent the tire’s ability to stop on wet pavement as measured
under controlled conditions on specified government test surfaces of
asphalt and concrete. A tire marked C may have poor traction
performance.
2006 Monterey(mty)
Owners Guide (post-2002-fmt)
USA(fus)
Tires, Wheels and Loading
179
Page 198 of 320

How temperature affects your tire pressure
The Tire Pressure Monitoring System (TPMS) monitors tire pressure in
each pneumatic tire. The pressure in each tire is dependent upon several
factors, one of them being the contained air temperature (temperature of
the air inside the tire). As the contained air temperature increases, the
tire pressure also increases. While driving in a normal manner, a typical
passenger tire inflation pressure may increase approximately 2 to 4 psi
(14 to 28 kPa) from a cold start situation. This increase in tire pressure
is due to an increase in the contained air temperature. Contained air
temperature is dependent upon several factors such as rate of tire
rotation, tire deflection, amount of braking, etc. In a similar manner, the
tire pressure will decrease if the contained air temperature decreases.
For example, if the vehicle is stationary over night with the outside
temperature significantly lower than the daytime temperature, the tire
pressure may decrease approximately 3 psi (20.7 kPa) for a drop of
30° F (16.6° C) in ambient temperature. This lower pressure value may
be detected by the TPMS as being significantly lower than the cold
pressure indicated on your vehicles Safety Compliance Certification
Label, and activate the TPMS warning for low tire pressure. If the low
tire pressure warning light is ON, visually check each tire to verify that
no tire is flat. If one or more tires are flat, repair as necessary. Check air
pressure in the road tires. If any tire is underinflated, carefully drive the
vehicle to the nearest location where air can be added to the tires. Turn
the ignition to the OFF position. Inflate all the tires to the recommended
inflation pressure.
The Tire Pressure Monitoring System is NOT a substitute for
manually checking tire pressure. The tire pressure should be
checked periodically (at least monthly) using an accurate tire gauge,
seeInspecting and inflating your tiresin this chapter. Failure to
properly maintain your tire pressure could increase the risk of tire
failure, loss of control, vehicle rollover and personal injury.
SNOW TIRES AND CHAINS
Snow tires must be the same size and grade as the tires you
currently have on your vehicle.
The tires on your vehicle have all weather treads to provide traction in
rain and snow. However, in some climates, you may need to use snow
tires and chains. If you need to use chains, it is recommended that steel
wheels (of the same size and specifications) be used as chains may chip
aluminum wheels.
2006 Monterey(mty)
Owners Guide (post-2002-fmt)
USA(fus)
Tires, Wheels and Loading
198
Page 231 of 320

The fuses are coded as follows:
Fuse/Relay
LocationFuse Amp
RatingPassenger Compartment Fuse
Panel Description
1 Relay Accessory delay relay 1
2 Relay Accessory delay relay 2
3 10A Front wiper motor Run feed
4 5A B+ feed to outside mirrors
5 20A Vent window power feed/Radio
feed
6 5A Driver door switch
illumination/Passenger door
switch illumination
7 10A Rear wiper Run feed
8 10A Cluster/Electronic Automatic
Temperature Control (EATC) B+
feed, DVD
9 10A Passive Anti-theft System (PATS)
LED feed
10 5A Auxiliary radio
11 5A Auxiliary climate control
system/Power Liftgate
Module/Left and right power
sliding door module/Data Link
Connector (DLC)/Clock B+ feeds
2006 Monterey(mty)
Owners Guide (post-2002-fmt)
USA(fus)
Roadside Emergencies
231
Page 232 of 320

Fuse/Relay
LocationFuse Amp
RatingPassenger Compartment Fuse
Panel Description
12 5A Brake-Shift Interlock (BSI) Run
feed, Climate control system Run
feed
13 5A Compass/Driver heated
seat/Passenger heated
seats/Reverse sensing
system/Power Liftgate
Module/Power sliding door Run
feeds
14 5A Underhood fuse box Run feed,
Front blower Run feed
15 10A Brake On-Off (BOO) switch B+
16 5A Steering angle/Cluster/Power
sliding door and power liftgate
inhibit LED/Electrochromatic
mirror Run/Start/Tire Pressure
Monitoring System (TPMS)
17 10A Restraint Control Module
(RCM)/Passenger Air bag Disable
Indicator (PADI)/Passenger
Occupant Detection System
(PODS) Run/Start
18 10A Anti-lock Brake System (ABS)
module/Brake pressure
switch/Speed control Run/Start
19 5A PATS/Cluster/Air bag
LED/Powertrain Control Module
(PCM) relay Run/Start
20 10A Liftgate Start feed, Radio Start
feed
21 10A Starter relay power START
2006 Monterey(mty)
Owners Guide (post-2002-fmt)
USA(fus)
Roadside Emergencies
232