AUX Mercury Monterey 2007 s User Guide
[x] Cancel search | Manufacturer: MERCURY, Model Year: 2007, Model line: Monterey, Model: Mercury Monterey 2007Pages: 312, PDF Size: 3.57 MB
Page 39 of 312

16.A/C:Press to activate/deactivate air conditioning. Use with
recirculated air to improve cooling performance and efficiency. Engages
automatically in AUTO,
, and.
17.REAR:Press to enable the control located in the rear seat. Press
again to turn the auxiliary system off.
18.
Recirculated air:Press to activate/deactivate air
recirculation in the vehicle cabin. Recirculated air may reduce the
amount of time to cool down the interior of the vehicle and may also
help reduce undesired odors from reaching the interior of the vehicle.
Recirculated air can be engaged manually in any airflow selection
except
. Recirculated air may turn off automatically in all airflow
selections.
Operating tips
•To reduce fog build up on the windshield during humid weather, place
the air flow selector in the
position.
•To reduce humidity build up inside the vehicle: do not drive with the
airflow selector in the OFF or with recirculated air engaged.
•Do not put objects under the front seats that will interfere with the
airflow to the back seats.
•Remove any snow, ice or leaves from the air intake area at the base of
the windshield.
•For maximum cooling performance (MAX A/C):
In AUTO mode, press AUTO control and set to desired temperature.
In manual override control, select
or, A/C and recirculated
air
and set the temperature to 60°F (16°C). Set the fan to the
highest speed initially, then adjust to maintain passenger comfort.
•To improve the A/C cool down, drive with the windows slightly open
for 2–3 minutes after starting the vehicle or until the vehicle has
“aired out.”
In extremely cold temperatures, to maximize overall heater performance
it is suggested to not operate the auxiliary system (if so equipped) until
the engine temperature gauge crosses into the normal operating range.
To aid in side window defogging/demisting in cold weather:
1. Select
.
2. Select A/C.
2007 Monterey(mty)
Owners Guide (post-2002-fmt)
USA(fus)
Climate Controls
39
Page 40 of 312
3. Adjust the temperature control to maintain comfort.
4. Set the fan to the highest speed.
5. Direct the outer instrument panel vents towards the side windows.
Do not place objects on top of the instrument panel as these
objects may become projectiles in a collision or sudden stop.
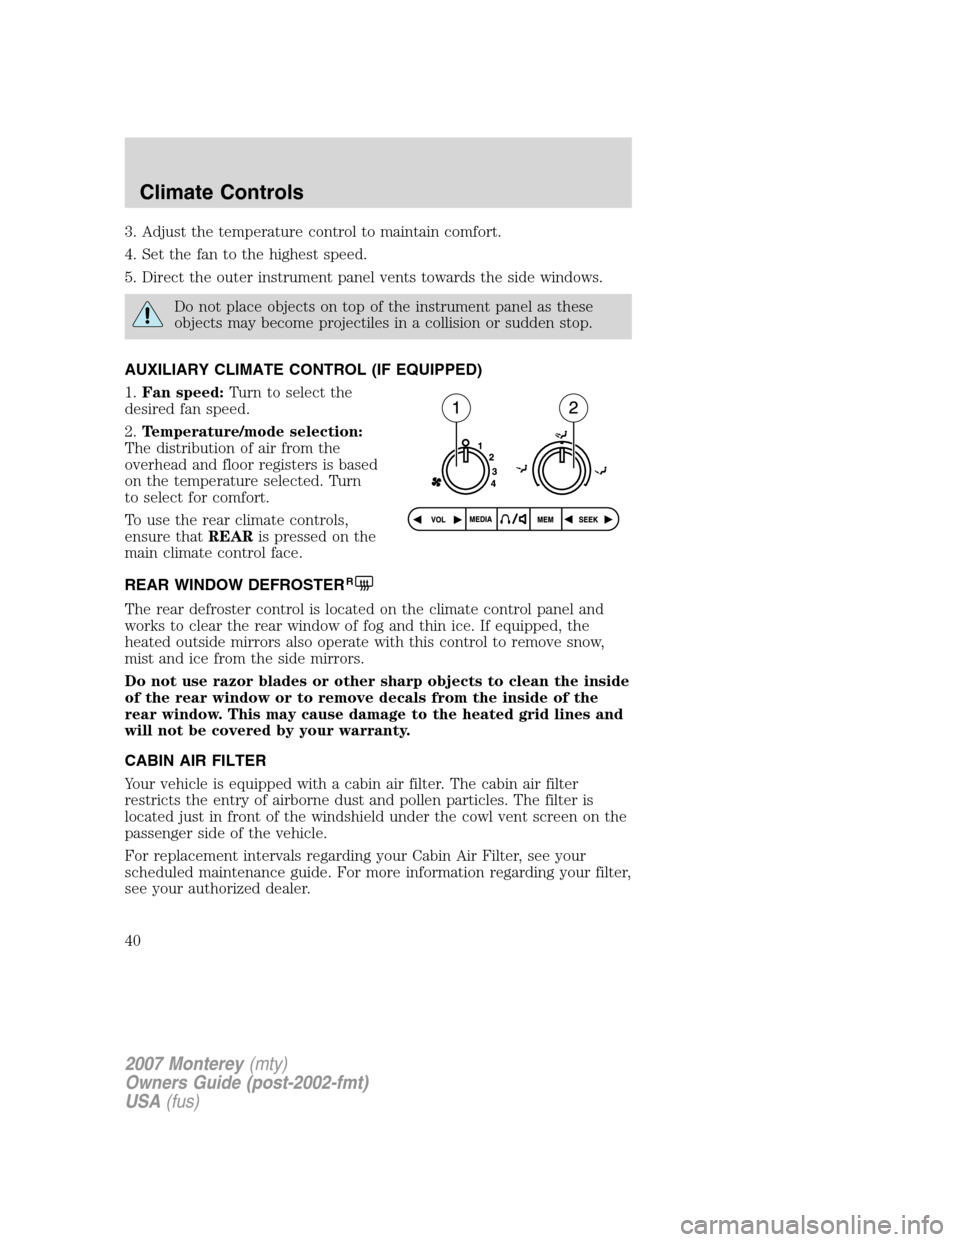
AUXILIARY CLIMATE CONTROL (IF EQUIPPED)
1.Fan speed:Turn to select the
desired fan speed.
2.Temperature/mode selection:
The distribution of air from the
overhead and floor registers is based
on the temperature selected. Turn
to select for comfort.
To use the rear climate controls,
ensure thatREARis pressed on the
main climate control face.
REAR WINDOW DEFROSTER
R
The rear defroster control is located on the climate control panel and
works to clear the rear window of fog and thin ice. If equipped, the
heated outside mirrors also operate with this control to remove snow,
mist and ice from the side mirrors.
Do not use razor blades or other sharp objects to clean the inside
of the rear window or to remove decals from the inside of the
rear window. This may cause damage to the heated grid lines and
will not be covered by your warranty.
CABIN AIR FILTER
Your vehicle is equipped with a cabin air filter. The cabin air filter
restricts the entry of airborne dust and pollen particles. The filter is
located just in front of the windshield under the cowl vent screen on the
passenger side of the vehicle.
For replacement intervals regarding your Cabin Air Filter, see your
scheduled maintenance guide. For more information regarding your filter,
see your authorized dealer.
2007 Monterey(mty)
Owners Guide (post-2002-fmt)
USA(fus)
Climate Controls
40
Page 63 of 312

CLOCK
Press the right (+) control to move
the time display forwards.
Press the left (-) control to move
the time display backwards.
AUXILIARY POWER POINT (12VDC)
Power outlets are designed for accessory plugs only. Do not insert
any other object in the power outlet as this will damage the
outlet and blow the fuse. Do not hang any type of accessory or
accessory bracket from the plug. Improper use of the power
outlet can cause damage not covered by your warranty.
Do not use the power point for operating the cigarette lighter element (if
equipped).
To prevent the fuse from being blown, do not use the power point(s)
over the vehicle capacity of 12 VDC/180W.
To prevent the battery from being discharged, do not use the power
point longer than necessary when the engine is not running.
Always keep the power point caps closed when not being used.
There are up to three auxiliary power points in the following locations:
•Located on the instrument panel.
2007 Monterey(mty)
Owners Guide (post-2002-fmt)
USA(fus)
Driver Controls
63
Page 203 of 312
1400 – (2 x 220) – (9 x 100) = 1400 – 440 – 900 = 60 lb. Now you
have the load capacity to transport the cement and your friend home.
In metric units, the calculation would be: 635 kg — (2 x 99 kg) —
(9 x 45 kg) = 635 — 198 — 405 = 32 kg.
The above calculations also assume that the loads are positioned in your
vehicle in a manner that does not overload the Front or the Rear Gross
Axle Weight Rating specified for your vehicle on the Safety Compliance
Certification Label found on the edge of the driver’s door.
TRAILER TOWING
Your vehicle is capable either of towing Class I trailers or up to Class II
trailers when equipped with the optional trailer tow package.
If your vehicle does not have the optional trailer tow package your
vehicle is partially prepped for trailer tow lamp wiring but you will also
need to install electrical kit (15A416). This kit contains fuses and relays
to isolate the vehicle lighting circuitry from the trailer lighting and an
adapter wiring harness containing the standard 4-pin trailer plug. Refer
to theTrailer lampssection in this chapter for additional information.
Do not tow above 2,000 lb. (907 kg) without the
manufacturer-installed trailer tow package.
A new underbody wiring harness (14406) will be a component to this kit
and will need to be installed, if applicable, per instructions located in the
service kit.
If your vehicle has the optional trailer tow package it comes with heavy
duty cooling fans, auxiliary transmission fluid cooler, an auxiliary engine
oil cooler, heavy duty battery, trailer tow wiring (including fuses and
relays to isolate the vehicle lighting circuitry from the trailer lighting)
and a kit (in a cardboard box) that includes an adapter wiring harness
that contains the standard 4-pin trailer plug.
Trailer towing puts additional loads on your vehicle’s engine,
transmission, axle, brakes, tires, and suspension. For your safety and to
maximize vehicle performance, be sure to use the proper equipment
while towing.
Follow these guidelines to ensure safe towing procedure:
•Stay within your vehicle’s load limits. If exceeded, cargo should be
removed from the trailer and/or the vehicle until all weights are within
specified limits.
•Thoroughly prepare your vehicle for towing. Refer toPreparing to
towin this chapter.
2007 Monterey(mty)
Owners Guide (post-2002-fmt)
USA(fus)
Tires, Wheels and Loading
203
Page 228 of 312

The fuses are coded as follows:
Fuse/Relay
LocationFuse Amp
RatingPassenger Compartment Fuse
Panel Description
1 Relay Accessory delay relay 1
2 Relay Accessory delay relay 2
3 10A Front wiper motor Run feed
4 5A B+ feed to outside mirrors
5 20A Vent window power feed/Radio
feed
6 5A Driver door switch
illumination/Passenger door
switch illumination
7 10A Rear wiper Run feed
8 10A Cluster/Electronic Automatic
Temperature Control (EATC) B+
feed, DVD
9 10A Passive Anti-theft System (PATS)
LED feed
10 5A Auxiliary radio
11 5A Auxiliary climate control
system/Power Liftgate
Module/Left and right power
sliding door module/Data Link
Connector (DLC)/Clock B+ feeds
2007 Monterey(mty)
Owners Guide (post-2002-fmt)
USA(fus)
Roadside Emergencies
228
Page 231 of 312

Fuse/Relay
LocationFuse Amp
RatingPower Distribution Box
Description
3 30A** Left cooling fan
4 30A** Starter solenoid
5 30A** Right-hand power sliding door
6 30A** SJB accessory #2 (driver power
window)
7 30A** Auxiliary blower motor
8 40A** Anti-lock Brake System (ABS) #2
(coil power)
9 30A** Power liftgate
10 30A** SJB accessory #1 (passenger
window, radio, vent windows)
11 30A** Left power seat/heated seat
12 40A** ABS #1 (pump motor)
13 40A** Rear defroster
14 30A** Front climate control system
blower motor
15 30A** Right power seat/heated seat
16 30A** Left-hand power sliding door
20 Mini relay Powertrain Control Module (PCM)
power
21 Mini relay Horn
22 Micro relay A/C clutch
23 Micro relay High beams
24 Mini relay Starter
25 Micro relay Fuel pump
26 Micro relay Fog lamps
27 — Not used
28 Mini relay Auxiliary blower
29 Micro relay Trailer park lamps
30 Micro relay Left trailer stop/turn lamps
31 Micro relay Right trailer stop/turn lamps
32 Mini relay Rear defroster
2007 Monterey(mty)
Owners Guide (post-2002-fmt)
USA(fus)
Roadside Emergencies
231
Page 232 of 312
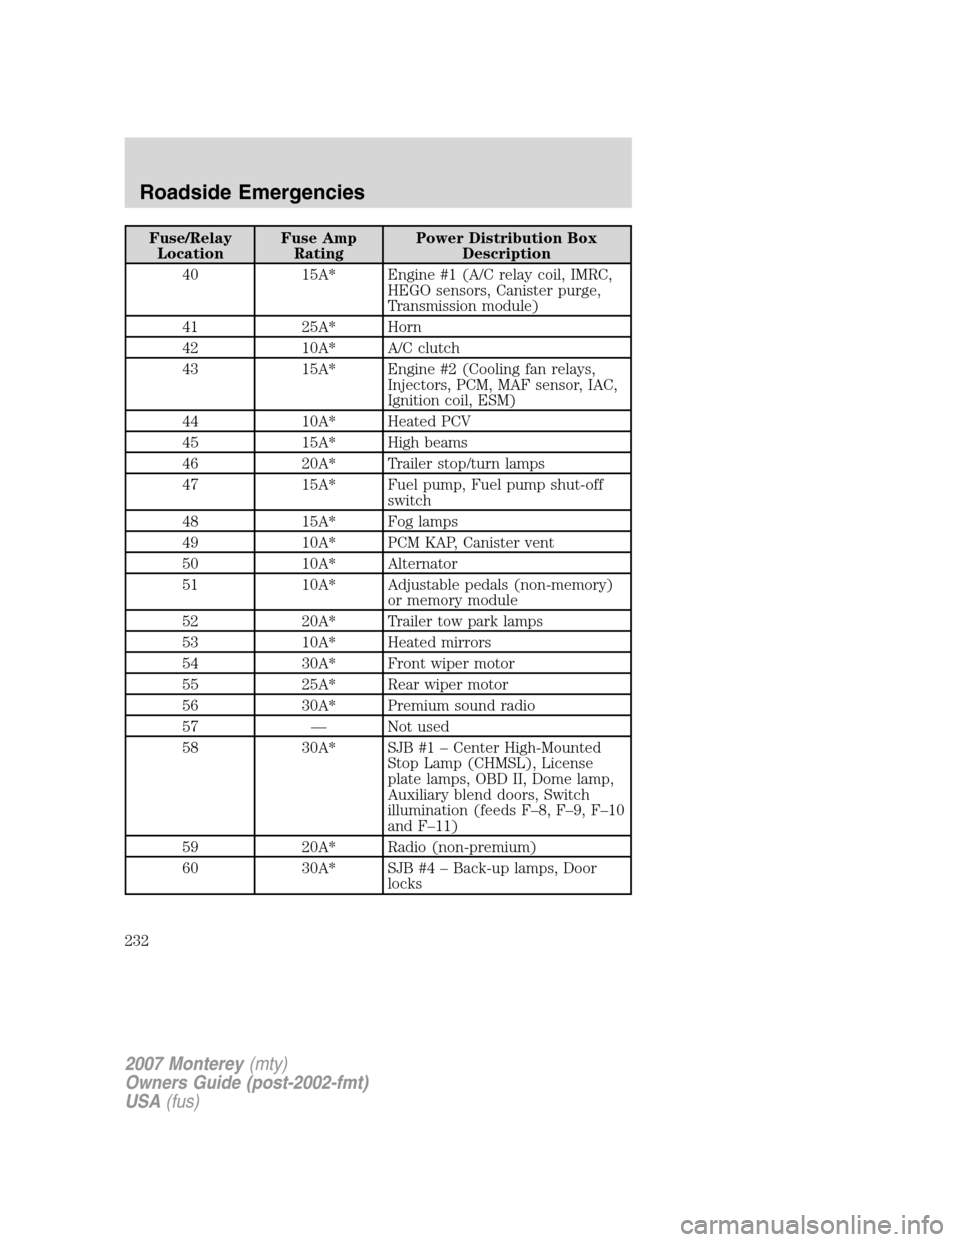
Fuse/Relay
LocationFuse Amp
RatingPower Distribution Box
Description
40 15A* Engine #1 (A/C relay coil, IMRC,
HEGO sensors, Canister purge,
Transmission module)
41 25A* Horn
42 10A* A/C clutch
43 15A* Engine #2 (Cooling fan relays,
Injectors, PCM, MAF sensor, IAC,
Ignition coil, ESM)
44 10A* Heated PCV
45 15A* High beams
46 20A* Trailer stop/turn lamps
47 15A* Fuel pump, Fuel pump shut-off
switch
48 15A* Fog lamps
49 10A* PCM KAP, Canister vent
50 10A* Alternator
51 10A* Adjustable pedals (non-memory)
or memory module
52 20A* Trailer tow park lamps
53 10A* Heated mirrors
54 30A* Front wiper motor
55 25A* Rear wiper motor
56 30A* Premium sound radio
57 — Not used
58 30A* SJB #1 – Center High-Mounted
Stop Lamp (CHMSL), License
plate lamps, OBD II, Dome lamp,
Auxiliary blend doors, Switch
illumination (feeds F–8, F–9, F–10
and F–11)
59 20A* Radio (non-premium)
60 30A* SJB #4 – Back-up lamps, Door
locks
2007 Monterey(mty)
Owners Guide (post-2002-fmt)
USA(fus)
Roadside Emergencies
232
Page 233 of 312
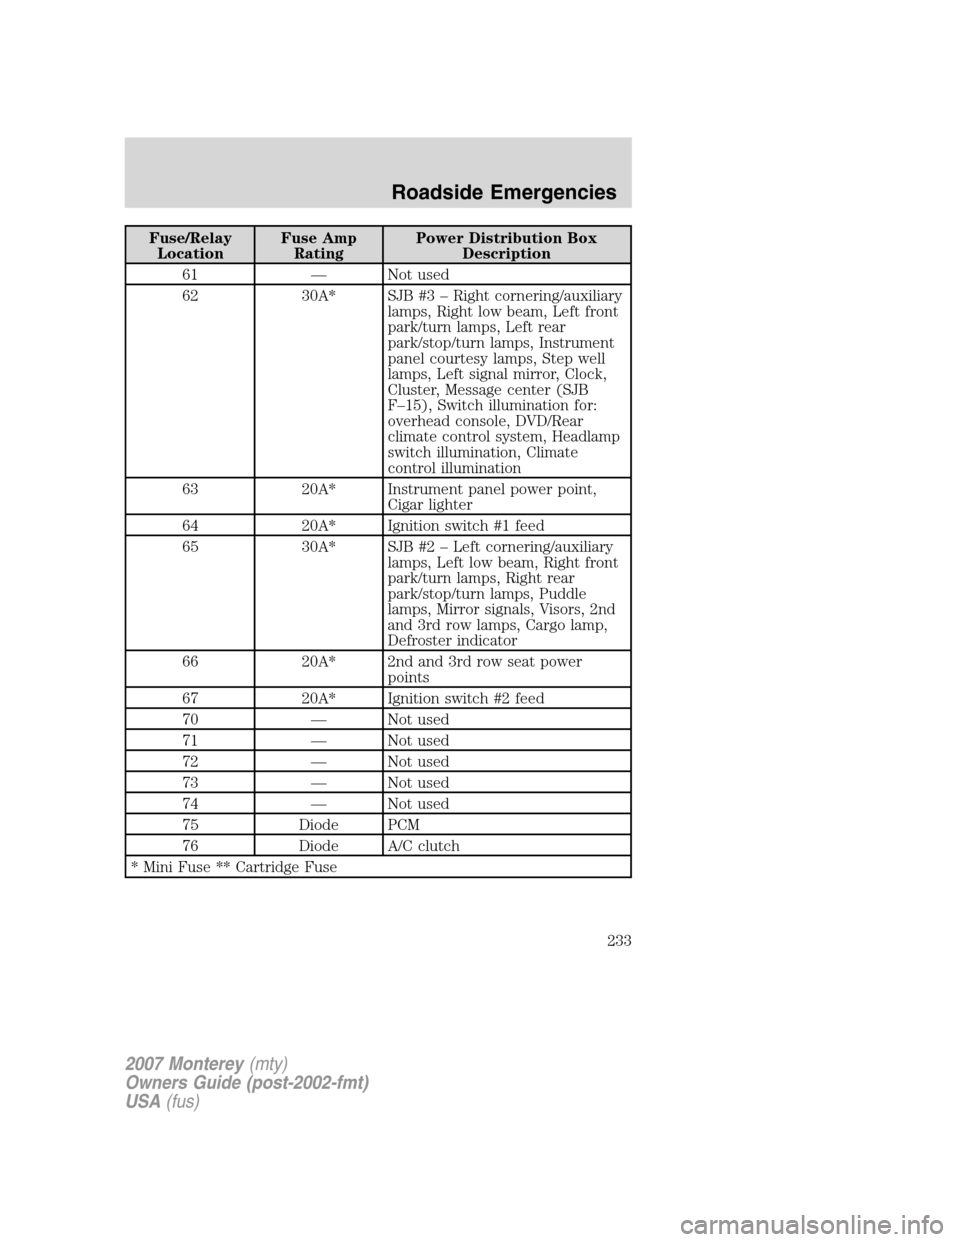
Fuse/Relay
LocationFuse Amp
RatingPower Distribution Box
Description
61 — Not used
62 30A* SJB #3 – Right cornering/auxiliary
lamps, Right low beam, Left front
park/turn lamps, Left rear
park/stop/turn lamps, Instrument
panel courtesy lamps, Step well
lamps, Left signal mirror, Clock,
Cluster, Message center (SJB
F–15), Switch illumination for:
overhead console, DVD/Rear
climate control system, Headlamp
switch illumination, Climate
control illumination
63 20A* Instrument panel power point,
Cigar lighter
64 20A* Ignition switch #1 feed
65 30A* SJB #2 – Left cornering/auxiliary
lamps, Left low beam, Right front
park/turn lamps, Right rear
park/stop/turn lamps, Puddle
lamps, Mirror signals, Visors, 2nd
and 3rd row lamps, Cargo lamp,
Defroster indicator
66 20A* 2nd and 3rd row seat power
points
67 20A* Ignition switch #2 feed
70 — Not used
71 — Not used
72 — Not used
73 — Not used
74 — Not used
75 Diode PCM
76 Diode A/C clutch
* Mini Fuse ** Cartridge Fuse
2007 Monterey(mty)
Owners Guide (post-2002-fmt)
USA(fus)
Roadside Emergencies
233
Page 234 of 312

Auxiliary relay box (cooling fans)
The relay box is located in the engine compartment by the radiator.
Fuse/Relay
locationFuse amp
ratingDescription
1 — Cooling fan relay #4
2 — Cooling fan relay #5
3 — Cooling fan relay #3
4 — Cooling fan relay #1
5 — Cooling fan relay #2
6 40A* Right-hand cooling fan motor (Vehicles with
trailer tow package only)
7 15A** Low-speed cooling fan circuit breaker
(Vehicles with trailer tow package only)
8 40A* Left-hand cooling fan motor (Vehicles with
trailer tow package)
10A** Low-speed cooling fan circuit breaker
(Vehicles without trailer tow package)
* Maxi fuse **Circuit breaker
CHANGING A FLAT TIRE
If you get a flat tire while driving:
•do not brake heavily.
•gradually decrease the vehicle’s speed.
•hold the steering wheel firmly.
•slowly move to a safe place on the side of the road.
•If your low tire warning light is on, refer toLow tire warningin this
chapter.
2007 Monterey(mty)
Owners Guide (post-2002-fmt)
USA(fus)
Roadside Emergencies
234
Page 266 of 312
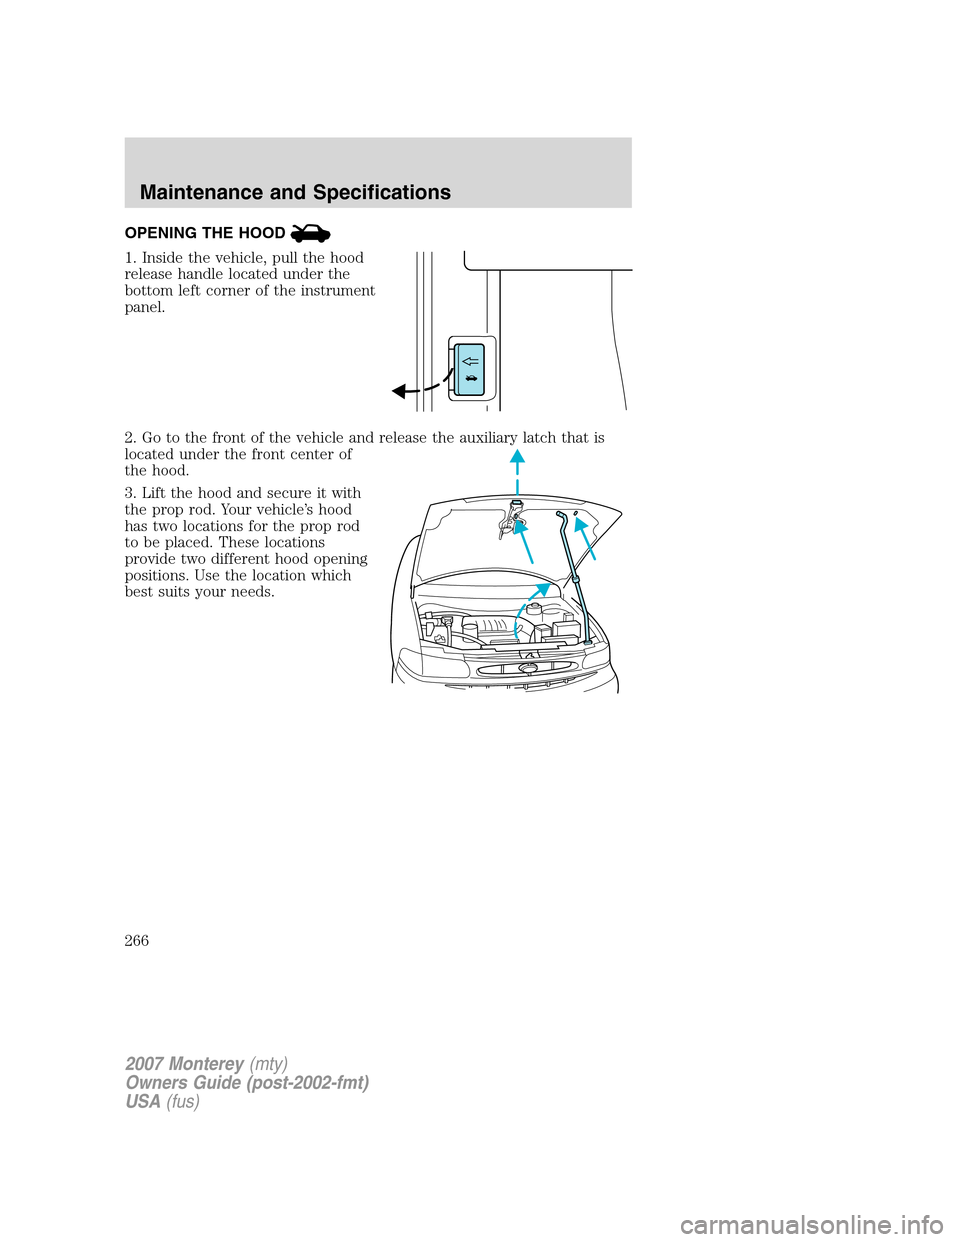
OPENING THE HOOD
1. Inside the vehicle, pull the hood
release handle located under the
bottom left corner of the instrument
panel.
2. Go to the front of the vehicle and release the auxiliary latch that is
located under the front center of
the hood.
3. Lift the hood and secure it with
the prop rod. Your vehicle’s hood
has two locations for the prop rod
to be placed. These locations
provide two different hood opening
positions. Use the location which
best suits your needs.
2007 Monterey(mty)
Owners Guide (post-2002-fmt)
USA(fus)
Maintenance and Specifications
266