window Mercury Mountaineer 1997 s User Guide
[x] Cancel search | Manufacturer: MERCURY, Model Year: 1997, Model line: Mountaineer, Model: Mercury Mountaineer 1997Pages: 197, PDF Size: 2.08 MB
Page 85 of 197

7. Insert the left and right safety
belt tongues into the left and right
slots of the crotch buckle. Verify
that the indicator window on each
tongue is green to ensure proper
safety belt connections.
If both tongues do not
latch in the buckle, do not
use the child seat. See your
dealer for repairs.
8. Fasten the left and right chest
clip halves together, and adjust the
clip (up or down) to comfortably
hold the shoulder belts in place on
the child's chest.
The chest clip is designed to easily
pull apart in the event of an
accident. The clip helps keep the
belts on a squirming or sleeping
child.
Seating and safety restraints
85
Page 95 of 197

Ventilating your vehicle
²If the engine is idling while the
vehicle is stopped in an open
area for long periods of time,
open the windows at least 2.5
cm (1 inch). Adjust the heating
or air conditioning to bring in
fresh air.
²Improve vehicle ventilation by
keeping all air inlet vents clear
of snow, leaves and other debris.
OFF
A/C
MAX
A/C
U
AUTO
L DOOR LOCK
Starting your vehicle
95
Page 117 of 197

²sudden stops
²extended engine idling
²use of speed control in hilly
terrain
²extended use of the air
conditioner, defroster, rear
window defroster and other
accessories
²underinflated tires
²heavy loads
²aftermarket add-ons such as
bike, ski or luggage racks, bug
deflectors, etc.
Driving
117
Page 123 of 197

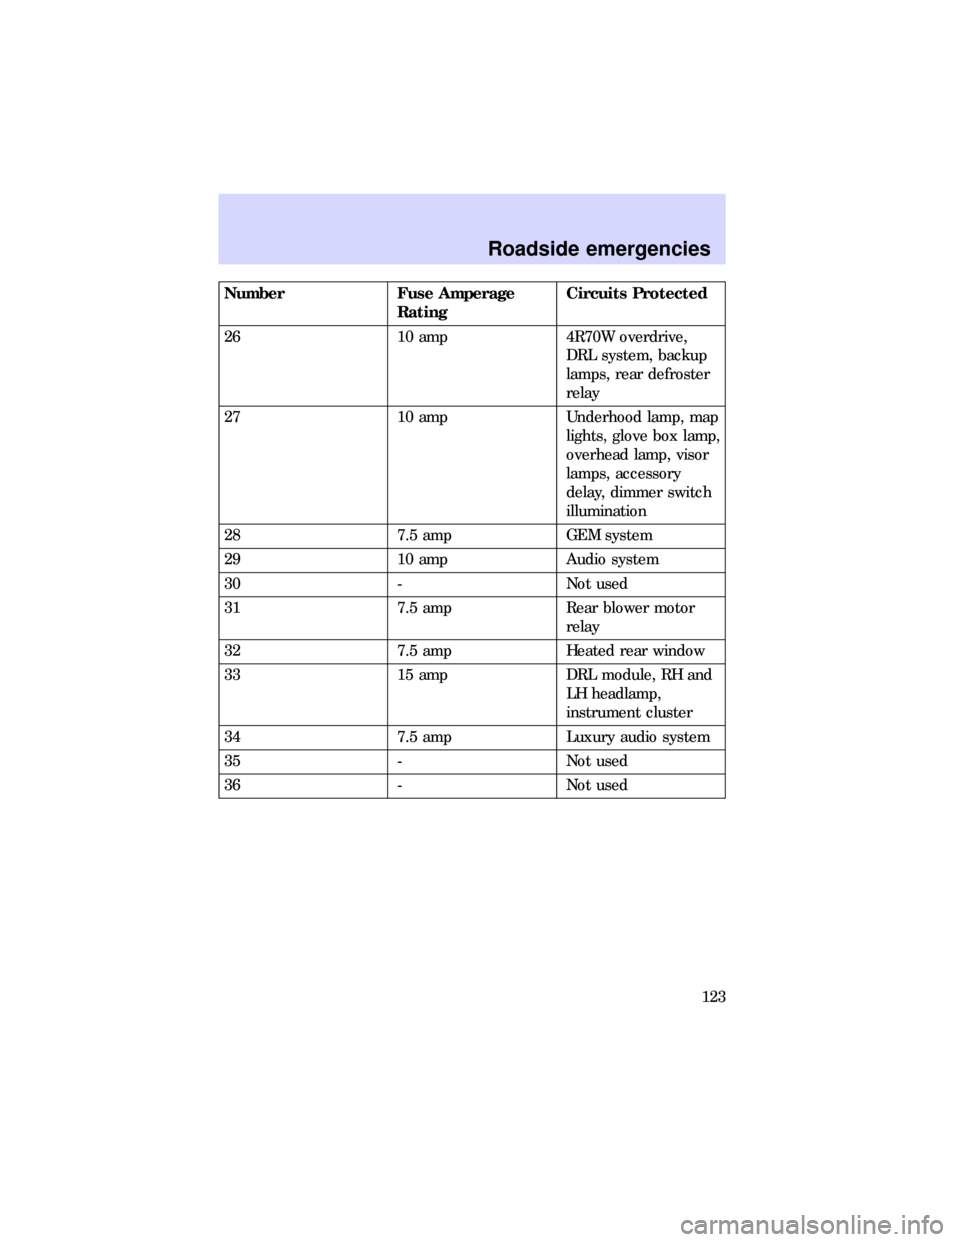
Number Fuse Amperage
RatingCircuits Protected
26 10 amp 4R70W overdrive,
DRL system, backup
lamps, rear defroster
relay
27 10 amp Underhood lamp, map
lights, glove box lamp,
overhead lamp, visor
lamps, accessory
delay, dimmer switch
illumination
28 7.5 amp GEM system
29 10 amp Audio system
30 - Not used
31 7.5 amp Rear blower motor
relay
32 7.5 amp Heated rear window
33 15 amp DRL module, RH and
LH headlamp,
instrument cluster
34 7.5 amp Luxury audio system
35 - Not used
36 - Not used
Roadside emergencies
123
Page 125 of 197

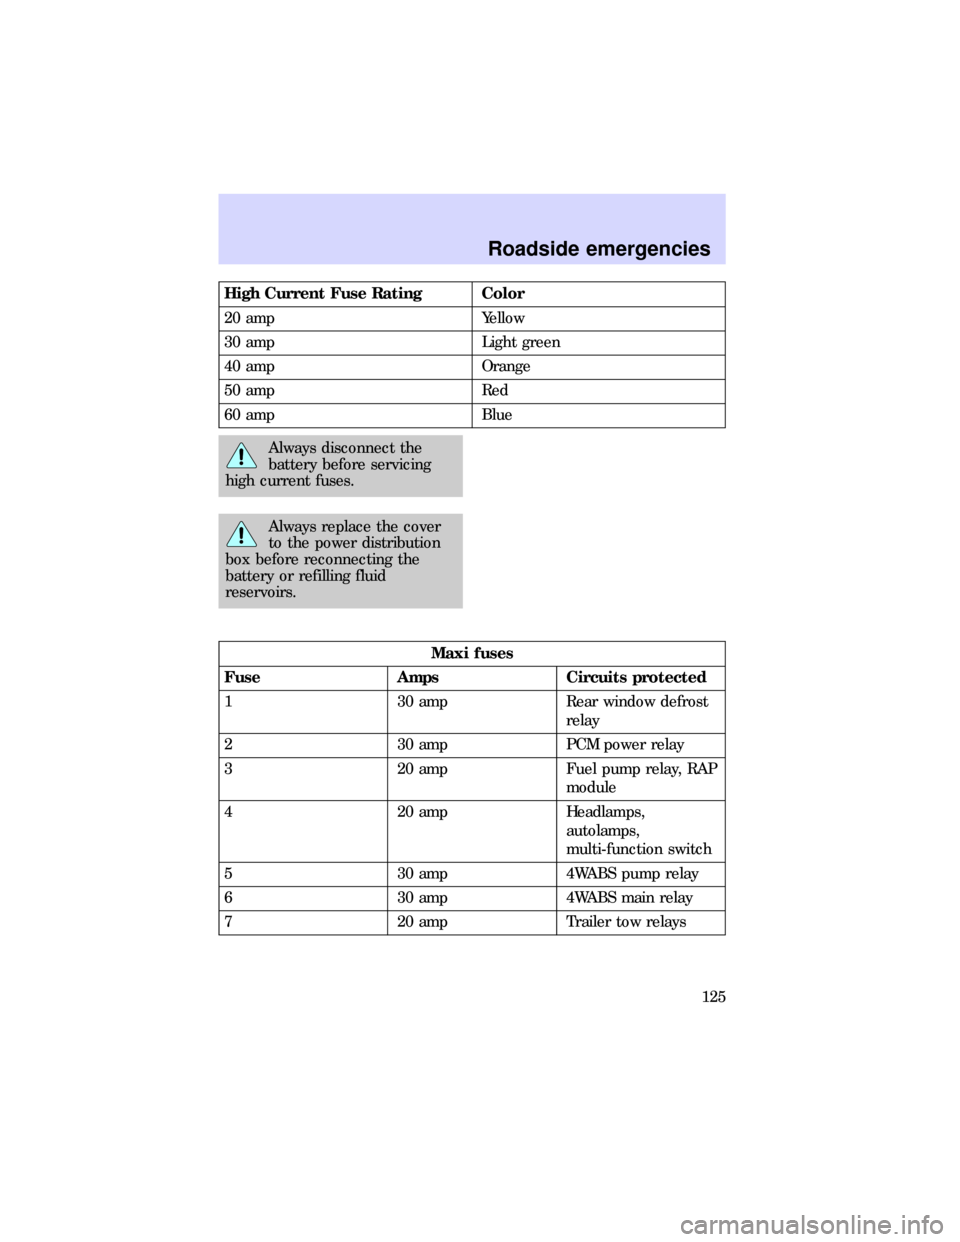
High Current Fuse Rating Color
20 amp Yellow
30 amp Light green
40 amp Orange
50 amp Red
60 amp Blue
Always disconnect the
battery before servicing
high current fuses.
Always replace the cover
to the power distribution
box before reconnecting the
battery or refilling fluid
reservoirs.
Maxi fuses
Fuse Amps Circuits protected
1 30 amp Rear window defrost
relay
2 30 amp PCM power relay
3 20 amp Fuel pump relay, RAP
module
4 20 amp Headlamps,
autolamps,
multi-function switch
5 30 amp 4WABS pump relay
6 30 amp 4WABS main relay
7 20 amp Trailer tow relays
Roadside emergencies
125
Page 158 of 197

on wiper blade until lock tab is
engaged.
To replace liftgate wiper blade:
1. Pull wiper arm away from
liftgate window.
2. Use small screwdriver to
depress lock tab and pull wiper
blade upwards and away from
wiper arm.
3. Attach new wiper blade by
pushing wiper arm post through
hole in wiper blade until lock tab is
engaged.
Information about tire grades
New vehicles are fitted with tires
that have their Tire Quality Grade
(described below) molded into the
tire's sidewall. These Tire Quality
Grades are determined by
standards that the United States
Department of Transportation has
set.
Tire Quality Grades apply to new
pneumatic tires for use on
passenger cars. They do not apply
to deep tread, winter-type snow
tires, space-saver or temporary use
spare tires, tires with nominal rim
diameters of 25.4 cm to 30.48 cm
(10 to 12 in.) or limited production
tires as defined in Title 49 Code of
Federal Regulations Part
575.104(c)(2).
U.S. Department of Transportation
- Tire quality grades: The U.S.
Department of Transportation
requires Ford to give you the
following information about tire
Maintenance and care
158
Page 174 of 197

3. Remove electrical connector by
grasping wires and pulling
rearward.
4. Remove bulb retaining ring by
turning it 1/8 turn to free it from
the socket. Slide the ring off the
plastic base.
5. Carefully remove the bulb
assembly from its socket by gently
pulling it rearward.
6. With the flat side of the bulb's
plastic base facing upward, insert
the glass end of the bulb into the
socket. You may need to turn the
bulb left or right to line up the
grooves in the plastic base with
the tabs in the socket.
7. Slip the bulb retaining ring over
the plastic base and lock it by
rotating it clockwise until you feel
it stop.
8. Push the electrical connector
into the rear of the plastic base
until you feel it ªsnap.º
9. Replace the bulb assembly into
the headlamp.
High-mount brakelamp
The high-mount brakelamp is
located just above the rear liftgate
window. For bulb replacement, see
your dealer.
Rear turn signals/brake/tail
lamps/backup lamps
The tail lamps, backup lamps and
the brake lamps are located in the
same bezel. Follow these steps to
Maintenance and care
174
Page 180 of 197

DescriptionNumber
of BulbsTrade Number
Radio Illumination
1
Instrument Panel
Ashtray lamp 1 161
Glove compartment lamp 1 194
Instrument cluster 1 each 194
Instrument Panel Controls
A/C controls 1 161
Rear window wiper/washer
control1
2
Headlamp controls 1 1815
Heater controls 1 161
1Replaceable at Lincoln/Mercury and Ford authorized radio service
centers.
2See your dealer for bulb replacement.
* Natural amber
Aiming headlamps
The alignment of your headlamps
should be checked if:
²Oncoming motorists frequently
signal you to turn off your
vehicle's high beams when you
do not have the high beams on.
²The headlamps do not seem to
give you enough light to see
clearly at night.
²The headlamp beams are
pointed substantially away from
a position slightly down and to
the right.
Maintenance and care
180
Page 193 of 197

Air bag supplemental restraint
system ............71,74,75,76,77,82,87
and child safety
seats .......................74,76,77,82,87
description ................................73
indicator light ...........................74
Air cleaner filter
replacing ..................................156
All Wheel Drive .........................102
Anti-theft system ........................56
arming the system ....................56
disarming a triggered system ..57
disarming an untriggered
system .......................................57
Audio system (see Electronic
sound system) .............................16
Autolamp system (see
Headlamps) .................................33
Automatic transmission ..............98
fluid, adding ............................149
Battery .......................................153
battery saver .............................58
how to service ........................153
Brake fluid
checking and adding ..............142
Brakelamp
bulb replacement ....................174
Brakes ..........................................97
adjustment ................................96
anti-lock .....................................96
anti-lock brake system (ABS)
warning light .............................97
parking ......................................97
Break-in period .............................3
Bulbs, replacing
specifications ..........................179
Cargo area shade ...................46,47
Cargo cover ............................46,47
Childproof locks ..........................39
Chime ...........................................11
headlamps on ............................12
key-in-ignition ...........................11safety belt ............................11,69
Cleaning your vehicle
built-in child seat ...................184
engine compartment ..............183
exterior ....................................182
instrument panel ....................182
plastic parts ............................182
safety belts ..............................184
washing ....................................181
wheels ......................................182
wiper blades ............................183
Climate control
system ...........................17,18,19,21
air conditioning .........................21
heating .......................................21
Compass, electronic
calibration .................................30
set zone adjustment .................30
Compass/temperature display ...29
Console, description ...................42
Controls
instrument panel ......................13
steering column ........................22
Daytime running light system ...14
Defects, reporting .....................192
Defrost
rear window ..............................15
Driving under special
conditions
towing a trailer .......................114
Electronic sound system ............16
Emission control system ..........168
Engine .................................139,189
Engine block heater ...................93
Engine coolant
checking and adding ..............145
checking hoses .......................148
Engine coolant temperature
gauge ..............................................7
Engine oil
checking and adding .......140,142
Exhaust fumes ............................94
Index
193
Page 195 of 197

Parts (see Motorcraft Parts) ...185
Power door locks ........................38
Power steering
fluid, checking and adding ....148
Rear climate control system ......45
Refill capacities for fluids ........185
Relays .................................127,128
Remote entry system
arming and disarming the
anti-theft system .................52,54
locking/unlocking doors ...........53
panic alarm ...............................53
replacement/additional
transmitters ...............................55
replacing the batteries .............54
Repairing paint chips ...............181
Reporting safety defects ..........192
Safety chains, when towing a
trailer .........................................113
Safety defects, reporting ..........192
Safety restraints ..........................63
adjusting the safety belts .........67
automatic locking mode
(retractor) .................................66
center rear lap belt ..................68
cleaning the safety belts ..........71
extension assembly ..................71
lap and shoulder belts .............64
maintenance ..............................69
proper use .................................64
replacement ..............................70
warning light and chime ..........69
Seats
adjusting the seat, manual .......59
adjusting the seats, power .......60
folding rear seats ......................62
head restraints ..........................62
Servicing your vehicle ..............136
precautions when
servicing ...........................136,138
servicing when you tow .........115
Shift-lock system ......................101Spare tire .....................................48
Speed control ..............................23
Speedometer .................................6
Starting your vehicle .............89,91
preparing to start your
vehicle ..................................89,91
starting a warm engine ............92
Steering wheel
tilting .........................................27
Tachometer ...................................6
Tail lamps
bulb replacement ....................174
Tilt steering wheel ......................27
Tire types ..................................163
Tires
changing ..................................128
checking the pressure ............160
replacing ...........................162,163
rotating .............................161,162
snow tires and chains ............163
treadwear ................................159
Towing your vehicle .................135
Trailer towing ..............110,113,114
calculating maximum trailer
weight ......................................111
tips ...........................................115
trailer brakes ...........................113
trailer lamps ............................114
Transfer case
fluid checking .........................152
Trip odometer ...............................7
Turn signal .........................174,176
Vehicle dimensions ...................190
Vehicle Identification Number
(VIN) ..........................................191
Ventilating your vehicle (see
Climate control) ..........................21
Washer fluid ..............................144
rear window reservoir ............145
Windows
power windows,
operating .........................35,36,37
Index
195