ESP Mercury Mountaineer 1997 Owner's Manuals
[x] Cancel search | Manufacturer: MERCURY, Model Year: 1997, Model line: Mountaineer, Model: Mercury Mountaineer 1997Pages: 197, PDF Size: 2.08 MB
Page 2 of 197

The following icons appear in this
Owner's Guide:
indicates a warning. Read the
following section onWarningsfor
a full explanation of warnings.
indicates that vehicle
information related to recycling
and other environmental concerns
will follow.
Warnings
Warnings remind you to be
especially careful in those areas
where carelessness can cause
damage to your vehicle or personal
injury to yourself, your passengers
or other people. Please read all
Warnings carefully.
Notice to owners of utility-type
vehicles
As with other vehicles of this type,
failure to operate this vehicle
correctly may result in loss of
control or an accident. Be sure to
readSpecial driving instructions
for AWD vehicleslater in this
Owner's Guide and the special
supplement included with AWD
and 4x4 vehicles entitled
Four-Wheeling.
Four-Wheelingpresents safe
driving practices to owners of AWD
and 4x4 utility vehicles. Your AWD
vehicle handles differently than an
ordinary passenger car and has
some special safety considerations.
This is because your AWD vehicle
has several design and equipment
Introduction
2
Page 50 of 197

presents them in a sequential
order.
Press the middle of the buttons
(there is only one switch under
each button).
You can use either code to unlock
your vehicle. If a second personal
code is entered, the module will
erase the old code in favor of the
new code. If you wish to erase
your personal code, use the
following instructions:
Erasing personal code
1. Enter factory-set code.
2. Press 1/2 within five seconds of
Step 1.
3. Wait six seconds.
The system will now only respond
to the factory-set code.
Unlocking the doors with the
keyless entry system
1. Enter either factory-set code or
personal code. Driver door will
unlock and interior lamps will
illuminate.
2. Press 3/4 button within five
seconds of unlocking driver door.
Passenger doors and liftgate will
unlock.
If five seconds expire, you must
re-enter code, then press 3/4
button to unlock all doors.
Locking doors with keyless
entry system
It is not necessary to enter the
factory or personal code prior to
Controls and features
50
Page 65 of 197

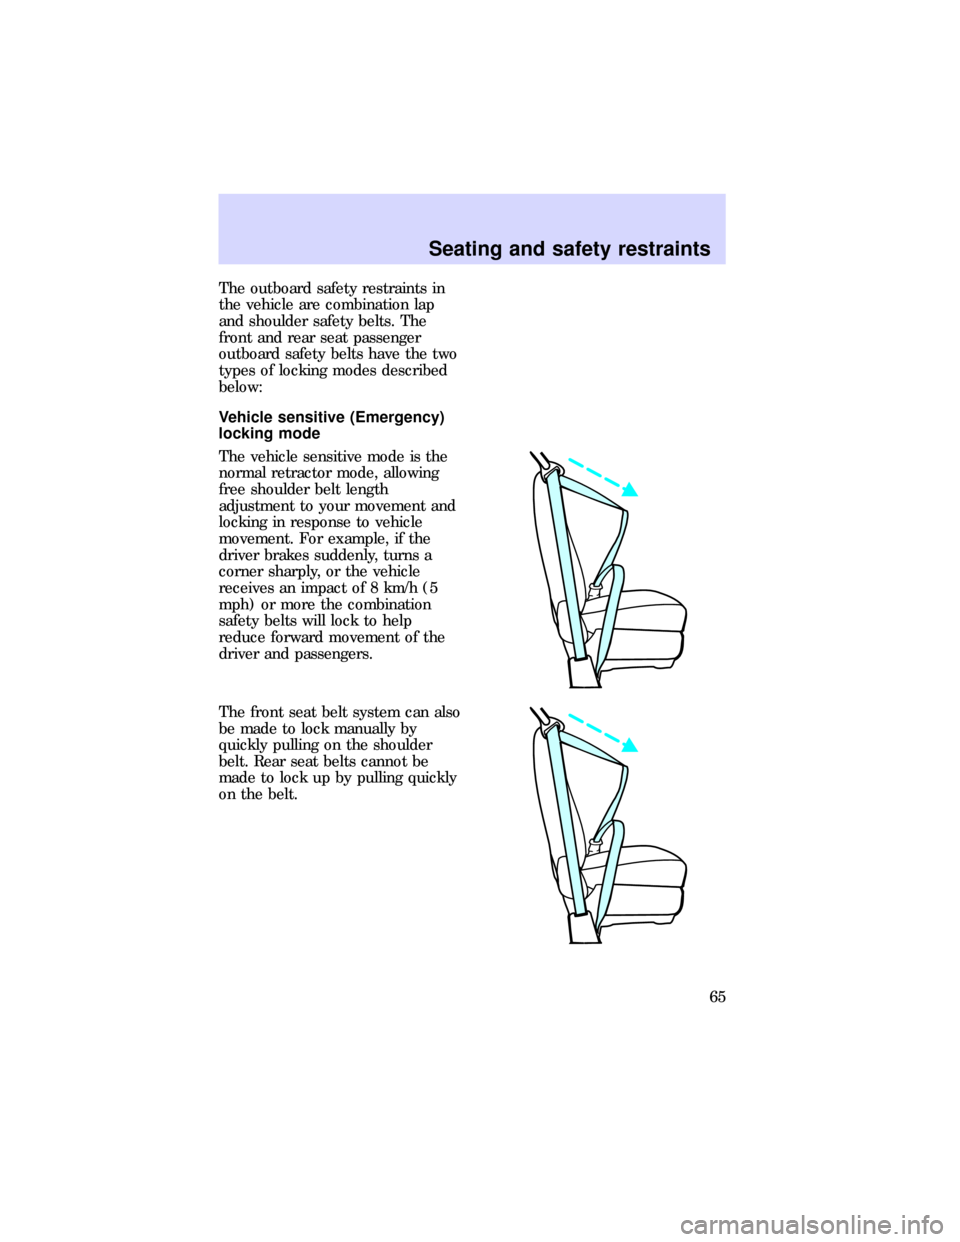
The outboard safety restraints in
the vehicle are combination lap
and shoulder safety belts. The
front and rear seat passenger
outboard safety belts have the two
types of locking modes described
below:
Vehicle sensitive (Emergency)
locking mode
The vehicle sensitive mode is the
normal retractor mode, allowing
free shoulder belt length
adjustment to your movement and
locking in response to vehicle
movement. For example, if the
driver brakes suddenly, turns a
corner sharply, or the vehicle
receives an impact of 8 km/h (5
mph) or more the combination
safety belts will lock to help
reduce forward movement of the
driver and passengers.
The front seat belt system can also
be made to lock manually by
quickly pulling on the shoulder
belt. Rear seat belts cannot be
made to lock up by pulling quickly
on the belt.
Seating and safety restraints
65
Page 74 of 197

bags, and the air bags deflate. You
may notice smoke and smell the
escaping gas after the air bags
deflate. This is normal.
You and your passenger must wear
your safety belts in order for the
air bag system to operate
effectively.
AIR BAG WARNING LIGHT AND
CHIME
When you turn the ignition key to
the ON position, the
warning
light in the instrument cluster
illuminates for approximately six
seconds to indicate the air bag
system is functional.
If you hear a group of five beeps,
or if the
warning light does
not illuminate, stays lit, or flashes,
the air bag system requires
immediate service. Have the
vehicle serviced at your dealer.
CHILD RESTRAINT
PRECAUTIONS
You are required by law to use
safety restraints in the United
States and Canada. If small
children ride in your vehicle
(generally children who are four
years of age or younger and who
weigh 18 kg [40 lb or less]), you
must put them in safety seats
made especially for children.
Check your local and state laws for
specific requirements regarding the
safety of your children.
Seating and safety restraints
74
Page 86 of 197

9. Pull on the safety belt tongues
to ensure they are both securely
latched. If they are not latched,
repeat Steps 7 and 8.
If necessary, the shoulder belts can
be put in automatic locking mode
(ALR) to limit the child's
movement in the child seat. The
ALR mode may be used if the child
is sleeping or attempting to get out
of the child seat.
If not placed in the ALR mode, the
child seat shoulder belts are in a
vehicle sensitive (emergency
locking) mode, adjusting shoulder
belt tightness in response to
vehicle movement.
Activating the automatic locking
mode (ALR) on the built-in child
seat.
1. Pull out right shoulder belt fully.
2. Allow the belts to tighten snugly
against child's shoulders.
Canceling the automatic locking
mode (ALR) on the built-in child
seat
1. Disconnect the chest clip and
remove the left and right safety
belt tongues from the crotch
buckle.
Seating and safety restraints
86
Page 93 of 197

2. Press the accelerator all the way
to the floor and hold.
3. Turn the key to START. Release
it once the engine starts.
4. Release the accelerator
gradually as the engine speeds up.
If the engine still does not start,
refer toFuel pump shutoff
switchin theRoadside
emergencieschapter.
Engine block heater (if
equipped)
To prevent electrical
shock, do not use your
engine block heater with
ungrounded electrical systems or
two-pronged (cheater) adapters.
Engine block heaters are strongly
recommended if you live in a
region where temperatures reach
-23ÉC (-10ÉF) or below. An engine
block heater works by warming the
engine coolant. This improves
engine starting by warming the
engine faster. Engine block heater
operation also allows the heater
and defrost system to respond
more quickly than usual.
Starting your vehicle
93
Page 103 of 197

features to make them capable of
performing in a wide variety of
off-road applications. Specific
design characteristics give them
higher centers of gravity than
ordinary passenger cars.
Utility and four-wheel
drive vehicles are NOT
designed for cornering at speeds
as high as passenger cars any
more than low-slung sports cars
are designed to perform
satisfactorily under off-road
conditions. Avoid sharp turns or
abrupt maneuvers in these
vehicles.
DRIVING OFF ROAD WITH ALL-
WHEEL DRIVE (AWD)
Your vehicle is specially equipped
for driving on sand, snow, mud,
and rough terrain and has
operating characteristics that are
somewhat different from
conventional vehicles, both on and
off road. The following information
will help you learn to properly use
AWD.
When using AWD, maintain
steering wheel control at all times,
especially in rough terrain. Since
sudden changes in terrain can
result in abrupt steering wheel
motion, make sure you grip the
steering wheel from the outside.
Do not grip the spokes.
Drive cautiously to avoid vehicle
damage from concealed objects
such as rocks and stumps. You
Driving
103
Page 105 of 197

that could damage drive
components.
If the transmission and transfer
case are submerged in water, their
fluids should be checked and
changed, if necessary.
All rear axle lubricants must be
replaced every 160,000 km
(100,000 miles) or if the axle has
been submerged in water.
Otherwise, check the lubrication of
the rear axle according to the
intervals in theService Guide.
Driving on hill or slope terrain
When driving on a hill, avoid
driving crosswise or turning on
steep slopes. You could lose
traction and slip sideways. Drive
straight up, straight down or avoid
the hill completely. Know the
conditions on the other side of a
hill before driving over the crest.
When climbing a steep hill, start in
a lower gear rather than
downshifting to a lower gear from
a higher gear once the ascent has
started. This reduces strain on the
engine and the possibility of
stalling.
When descending a steep hill avoid
sudden braking. Rapid pumping of
the brake pedal will help slow the
vehicle and still maintain steering
control.
When speed control is on and you
are driving uphill, your vehicle
speed may drop considerably,
especially if you are carrying a
Driving
105
Page 146 of 197

or 80,000 km (50,000 miles). It is
not necessary and not
recommended to use supplemental
coolant additives in your
gasoline-powered vehicle. These
additives may harm your engine
cooling system.
When you change or add engine
coolant, it is important to maintain
your engine coolant concentration
between 40% (-24ÉC [11ÉF]) and
60% (-52ÉC [-62ÉF]), depending on
your local climate conditions. A
coolant concentration below 40%
may cause the engine to overheat
on a warm day.
Do not use engine coolant that
does not meet all 14 requirements
of Ford Specification ESE-M97B44-A.
The use of an improper coolant
may void your warranty for the
engine cooling system. Use only a
premium nationally-recognized
brand name engine coolant.
Always dispose of used
automotive fluids in a responsible
manner. Follow your community's
standards for disposing of these
types of fluids. Call your local
recycling center to find out more
about recycling automotive fluids.
Adding engine coolant
Never remove the coolant
recovery cap while the
engine is running or hot.
Maintenance and care
146
Page 151 of 197

6. Remove the dipstick and inspect
the fluid level.
The fluid level should be within
the crosshatched area, or if the
vehicle has not been driven,
between the holes near the bottom
of the indicator.
7. If necessary, add fluid in .25 L
(1/2 pint) increments through the
filler tube until the level is at the
correct area on the dipstick. If an
overfill occurs, excess fluid should
be removed by a qualified
technician.
²Use fluid certified to meet Ford
Motor Company lubricant
specifications. Refer toRefill
capacitiesandLubricant
specificationslater in this
chapter.
Always dispose of used
automotive fluids in a responsible
manner. Follow your community's
standards for disposing of these
types of fluids. Call your local
recycling center to find out more
about recycling automotive fluids.
DON'T ADD IF IN CROSSHATCHED AREA • CHECK WHEN HOT IDLING IN PARK
Maintenance and care
151