lock Mercury Mountaineer 1998 s Workshop Manual
[x] Cancel search | Manufacturer: MERCURY, Model Year: 1998, Model line: Mountaineer, Model: Mercury Mountaineer 1998Pages: 216, PDF Size: 1.72 MB
Page 147 of 216

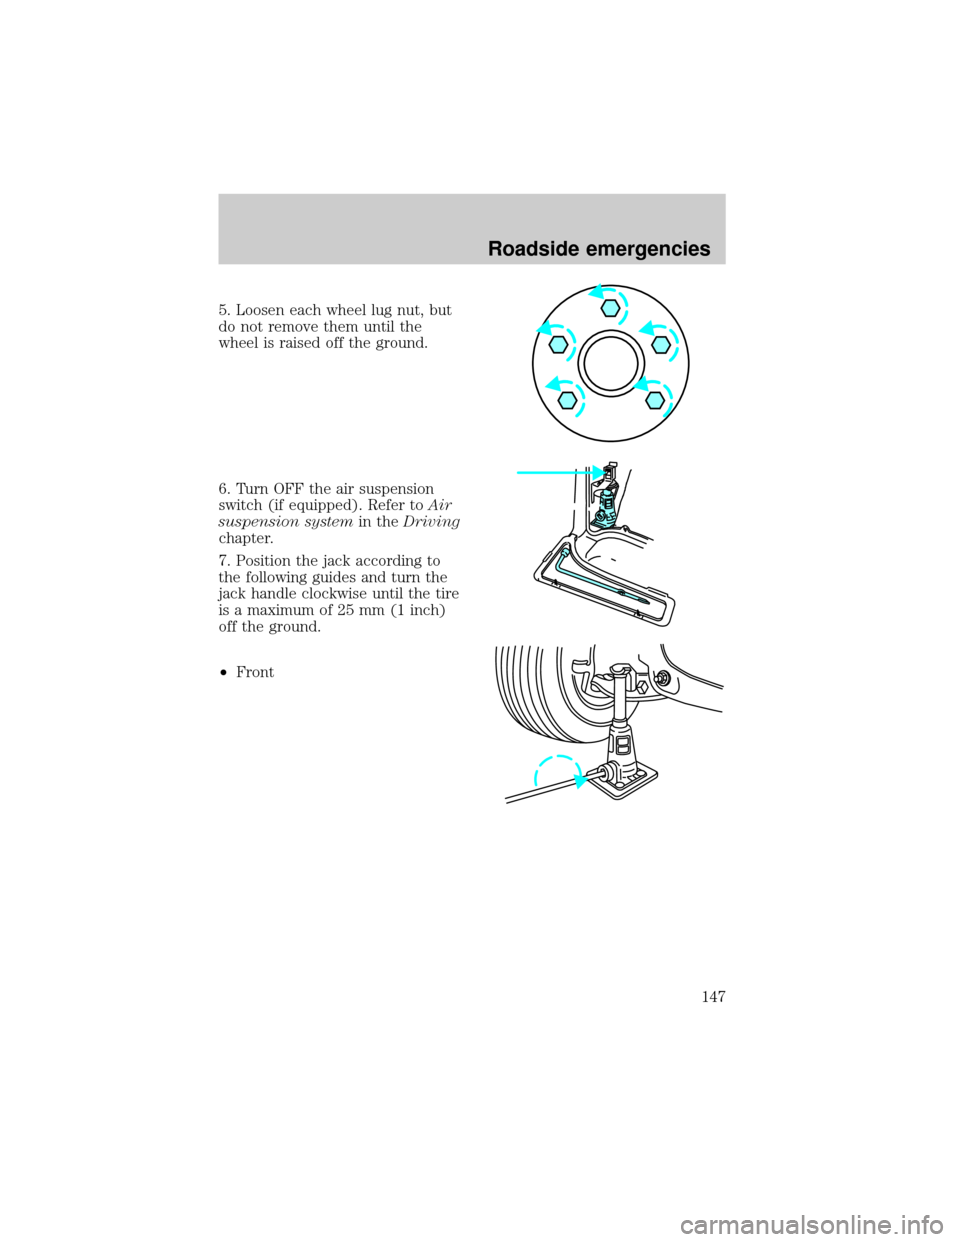
5. Loosen each wheel lug nut, but
do not remove them until the
wheel is raised off the ground.
6. Turn OFF the air suspension
switch (if equipped). Refer toAir
suspension systemin theDriving
chapter.
7. Position the jack according to
the following guides and turn the
jack handle clockwise until the tire
is a maximum of 25 mm (1 inch)
off the ground.
²Front
Roadside emergencies
147
Page 148 of 216

²Rear
²Never use the front or rear
differential as a jacking
point.
8. Remove the lug nuts with the
lug wrench.
9. Replace the flat tire with the
spare tire, making sure the valve
stem is facing outward. Reinstall
the lug nuts, cone side in, until the
wheel is snug against the hub. Do
not fully tighten the lug nuts until
the wheel has been lowered.
10. Lower the wheel by turning the
jack handle counterclockwise.
11. Remove the jack and fully
tighten the lug nuts in the order
shown.
1
4 3
52
Roadside emergencies
148
Page 149 of 216

12. Stow the flat tire, jack and lug
wrench. Make sure the jack is
fastened so it does not rattle when
you drive.
13. Turn ON the air suspension
switch (if equipped).
14. Unblock the wheels.
JUMP STARTING YOUR
VEHICLE
The gases around the
battery can explode if
exposed to flames, sparks, or lit
cigarettes. An explosion could
result in injury or vehicle
damage.
Do not push start your
vehicle. You could damage
the catalytic converter.
Batteries contain sulfuric
acid which burns skin,
eyes, and clothing.
Preparing your vehicle
Also see the label on the battery.
1. Use only a 12±volt supply to
start your vehicle. If you connect
your battery to a 24±volt power
supply you can damage your
starter, ignition system and other
electrical components.
Roadside emergencies
149
Page 155 of 216

²Keep all lit cigarettes, open
flames and other lit material
away from the battery and all
fuel related parts.
If you disconnect the battery, the
engine must ªrelearnº its idle
conditions before your vehicle will
drive properly, as explained in
Batteryin this chapter.
Working with the engine off
1. Set the parking brake and
ensure the gearshift is securely
latched in P (Park).
2. Turn off the engine and remove
the key.
3. Block the wheels to prevent the
vehicle from moving unexpectedly.
Working with the engine on
1. Set the parking brake and
ensure the gearshift is securely
latched in P (Park).
2. Block the wheels to prevent the
vehicle from moving unexpectedly.
Do not start your engine
with the air cleaner
removed and do not remove it
while the engine is running.
Maintenance and care
155
Page 165 of 216

If sprayed on the windshield,
engine coolant could make it
difficult to see through the
windshield.
When the engine is cool, add a
50/50 mixture of engine coolant
and water to the engine coolant
recovery reservoir-DO NOT ADD
DIRECTLY TO THE RADIATOR.
Add straight water only in an
emergency, but you should replace
it with a 50/50 mixture of coolant
and distilled water as soon as
possible.
Check the coolant level in the
coolant recovery reservoir the next
few times you drive the vehicle. If
necessary, add enough of a 50/50
mixture of coolant and water to
bring the liquid level to the fill line
on the reservoir.
Never remove the coolant
recovery cap while the
engine is running or hot.
If you must remove the coolant
recovery cap, follow these steps to
avoid personal injury:
1. Before you remove the cap, turn
the engine off and let it cool.
2. When the engine is cool, wrap a
thick cloth around the cap. Slowly
turn cap counterclockwise to the
first stop.
3. Step back while the pressure
releases.
4. When you are sure that all the
pressure has been released, use
Maintenance and care
165
Page 166 of 216

the cloth to press the cap down,
turn it counterclockwise and
remove it.
Use Ford Premium Cooling System
Fluid E2FZ-19549±AA (in Canada,
Motorcraft CXC-8±B) or an
equivalent premium engine coolant
that meets Ford specification
ESE-M97B44±A. Ford Premium
Engine Coolant is an optimized
formula that will protect all metals
and rubber elastomers used in
Ford cooling systems for four years
or 80,000 km (50,000 miles).
Do not use alcohol or methanol
antifreeze or any engine coolants
mixed with alcohol or methanol
antifreeze. Do not use
supplemental coolant additives in
your vehicle. These additives may
harm your engine cooling system.
The use of an improper coolant
may void your warranty of your
vehicle's engine cooling system.
Recycled engine coolant
Ford Motor Company recommends
that Ford and Lincoln-Mercury
dealers use recycled engine
coolant produced by
Ford-approved processes. Not all
coolant recycling processes
produce coolant which meets Ford
specification ESE-M97B44±A, and
use of such coolant may harm
engine and cooling system
components.
Always dispose of used
automotive fluids in a responsible
manner. Follow your community's
Maintenance and care
166
Page 175 of 216

²If the battery has been
disconnected or a new battery
has been installed, the clock and
the preset radio stations must
be reset once the battery is
reconnected.
²Always dispose of automotive
batteries in a responsible
manner. Follow your
communities standards for
disposal. Call your local
recycling center to find out
more about recycling automotive
batteries.
WINDSHIELD WIPER BLADES
Check the wiper blades at least
twice a year or when they seem
less effective. Substances such as
tree sap and some hot wax
treatments used by commercial car
washes reduce the effectiveness of
wiper blades.
Checking the wiper blades
If the wiper blades do not wipe
properly, clean both the windshield
and wiper blades using undiluted
windshield wiper solution or a mild
detergent. Rinse thoroughly with
clean water. To avoid damaging the
blades, do not use fuel, kerosene,
paint thinner or other solvents.
Changing the wiper blades
When replacing wiper blade
assemblies, always use a
Motorcraft part or equivalent. To
make replacing the wipers easy,
Maintenance and care
175
Page 176 of 216

turn the ignition to ACC, then turn
the wipers on. When the wipers
reach the vertical position, turn
the ignition to LOCK.
To replace the wiper blades:
1. Pull the wiper arm away from
the windshield and lock into the
service position.
2. Turn the blade at an angle from
the wiper arm. Push the lock pin
with a screwdriver to release the
blade and pull the wiper blade
down toward the windshield to
remove it from the arm.
3. Attach the new wiper to the
wiper arm and press it into place
until a click is heard.
INFORMATION ABOUT TIRE
QUALITY GRADES
New vehicles are fitted with tires
that have their Tire Quality Grade
(described below) molded into the
tire's sidewall. These Tire Quality
Grades are determined by
standards that the United States
Department of Transportation has
set.
Tire Quality Grades apply to new
pneumatic tires for use on
passenger cars. They do not apply
to deep tread, winter-type snow
tires, space-saver or temporary use
spare tires, tires with nominal rim
diameters of 10 to 12 inches or
limited production tires as defined
in Title 49 Code of Federal
Maintenance and care
176
Page 192 of 216

3. Disconnect the electrical
connector from the bulb by pulling
the connector rearward.
4. Remove the bulb retaining ring
by rotating it counterclockwise
(when viewed from the rear) about
an eighth of a turn to free it from
the bulb socket, and by sliding the
ring off the plastic base. Keep the
ring because it will be used again
to retain the new bulb.
5. Remove the old bulb from its
socket by gently pulling it straight
back out of the socket. Do not turn
the bulb while removing it.
To install the new bulb:
1. With the flat side of the bulb's
plastic base facing upward, insert
the glass end of the bulb into the
socket. You may need to turn the
bulb left or right to line up the
grooves in the plastic base with
the tabs in the socket. When the
grooves are aligned, push the bulb
into the socket until the plastic
base contacts the rear of the
socket.
2. Slip the bulb retaining ring over
the plastic base until it contacts
the rear of the socket by rotating it
clockwise until you feel a ªstop.º
Maintenance and care
192
Page 193 of 216

3. Push the electrical connector
into the rear of the plastic base
until it snaps, locking it into
position.
4. Turn the headlamps on and
make sure they work properly. If
the headlamp was correctly aligned
before you changed the bulb, you
should not need to align it again.
Bulb specifications
Function Number of bulbs Trade number
Park/turn lamps
(front)4
3156 NAK
Headlamps 2 9007
Rear stop/tail lamps 2 3157K
Rear turn lamps 2 3156K
Rear license plate
lamps2
3156
Backup lamp 2 3156K
Rear/turn/sidemarker 2 916NA
Cargo lamp 1 211-2
Interior overhead lamp 1 912 (906)
Front door courtesy
lamp1
168
Map lamps 2 168 (T10)
Ashtray lamp 1 161
To replace all instrument panel lights - see your dealer.
Maintenance and care
193