suspension Mercury Mountaineer 1999 Owner's Manuals
[x] Cancel search | Manufacturer: MERCURY, Model Year: 1999, Model line: Mountaineer, Model: Mercury Mountaineer 1999Pages: 248, PDF Size: 1.74 MB
Page 10 of 248

Four wheel drive high (if equipped)
This light momentarily illuminates
when the ignition is turned to ON.
Illuminates when four-wheel drive
high is engaged. If the light
continues to flash have the system
serviced.
Door ajar
Illuminates when the ignition is in
the ON or START position and any
door is open.
O/D off
Illuminates when the ignition is
turned to the ON position and
transmission control switch has
been pushed. When the light is on,
the transmission does not shift into
overdrive. If the light does not come on when the transmission control
switch is depressed or if the light flashes when you are driving, have
your vehicle serviced.
Check air suspension (if equipped)
Illuminates momentarily when the
ignition is turned to the ON position
and the engine is OFF. The light
also illuminates when the air
suspension system requires
servicing.
For information, refer toAir suspension systemin theDrivingchapter.
Speed control
This light comes on when either the
SET/ACCEL or RESUME controls
are pressed. It turns off when the
speed control OFF control is
4WD
HIGH
DOOR
AJAR
O/D
OFF
CHECK
SUSP
SPEED
CONT
Instrumentation
10
Page 145 of 248

The BRAKE warning lamp in the
instrument cluster illuminates and
remains illuminated (when the
ignition is turned ON) until the
parking brake is released.
Always set the parking brake fully and make sure that the
gearshift is securely latched in P (Park).
The parking brake is not recommended to stop a moving vehicle.
However, if the normal brakes fail, the parking brake can be used to stop
your vehicle in an emergency. Since the parking brake applies only the
rear brakes, the vehicle's stopping distance will increase greatly and the
handling of your vehicle will be adversely affected.
Pull the release lever to release the
brake. Driving with the parking
brake on will cause the brakes to
wear out quickly and reduce fuel
economy.
AIR SUSPENSION SYSTEM (IF EQUIPPED)
The load leveling feature of the air suspension automatically keeps the
vehicle at a constant level if a load is added or removed from the vehicle.
This system maintains the vehicle height at a constant level by
automatically adding air or releasing air from the springs to offset
changes in vehicle loads.
When ever a door is opened (including the liftgate) the system
memorizes and maintains the height of the vehicle until all doors are
closed.
It is normal to hear a buzz or clicking from the air compressor on the
vehicle when the ignition is turned off. The system stays energized for 40
minutes after the ignition is turned off to compensate for any load
changes made after the vehicle is parked.
!
BRAKE
Driving
145
Page 146 of 248

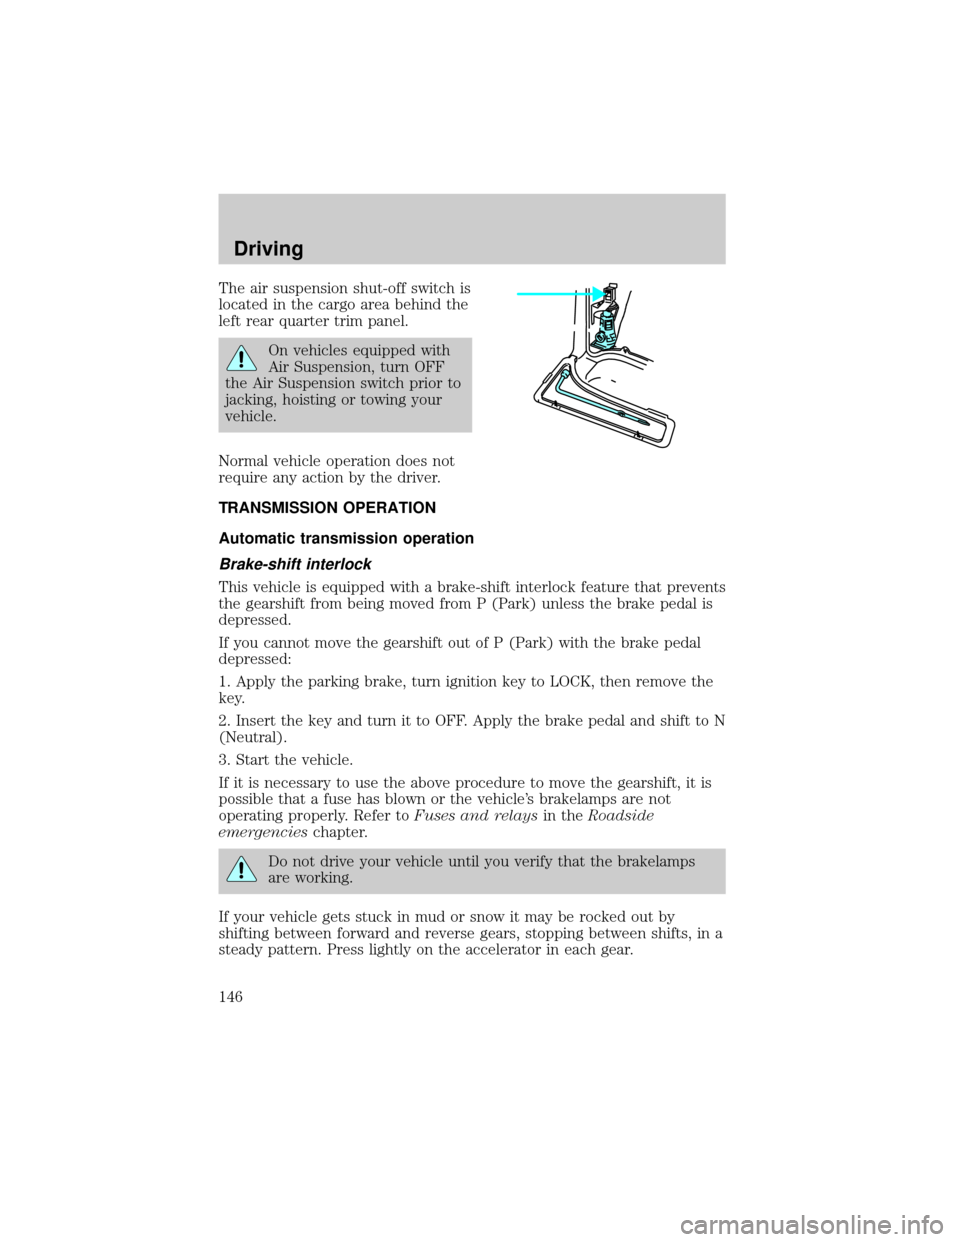
The air suspension shut-off switch is
located in the cargo area behind the
left rear quarter trim panel.
On vehicles equipped with
Air Suspension, turn OFF
the Air Suspension switch prior to
jacking, hoisting or towing your
vehicle.
Normal vehicle operation does not
require any action by the driver.
TRANSMISSION OPERATION
Automatic transmission operation
Brake-shift interlock
This vehicle is equipped with a brake-shift interlock feature that prevents
the gearshift from being moved from P (Park) unless the brake pedal is
depressed.
If you cannot move the gearshift out of P (Park) with the brake pedal
depressed:
1. Apply the parking brake, turn ignition key to LOCK, then remove the
key.
2. Insert the key and turn it to OFF. Apply the brake pedal and shift to N
(Neutral).
3. Start the vehicle.
If it is necessary to use the above procedure to move the gearshift, it is
possible that a fuse has blown or the vehicle's brakelamps are not
operating properly. Refer toFuses and relaysin theRoadside
emergencieschapter.
Do not drive your vehicle until you verify that the brakelamps
are working.
If your vehicle gets stuck in mud or snow it may be rocked out by
shifting between forward and reverse gears, stopping between shifts, in a
steady pattern. Press lightly on the accelerator in each gear.
Driving
146
Page 163 of 248

Once through the water, always try the brakes. Wet brakes do not stop
the vehicle as effectively as dry brakes. Drying can be improved by
moving your vehicle slowly while applying light pressure on the brake
pedal.
Driving through deep water where the transmission is submerged
may allow water into the transmission and cause internal
transmission damage.
TRAILER TOWING
Trailer towing with your vehicle may require the use of a trailer tow
option package.
Trailer towing puts additional loads on your vehicle's engine,
transmission, axle, brakes, tires, and suspension. For your safety and to
maximize vehicle performance, be sure to use the proper equipment
while towing.
Follow these guidelines to ensure safe towing procedure:
²Stay within your vehicle's load limits.
²Thoroughly prepare your vehicle for towing. Refer toPreparing to
towin this chapter.
²Use extra caution when driving while trailer towing. Refer toDriving
while you towin this chapter.
²Service your vehicle more frequently if you tow a trailer. Refer to the
severe duty schedule in the service guide and or maintenance guide.
²Do not tow a trailer until your vehicle has been driven at least 800 km
(500 miles).
²Refer to the instructions included with towing accessories for the
proper installation and adjustment specifications.
Do not exceed the maximum loads listed on the Safety Compliance
Certification label. For load specification terms found on the label, refer
toVehicle loadingin this chapter. Remember to figure in the tongue
load of your loaded vehicle when figuring the total weight.
Driving
163
Page 179 of 248

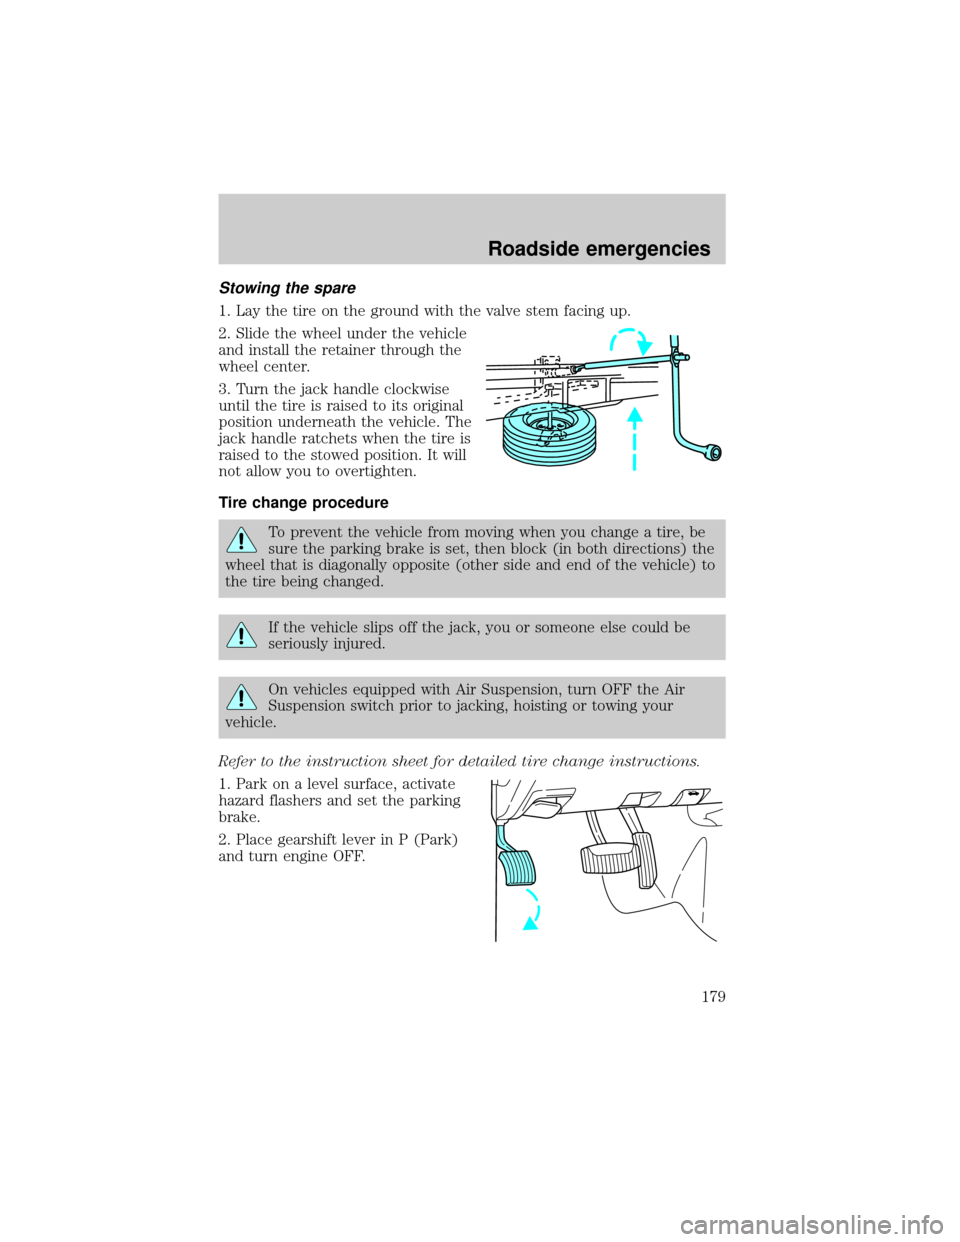
Stowing the spare
1. Lay the tire on the ground with the valve stem facing up.
2. Slide the wheel under the vehicle
and install the retainer through the
wheel center.
3. Turn the jack handle clockwise
until the tire is raised to its original
position underneath the vehicle. The
jack handle ratchets when the tire is
raised to the stowed position. It will
not allow you to overtighten.
Tire change procedure
To prevent the vehicle from moving when you change a tire, be
sure the parking brake is set, then block (in both directions) the
wheel that is diagonally opposite (other side and end of the vehicle) to
the tire being changed.
If the vehicle slips off the jack, you or someone else could be
seriously injured.
On vehicles equipped with Air Suspension, turn OFF the Air
Suspension switch prior to jacking, hoisting or towing your
vehicle.
Refer to the instruction sheet for detailed tire change instructions.
1. Park on a level surface, activate
hazard flashers and set the parking
brake.
2. Place gearshift lever in P (Park)
and turn engine OFF.
Roadside emergencies
179
Page 181 of 248

6. Turn OFF the air suspension
switch (if equipped). Refer toAir
suspension systemin theDriving
chapter.
7. Position the jack according to the
following guides and turn the jack
handle clockwise until the tire is a
maximum of 25 mm (1 inch) off the
ground.
²Front
²Rear
Roadside emergencies
181
Page 182 of 248

To lessen the risk of
personal injury, do not put
any part of your body under the
vehicle while changing a tire. Do
not start the engine when your
vehicle is on the jack. The jack is
only meant for changing the tire.
²Never use the front or rear
differential as a jacking point.
8. Remove the lug nuts with the lug wrench.
9. Replace the flat tire with the spare tire, making sure the valve stem is
facing outward. Reinstall the lug nuts, cone side in, until the wheel is
snug against the hub. Do not fully tighten the lug nuts until the wheel
has been lowered.
10. Lower the wheel by turning the jack handle counterclockwise.
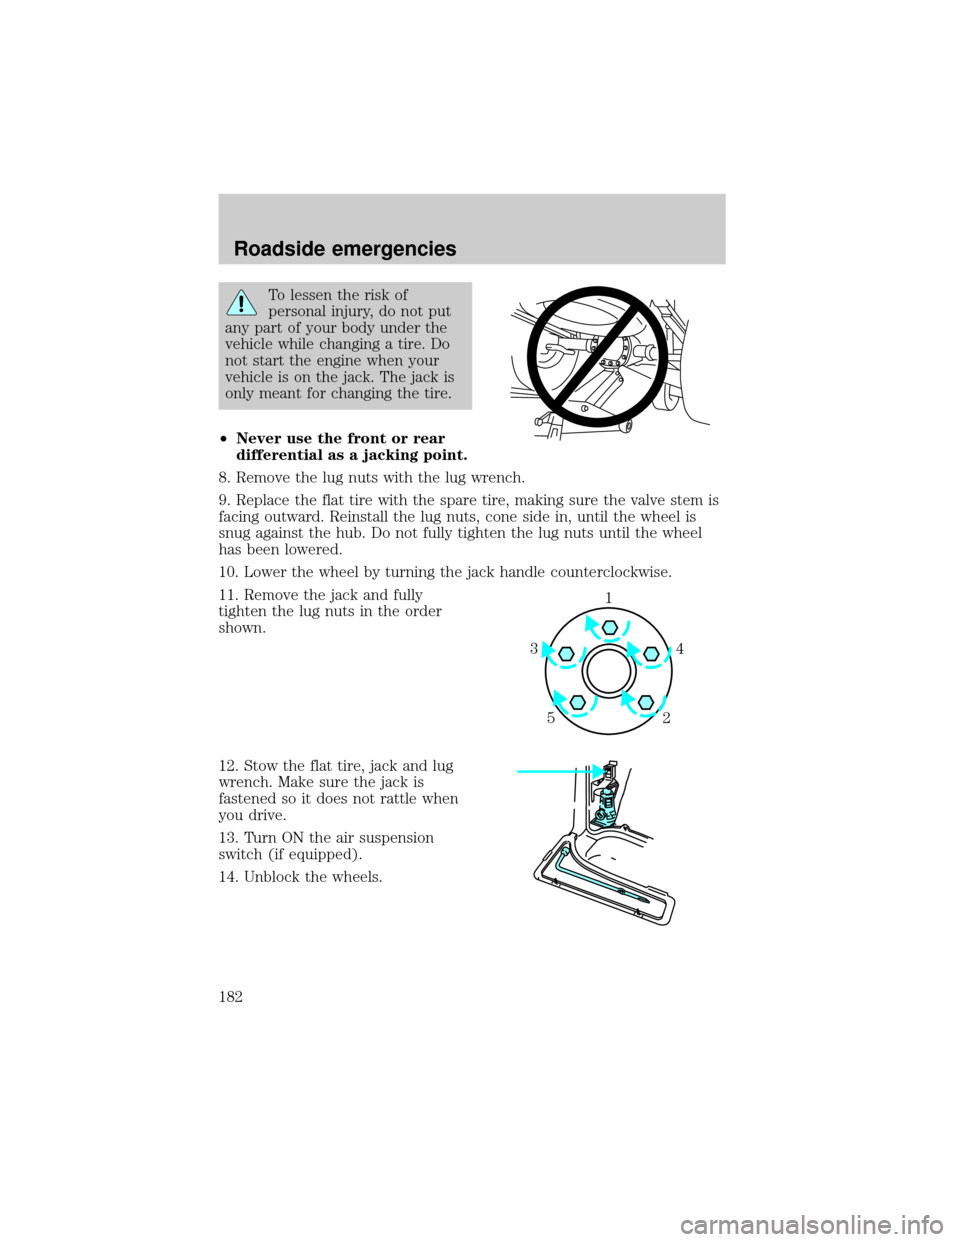
11. Remove the jack and fully
tighten the lug nuts in the order
shown.
12. Stow the flat tire, jack and lug
wrench. Make sure the jack is
fastened so it does not rattle when
you drive.
13. Turn ON the air suspension
switch (if equipped).
14. Unblock the wheels.
1
4 3
52
Roadside emergencies
182
Page 189 of 248

4. Remove the jumper cable from the positive (+) terminal of the
disabled vehicle's battery.
After the disabled vehicle has been started and the jumper cables
removed, allow it to idle for several minutes so the engine computer can
relearnits idle conditions.
WRECKER TOWING
If you need to have your vehicle towed, contact a professional towing
service or, if you are a member, your roadside assistance center.
If equipped with air suspension, the air suspension control must be
turned to the OFF position.
The Ford approved towing procedure is flatbed or wheel lift with
dollies.
On 4x2 vehicles, it is acceptable to tow the vehicle with the front wheels
on the ground (without dollies) and the rear wheels off the ground.
On 4x4 vehicles, it is recommended that your vehicle be towed with a
wheel lift or flatbed equipment with all the wheels off the ground.
Roadside emergencies
189
Page 212 of 248

Do not replace your tires with ªhigh performanceº tires or larger
size tires.
Failure to follow these precautions may adversely affect the
handling of the vehicle and make it easier for the driver to lose
control and roll over.
Tires that are larger or smaller than your vehicle's original tires may also
affect the accuracy of your speedometer.
SNOW TIRES AND CHAINS
Snow tires must be the same size and grade as the tires you
currently have on your vehicle.
The tires on your vehicle have all weather treads to provide traction in
rain and snow. However, in some climates, you may need to use snow
tires and chains. If you need to use chains, it is recommended that steel
wheels (of the same size and specifications) be used as chains may chip
aluminum wheels.
Follow these guidelines when using snow tires and chains:
²Use only SAE Class S chains.
²Install chains securely, verifying that the chains do not touch any
wiring, brake lines or fuel lines.
²Drive cautiously. If you hear the chains rub or bang against your
vehicle, stop and re-tighten the chains. If this does not work, remove
the chains to prevent damage to your vehicle.
²If possible, avoid fully loading your vehicle.
²Remove the tire chains when they are no longer needed. Do not use
tire chains on dry roads.
²The suspension insulation and bumpers will help prevent vehicle
damage. Do not remove these components from your vehicle when
using snow tires and chains.
Maintenance and care
212
Page 242 of 248

Air bag supplemental restraint
system ........................................125
and child safety seats ............127
description .......................126,129
disposal ....................................131
indicator light ..................129,131
passenger air bag ............127,130
Air conditioning
automatic temperature
control system..24,25,26,27,28,29
rear seat controls .....................30
Air suspension
description ..............................145
warning light .............................10
All Wheel Drive (AWD),
driving off road .........................157
Armrests ....................................103
Automatic transmission
driving an automatic
overdrive ..................147,148,149,
150,151,152
Axle
refill capacities ........................233
Battery
voltage gauge ............................14
Brakes ........................................143
anti-lock ............................143,144
anti-lock brake system (ABS)
warning light ...........................144
fluid, checking and adding ....197
shift interlock ..........................146
Break-in period ..........................2,3
Cargo area shade ......................104
Cargo cover ...............................104
CD player .....................76,78,79,80
Child safety seats
attaching with tether straps ..137
in rear seat ..............................135
tether anchorage hardware ...138
Cleaning your vehicle ...............227
engine compartment ..............228
exterior .............................228,230exterior lamps .........................230
interior .....................................231
plastic parts ............................230
washing ....................................227
waxing .....................................228
wheels ......................................229
windows ..................................232
wiper blades ............................230
woodtone trim ........................232
Compass, electronic ....................90
calibration .................................92
set zone adjustment .................91
Console ...............................101,102
overhead ...............................87,88
rear ..........................................102
Controls
power seat ........................116,118
Coolant ......................................201
checking and adding ..............199
refill capacities ........................201
Defrost
rear window ..............................31
Driveline universal joint and
slip yoke ....................................205
Driving under special
conditions ...........................156,159
sand ..................................156,158
snow and ice ......155,157,158,160
through water ..................156,158
Emission control system ..........221
Engine
check engine/service engine
soon light ....................................6
coolant .....................................199
idle speed control ...................206
service points ...................193,194
starting after a collision .........169
Engine block heater .................141
Engine oil
checking and adding ..............196
dipstick ....................................194
specifications ...................194,196
Index
242