lock Mercury Mountaineer 2000 Owner's Manuals
[x] Cancel search | Manufacturer: MERCURY, Model Year: 2000, Model line: Mountaineer, Model: Mercury Mountaineer 2000Pages: 264, PDF Size: 2.29 MB
Page 4 of 264

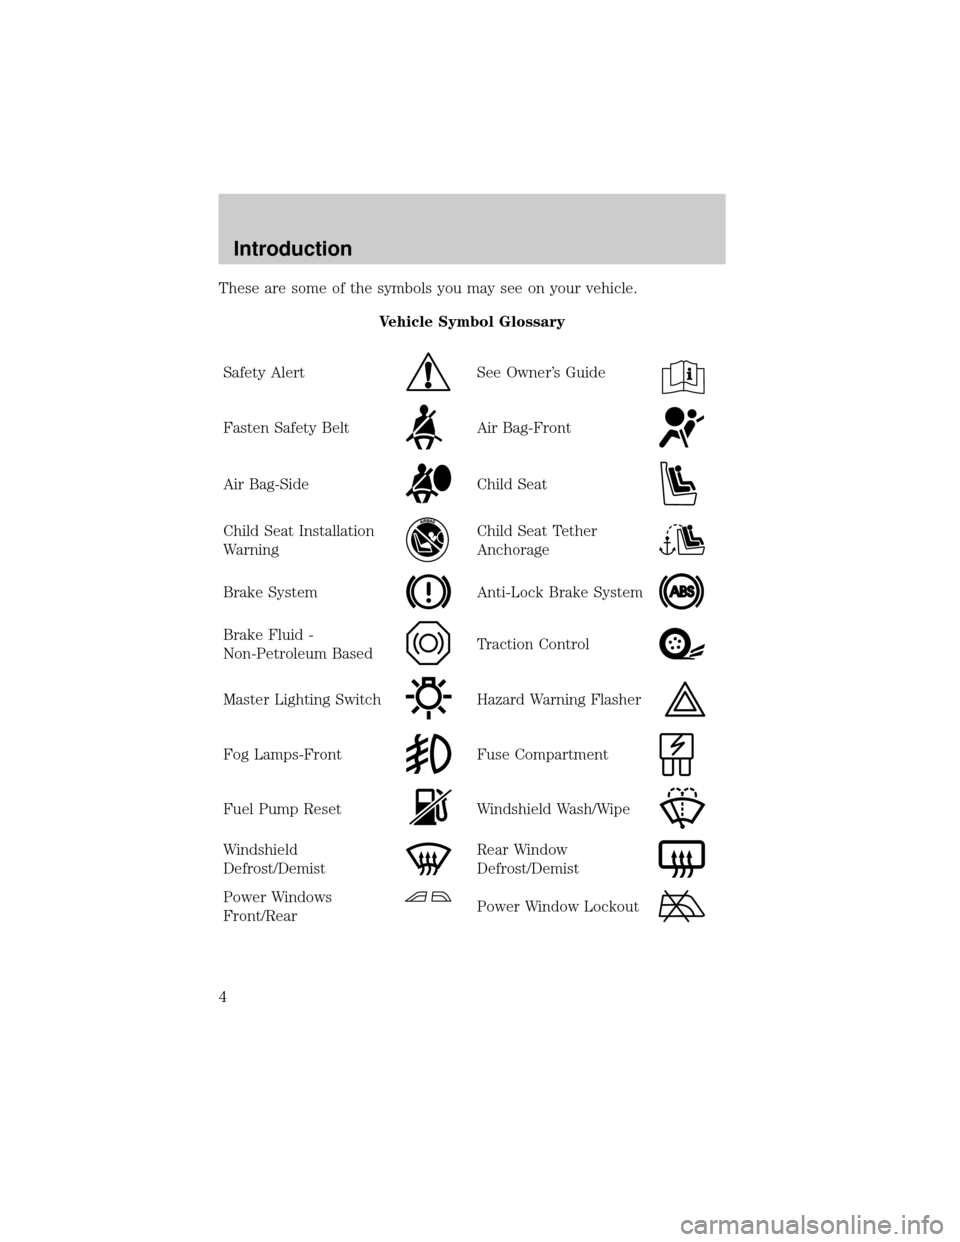
These are some of the symbols you may see on your vehicle.
Vehicle Symbol Glossary
Safety Alert
See Owner's Guide
Fasten Safety BeltAir Bag-Front
Air Bag-SideChild Seat
Child Seat Installation
WarningChild Seat Tether
Anchorage
Brake SystemAnti-Lock Brake System
Brake Fluid -
Non-Petroleum BasedTraction Control
Master Lighting SwitchHazard Warning Flasher
Fog Lamps-FrontFuse Compartment
Fuel Pump ResetWindshield Wash/Wipe
Windshield
Defrost/DemistRear Window
Defrost/Demist
Power Windows
Front/RearPower Window Lockout
Introduction
4
Page 5 of 264

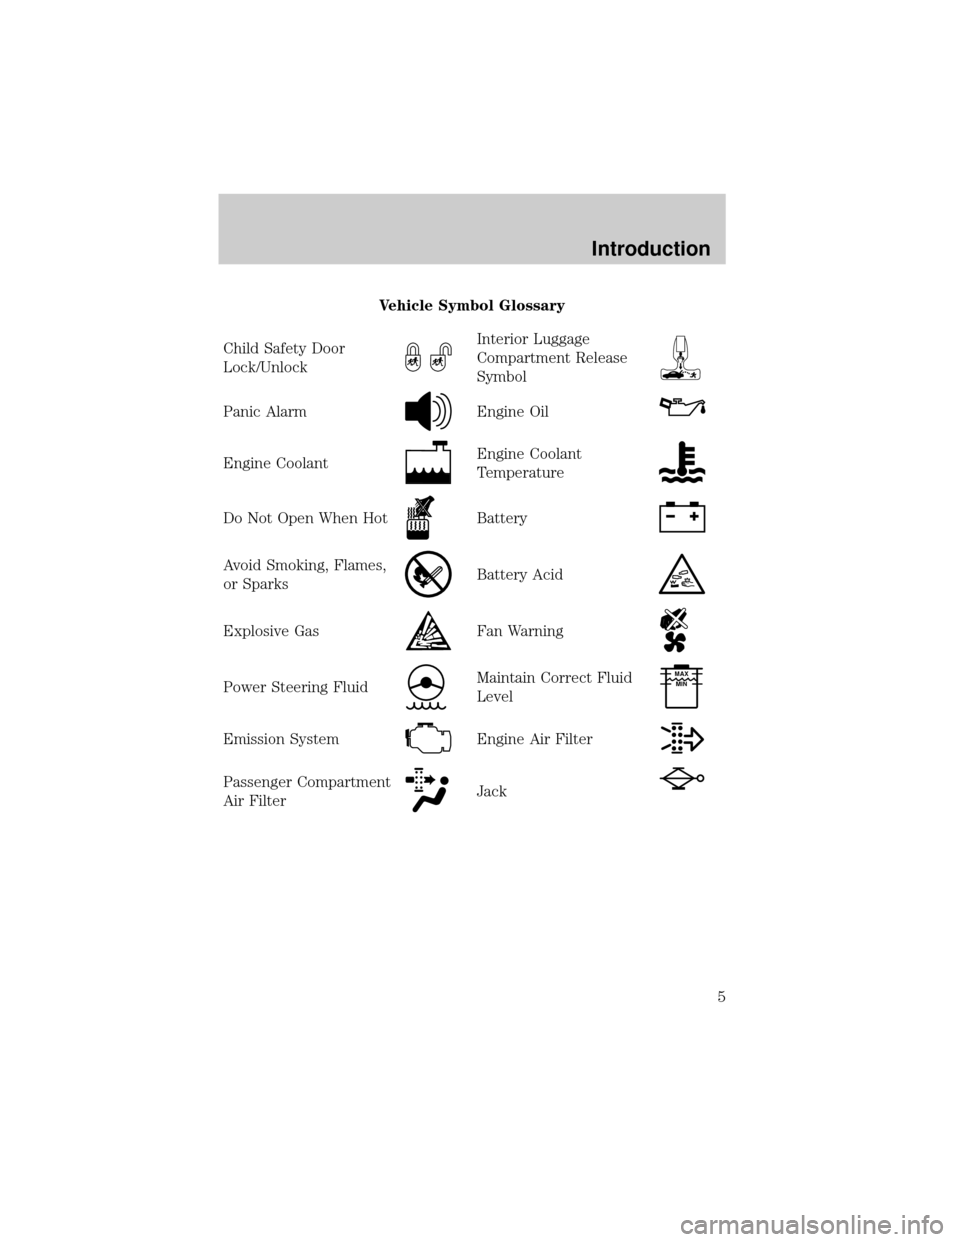
Vehicle Symbol Glossary
Child Safety Door
Lock/Unlock
Interior Luggage
Compartment Release
Symbol
Panic AlarmEngine Oil
Engine CoolantEngine Coolant
Temperature
Do Not Open When HotBattery
Avoid Smoking, Flames,
or SparksBattery Acid
Explosive GasFan Warning
Power Steering FluidMaintain Correct Fluid
LevelMAX
MIN
Emission SystemEngine Air Filter
Passenger Compartment
Air FilterJack
Introduction
5
Page 10 of 264

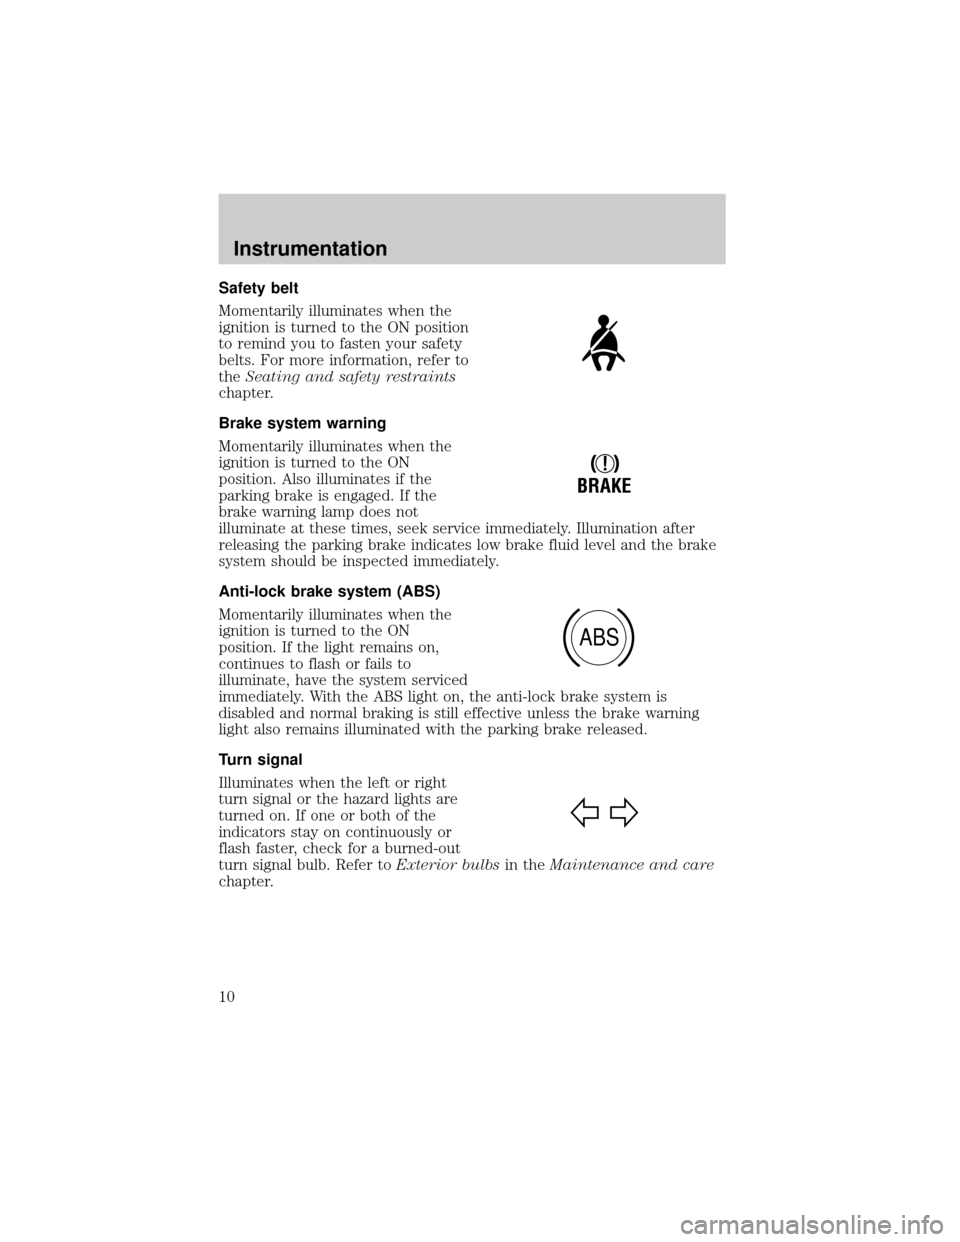
Safety belt
Momentarily illuminates when the
ignition is turned to the ON position
to remind you to fasten your safety
belts. For more information, refer to
theSeating and safety restraints
chapter.
Brake system warning
Momentarily illuminates when the
ignition is turned to the ON
position. Also illuminates if the
parking brake is engaged. If the
brake warning lamp does not
illuminate at these times, seek service immediately. Illumination after
releasing the parking brake indicates low brake fluid level and the brake
system should be inspected immediately.
Anti-lock brake system (ABS)
Momentarily illuminates when the
ignition is turned to the ON
position. If the light remains on,
continues to flash or fails to
illuminate, have the system serviced
immediately. With the ABS light on, the anti-lock brake system is
disabled and normal braking is still effective unless the brake warning
light also remains illuminated with the parking brake released.
Turn signal
Illuminates when the left or right
turn signal or the hazard lights are
turned on. If one or both of the
indicators stay on continuously or
flash faster, check for a burned-out
turn signal bulb. Refer toExterior bulbsin theMaintenance and care
chapter.
!
BRAKE
ABS
Instrumentation
10
Page 11 of 264

High beams
Illuminates when the high beam
headlamps are turned on.
Anti-theft system (if equipped)
Refer toSecuriLockypassive
anti-theft systemin theControls
and featureschapter.
Charging system
Illuminates when the ignition is
turned to the ON position and the
engine is off. The light also
illuminates when the battery is not
charging properly, requiring
electrical system service.
Check gage
Illuminates when the engine coolant
temperature is high, the engine oil
pressure is low or the fuel gauge is
at or near empty. The ignition must
be in the ON position for this lamp to illuminate. The lamp will also
illuminate for several seconds after the ignition is turned to the ON
position. Refer toEngine coolant temperature gauge, Engine oil
pressure gaugeorFuel gaugein this chapter for more information.
Four wheel drive low (if equipped)
Momentarily illuminates when the
ignition is turned to the START
position. Illuminates when
four-wheel drive low is engaged. If
the light continues to flash have the system serviced.
THEFT
CHECK
GAGE
4WD
LOW
Instrumentation
11
Page 13 of 264

Speed control
This light comes on when either the
SET/ACCEL or RESUME controls
are pressed. It turns off when the
speed control OFF control is
pressed, the brake is applied or the ignition is turned to the OFF
position.
Safety belt warning chime
Sounds to remind you to fasten your safety belts.
For information on the safety belt warning chime, refer to theSeating
and safety restraintschapter.
Supplemental restraint system (SRS) warning chime
For information on the SRS warning chime, refer to theSeating and
safety restraintschapter.
Key-in-ignition warning chime
Sounds when the key is left in the ignition in the OFF/LOCK or ACC
position and the driver's door is opened.
Headlamps on warning chime
Sounds when the headlamps or parking lamps are on, the ignition is off
(and the key is not in the ignition) and the driver's door is opened.
SPEED
CONT
Instrumentation
13
Page 25 of 264

²To prevent humidity buildup inside the vehicle, do not drive with the
climate control system in the OFF or MAX A/C position.
²Do not put objects under the front seat that will interfere with the
airflow to the rear seats.
²Remove any snow, ice or leaves
from the air intake area (at the
bottom of the windshield under
the hood).
²If your vehicle has been parked with the windows closed during hot
weather, the air conditioner will do a much faster job of cooling if you
drive for two or three minutes with the windows open. This will force
most of the hot, stale air out of the vehicle. Then operate your air
conditioner as you would normally.
²When placing objects on top of your instrument panel, be careful to
not place them over the defroster outlets. These objects can block
airflow and reduce your ability to see through your windshield. Also,
avoid placing small objects on top of your instrument panel. These
objects can fall down into the defroster outlets and block airflow and
possibly damage your climate control system.
Do not place objects on top of the instrument panel as these
objects may become projectiles in a collision or sudden stop.
Electronic Automatic Temperature Control (EATC) system
(if equipped)
The EATC system will maintain a
selected temperature and
automatically control airflow. You
can override automatic operation
with any of the override controls,
the fan speed control or the steering
wheel controls.
˚FAUTO
VENT PNL • FLR FLOOR FLR • DEF DEF
HI
LO
MAX A/C
REAR FAN OFF AUTOMATICOFF
Controls and features
25
Page 31 of 264

²Remove any snow, ice or leaves
from the air intake area (at the
bottom of the windshield).
²If your vehicle has been parked with the windows closed during hot
weather, the air conditioner will do a much faster job of cooling if you
drive for two or three minutes with the windows open. This will force
most of the hot, stale air out of the vehicle. Then operate the air
conditioner as you would normally.
²When placing objects on top of your instrument panel, be careful to
not place them over the defroster outlets. These objects can block
airflow and reduce your ability to see through your windshield. Also,
avoid placing small objects on top of your instrument panel. These
objects can fall down into the defroster outlets and block airflow and
possibly damage your climate control system.
Do not place objects on top of the instrument panel, as these
objects may become projectiles in a collision or sudden stop.
Rear console climate controls (if equipped)
Depending on the equipment
package of your vehicle, the rear
console may be equipped with rear
console audio/climate controls.
The instrument panel climate controls must be on in order for the rear
console climate controls to work.
Turn the air distribution control to the desired airflow position.
- VOLUME +
MODE
SEEK MEMORY
Controls and features
31
Page 41 of 264

Setting the clock
Press CLK to toggle between
listening frequencies and clock
mode while in radio mode.
To set the hour, press and hold the
CLK control and press the SEEK
control:
²
to decrease hours and
²
to increase hours.
To set the minute, press and hold
the CLK control and press the
TUNE control:
²
to decrease minutes and
²
to increase minutes.
The CLK control will allow you to switch between media display mode
(radio station, stereo information, etc.) and clock display mode (time).
TAPE
AMS
CLK
SEEKSEEK
TUNE TUNE
TAPE
AMS
CLK
SEEK
TUNE
SEEK
TUNE
Controls and features
41
Page 42 of 264

When in clock mode, the media information will display for 10 seconds,
when the radio is turned on, and then revert to clock information.
Anytime that the media is changed, (new radio station, etc.), the media
information will again display for 10 seconds before reverting back to the
clock. In media mode, the media information will always be displayed.
Premium AM/FM Stereo/Cassette/Single CD
Volume/power control
Press the control to turn the audio
system on or off.
Audio power can also be turned on
by pressing the AM/FM select
control or the tape/CD select
control. Audio power is turned off
by using the volume/power control.
FM 1
AMC
BL RF
REW FFSCAN
BASS TREB SEL BALTAPE DISC
EJ CD
FADEAUTO
CLK
SIDE 1-2 COMP SHUFFLEEJ
MUTE
VOL PUSH ON
SEEK
TUNE AM FM
12 3456
DOLBY B NR
ST
VOL - PUSH ON
Controls and features
42
Page 51 of 264

Setting the clock
To set the hour, press and hold the
CLK control and press SEEK:
²
to decrease hours and
²
to increase hours.
To set the minute, press and hold
the CLK control and press TUNE:
²
to decrease minutes and
²
to increase minutes.
If your vehicle has a separate clock
module, (other than the digital radio
display), the CLK button will not
function in the above manner.
AUTO
CLK
SEEKSEEK
TUNE TUNE
AUTO
CLK
SEEK
TUNE
SEEK
TUNE
Controls and features
51