Speed control Mercury Mountaineer 2005 s Owner's Guide
[x] Cancel search | Manufacturer: MERCURY, Model Year: 2005, Model line: Mountaineer, Model: Mercury Mountaineer 2005Pages: 304, PDF Size: 4.34 MB
Page 91 of 304

To adjust cross-bar position (if
equipped):
1. Loosen the thumbwheel at both
ends of the cross-bar (both
cross-bars are adjustable).
2. Slide the cross-bar to the desired
location.
3. Tighten the thumbwheel at both
ends of the cross-bar.
Vehicles with a higher center of gravity such as utility and
four-wheel drive vehicles handle differently than vehicles with a
lower center of gravity. Utility and four-wheel drive vehicles are not
designed for cornering at speeds as high as passenger cars any more
than low-slung sport cars are designed to perform satisfactorily under
off-road conditions. Avoid sharp turns, excessive speed and abrupt
maneuvers in these vehicles. Failure to drive cautiously could result in
an increase risk of loss of vehicle control, vehicle rollover, personal
injury and death.
2005 Mountaineer(mnt)
Owners Guide (post-2002-fmt)
USA(fus)
Driver Controls
91
Page 94 of 304
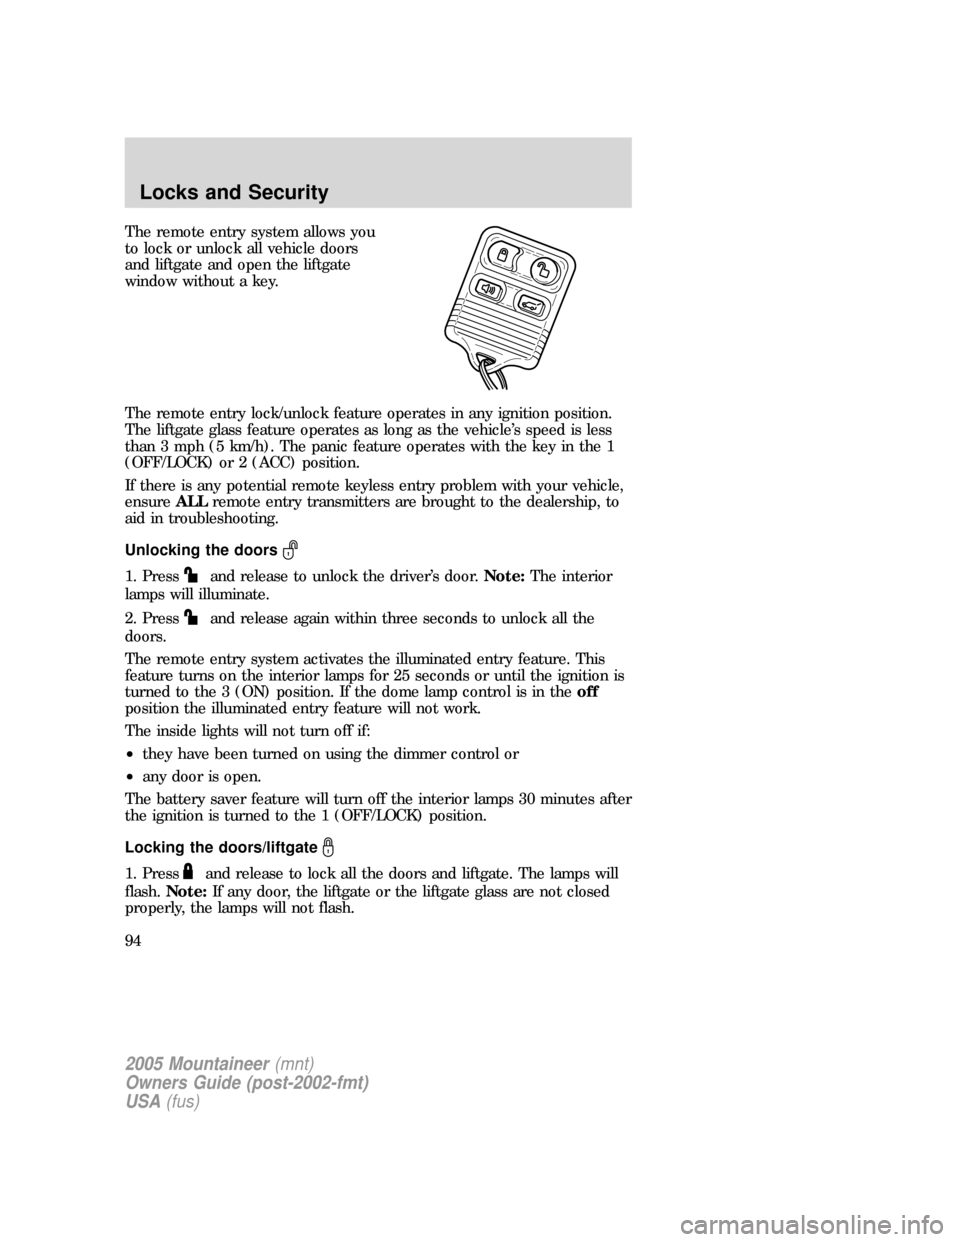
The remote entry system allows you
to lock or unlock all vehicle doors
and liftgate and open the liftgate
window without a key.
The remote entry lock/unlock feature operates in any ignition position.
The liftgate glass feature operates as long as the vehicle’s speed is less
than 3 mph (5 km/h). The panic feature operates with the key in the 1
(OFF/LOCK) or 2 (ACC) position.
If there is any potential remote keyless entry problem with your vehicle,
ensureALLremote entry transmitters are brought to the dealership, to
aid in troubleshooting.
Unlocking the doors
1. Pressand release to unlock the driver’s door.Note:The interior
lamps will illuminate.
2. Press
and release again within three seconds to unlock all the
doors.
The remote entry system activates the illuminated entry feature. This
feature turns on the interior lamps for 25 seconds or until the ignition is
turned to the 3 (ON) position. If the dome lamp control is in theoff
position the illuminated entry feature will not work.
The inside lights will not turn off if:
•they have been turned on using the dimmer control or
•any door is open.
The battery saver feature will turn off the interior lamps 30 minutes after
the ignition is turned to the 1 (OFF/LOCK) position.
Locking the doors/liftgate
1. Pressand release to lock all the doors and liftgate. The lamps will
flash.Note:If any door, the liftgate or the liftgate glass are not closed
properly, the lamps will not flash.
2005 Mountaineer(mnt)
Owners Guide (post-2002-fmt)
USA(fus)
Locks and Security
94
Page 100 of 304

To unlock all doors and liftgate,press the 3•4 control within five
seconds.
To open the liftgate window,press the 5•6 control within five
seconds.
To lock all doors, liftgate and liftgate window,press the 7•8 and
the 9•0 at the same time.Note:The driver’s door must be closed. You
do notneed to enter the keypad code first.
Autolock
The autolock feature will lock all the doors, liftgate and liftgate window
when:
•all the doors, the liftgate and liftgate window are closed,
•the ignition is in the 3 (ON) position,
•you shift into any gear putting the vehicle in motion, and
•the brake pedal is released and the vehicle attains a speed greater
than 5 mph (8 km/h).
The autolock feature repeats when:
•any door, liftgate or liftgate window is opened then closed while the
ignition is in the 3 (ON) position, and
•you put the vehicle in motion by releasing the brake pedal and the
vehicle attains a speed greater than 5 mph (8 km/h).
Deactivating/activating autolock
Your vehicle comes with the autolock feature activated. There are four
methods to enable/disable this feature: One is through your dealer, the
second with a power door unlock/lock sequence, the third with the
keypad, and the fourth by using the message center (if equipped).
Before following the activation or deactivation procedures, make sure
that the anti-theft system is not armed, ignition is off, and all vehicle
doors, liftgate and liftgate window are closed.
2005 Mountaineer(mnt)
Owners Guide (post-2002-fmt)
USA(fus)
Locks and Security
100
Page 154 of 304
Treadwear
The treadwear grade is a comparative rating based on the wear rate of
the tire when tested under controlled conditions on a specified
government test course. For example, a tire graded 150 would wear one
and one-half (1 1/2) times as well on the government course as a tire
graded 100. The relative performance of tires depends upon the actual
conditions of their use, however, and may depart significantly from the
norm due to variations in driving habits, service practices, and
differences in road characteristics and climate.
Traction AA A B C
The traction grades, from highest to lowest are AA, A, B, and C. The
grades represent the tire’s ability to stop on wet pavement as measured
under controlled conditions on specified government test surfaces of
asphalt and concrete. A tire marked C may have poor traction
performance.
The traction grade assigned to this tire is based on
straight-ahead braking traction tests, and does not include
acceleration, cornering, hydroplaning or peak traction characteristics.
Temperature A B C
The temperature grades are A (the highest), B and C, representing the
tire’s resistance to the generation of heat and its ability to dissipate heat
when tested under controlled conditions on a specified indoor laboratory
test wheel. Sustained high temperature can cause the material of the tire
to degenerate and reduce tire life, and excessive temperature can lead to
sudden tire failure. The grade C corresponds to a level of performance
which all passenger car tires must meet under the Federal Motor Vehicle
Safety Standard No. 109. Grades B and A represent higher levels of
performance on the laboratory test wheel than the minimum required by
law.
The temperature grade for this tire is established for a tire that
is properly inflated and not overloaded. Excessive speed,
underinflation, or excessive loading, either separately or in
combination, can cause heat buildup and possible tire failure.
TIRES
Tires are designed to give many thousands of miles of service, but they
must be maintained in order to get the maximum benefit from them.
2005 Mountaineer(mnt)
Owners Guide (post-2002-fmt)
USA(fus)
Tires, Wheels and Loading
154
Page 158 of 304
when you get to the pump. It is normal for tires to heat up and the air
pressure inside to go up as you drive. Never “bleed” or reduce air
pressure when tires are hot.
2. Remove the cap from the valve on one tire, then firmly press the tire
gauge onto the valve and measure the pressure.
3. Add enough air to reach the recommended air pressure
Note:If you overfill the tire, release air by pushing on the metal stem in
the center of the valve. Then recheck the pressure with your tire gauge.
4. Replace the valve cap.
5. Repeat this procedure for each tire, including the spare.
Note:Some spare tires require higher inflation pressure than the other
tires. Check the Safety Compliance Certification Label on the B-pillar or
the edge of the driver’s door for the recommended spare tire pressure.
6. Visually inspect the tires to make sure there are no nails or other
objects embedded that could poke a hole in the tire and cause an air
leak.
7. Check the sidewalls to make sure there are no gouges, cuts or bulges.
TIRE REPLACEMENT REQUIREMENTS
Your vehicle is equipped with tires designed to provide a safe ride and
handling capability.
Only use replacement tires and wheels that are the same size
and type (such as P-metric versus LT-metric or all-season versus
all-terrain) as those originally provided by Ford. Use of any tire or
wheel not recommended by Ford can affect the safety and
performance of your vehicle, which could result in an increased risk of
loss of vehicle control, vehicle rollover, personal injury and death.
Additionally the use of non-recommended tires and wheels could cause
steering, suspension, axle or transfer case/power transfer unit failure. If
you have questions regarding tire replacement, see an authorized Ford
or Lincoln Mercury dealer.
Make sure all tires and wheels on the vehicle are of the same size, type,
tread design, brand, load-carrying capacity and speed rating because it
can affect the safety and performance of your vehicle, which could result
in an increased risk of loss of vehicle control, vehicle rollover, personal
injury and death.
The tire pressure monitoring sensors mounted in the wheels (originally
installed on your vehicle) are not designed to be used in after market
wheels.
2005 Mountaineer(mnt)
Owners Guide (post-2002-fmt)
USA(fus)
Tires, Wheels and Loading
158
Page 159 of 304
The installation of replacement tires with steel cord body plies in the tire
sidewall may cause malfunction of the Tire Pressure Monitoring System
(TPMS), and is not recommended (cord material information is molded
on the tire sidewall). Additionally, if your vehicle was originally equipped
with run-flat tires, replacing them with tires that are not identical to
those originally fitted may cause malfunction of the TPMS, and is not
recommended. Run-flat tires should not be used to replace regular tires.
Always check your TPMS indicator immediately after replacing one or
more tires on your vehicle. If the TPMS indicator is on, your TPMS is
malfunctioning. Your replacement tire might be incompatible with your
TPMS system, or some component of the TPMS system may be damaged.
Important:Ford recommends you replace your tires every 6 years
regardless of the condition of the tire tread wear. As tires age, the
rubber weakens, potentially increasing the risk of a tire failure during
use, causing loss of vehicle control and personal injury.
Important:Remember to replace the spare tire when you replace the
road tires on your vehicle. Even if it has never been used, the spare tire
should be replaced because tires degrade over time.
Important:Remember to replace the wheel air valves when the road
tires are replaced on your vehicle.
CHANGING THE TIRES
If you get a flat tire while driving:
•do not brake heavily.
•gradually decrease the vehicle’s speed.
•hold the steering wheel firmly.
•slowly move to a safe place on the side of the road.
Note:If your vehicle is equipped with the tire pressure monitoring
system (TPMS), the system indicator light will illuminate when the spare
is in use. To restore the full functionality of the monitoring system, all
road wheels equipped with tire pressure monitoring sensors must be
mounted on the vehicle.
If your vehicle is equipped with TPMS, have a flat serviced by a dealer or
a qualified technician in order to prevent damage to the TPMS sensor,
refer toChanging tires with TPMSin theTires, Wheels and Loading
chapter. Replace the spare tire with a road tire as soon as possible.
2005 Mountaineer(mnt)
Owners Guide (post-2002-fmt)
USA(fus)
Tires, Wheels and Loading
159
Page 168 of 304
When a wheel is installed, always remove any corrosion, dirt and
foreign materials present on the mounting surfaces of the wheel
and the surface of the front disc brake hub and rotor that contacts the
wheel. Installing wheels without correct metal-to-metal contact at the
wheel mounting surfaces can cause the wheel nuts to loosen and the
wheel to come off while the vehicle is in motion, resulting in loss of
control.
Note:If there is corrosion on the area where the wheel contacts the
hub, apply a thin film of grease or anti-seize compound on that area.
INFORMATION CONTAINED ON THE TIRE SIDEWALL
Federal law requires tire manufacturers to place standardized
information on the sidewall of all tires. This information identifies and
describes the fundamental characteristics of the tire and also provides a
U.S. DOT Tire Identification Number for safety standard certification and
in case of a recall.
Information on “P” type tires
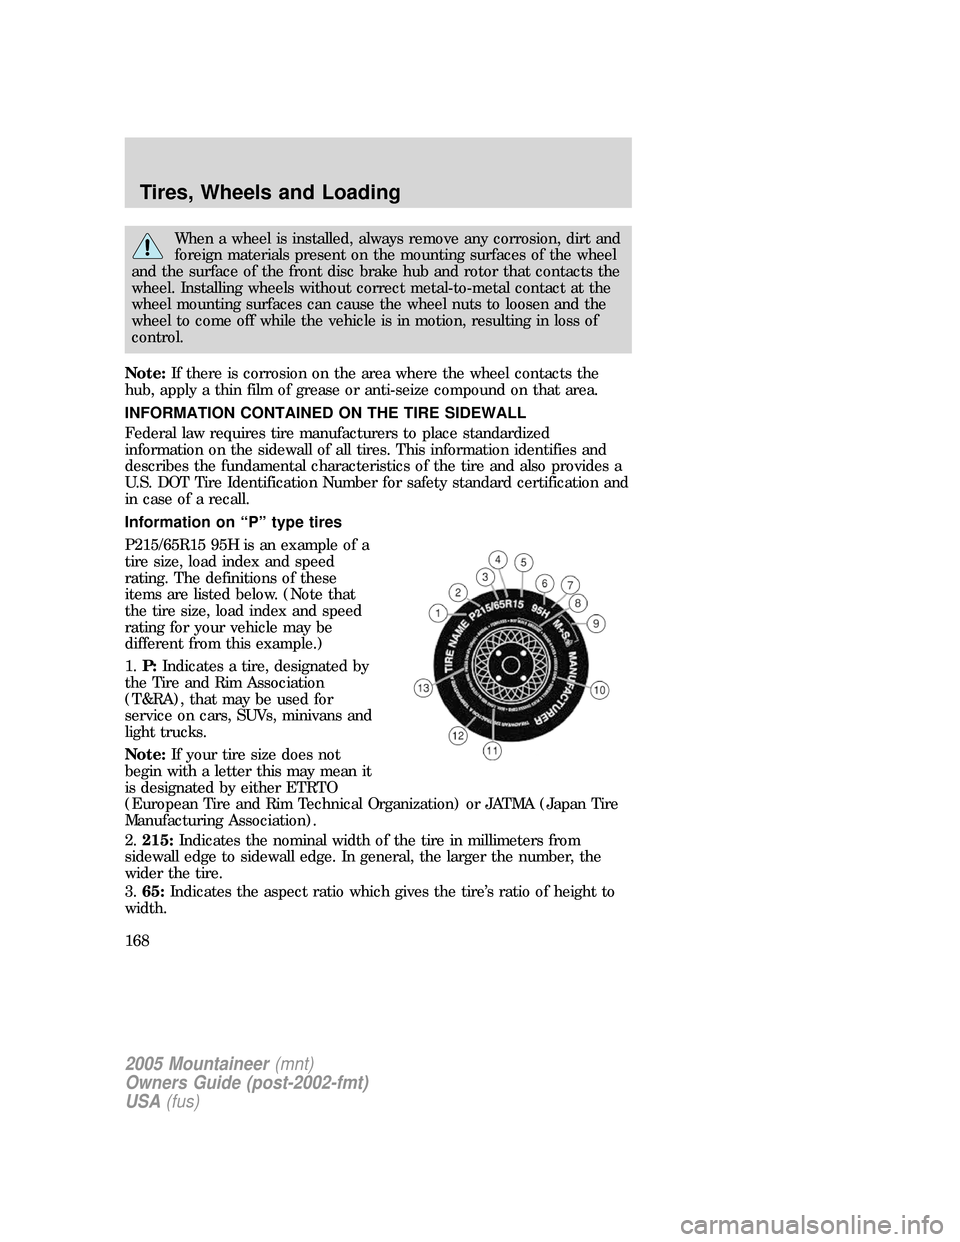
P215/65R15 95H is an example of a
tire size, load index and speed
rating. The definitions of these
items are listed below. (Note that
the tire size, load index and speed
rating for your vehicle may be
different from this example.)
1.P:Indicates a tire, designated by
the Tire and Rim Association
(T&RA), that may be used for
service on cars, SUVs, minivans and
light trucks.
Note:If your tire size does not
begin with a letter this may mean it
is designated by either ETRTO
(European Tire and Rim Technical Organization) or JATMA (Japan Tire
Manufacturing Association).
2.215:Indicates the nominal width of the tire in millimeters from
sidewall edge to sidewall edge. In general, the larger the number, the
wider the tire.
3.65:Indicates the aspect ratio which gives the tire’s ratio of height to
width.
2005 Mountaineer(mnt)
Owners Guide (post-2002-fmt)
USA(fus)
Tires, Wheels and Loading
168
Page 192 of 304

•Class III/IV receiver: 500 lb. (227 kg) (weight carrying); 770 lb. (349
kg) (weight distributing)
Safety chains
Always connect the trailer’s safety chains to the frame or hook retainers
of the vehicle hitch. To connect the trailer’s safety chains, cross the
chains under the trailer tongue and allow slack for turning corners.
If you use a rental trailer, follow the instructions that the rental agency
gives to you.
Do not attach safety chains to the bumper.
Trailer brakes
Electric brakes and manual, automatic or surge-type trailer brakes are
safe if installed properly and adjusted to the manufacturer’s
specifications. The trailer brakes must meet local and Federal
regulations.
Do not connect a trailer’s hydraulic brake system directly to your
vehicle’s brake system. Your vehicle may not have enough
braking power and your chances of having a collision greatly increase.
The braking system of the tow vehicle is rated for operation at the
GVWR not GCWR.
Trailer lamps
Trailer lamps are required on most towed vehicles. Make sure all running
lights, brake lights, turn signals and hazard lights are working. See your
dealer or trailer rental agency for proper instructions and equipment for
hooking up trailer lamps.
Never connect any trailer lighting to the vehicle’s taillamp
circuits, because it may damage the electrical system resulting in
fire. Contact your local Ford dealership for assistance in proper trailer
tow wiring installation. Additional electrical equipment may be
required.
Driving while you tow
When towing a trailer:
•Turn off the speed control. The speed control may shut off
automatically when you are towing on long, steep grades.
2005 Mountaineer(mnt)
Owners Guide (post-2002-fmt)
USA(fus)
Tires, Wheels and Loading
192
Page 204 of 304

STEERING
To prevent damage to the power steering system:
•Never hold the steering wheel at its furthest turning points (until it
stops) for more than a few seconds when the engine is running.
•Do not operate the vehicle with a low power steering pump reservoir
fluid level (below the MIN mark on the reservoir).
If the power steering system breaks down (or if the engine is turned
off), you can steer the vehicle manually, but it takes more effort.
If the steering wanders or pulls, check for:
•an improperly inflated tire
•uneven tire wear
•loose or worn suspension components
•loose or worn steering components
•improper steering alignment
A high crown in the road or high crosswinds may also make the steering
seem to wander/pull.
PREPARING TO DRIVE YOUR VEHICLE
Utility vehicles have a significantly higher rollover rate than
other types of vehicles.
In a rollover crash, an unbelted person is significantly more likely
to die than a person wearing a safety belt.
Your vehicle has larger tires and increased ground clearance, giving the
vehicle a higher center of gravity than a passenger car.
Vehicles with a higher center of gravity such as utility and
four-wheel drive vehicles handle differently than vehicles with a
lower center of gravity. Utility and four-wheel drive vehicles arenot
designed for cornering at speeds as high as passenger cars any more
than low-slung sports cars are designed to perform satisfactorily under
off-road conditions. Avoid sharp turns, excessive speed and abrupt
maneuvers in these vehicles. Failure to drive cautiously could result in
an increased risk of loss of vehicle control, vehicle rollover, personal
injury and death.
2005 Mountaineer(mnt)
Owners Guide (post-2002-fmt)
USA(fus)
Driving
204
Page 208 of 304
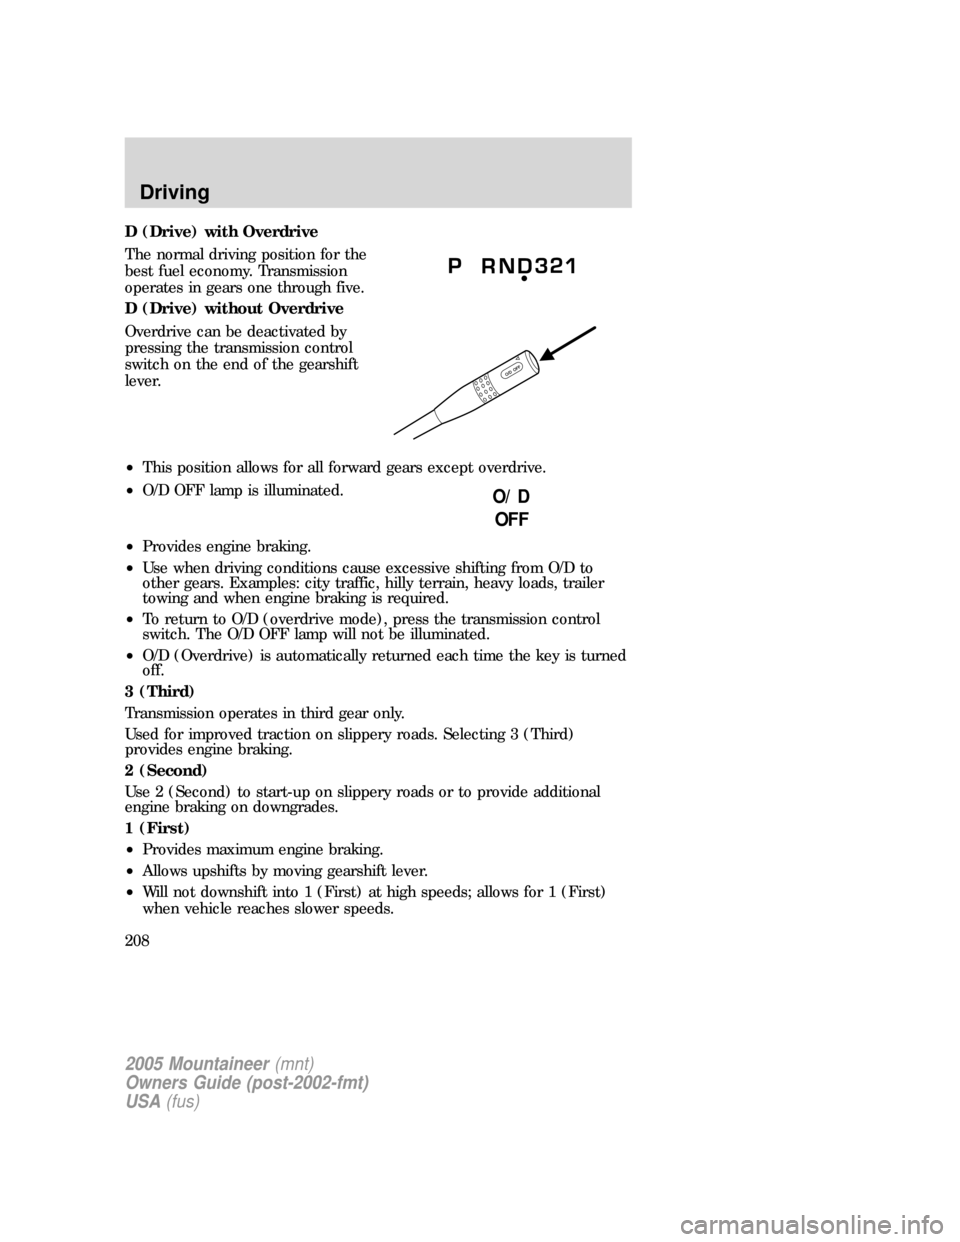
D (Drive) with Overdrive
The normal driving position for the
best fuel economy. Transmission
operates in gears one through five.
D (Drive) without Overdrive
Overdrive can be deactivated by
pressing the transmission control
switch on the end of the gearshift
lever.
•This position allows for all forward gears except overdrive.
•O/D OFF lamp is illuminated.
•Provides engine braking.
•Use when driving conditions cause excessive shifting from O/D to
other gears. Examples: city traffic, hilly terrain, heavy loads, trailer
towing and when engine braking is required.
•To return to O/D (overdrive mode), press the transmission control
switch. The O/D OFF lamp will not be illuminated.
•O/D (Overdrive) is automatically returned each time the key is turned
off.
3 (Third)
Transmission operates in third gear only.
Used for improved traction on slippery roads. Selecting 3 (Third)
provides engine braking.
2 (Second)
Use 2 (Second) to start-up on slippery roads or to provide additional
engine braking on downgrades.
1 (First)
•Provides maximum engine braking.
•Allows upshifts by moving gearshift lever.
•Will not downshift into 1 (First) at high speeds; allows for 1 (First)
when vehicle reaches slower speeds.
O/D
OFF
2005 Mountaineer(mnt)
Owners Guide (post-2002-fmt)
USA(fus)
Driving
208