tow Mercury Mountaineer 2005 s Owner's Guide
[x] Cancel search | Manufacturer: MERCURY, Model Year: 2005, Model line: Mountaineer, Model: Mercury Mountaineer 2005Pages: 304, PDF Size: 4.34 MB
Page 115 of 304

Second row center seat storage space (if equipped)
Storage space is provided
underneath the 40/20/40 second row
center seat. To access the storage
space pull up on the strap.
Third row seat (if equipped)
3rd row stow feature
The 3rd row seat has a tip/stow feature to increase cargo space without
removing the seat from the vehicle.
Lower the head restraints before putting the seat in the stowed position.
To put seat in stowed position:
1. Pull the seat release lever located
on top of the seatback while
pushing the seatback down onto the
seat cushion.
2. The seatback will latch into place.
2005 Mountaineer(mnt)
Owners Guide (post-2002-fmt)
USA(fus)
Seating and Safety Restraints
115
Page 132 of 304

Do not attempt to service, repair, or modify the airbag
supplemental restraint systems or its fuses. See your Ford or
Lincoln Mercury dealer.
Modifications to the front end of the vehicle, including frame,
bumper, front end body structure and non-Ford tow hooks may
effect the performance of the airbag sensors increasing the risk of
injury. Do not modify the front end of the vehicle with anything other
than authorized Ford accessories for your vehicle.
Additional equipment may affect the performance of the airbag
sensors increasing the risk of injury. Please refer to theBody
Builders Layout Bookfor instructions about the appropriate
installation of additional equipment.
Children and airbags
Children must always be properly
restrained. Accident statistics
suggest that children are safer when
properly restrained in the rear
seating positions than in the front
seating position. Failure to follow
these instructions may increase the
risk of injury in a collision.
Airbags can kill or injure a
child in a child seat.
NEVERplace a rear-facing child
seat in front of an active airbag. If
you must use a forward-facing
child seat in the front seat, move
the seat all the way back.
2005 Mountaineer(mnt)
Owners Guide (post-2002-fmt)
USA(fus)
Seating and Safety Restraints
132
Page 141 of 304

The shoulder belt should cross the chest, resting snugly on the center of
the shoulder. The lap belt should rest low and snug across the hips,
never up high across the stomach.
If the booster seat slides on the vehicle seat, placing a rubberized mesh
sold as shelf or carpet liner under the booster seat may improve this
condition.
The importance of shoulder belts
Using a booster without a shoulder belt increases the risk of a child’s
head hitting a hard surface in a collision. For this reason, you should
never use a booster seat with a lap belt only. It is best to use a booster
seat with lap/shoulder belts in the back seat- the safest place for children
to ride.
Follow all instructions provided by the manufacturer of the
booster seat.
Never put the shoulder belt under a child’s arm or behind the
back because it eliminates the protection for the upper part of
the body and may increase the risk of injury or death in a collision.
Never use pillows, books, or towels to boost a child. They can
slide around and increase the likelihood of injury or death in a
collision.
SAFETY SEATS FOR CHILDREN
Child and infant or child safety seats
Use a safety seat that is recommended for the size and weight of the
child. Carefully follow all of the manufacturer’s instructions with the
safety seat you put in your vehicle. If you do not install and use the
safety seat properly, the child may be injured in a sudden stop or
collision.
2005 Mountaineer(mnt)
Owners Guide (post-2002-fmt)
USA(fus)
Seating and Safety Restraints
141
Page 145 of 304

7. Pull the lap belt portion across
the child seat toward the buckle and
pull up on the shoulder belt while
pushing down with your knee on the
child seat.
8. Allow the safety belt to retract to
remove any slack in the belt.
9. Before placing the child in the
seat, forcibly move the seat forward
and back to make sure the seat is
securely held in place. To check
this, grab the seat at the belt path
and attempt to move it side to side
and forward. There should be no
more than one inch of movement for
proper installation.
10. Try to pull the belt out of the retractor to make sure the retractor is
in the automatic locking mode (you should not be able to pull more belt
out). If the retractor is not locked, unbuckle the belt and repeat Steps 2
through 9.
Check to make sure the child seat is properly secured before each use.
Attaching child safety seats with tether straps
Most new forward-facing child safety seats include a tether strap which
goes over the back of the seat and hooks to an anchoring point. Tether
straps are available as an accessory for many older safety seats. Contact
the manufacturer of your child seat for information about ordering a
tether strap.
The rear seats of your vehicle are equipped with built-in tether strap
anchors located behind the seats as shown below.
2005 Mountaineer(mnt)
Owners Guide (post-2002-fmt)
USA(fus)
Seating and Safety Restraints
145
Page 161 of 304

•All-Wheel driving capability (if applicable)
•Load leveling adjustment (if applicable)
When driving with the dissimilar spare tire/wheel additional caution
should be given to:
•Towing a trailer
•Driving vehicles equipped with a camper body
•Driving vehicles with a load on the cargo rack
Drive cautiously when using a dissimilar spare tire/wheel and seek
service as soon as possible.
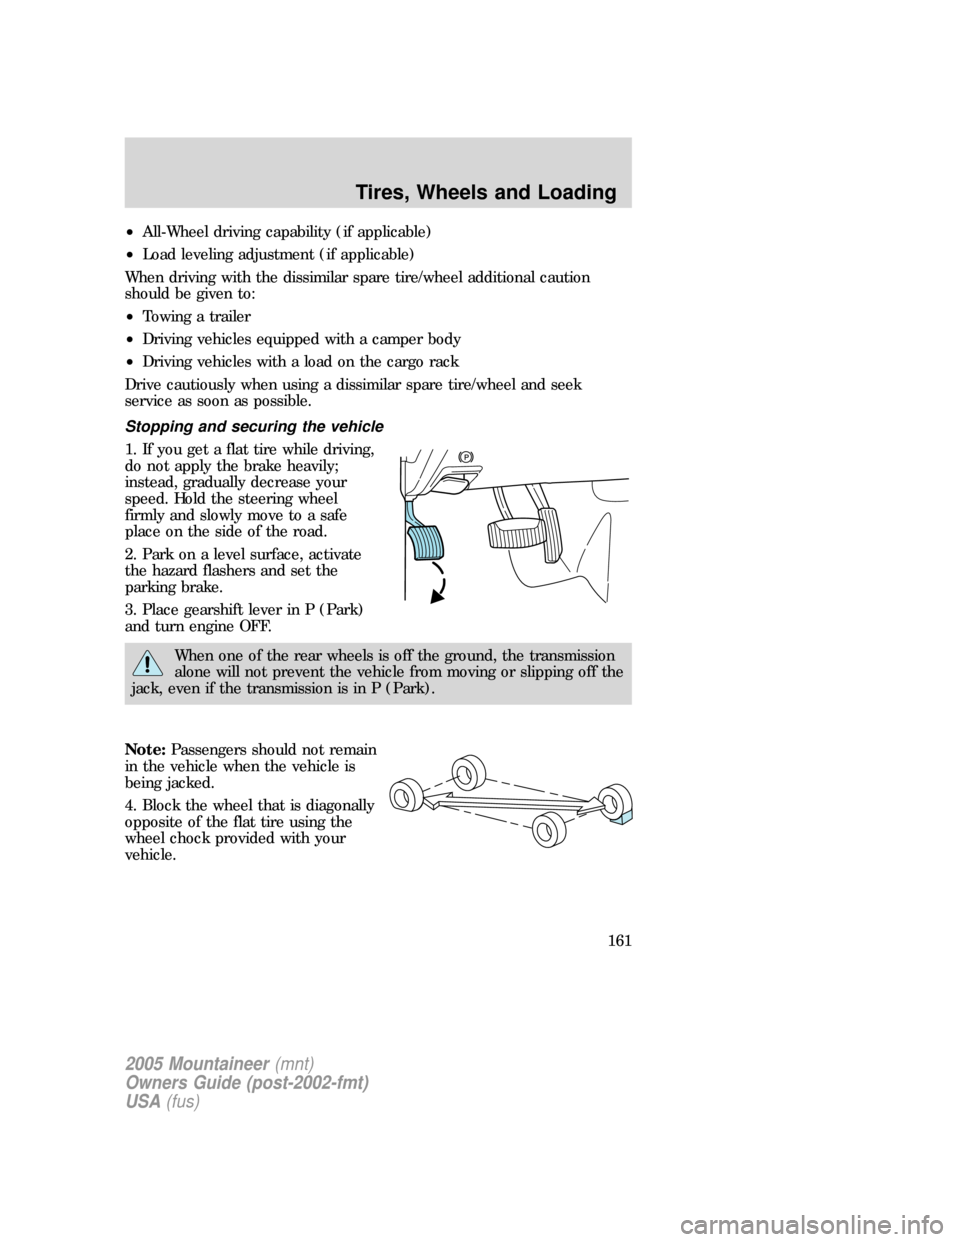
Stopping and securing the vehicle
1. If you get a flat tire while driving,
do not apply the brake heavily;
instead, gradually decrease your
speed. Hold the steering wheel
firmly and slowly move to a safe
place on the side of the road.
2. Park on a level surface, activate
the hazard flashers and set the
parking brake.
3. Place gearshift lever in P (Park)
and turn engine OFF.
When one of the rear wheels is off the ground, the transmission
alone will not prevent the vehicle from moving or slipping off the
jack, even if the transmission is in P (Park).
Note:Passengers should not remain
in the vehicle when the vehicle is
being jacked.
4. Block the wheel that is diagonally
opposite of the flat tire using the
wheel chock provided with your
vehicle.
2005 Mountaineer(mnt)
Owners Guide (post-2002-fmt)
USA(fus)
Tires, Wheels and Loading
161
Page 162 of 304

Location of the spare tire and tools
The spare tire and tools for your vehicle are stowed in the following
locations:
Tool Location
Spare tire Under the vehicle, just in front of
the rear bumper. The spare tire
winch drive nut is located at the
rear center of the cargo area
under a lid.
Jack, lug nut wrench, jack handle,
wheel chockBehind the rear seat under the
carpeted floor lid in the cargo
floor. The tools are located in a
bag attached to the jack.
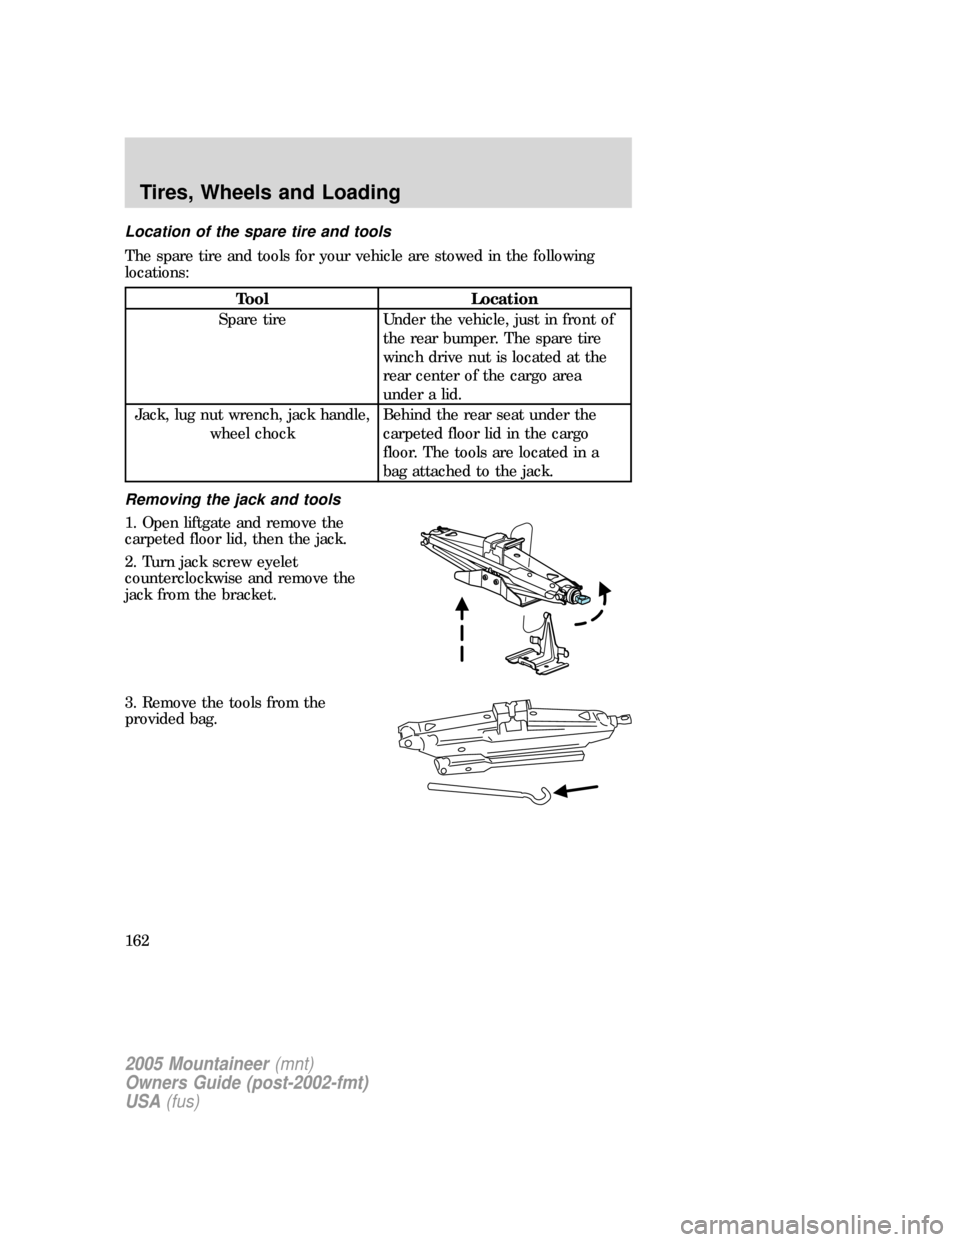
Removing the jack and tools
1. Open liftgate and remove the
carpeted floor lid, then the jack.
2. Turn jack screw eyelet
counterclockwise and remove the
jack from the bracket.
3. Remove the tools from the
provided bag.
2005 Mountaineer(mnt)
Owners Guide (post-2002-fmt)
USA(fus)
Tires, Wheels and Loading
162
Page 166 of 304

To lessen the risk of
personal injury, do not put
any part of your body under the
vehicle while changing a tire. Do
not start the engine when your
vehicle is on the jack. The jack is
only meant for changing the tire.
•Never use the front or rear
differential as a jacking point.
5. Remove the lug nuts with the lug wrench.
6. Replace the flat tire with the spare tire, making sure the valve stem is
facing outward. Reinstall the lug nuts, cone side in, until the wheel is
snug against the hub. Do not fully tighten the lug nuts until the wheel
has been lowered.
7. Lower the wheel by turning the jack handle counterclockwise.
8. Remove the jack and fully tighten
the lug nuts in the order shown.
Refer toWheel lug nut torque
specificationslater in this chapter
for the proper lug nut torque
specification.
Stowing the flat/spare tire
Note:Failure to follow spare tire stowage instructions may result in
failure of cable or loss of spare tire.
1. Lay the tire on the ground with the valve stem facing up, toward the
vehicle.
2. Slide the wheel partially under the vehicle and install the retainer
through the wheel center. Pull on the cable to align the components at
the end of the cable.
1
4 3
2 5
2005 Mountaineer(mnt)
Owners Guide (post-2002-fmt)
USA(fus)
Tires, Wheels and Loading
166
Page 167 of 304

3. Turn the lug wrench clockwise until the tire is raised to its stowed
position underneath the vehicle. The effort to turn the jack handle
increases significantly and the spare tire carrier ratchets or slips when
the tire is raised to the maximum tightness. Tighten to the best of your
ability, to the point where the ratchet/slip occurs, if possible. The spare
tire carrier will not allow you to overtighten. If the spare tire carrier
ratchets or slips with little effort, take the vehicle to your dealer for
assistance at your earliest convenience.
4. Check that the tire lies flat against the frame and is properly
tightened. Try to push or pull, then turn the tire to be sure it will not
move. Loosen and retighten, if necessary. Failure to properly stow the
spare tire may result in failure of the winch cable and loss of the tire.
5. If your vehicle is equipped with a spare tire lock and key, be sure to
install the spare tire lock into the bumper drive tube with the spare tire
lock key and jack handle.
6. Repeat this tightness check procedure when servicing the spare tire
pressure (every six months, perscheduled maintenance information),
or at any time that the spare tire is disturbed through service of other
components.
Re-stowing the jack and tools
1. Unblock the wheels.
2. Stow the wheel ornament (if removed) in a safe location in the vehicle
(such as the glove box or jack stowage compartment) so it will not
become damaged. Re-install the wheel ornament onto the wheel once the
tire is repaired or replaced.
3. Stow the jack and tools in their respective locations, making sure they
are fully secured so they do not rattle when you drive.
WHEEL LUG NUT TORQUE SPECIFICATIONS
Retighten the lug nuts to the specified torque at 50–100 miles (80–160
km) after any wheel disturbance (rotation, flat tire, wheel removal, etc.).
Lug nut socket size/Bolt size Wheel lug nut torque*
lb.ft. N•m
Lug nut socket size:
3�4” (19 mm) hex
Bolt size:1�2x20100 135
* Torque specifications are for nut and bolt threads free of dirt and
rust. Use only Ford recommended replacement fasteners.
2005 Mountaineer(mnt)
Owners Guide (post-2002-fmt)
USA(fus)
Tires, Wheels and Loading
167
Page 174 of 304

Safety practices
Driving habits have a great deal to do with your tire mileage and safety.
•Observe posted speed limits
•Avoid fast starts, stops and turns
•Avoid potholes and objects on the road
•Do not run over curbs or hit the tire against a curb when parking
If your vehicle is stuck in snow, mud, sand, etc.,do notrapidly
spin the tires; spinning the tires can tear the tire and cause an
explosion. A tire can explode in as little as three to five seconds.
Never spin the tires in excess of the 35 mph (55 km/h) point
indicated on the speedometer.
Highway hazards
No matter how carefully you drive there’s always the possibility that you
may eventually have a flat tire on the highway. Drive slowly to the
closest safe area out of traffic. This may further damage the flat tire, but
your safety is more important.
If you feel a sudden vibration or ride disturbance while driving, or you
suspect your tire or vehicle has been damaged, immediately reduce your
speed. Drive with caution until you can safely pull off the road. Stop and
inspect the tires for damage. If a tire is under-inflated or damaged,
deflate it, remove wheel and replace it with your spare tire and wheel. If
you cannot detect a cause, have the vehicle towed to the nearest repair
facility or tire dealer to have the vehicle inspected.
Tire and wheel alignment
A bad jolt from hitting a curb or pothole can cause the front end of your
vehicle to become misaligned or cause damage to your tires. If your
vehicle seems to pull to one side when you’re driving, the wheels may be
out of alignment. Have a qualified technician at a Ford or Lincoln
Mercury dealer check the wheel alignment periodically.
Wheel misalignment in the front or the rear can cause uneven and rapid
treadwear of your tires and should be corrected by a qualified technician
at a Ford or Lincoln Mercury dealer. Front wheel drive (FWD) vehicles
and those with an independent rear suspension (if equipped) may
require alignment of all four wheels.
2005 Mountaineer(mnt)
Owners Guide (post-2002-fmt)
USA(fus)
Tires, Wheels and Loading
174
Page 179 of 304

When you believe your system is not operating properly
The main function of the Tire Pressure Monitoring System is to warn you
when your tires need air. It can also warn you in the event the system is
no longer capable of functioning as intended. Please refer to the
following chart for information concerning your Tire Pressure Monitoring
System:
Low Tire Warning
LightCustomer Action Required
Solid Warning Light 1. Check your tire pressure to ensure they are
properly inflated, refer toInspecting and
inflating your tiresin this chapter. Ford
recommends the use of a digital or dial type
tire pressure gauge rather than a stick type
tire pressure gauge for increased accuracy.
2. After inflating your tires to the
manufacturer’s recommended air pressure as
shown on the Safety Compliance Certification
Label (located on the driver’s door or the
B-Pillar), the vehicle must be driven for at
least two minutes at 20 mph (32 km/h) to
guarantee that the light will turn off.
3. If the light remains on even after these
steps have been taken, have the system
inspected by your servicing dealership
Flashing Warning Light
(flashes for 20 to 30
seconds either at
start-up or while
driving)1. Your spare tire is in use. Repair the
damaged road wheel and re-mount it on the
vehicle to restore system functionality. For a
description of how the system functions under
these conditions, refer toWhen You Have a
Flat Tirein this section.
2. If your tires are inflated to the
manufacturer’s recommended tire pressure,
and your spare tire is not in use, and a
flashing low time warning light is still present,
have the system inspected by your servicing
dealership.
2005 Mountaineer(mnt)
Owners Guide (post-2002-fmt)
USA(fus)
Tires, Wheels and Loading
179