fuel Mercury Mountaineer 2009 s Owner's Guide
[x] Cancel search | Manufacturer: MERCURY, Model Year: 2009, Model line: Mountaineer, Model: Mercury Mountaineer 2009Pages: 388, PDF Size: 3.28 MB
Page 261 of 388

STARTING
Positions of the ignition
1. Off— locks the gearshift lever
and allows key removal. This
position also shuts the engine and
all electrical accessories off.
2. Accessory— allows the electrical
accessories such as the radio to
operate while the engine is not
running.
3. On— all electrical circuits
operational. Warning lights
illuminated. Key position when driving.
4. Start— cranks the engine. Release the key as soon as the engine
starts.
Preparing to start your vehicle
Engine starting is controlled by the powertrain control system.
This system meets all Canadian interference-causing equipment standard
requirements regulating the impulse electrical field strength of radio
noise.
When starting a fuel-injected engine, don’t press the accelerator before
or during starting. Only use the accelerator when you have difficulty
starting the engine. For more information on starting the vehicle, refer to
Starting the enginein this chapter.
WARNING:Extended idling at high engine speeds can produce
very high temperatures in the engine and exhaust system,
creating the risk of fire or other damage.
WARNING:Do not park, idle, or drive your vehicle in dry grass
or other dry ground cover. The emission system heats up the
engine compartment and exhaust system, which can start a fire.
WARNING:Do not start your vehicle in a closed garage or in
other enclosed areas. Exhaust fumes can be toxic. Always open
the garage door before you start the engine. SeeGuarding against
exhaust fumesin this chapter for more instructions.
2009 Mountaineer(mnt)
Owners Guide, 2nd Printing
USA(fus)
Driving
261
Page 264 of 388

Starting the engine
1. Turn the key to 3 (on) without
turning the key to 4 (start). If there
is difficulty in turning the key,
rotate the steering wheel until the
key turns freely. This condition may
occur when:
•the front wheels are turned
•a front wheel is against the curb
2. Turn the key to 4 (start), then
release the key as soon as the
engine begins cranking. Your vehicle has a computer assisted cranking
system that assists in starting the engine. After releasing the key from
the 4 (start) position, the engine may continue cranking for up to
10 seconds or until the vehicle starts.
Note:Cranking may be stopped at any time by turning the key to the off
position.
3. After idling for a few seconds, release the parking brake, apply the
brake, shift into gear and drive.
Note:If the engine does not start on the first try, turn the key to the off
position, wait 10 seconds and try Step 2 again. If the engine still fails to
start, press the accelerator to the floor and try Step 2 again, keeping the
accelerator on the floor until the engine begins to accelerate above
cranking speeds; this will allow the engine to crank with the fuel shut off
in case the engine is flooded with fuel.
Guarding against exhaust fumes
Carbon monoxide is present in exhaust fumes. Take precautions to avoid
its dangerous effects.
WARNING:If you smell exhaust fumes inside your vehicle, have
your dealer inspect your vehicle immediately. Do not drive if you
smell exhaust fumes.
Important ventilating information
If the engine is idling while the vehicle is stopped for a long period of
time, open the windows at least one inch (2.5 cm) or adjust the heating
or air conditioning to bring in fresh air.
ENGINE BLOCK HEATER (IF EQUIPPED)
An engine block heater warms the engine coolant which aids in starting
and allows the heater/defroster system to respond quickly. If your vehicle
2009 Mountaineer(mnt)
Owners Guide, 2nd Printing
USA(fus)
Driving
264
Page 268 of 388

WARNING:Always set the parking brake fully and make sure
that the gearshift is securely latched in P (Park).
WARNING:If the parking brake is fully released, but the brake
warning lamp remains illuminated, the brakes may not be
working properly. See your authorized dealer.
The parking brake is not recommended to stop a moving vehicle.
However, if the normal brakes fail, the parking brake can be used to stop
your vehicle in an emergency. Since the parking brake applies only the
rear brakes, the vehicle’s stopping distance will increase greatly and the
handling of your vehicle will be adversely affected.
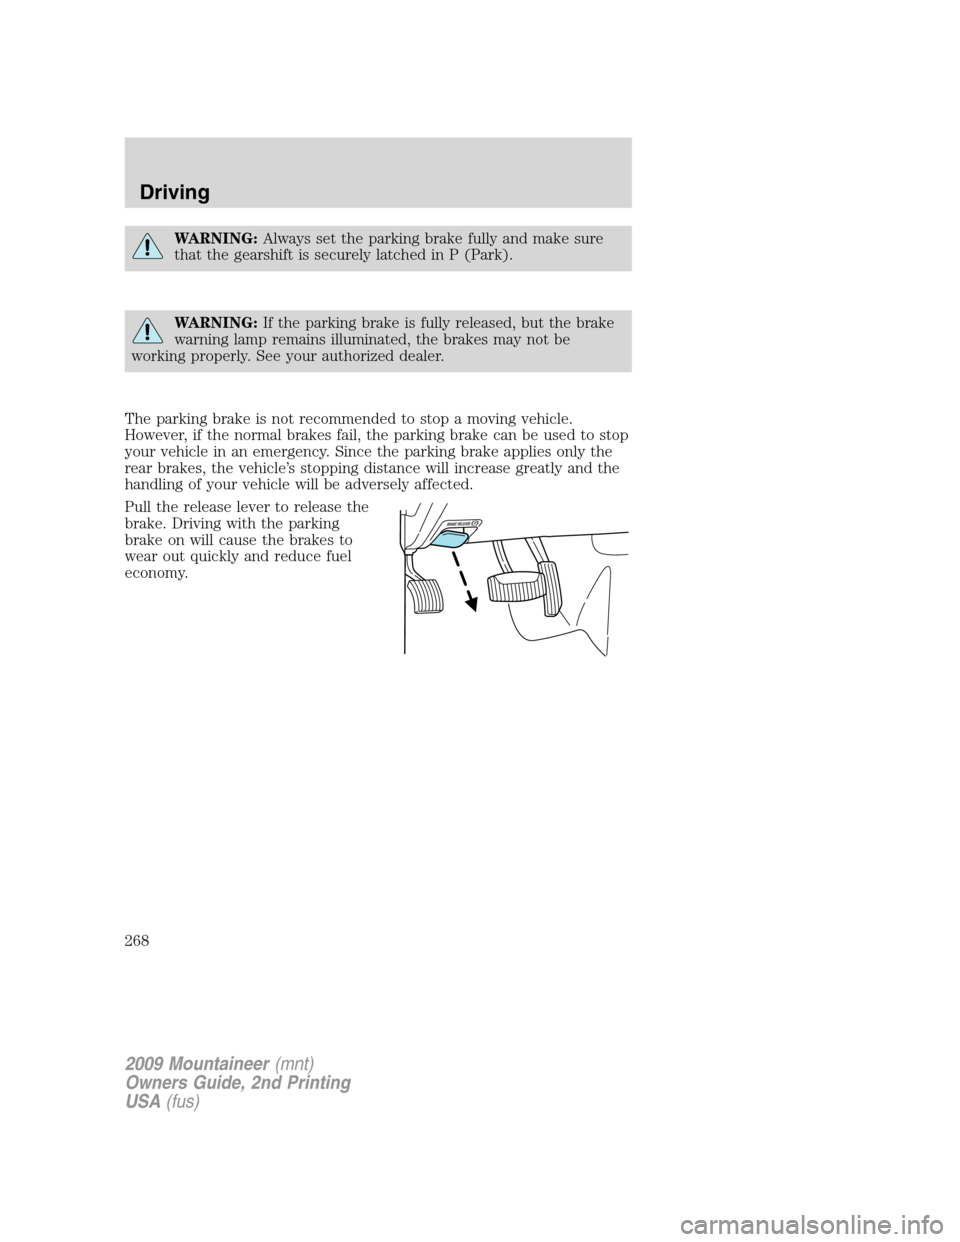
Pull the release lever to release the
brake. Driving with the parking
brake on will cause the brakes to
wear out quickly and reduce fuel
economy.
2009 Mountaineer(mnt)
Owners Guide, 2nd Printing
USA(fus)
Driving
268
Page 278 of 388

N (Neutral)
With the gearshift lever in N (Neutral), the vehicle can be started and is
free to roll. Hold the brake pedal down while in this position.
D (Drive) with Overdrive
The normal driving position for the best fuel economy. Transmission
operates in gears one through five.
D (Drive) without Overdrive
Overdrive can be deactivated by
pressing the transmission control
switch on the side of the gearshift
lever.
•This position allows for all
forward gears (1-4) except
overdrive.
•Provides engine braking.
•Use when driving conditions
cause excessive shifting from O/D
to other gears. Examples: heavy
city traffic where continuous
shifting in and out of overdrive
occurs, hilly terrain, heavy loads,
trailer towing and when engine
braking is required.
•O/D OFF lamp is illuminated.
•To return to O/D (overdrive
mode), press the transmission
control switch. The O/D OFF
lamp will not be illuminated.
•O/D (Overdrive) is automatically returned each time the key is turned
off.
3 (Third)
Transmission operates in third gear only.
Used for improved traction on slippery roads. Selecting 3 (Third)
provides engine braking.
2 (Second)
Use 2 (Second) to start-up on slippery roads or to provide additional
engine braking on downgrades.
O/D
OFF
2009 Mountaineer(mnt)
Owners Guide, 2nd Printing
USA(fus)
Driving
278
Page 280 of 388

P (Park)
This position locks the transmission
and prevents the rear wheels from
turning.
To put your vehicle in gear:
•Depress the brake pedal
•Start the engine
•Press the gearshift lever release
button (on the front of the lever)
and shift into the desired gear
To put your vehicle in P (Park):
•Come to a complete stop
•Move the gearshift lever and
securely latch it in P (Park)
WARNING:Always set the parking brake fully and make sure
the gearshift is latched in P (Park). Turn the ignition to the off
position and remove the key whenever you leave your vehicle.
R (Reverse)
With the gearshift lever in R (Reverse), the vehicle will move backward.
Always come to a complete stop before shifting into and out of R
(Reverse).
N (Neutral)
With the gearshift lever in N (Neutral), the vehicle can be started and is
free to roll. Hold the brake pedal down while in this position.
D (Drive) with Overdrive
The normal driving position for the best fuel economy. Transmission
operates in gears one through six.
2009 Mountaineer(mnt)
Owners Guide, 2nd Printing
USA(fus)
Driving
280
Page 292 of 388

ROADSIDE ASSISTANCE
Getting roadside assistance
To fully assist you should you have a vehicle concern, Ford Motor
Company offers a complimentary roadside assistance program. This
program is separate from the New Vehicle Limited Warranty. The service
is available:
•24–hours, seven days a week
•for the coverage period listed on the Roadside Assistance Card
included in your Owner Guide portfolio.
Roadside assistance will cover:
•a flat tire change with a good spare (except vehicles that have been
supplied with a tire inflation kit)
•battery jump start
•lock-out assistance (key replacement cost is the customer’s
responsibility)
•fuel delivery – Independent Service Contractors, if not prohibited by
state, local or municipal law shall deliver up to 2.0 gallons (7.5L) of
gasoline or 5 gallons (18.9L) of diesel fuel to a disabled vehicle. Fuel
delivery service is limited to two no-charge occurrences within a
12-month period.
•winch out – available within 100 feet (30.5 meters) of a paved or
county maintained road, no recoveries.
•towing – Ford/Mercury/Lincoln eligible vehicle towed to an authorized
dealer within 35 miles (56.3 km) of the disablement location or to the
nearest authorized dealer. If a member requests to be towed to an
authorized dealer more than 35 miles (56.3 km) from the disablement
location, the member shall be responsible for any mileage costs in
excess of 35 miles (56.3 km).
Trailers shall be covered up to $200 if the disabled eligible vehicle
requires service at the nearest authorized dealer. If the trailer is disabled,
but the towing vehicle is operational, the trailer does not qualify for any
roadside services.
Canadian customers refer to your Customer Information Guide
for information on:
•coverage period
•exact fuel amounts
2009 Mountaineer(mnt)
Owners Guide, 2nd Printing
USA(fus)
Roadside Emergencies
292
Page 294 of 388

FUEL PUMP SHUT-OFF SWITCHFUEL
RESET
The fuel pump shut-off switch is a device intended to stop the electric
fuel pump when your vehicle has been involved in a substantial jolt.
After a collision, if the engine cranks but does not start, the fuel pump
shut-off switch may have been activated.
The fuel pump shut-off switch is
located in the passenger’s foot well,
by the kick panel.
Use the following procedure to reset the fuel pump shut-off switch.
1. Turn the ignition to the off position.
2. Check the fuel system for leaks.
3. If no fuel leak is apparent, reset the fuel pump shut-off switch by
pushing in on the reset button.
4. Turn the ignition to the on position. Pause for a few seconds and
return the key to the off position.
5. Make a further check for leaks in the fuel system.
2009 Mountaineer(mnt)
Owners Guide, 2nd Printing
USA(fus)
Roadside Emergencies
294
Page 297 of 388

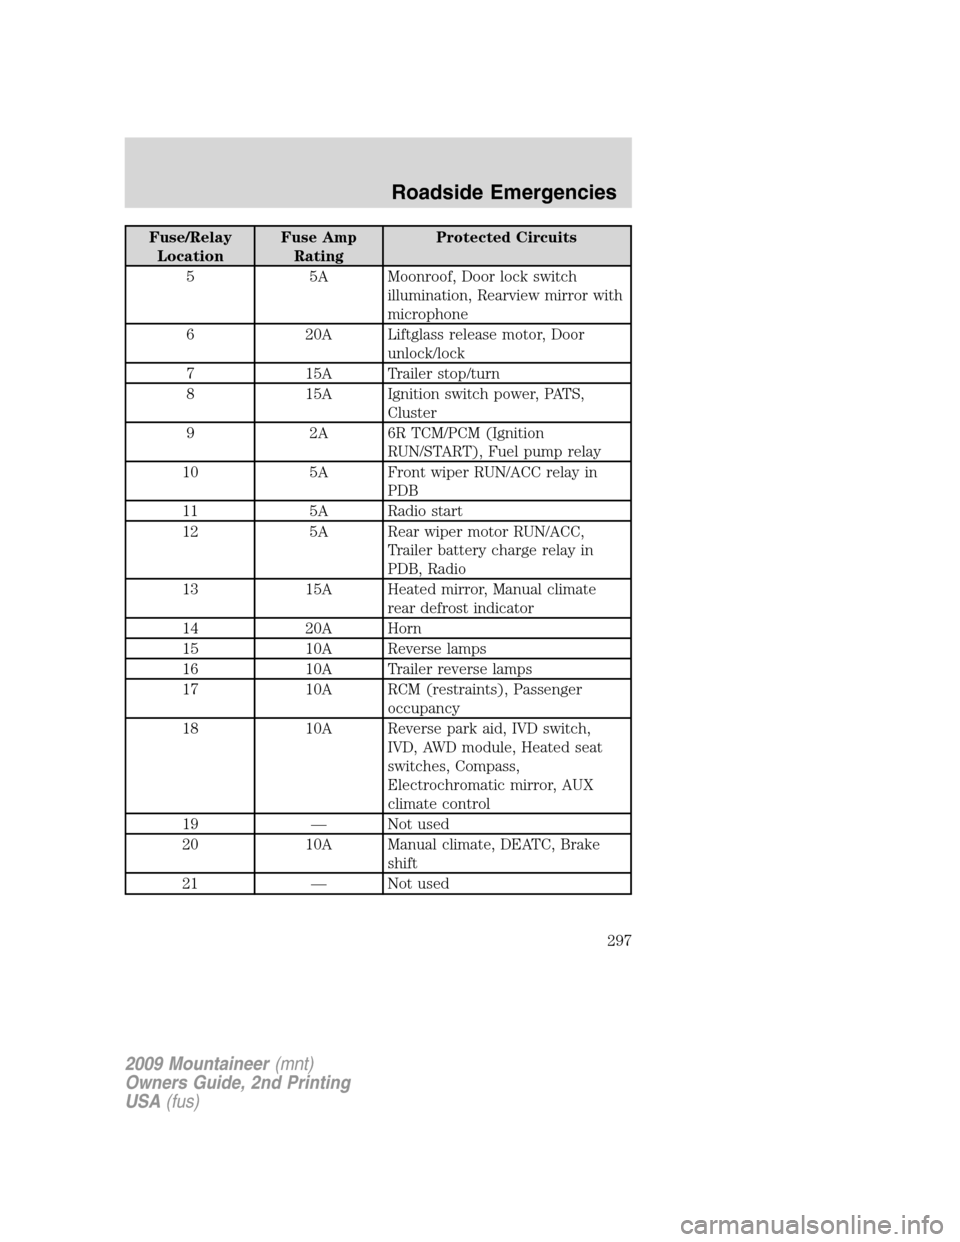
Fuse/Relay
LocationFuse Amp
RatingProtected Circuits
5 5A Moonroof, Door lock switch
illumination, Rearview mirror with
microphone
6 20A Liftglass release motor, Door
unlock/lock
7 15A Trailer stop/turn
8 15A Ignition switch power, PATS,
Cluster
9 2A 6R TCM/PCM (Ignition
RUN/START), Fuel pump relay
10 5A Front wiper RUN/ACC relay in
PDB
11 5A Radio start
12 5A Rear wiper motor RUN/ACC,
Trailer battery charge relay in
PDB, Radio
13 15A Heated mirror, Manual climate
rear defrost indicator
14 20A Horn
15 10A Reverse lamps
16 10A Trailer reverse lamps
17 10A RCM (restraints), Passenger
occupancy
18 10A Reverse park aid, IVD switch,
IVD, AWD module, Heated seat
switches, Compass,
Electrochromatic mirror, AUX
climate control
19 — Not used
20 10A Manual climate, DEATC, Brake
shift
21 — Not used
2009 Mountaineer(mnt)
Owners Guide, 2nd Printing
USA(fus)
Roadside Emergencies
297
Page 300 of 388

The high-current fuses are coded as follows:
Fuse/Relay
LocationFuse Amp
RatingProtected Circuits
1 50A** BATT 2 (SJB)
2 50A** BATT 3 (SJB)
3 50A** BATT 1 (SJB)
4 30A** Fuel pump, Injectors
5 30A** Third row seat (left)
6 40A** ABS pump
7 40A** Powertrain Control Module
(PCM)
8 — Not used
9 — Not used
10 30A** Power seat (right)
11 30A** Starter
12 30A** Third row seat (right)
13 30A** Trailer tow battery charger
2009 Mountaineer(mnt)
Owners Guide, 2nd Printing
USA(fus)
Roadside Emergencies
300
Page 302 of 388

Fuse/Relay
LocationFuse Amp
RatingProtected Circuits
40 15A* Fan clutch, PCV valve, AC clutch
relay, GCC fan
41 15A* SDARS, DVD, SYNC
42 15A* Redundant brake switch, EVMV,
MAFS, HEGO, EVR, VCT1 (4.6L
engine only), VCT2 (4.6L engine
only), CMCV (4.6L engine only),
CMS
43 15A* Coil on plug (4.6L engine only),
Coil tower (4.0L engine only)
44 15A* Injectors
45B — GCC fan relay
45A — Not used
46B — Not used
46A — Not used
49 — Fuel pump relay
50B — A/C clutch relay
50A — Fog lamps relay
51 — Not used
52 — Not used
53 — One Touch Integrated Start
(OTIS) (diode)
54 — Trailer battery charger relay
55B — Front wiper relay
55A — PCM relay
56B — Starter relay
56A — Blower relay
* Mini Fuses ** Cartridge Fuses
2009 Mountaineer(mnt)
Owners Guide, 2nd Printing
USA(fus)
Roadside Emergencies
302