ECO mode Mercury Mountaineer 2010 s User Guide
[x] Cancel search | Manufacturer: MERCURY, Model Year: 2010, Model line: Mountaineer, Model: Mercury Mountaineer 2010Pages: 390, PDF Size: 2.75 MB
Page 52 of 390
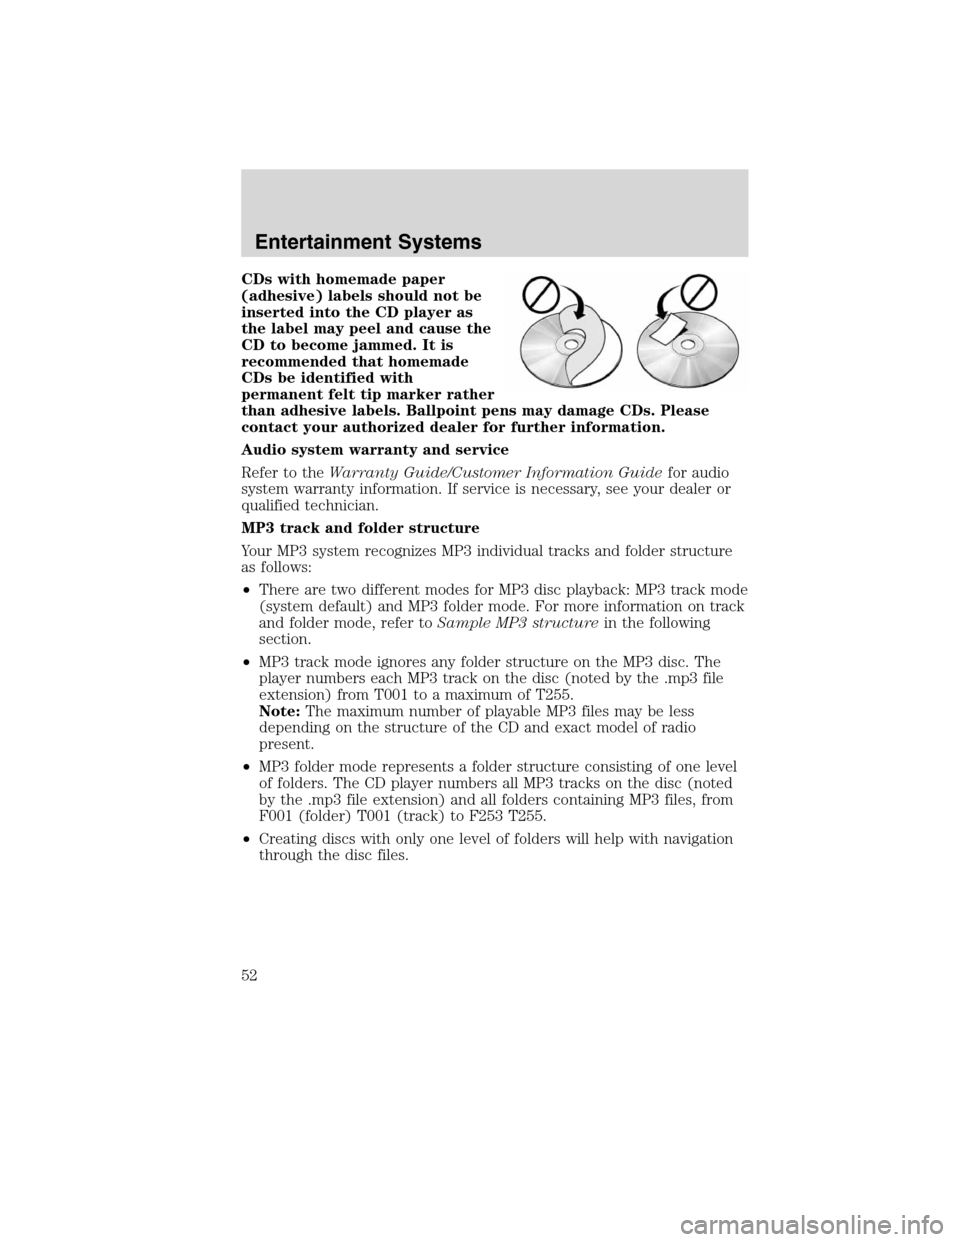
CDs with homemade paper
(adhesive) labels should not be
inserted into the CD player as
the label may peel and cause the
CD to become jammed. It is
recommended that homemade
CDs be identified with
permanent felt tip marker rather
than adhesive labels. Ballpoint pens may damage CDs. Please
contact your authorized dealer for further information.
Audio system warranty and service
Refer to theWarranty Guide/Customer Information Guidefor audio
system warranty information. If service is necessary, see your dealer or
qualified technician.
MP3 track and folder structure
Your MP3 system recognizes MP3 individual tracks and folder structure
as follows:
•There are two different modes for MP3 disc playback: MP3 track mode
(system default) and MP3 folder mode. For more information on track
and folder mode, refer toSample MP3 structurein the following
section.
•MP3 track mode ignores any folder structure on the MP3 disc. The
player numbers each MP3 track on the disc (noted by the .mp3 file
extension) from T001 to a maximum of T255.
Note:The maximum number of playable MP3 files may be less
depending on the structure of the CD and exact model of radio
present.
•MP3 folder mode represents a folder structure consisting of one level
of folders. The CD player numbers all MP3 tracks on the disc (noted
by the .mp3 file extension) and all folders containing MP3 files, from
F001 (folder) T001 (track) to F253 T255.
•Creating discs with only one level of folders will help with navigation
through the disc files.
Entertainment Systems
52
2010 Mountaineer(mnt)
Owners Guide(own2002), 1st Printing
USA(fus)
Page 57 of 390
Your vehicle may be equipped with a Family Entertainment System
(FES) which allows you to listen to audio CDs, MP3 discs, watch DVDs
and to plug in and play a variety of standard video game systems. The
DVD player is capable of playing standard DVDs, CDs, MP3s and is
compatible with CD-R/W, CD-R and certain CD-ROM media.
Please review this material to become familiar with the FES features and
controls as well as the very important safety information.
Note:Any notations or restrictions on individual DVD system controls
are applicable to the overhead controls as well as to duplicate controls
found on the remote control.
Quick start
Your Family Entertainment System includes a DVD system, two sets of
wireless infrared (IR) headphones and a wireless infrared (IR) remote
control.
Note:To disable the DVD rear-seat controls:
•If your vehicle is equipped with the navigation system, press the
MEDIA or RADIO hard button. Select the ’Rear Zone’ tab on the
touchscreen. Press the ’disabled’ button. (Press the ’enabled’ button to
turn the rear controls on again.)
•If your vehicle is equipped with an audio system, press the 3 and 5
preset buttons simultaneously. (Press again to enable the controls).
To play a DVD in the DVD system:
The DVD system can play DVD-Video, DVD-R, DVD-R/W discs as well as
audio CDs and video CDs. To ensure proper disc operation, check the
disc for finger prints, scratches and cleanliness. Clean with a soft cloth,
wiping from center to edge.
1. Ensure that the vehicle is on or the ignition is in accessory mode.
2. Insert a DVD into the system, label-side up to turn on the system. It
will load automatically.
3. Press the power button on the
DVD player, then press Play
to
begin to play the disc.
If a DVD is already loaded into the
system, press PLAY on the DVD
player.
Note:If sound can be heard, but no video is present, press VIDEO to
select the video source (DVD or aux-inputs).
Entertainment Systems
57
2010 Mountaineer(mnt)
Owners Guide(own2002), 1st Printing
USA(fus)
Page 59 of 390
Note (navigation-based radio
systems only):Whenadiscis
inserted, the FES switches to
dual-play mode–rear speakers turn off, and headphones turn on. To
switch back to all four speakers on, press the headphone button.
To play an MP3 disc in the DVD system:
1. Ensure that the vehicle is on or the ignition is in accessory mode.
2. Insert an MP3 disc into the
system, label-side up to turn on the
DVD system. It will load and
automatically begin to play. If there
is already a disc in the system, press
PLAY on the DVD player.
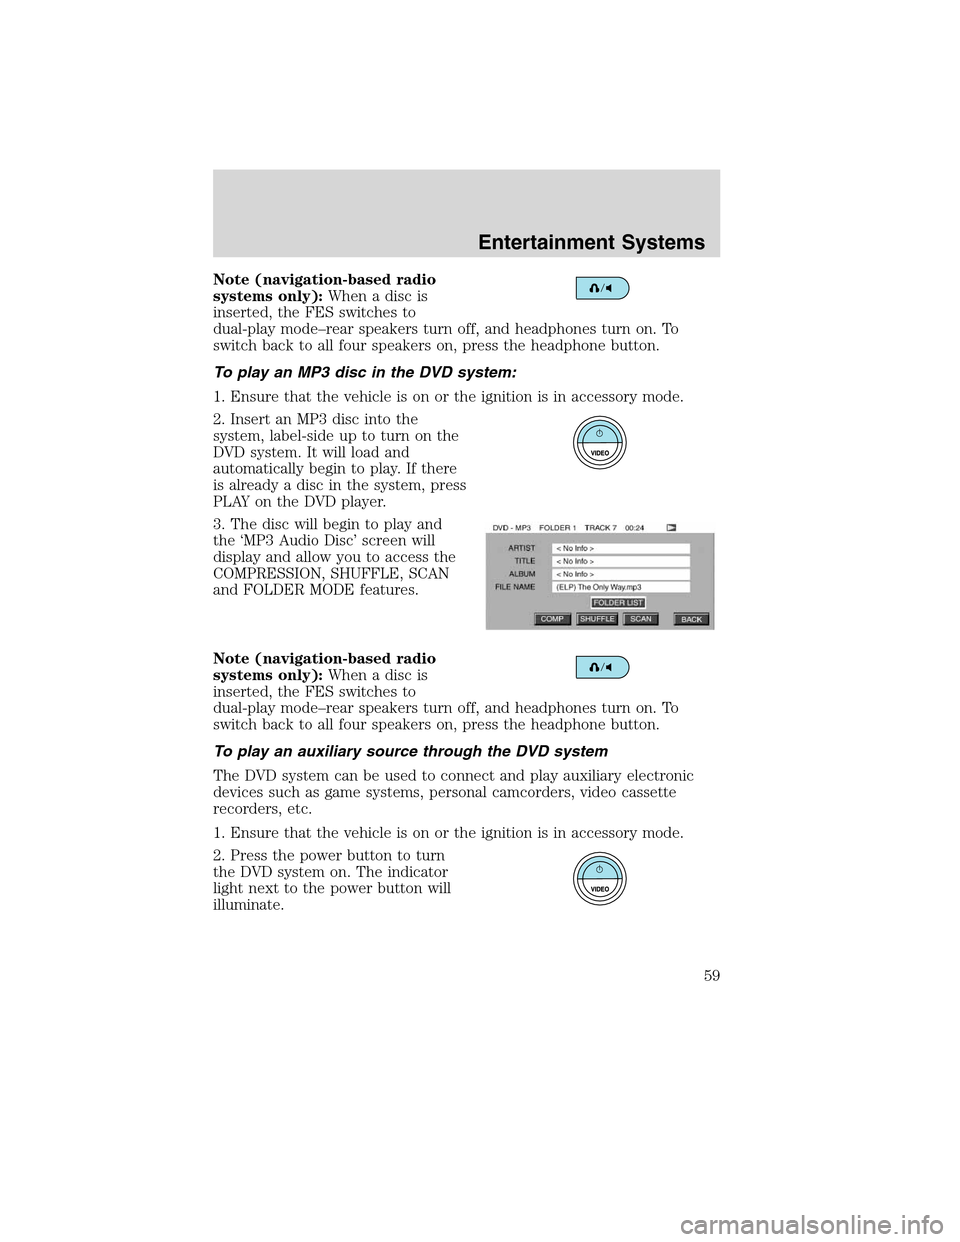
3. The disc will begin to play and
the ‘MP3 Audio Disc’ screen will
display and allow you to access the
COMPRESSION, SHUFFLE, SCAN
and FOLDER MODE features.
Note (navigation-based radio
systems only):Whenadiscis
inserted, the FES switches to
dual-play mode–rear speakers turn off, and headphones turn on. To
switch back to all four speakers on, press the headphone button.
To play an auxiliary source through the DVD system
The DVD system can be used to connect and play auxiliary electronic
devices such as game systems, personal camcorders, video cassette
recorders, etc.
1. Ensure that the vehicle is on or the ignition is in accessory mode.
2. Press the power button to turn
the DVD system on. The indicator
light next to the power button will
illuminate.
Entertainment Systems
59
2010 Mountaineer(mnt)
Owners Guide(own2002), 1st Printing
USA(fus)
Page 63 of 390
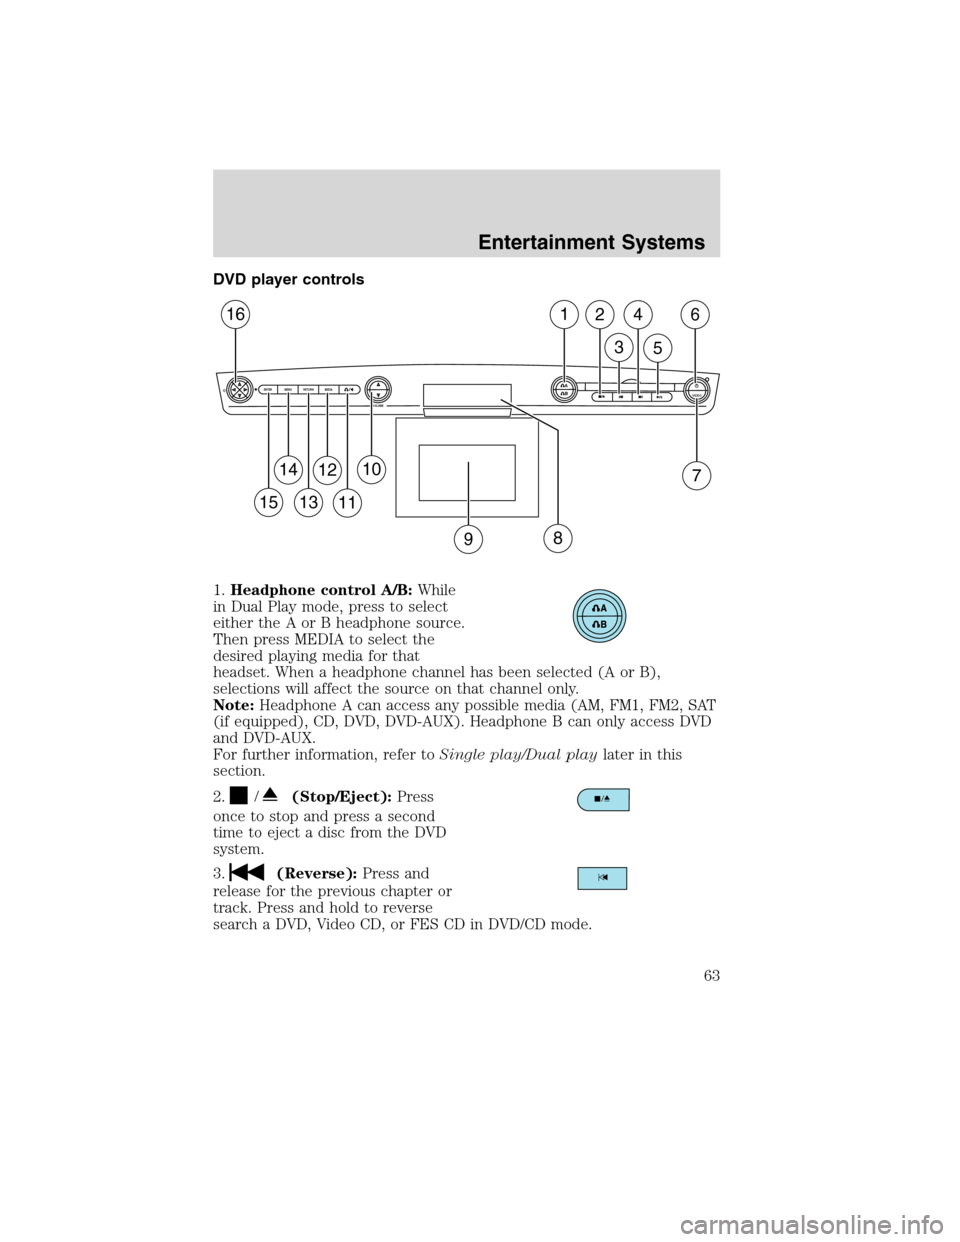
DVD player controls
1.Headphone control A/B:While
in Dual Play mode, press to select
either the A or B headphone source.
Then press MEDIA to select the
desired playing media for that
headset. When a headphone channel has been selected (A or B),
selections will affect the source on that channel only.
Note:Headphone A can access any possible media (AM, FM1, FM2, SAT
(if equipped), CD, DVD, DVD-AUX). Headphone B can only access DVD
and DVD-AUX.
For further information, refer toSingle play/Dual playlater in this
section.
2.
/(Stop/Eject):Press
once to stop and press a second
timetoejectadiscfromtheDVD
system.
3.
(Reverse):Press and
release for the previous chapter or
track. Press and hold to reverse
search a DVD, Video CD, or FES CD in DVD/CD mode.
A
BVIDEOVOLUME MEDIA RETURN MENU ENTER
1
7
2
3
4
5
6
9
10
11
12
13
14
15
16
8
Entertainment Systems
63
2010 Mountaineer(mnt)
Owners Guide(own2002), 1st Printing
USA(fus)
Page 72 of 390
Wired headphones
WARNING:Do not leave children unattended in the vehicle and
do not let children operate the system while unsupervised. If
wired headphones or auxiliary systems are used, children may become
entangled in the cords and seriously injure themselves.
WARNING:The driver should never use the headphones while
driving the vehicle. Using headphones may prevent the driver
from hearing audible warnings such as horns or emergency sirens,
which could result in a crash causing serious injury. Give your full
attention to driving and to the road.
You may purchase wired headphones for your FES (Family
Entertainment System). Plug them into the 3.5 mm headphone jack(s)
located on the left and right sides of the system. (Channel A is located
on the left side and Channel B is located on the right side.) These
headphones will be active when in Dual Play mode.
To listen to the audio on wired headphones (not included), connect the
wired headphones into the headphone jacks on the sides of the DVD
system. The wired headphone jack for Channel A is located on the left
side of the FES and is labeled
A. Headphones plugged into this
headphone jack will hear audio from the audio source selected to be the
Channel A source. The wired headphone jack for Channel B is located on
the right side of the FES and is labeled
B. Headphones plugged into
this headphone jack will hear audio from the audio source selected to be
the Channel B source.
Adjust the headphone volume using
the volume control on the DVD
system.
Operation
Single play/Dual play
Your DVD and audio system work together with the infrared headphones
and wired headphones (not included) to allow the rear seat passengers
to listen to the radio (and other media sources) over the headphones.
This enables the front and rear seat passengers to listen to a variety of
sources a variety of ways.
Entertainment Systems
72
2010 Mountaineer(mnt)
Owners Guide(own2002), 1st Printing
USA(fus)
Page 79 of 390
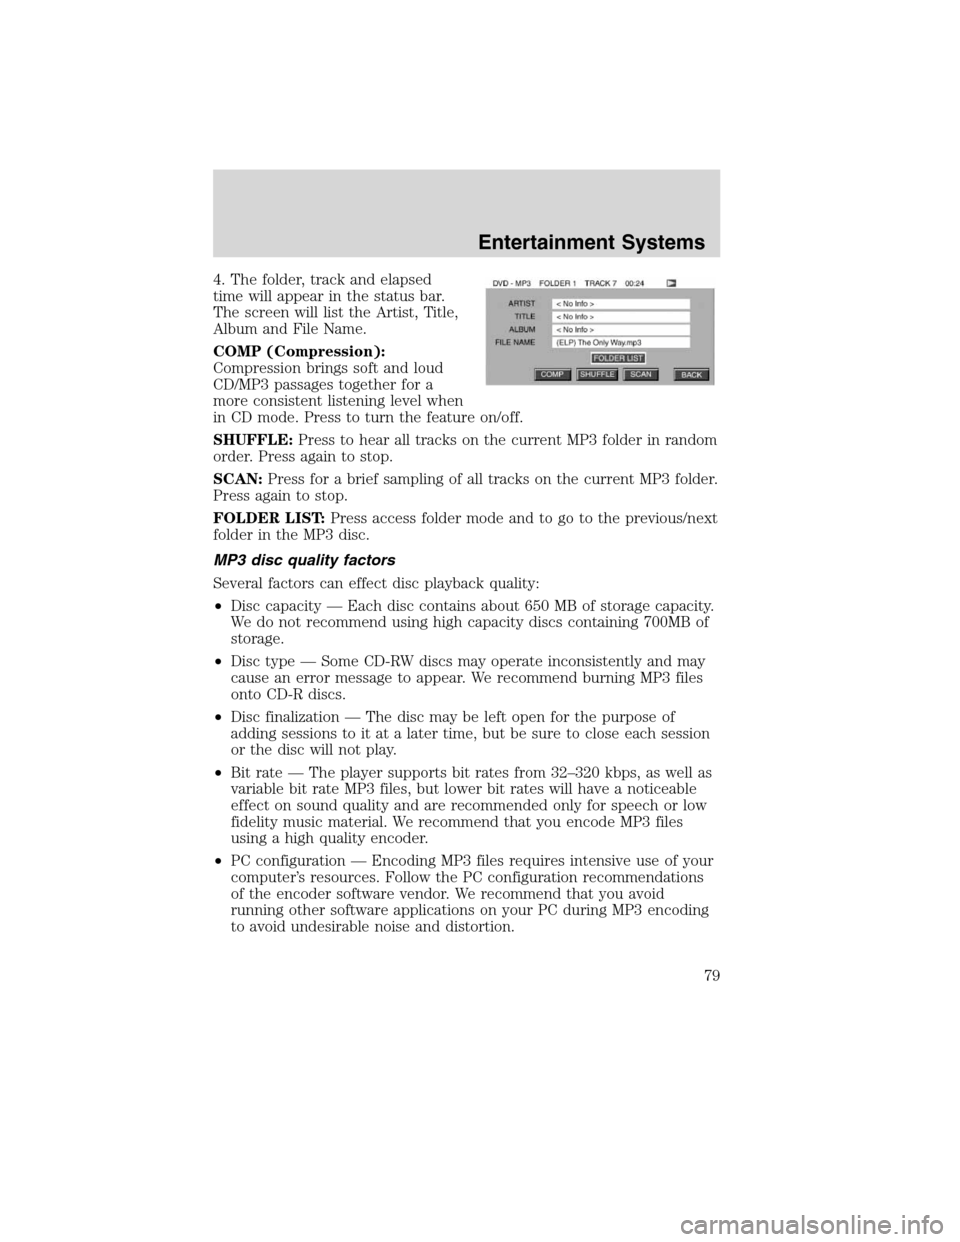
4. The folder, track and elapsed
time will appear in the status bar.
The screen will list the Artist, Title,
Album and File Name.
COMP (Compression):
Compression brings soft and loud
CD/MP3 passages together for a
more consistent listening level when
in CD mode. Press to turn the feature on/off.
SHUFFLE:Press to hear all tracks on the current MP3 folder in random
order. Press again to stop.
SCAN:Press for a brief sampling of all tracks on the current MP3 folder.
Press again to stop.
FOLDER LIST:Press access folder mode and to go to the previous/next
folder in the MP3 disc.
MP3 disc quality factors
Several factors can effect disc playback quality:
•Disc capacity — Each disc contains about 650 MB of storage capacity.
We do not recommend using high capacity discs containing 700MB of
storage.
•Disc type — Some CD-RW discs may operate inconsistently and may
cause an error message to appear. We recommend burning MP3 files
onto CD-R discs.
•Disc finalization — The disc may be left open for the purpose of
adding sessions to it at a later time, but be sure to close each session
or the disc will not play.
•Bit rate — The player supports bit rates from 32–320 kbps, as well as
variable bit rate MP3 files, but lower bit rates will have a noticeable
effect on sound quality and are recommended only for speech or low
fidelity music material. We recommend that you encode MP3 files
using a high quality encoder.
•PC configuration — Encoding MP3 files requires intensive use of your
computer’s resources. Follow the PC configuration recommendations
of the encoder software vendor. We recommend that you avoid
running other software applications on your PC during MP3 encoding
to avoid undesirable noise and distortion.
Entertainment Systems
79
2010 Mountaineer(mnt)
Owners Guide(own2002), 1st Printing
USA(fus)
Page 80 of 390
CD, MP3 and CD player care
•Handle discs by their edges only. Never touch the playing surface.
•Do not expose discs to direct sunlight or heat sources for extended
periods of time.
•Do not insert more than one disc into the slot of the CD player (if
equipped).
•Always store discs out of direct sunlight. Excessive heat may damage
or warp discs.
•Use care when handling and playing CD-R and CD-RW discs, which
are more susceptible to damage from heat, light and stress than are
regular CDs.
•Always insert and remove a disc by holding the disc flat, with the
playing surface facing down, in order to prevent damage to the disc or
the player.
•Never insert any object other than a compact disc (CD) or digital
versatile disc (DVD) into the player, as doing so may damage the
player and may cause injury to you.
•Do not disassemble the player. The laser used in disc playback is
extremely harmful to the eyes.
The FES DVD system is designed to play commercially pressed
12 cm (4.75 in) audio compact discs and digital versatile discs
(DVD), DVD-R and R/W discs only. Due to technical
incompatibility, certain recordable and re-recordable compact
discs may not function correctly when used in Ford CD and DVD
players. Irregular shaped CDs or DVDs, CDs or DVDs with a
scratch protection film attached, and CDs with homemade paper
(adhesive) labels should not be inserted into the FES DVD
system. The label may peel and cause the CD or DVD to become
jammed. It is recommended that homemade CDs or DVDs be
identified with permanent felt tip marker rather than adhesive
labels. Ball point pens may damage CDs or DVDs. Please contact
your authorized dealer for further information.
Playing a DVD
1. Ensure that the vehicle is on or the ignition is in accessory mode.
2. Ensure that the navigation system is on.
3. Insert a DVD label-side up into the system.
4. Use the DVD bezel controls to:
Entertainment Systems
80
2010 Mountaineer(mnt)
Owners Guide(own2002), 1st Printing
USA(fus)
Page 82 of 390
press of the right cursor button will advance the DVD video by one
frame.
Headphone/auxiliary jacks
There are wired headphones (not included) and auxiliary jacks on the
left and right side of your DVD system. They can be used to plug in
wired headphones or to connect and play auxiliary electronic devices
such as game systems, personal camcorders, video cassette recorders,
etc.
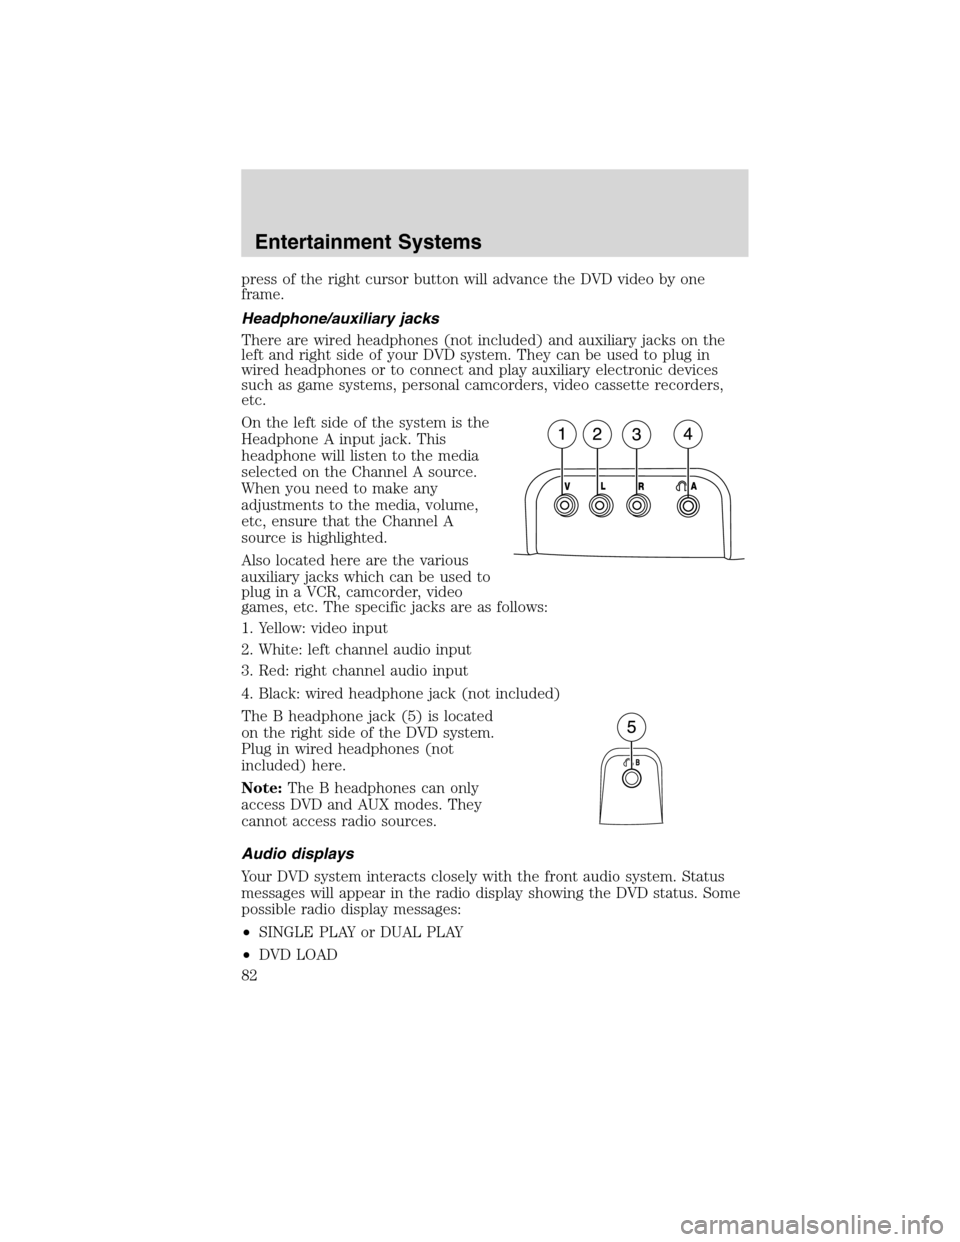
On the left side of the system is the
Headphone A input jack. This
headphone will listen to the media
selected on the Channel A source.
When you need to make any
adjustments to the media, volume,
etc, ensure that the Channel A
source is highlighted.
Also located here are the various
auxiliary jacks which can be used to
plug in a VCR, camcorder, video
games, etc. The specific jacks are as follows:
1. Yellow: video input
2. White: left channel audio input
3. Red: right channel audio input
4. Black: wired headphone jack (not included)
The B headphone jack (5) is located
on the right side of the DVD system.
Plug in wired headphones (not
included) here.
Note:The B headphones can only
access DVD and AUX modes. They
cannot access radio sources.
Audio displays
Your DVD system interacts closely with the front audio system. Status
messages will appear in the radio display showing the DVD status. Some
possible radio display messages:
•SINGLE PLAY or DUAL PLAY
•DVD LOAD
Entertainment Systems
82
2010 Mountaineer(mnt)
Owners Guide(own2002), 1st Printing
USA(fus)
Page 83 of 390
•DVD MENU
•DVD STOP
Audio interaction
You can then also use the front audio controls to advance, reverse, play
and pause a DVD. While a DVD is playing you may use the following
controls on the front radio:
•SEEK:Press to advance to the previous (
) or next () DVD
chapters.
•
: Press to play a DVD or to pause the DVD.
When the radio displays “DVD MENU”, press PLAY on the radio
(memory preset #6), to play the disc.
Parental control for the DVD system
Your Family Entertainment System (FES) allows you to have control
over the rear seat controls in a few different ways. The DVD system is
automatically activated when the vehicle ignition is ON, which allows the
rear seat passengers to use the DVD system.
There are three levels of control of
the FES buttons. The states are
FULL (enabled), LOCAL or
LOCKED (disabled). To change the level of control, press the memory
preset controls 3 and 5 simultaneously on the front audio controls. The
control level will cycle each time the buttons are pressed simultaneously.
The three states are described as:
FULL(enabled): The FES has control over the primary (speaker) and
secondary (headphone) audio sources.
LOCAL: The FES has control over the secondary source (headphones)
only. The radio will ignore button presses that affect the primary
(speaker) audio source.
LOCKED(disabled): The FES buttons are locked and all FES button
presses are ignored by the radio and the FES except for load and eject.
When the DVD system is ON, you
can then press the memory preset
controls 2 and 4 simultaneously to
toggle between Single Play and Dual Play. In Single Play mode, all
speakers listen to the same media. In Dual Play mode, rear seat
passengers can use the infrared wireless, or wired (not included)
headphones to listen to a different playing media than the front seat
passengers.
123456
Entertainment Systems
83
2010 Mountaineer(mnt)
Owners Guide(own2002), 1st Printing
USA(fus)
Page 90 of 390
•Remove any snow, ice or leaves from the air intake area at the base of
the windshield.
•To improve the A/C cool down when the vehicle interior is
significantly warmer than the outside temperature, drive with the
windows slightly open for 2–3 minutes after start up or until the
vehicle has been “aired out.”
•If you are driving during extreme high ambient temperatures and
idling for extended periods of time in gear, it is recommended to run
the A/C in the MAX A/C position, adjust the blower fan speed to the
lowest setting, turn off the rear A/C unit and put the vehicle’s
transmission into the P (Park) to continue to receive cool air from
your A/C system.
For maximum cooling performance in panel (
) mode:
•Select MAX A/C mode. MAX A/C uses recirculated air with A/C to
provide a cooler airflow.
•Move the temperature control to the coolest setting.
•Set the fan to the highest speed initially, then adjust in order to
maintain comfort.
To allow side window defogging and demisting while warming up the
vehicle cabin:
1. Select
.
2. Select A/C.
3. Set the temperature control to maintain comfort.
4. Set the fan speed to the highest setting.
5. Direct the outer instrument panel vents towards the side windows. To
increase airflow to the outer instrument panel vents, close the vents
located in the middle of the instrument panel.
To allow windshield defogging and demisting while warming up vehicle:
1. Select
floor/defrost mode.
2. Set temperature control to maintain comfort.
3. Set fan to highest setting.
Climate Controls
90
2010 Mountaineer(mnt)
Owners Guide(own2002), 1st Printing
USA(fus)