tow Mercury Mountaineer 2010 s Owner's Guide
[x] Cancel search | Manufacturer: MERCURY, Model Year: 2010, Model line: Mountaineer, Model: Mercury Mountaineer 2010Pages: 390, PDF Size: 2.75 MB
Page 162 of 390
WARNING:To reduce the risk of possible serious injury: Do not
hang objects off seat back or stow objects in the seatback map
pocket (if equipped) when a child is in the front passenger seat. Do
not place objects underneath the front passenger seat or between the
seat and the center console (if equipped). Check the “passenger airbag
off” or “pass airbag off” indicator lamp for proper airbag status. Refer
toFront passenger sensing systemsection for additional details.
Failure to follow these instructions may interfere with the front
passenger seat sensing system.
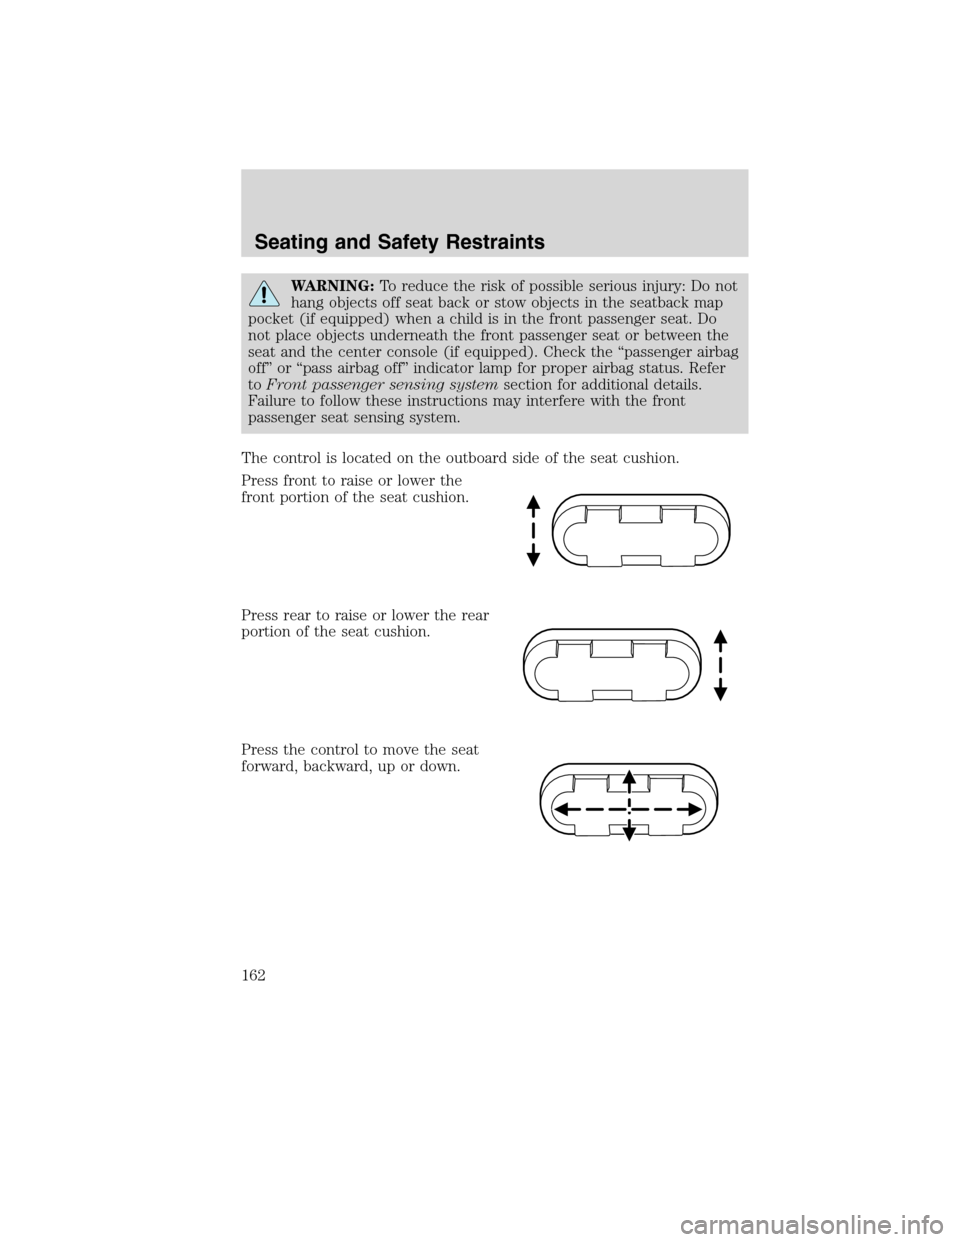
The control is located on the outboard side of the seat cushion.
Press front to raise or lower the
front portion of the seat cushion.
Press rear to raise or lower the rear
portion of the seat cushion.
Press the control to move the seat
forward, backward, up or down.
Seating and Safety Restraints
162
2010 Mountaineer(mnt)
Owners Guide(own2002), 1st Printing
USA(fus)
Page 167 of 390

Refer toSafety seats for childrenlater in this chapter.
WARNING:If the head restraint has been removed from a
seating position to accommodate a high back child restraint, the
head restraint must be re-installed prior to use of the seat by any other
occupant in order to reduce the risk of personal injury in the event of
a collision.
Folding down the 2nd row 60/40 seats and bucket seats
Ensure that the head restraint is in the down position and no objects
such as books, purses or briefcases are on the floor in front of the
second row seats before folding them down.
1. Lower the head restraints by
pulling on the strap.
2. Locate the recline handle situated
on the side of the seat cushion by
the door.
3. Pull up on the handle and push
the seatback forward toward the
front of the vehicle.
Seating and Safety Restraints
167
2010 Mountaineer(mnt)
Owners Guide(own2002), 1st Printing
USA(fus)
Page 168 of 390
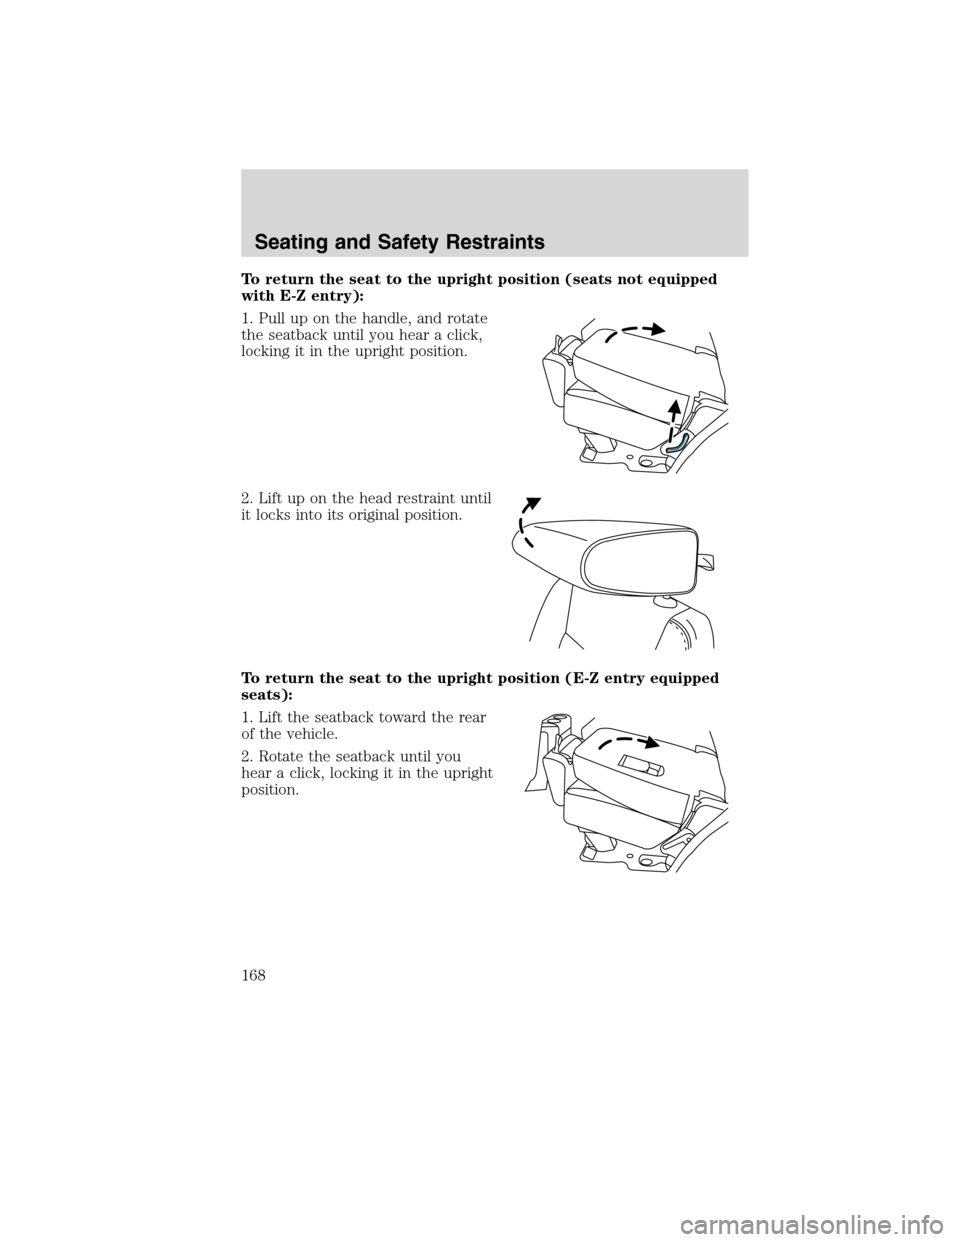
To return the seat to the upright position (seats not equipped
with E-Z entry):
1. Pull up on the handle, and rotate
the seatback until you hear a click,
locking it in the upright position.
2. Lift up on the head restraint until
it locks into its original position.
To return the seat to the upright position (E-Z entry equipped
seats):
1. Lift the seatback toward the rear
of the vehicle.
2. Rotate the seatback until you
hear a click, locking it in the upright
position.
Seating and Safety Restraints
168
2010 Mountaineer(mnt)
Owners Guide(own2002), 1st Printing
USA(fus)
Page 172 of 390

WARNING:Before returning the seatback to its original
position, make sure that cargo or any objects are not trapped
behind the seatback. After returning the seatback to its original
position, pull on the seatback to ensure that it has fully latched. An
unlatched seat may become dangerous in the event of a sudden stop or
collision.
Note: In vehicles equipped with 3rd row seats, the 2nd row
recline/unlatch handle on the outboard sides of both 60% and 40% seats
should not be used as a grab handle to raise the entire seat up from
cargo mode (kneeling position), or to lower it from its tumbled position.
This handle is there only to recline the seat back and to unlatch the rear
seat/floor attachment, in order to tumble the seat in the forward
direction. To raise the seat up from the cargo mode (kneeling position),
the entire seat should be lifted up using the seat back or the seat
cushion area as a grabbing surface.
Exiting the 3rd row
1. Lower the head restraints. See
Folding down the 2nd row 60/40
seats and buckets seatsearlier in
this section.
2. Pull on the lever/strap (as
equipped) located at the bottom
right of the seat back to release the
seat from the floor, and rotate the
seat up towards the front seat.
3. Follow the directions above to
return the seatback from the load floor and to the upright position.
Seating and Safety Restraints
172
2010 Mountaineer(mnt)
Owners Guide(own2002), 1st Printing
USA(fus)
Page 191 of 390
WARNING:Never place your arm over the airbag module as a
deploying airbag can result in serious arm fractures or other
injuries.
To properly position yourself away from the airbag:
•Move your seat to the rear as far as you can while still reaching the
pedals comfortably.
•Recline the seat slightly one or two degrees from the upright position.
WARNING:Do not put anything on or over the airbag module.
Placing objects on or over the airbag inflation area may cause
those objects to be propelled by the airbag into your face and torso
causing serious injury.
WARNING:Do not attempt to service, repair, or modify the
airbag supplemental restraint systems or its fuses. Contact your
authorized dealer as soon as possible.
WARNING:Modifications to the front end of the vehicle,
including frame, bumper, front end body structure and non-Ford
tow hooks may effect the performance of the airbag sensors increasing
the risk of injury. Do not modify the front end of the vehicle with
anything other than authorized Ford accessories for your vehicle.
WARNING:Additional equipment may affect the performance of
the airbag sensors increasing the risk of injury.
Seating and Safety Restraints
191
2010 Mountaineer(mnt)
Owners Guide(own2002), 1st Printing
USA(fus)
Page 197 of 390
ObjectsPass Airbag Off
Indicator LampPassenger Airbag
Small (i.e. three-ring
binder, small purse,
bottled water)Unlit Disabled
Medium (i.e. heavy
briefcase, fully packed
luggage)Lit Disabled
Empty seat, or small
to medium object with
safety belt buckledLit Disabled
If you think that the status of the passenger airbag off indicator lamp is
incorrect, check for the following:
•Objects lodged underneath the seat
•Objects between the seat cushion and the center console (if
equipped)
•Objects hanging off the seat back
•Objects stowed in the seatback map pocket (if equipped)
•Objects placed on the occupant’s lap
•Cargo interference with the seat
•Other passengers pushing or pulling on the seat
•Rear passenger feet and knees resting or pushing on the seat
•Check to see if the clear objects by pass seat warning is displaying in
the message center. Refer toMessage centerin theDriver controls
chapter.
The conditions listed above may cause the weight of a properly seated
occupant to be incorrectly interpreted by the front passenger sensing
system. The person in the front passenger seat may appear heavier or
lighter due to the conditions described in the list above.
WARNING:To reduce the risk of possible serious injury:
Do not stow objects in seat back map pocket (if equipped) or
hang objects off seat back if a child is in the front passenger seat.
Do not place objects underneath the front passenger seat or between
the seat and the center console (if equipped).
Check the “passenger airbag off” or “pass airbag off” indicator lamp for
proper airbag Status.
Failure to follow these instructions may interfere with the front
passenger seat sensing system.
Seating and Safety Restraints
197
2010 Mountaineer(mnt)
Owners Guide(own2002), 1st Printing
USA(fus)
Page 208 of 390

WARNING:Never let a passenger hold a child on his or her lap
while the vehicle is moving. The passenger cannot protect the
child from injury in a collision, which may result in serious injury or
death.
WARNING:Never use pillows, books, or towels to boost a child.
They can slide around and increase the likelihood of injury or
death in a collision.
WARNING:Always restrain an unoccupied child seat or booster
seat. These objects may become projectiles in a collision or
sudden stop, which may increase the risk of serious injury.
WARNING:Never place, or allow a child to place, the shoulder
belt under a child’s arm or behind the back because it reduces
the protection for the upper part of the body and may increase the risk
of injury or death in a collision.
WARNING:Do not leave children, unreliable adults, or pets
unattended in your vehicle.
Transporting children
Always make sure your child is secured properly in a device that is
appropriate for their age, height and weight. All children are shaped
differently. The child height, age and weight thresholds provided are
recommendations or the minimum requirements of law. The National
Highway Traffic Safety Administration (NHTSA) provides education and
training to ensure that all children ages 0 to 16 are properly restrained in
the correct restraint system. Ford recommends checking with a NHTSA
Certified Child Passenger Safety Technician (CPST) and your
pediatrician to make sure your seat is appropriate for your child and
properly installed in the vehicle. To locate a child seat fitting station and
CPST contact the NHTSA toll free at1-888-327-4236or on the internet
at http://www.nhtsa.dot.gov.
Follow all the safety restraint and airbag precautions that apply to adult
passengers in your vehicle.
Seating and Safety Restraints
208
2010 Mountaineer(mnt)
Owners Guide(own2002), 1st Printing
USA(fus)
Page 213 of 390

8. Remove remaining slack from the
belt. Force the seat down with extra
weight, e.g., by pressing down or
kneeling on the child restraint while
pulling up on the shoulder belt in
order to force slack from the belt.
This is necessary to remove the
remaining slack that will exist once
the additional weight of the child is
added to the child restraint. It also
helps to achieve the proper
snugness of the child seat to the vehicle. Sometimes, a slight lean
towards the buckle will additionally help to remove remaining slack from
the belt.
9. Attach the tether strap (if the child seat is equipped). Refer to
Attaching child safety seats with tether strapslater in this chapter.
10. Before placing the child in the
seat, forcibly move the seat forward
and back to make sure the seat is
securely held in place. To check
this, grab the seat at the belt path
and attempt to move it side to side
and forward and back. There should
be no more than 1 inch (2.5 cm) of
movement for proper installation.
11. Ford recommends checking with a NHTSA Certified Child Passenger
Safety Technician (CPST) to make certain the child restraint is properly
installed.
Attaching child safety seats with LATCH
(Lower Anchors and Tethers for CHildren) attachments
The LATCH system is composed of three vehicle anchor points: two (2)
lower anchors located where the vehicle seat back and seat cushion meet
(called the “seat bight”) and one (1) top tether anchor located behind
that seating position.
Seating and Safety Restraints
213
2010 Mountaineer(mnt)
Owners Guide(own2002), 1st Printing
USA(fus)
Page 234 of 390
It is recommended that the two front tires or two rear tires generally be
replaced as a pair.
The tire pressure sensors mounted in the wheels (originally installed on
your vehicle) are not designed to be used in aftermarket wheels.
The use of wheels or tires not recommended by Ford Motor Company
may affect the operation of your Tire Pressure Monitoring System.
If the TPMS indicator is flashing, your TPMS is malfunctioning. Your
replacement tire might be incompatible with your TPMS, or some
component of the TPMS may be damaged.
Safety practices
Driving habits have a great deal to do with your tire mileage and safety.
•Observe posted speed limits
•Avoid fast starts, stops and turns
•Avoid potholes and objects on the road
•Do not run over curbs or hit the tire against a curb when parking
WARNING:If your vehicle is stuck in snow, mud, sand, etc.,do
notrapidly spin the tires; spinning the tires can tear the tire and
cause an explosion. A tire can explode in as little as three to five
seconds.
WARNING:Do not spin the wheels at over 35 mph (56 km/h).
The tires may fail and injure a passenger or bystander.
Highway hazards
No matter how carefully you drive there’s always the possibility that you
may eventually have a flat tire on the highway. Drive slowly to the
closest safe area out of traffic. This may further damage the flat tire, but
your safety is more important.
If you feel a sudden vibration or ride disturbance while driving, or you
suspect your tire or vehicle has been damaged, immediately reduce your
speed. Drive with caution until you can safely pull off the road. Stop and
inspect the tires for damage. If a tire is under-inflated or damaged,
deflate it, remove wheel and replace it with your spare tire and wheel. If
you cannot detect a cause, have the vehicle towed to the nearest repair
facility or tire dealer to have the vehicle inspected.
Tires, Wheels and Loading
234
2010 Mountaineer(mnt)
Owners Guide(own2002), 1st Printing
USA(fus)
Page 244 of 390

When you believe your system is not operating properly
The main function of the Tire Pressure Monitoring System is to warn you
when your tires need air. It can also warn you in the event the system is
no longer capable of functioning as intended. Please refer to the
following chart for information concerning your Tire Pressure Monitoring
System:
Low Tire Pressure
Warning LightPossible cause Customer Action Required
Solid Warning Light Tire(s)
under-inflated1. Check your tire pressure to
ensure tires are properly
inflated; refer toInflating
your tiresin this chapter.
2. After inflating your tires to
the manufacturer’s
recommended inflation
pressure as shown on the Tire
Label (located on the edge of
driver’s door or the B-Pillar),
the vehicle must be driven for
at least two minutes over
20 mph (32 km/h) before the
light will turn OFF.
Spare tire in use Your temporary spare tire is in
use. Repair the damaged road
wheel/tire and reinstall it on
the vehicle to restore system
functionality. For a description
on how the system functions,
refer toWhen your temporary
spare tire is installedin this
section.
TPMS
malfunctionIf your tires are properly
inflated and your spare tire is
not in use and the light
remains ON, contact your
authorized dealer as soon as
possible.
Tires, Wheels and Loading
244
2010 Mountaineer(mnt)
Owners Guide(own2002), 1st Printing
USA(fus)