Mercury Mystique 1998 Owner's Manuals
Manufacturer: MERCURY, Model Year: 1998, Model line: Mystique, Model: Mercury Mystique 1998Pages: 196, PDF Size: 1.65 MB
Page 161 of 196

Maintenance and care
161 Fuel quality
If you are experiencing starting,
rough idle or hesitation problems
try a different brand of fuel. If the
condition persists, see your dealer
or qualified service technician.
The American Automobile
Manufacturers Association
(AAMA) issued a gasoline
specification to provide information
on high quality fuels that optimize
the performance of your vehicle.
We recommend the use of gasolines
that meet the AAMA specification
if they are available.
It should not be necessary to add
any aftermarket products to your
fuel tank if you continue to use a
high-quality fuel.
Cleaner air
Ford approves the use of gasolines
to improve air quality, including
reformulated gasolines that contain
oxygenates such as a maximum of
10% ethanol or 15% MTBE. There
should be no more than 5%
methanol with cosolvents and
additives to protect the fuel
system.
CDW VA1-19Maint en MM 5/15/97 7:56 PM Page 161
Page 162 of 196

Maintenance and care
162Calculating fuel economy
To accurately calculate your
vehicle’s fuel economy:
1. Fill the tank completely and
record the initial odometer reading.
2. Each time you fill the tank,
record the amount of fuel added
(in litres or gallons)
3. After at least three to five fill-
ups, fill the fuel tank and record
the current mileage reading.
4. Use one of the following
equations to calculate fuel
economy.
Litres used x 100 / Total kilometres
traveled
Total miles traveled / Total gallons
used
Keep a record for at least one
month. This will provide an
accurate estimate of the vehicle’s
fuel economy.
CDW VA1-19Maint en MM 5/15/97 7:56 PM Page 162
Page 163 of 196

Maintenance and care
163 WHAT YOU SHOULD KNOW
ABOUT THE EMISSION
CONTROLSYSTEM
For more information about your
vehicle’s emission control system,
refer to the Vehicle Emission
Control Information Decal located
on the inside, left of the engine
compartment.
The catalytic converter enables the
vehicle’s emission control system to
operate properly.
Follow these guidelines to ensure
proper emission system operation:
•Use unleaded fuel only.
•Avoid running out of fuel.
EF 1
/
2
UNLEADED FUEL ONLY
• Do not turn off the ignition while
your vehicle is in motion.
•Have maintenance performed
according to intervals in the
“Service Guide”.
Exhaust leaks may result in
the entry of harmful and
potentially lethal fumes into the
passenger compartment. Under
extreme conditions excessive
exhaust temperatures could
damage the fuel system, the
interior floor covering, or other
vehicle components, possibly
causing a fire.
CDW VA1-19Maint en MM 5/15/97 7:56 PM Page 163
Page 164 of 196

Maintenance and care
164
BRAKE
TRACTION
CONTROLO/D
OFF
If you notice one or more of the
following, the emission system may
not be functioning properly; have
the vehicle serviced as soon as
possible:
•Fluid leaks.
•The charging system, engine oil
pressure or low coolant warning
lights illuminate in the
instrument cluster and remain lit.
•Strange odors.
•Engine runs for more than five
seconds after shut off or engine
misfires, surges, stalls or
backfires.
•Loss of oil pressure.
CDW VA1-19Maint en MM 5/15/97 7:56 PM Page 164
Page 165 of 196

Maintenance and care
165
Do not park, idle or drive
your vehicle in dry grass or
other dry ground cover. The
emission system heats up the
engine compartment and exhaust
system, which can start a fire.
Important emission control
imformation
By law, anyone who manufactures,
repairs, services, leases, trades
vehicles or supervises a fleet of
vehicles is not permitted to
intentionally remove an emission
control device or prevent it from
working. Do not make any
unauthorized changes to the
vehicle or engine. Changes that
cause more unburned fuel to reach
the exhaust system can increase
the temperature of the engine or
exhaust system.
When your vehicle is serviced,
never use a metal exhaust
collector. The use of a metal
collector may melt or deform
plastic parts.
CDW VA1-19Maint en MM 5/15/97 7:56 PM Page 165
Page 166 of 196

Maintenance and care
166Preparing your vehicle for
inspection/maintenance (I/M)
testing
In some localities it may be a legal
requirement to pass an I/M test of
the on-board diagnostic(OBD) II
system. If your vehicle’s powertrain
system or battery has just been
serviced, the OBD II system is reset
to a condition unready for I/M
testing. To ready the OBDII system
for I/M testing, the law specifies
that additional city and highway
driving is necessary to complete
the check of the OBDII system.
The driving mode required to reach
the ready condition consists of a
minimum of 30 minutes of city and
highway driving:
•At least 20 minutes driving in
stop and go city-type traffic with
at least four idle periods.
•At least 10 minutes of driving on
an expressway or highway.
Before completing the above
driving modes, the engine must be
warmed up and at operating
temperature. Once started, the
vehicle must not be turned off
during these modes.
CDW VA1-19Maint en MM 5/15/97 7:56 PM Page 166
Page 167 of 196

Maintenance and care
167
1
1
2
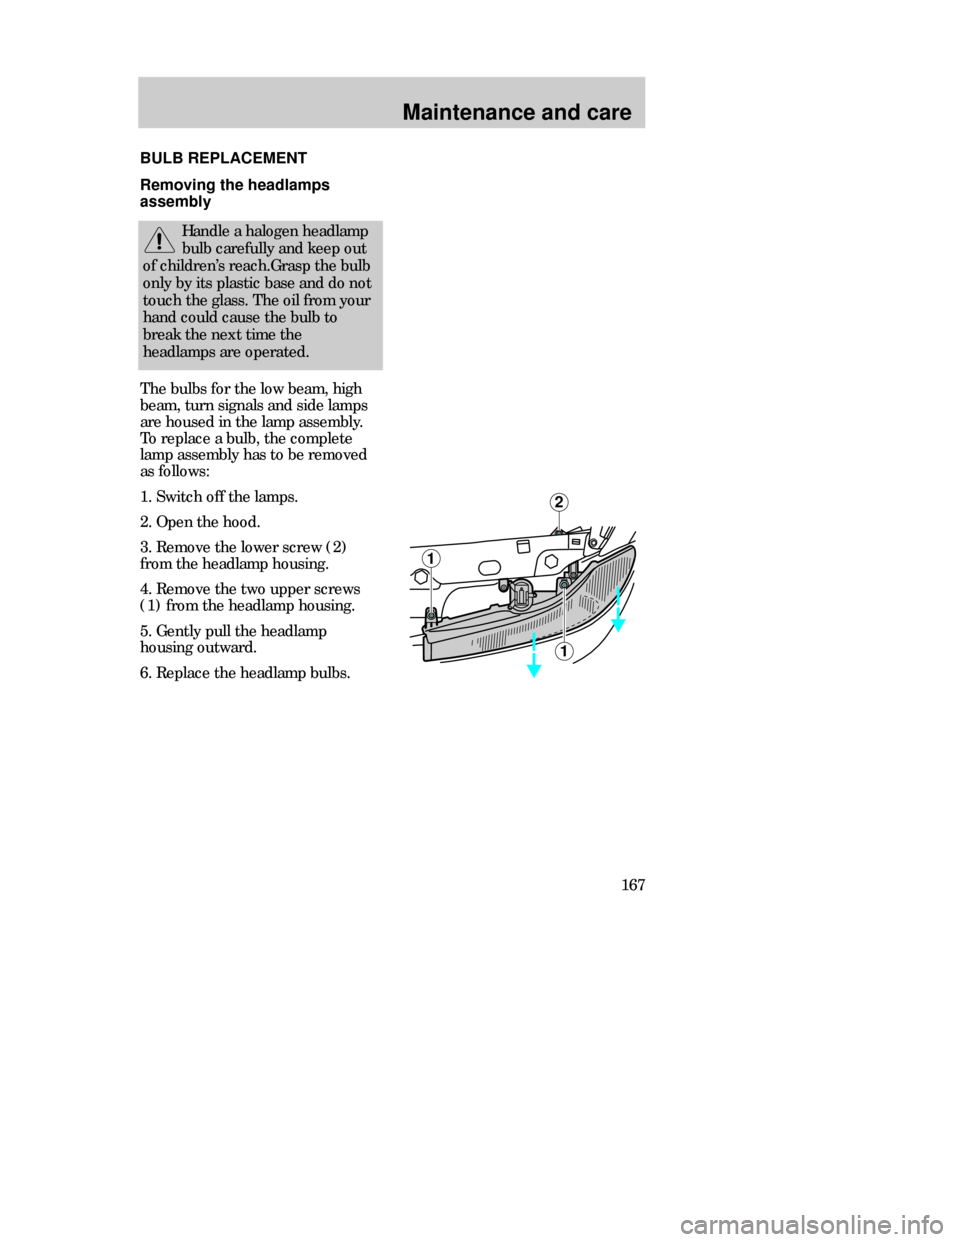
The bulbs for the low beam, high
beam, turn signals and side lamps
are housed in the lamp assembly.
To replace a bulb, the complete
lamp assembly has to be removed
as follows:
1. Switch off the lamps.
2. Open the hood.
3. Remove the lower screw (2)
from the headlamp housing.
4. Remove the two upper screws
(1) from the headlamp housing.
5. Gently pull the headlamp
housing outward.
6. Replace the headlamp bulbs. BULB REPLACEMENT
Handle a halogen headlamp
bulb carefully and keep out
of children’s reach.Grasp the bulb
only by its plastic base and do not
touch the glass. The oil from your
hand could cause the bulb to
break the next time the
headlamps are operated.
Removing the headlamps
assembly
CDW VA1-19Maint en MM 5/15/97 7:56 PM Page 167
Page 168 of 196

Maintenance and care
168Reinstalling the headlamp
assembly
The gasket lining must be seated
properly around the lamp assembly
when reinstalling.
All bulb connectors must be
correctly connected.
Install in the reverse order.
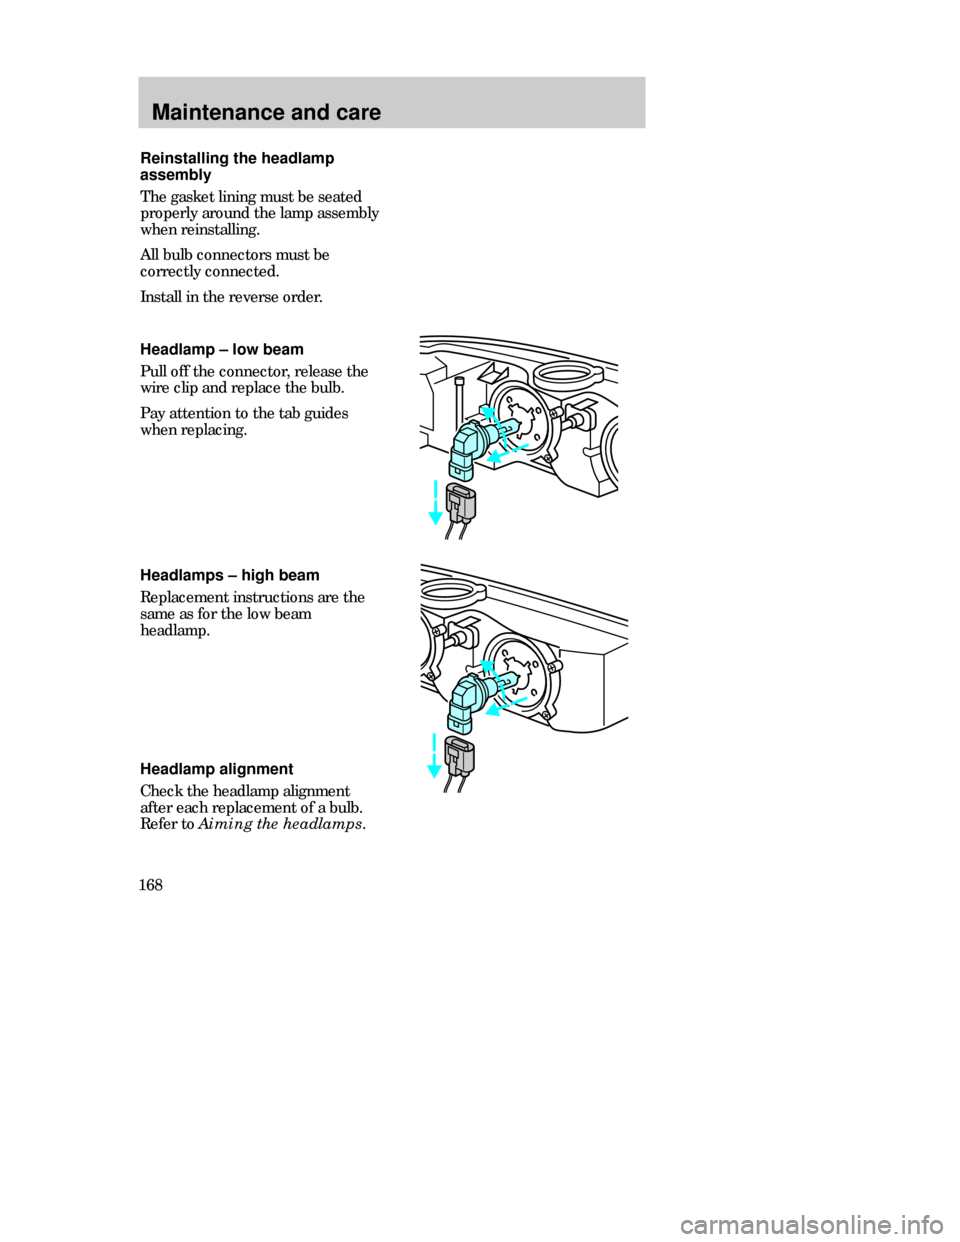
Headlamp – low beam
Pull off the connector, release the
wire clip and replace the bulb.
Pay attention to the tab guides
when replacing.
Headlamp alignment
Check the headlamp alignment
after each replacement of a bulb.
Refer to Aiming the headlamps. Headlamps – high beam
Replacement instructions are the
same as for the low beam
headlamp.
CDW VA1-19Maint en MM 5/15/97 7:56 PM Page 168
Page 169 of 196

Maintenance and care
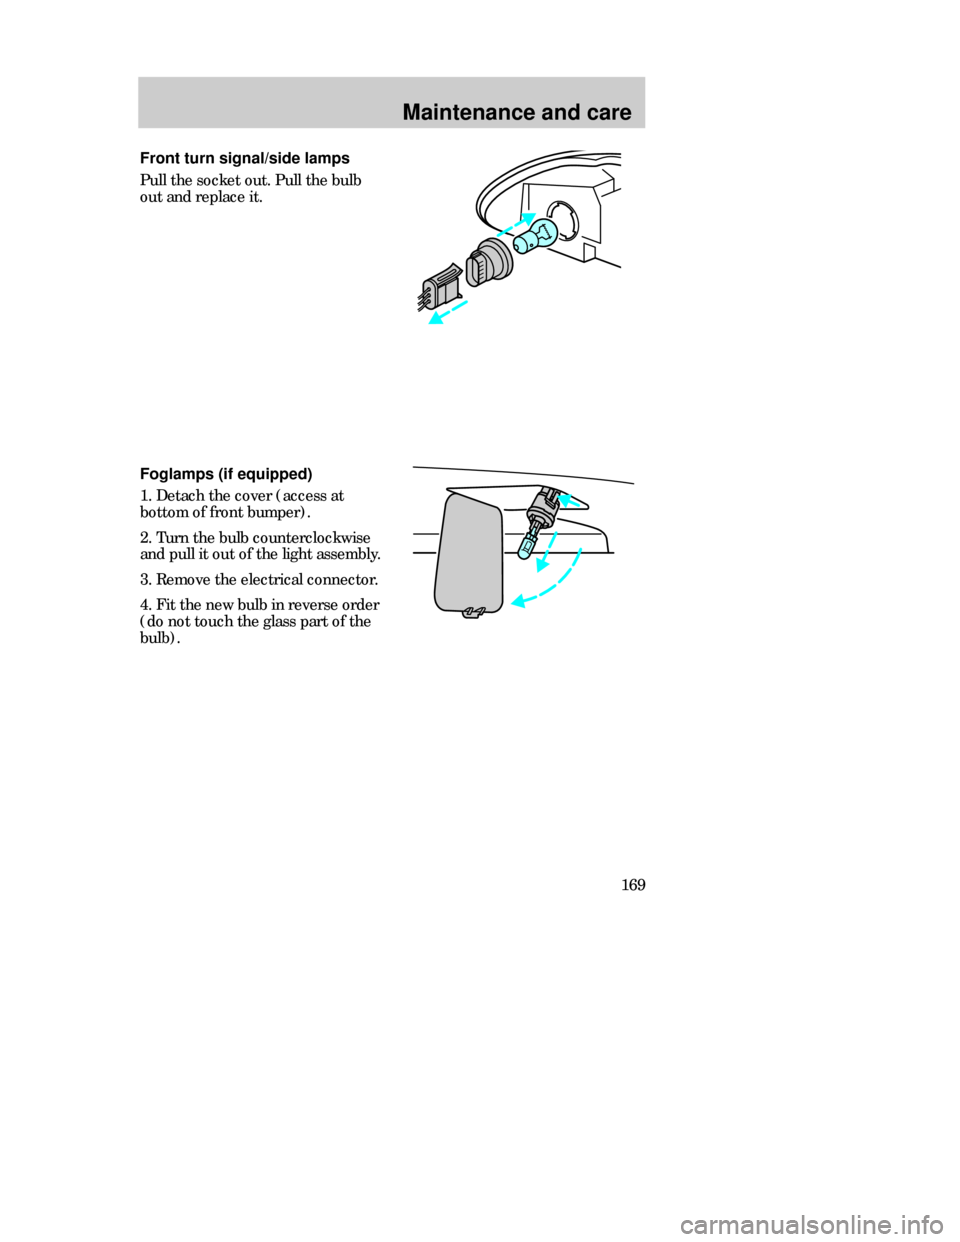
169 Front turn signal/side lamps
Pull the socket out. Pull the bulb
out and replace it.
Foglamps (if equipped)
1. Detach the cover (access at
bottom of front bumper).
2. Turn the bulb counterclockwise
and pull it out of the light assembly.
3. Remove the electrical connector.
4. Fit the new bulb in reverse order
(do not touch the glass part of the
bulb).
CDW VA1-19Maint en MM 5/15/97 7:56 PM Page 169
Page 170 of 196

Maintenance and care
170
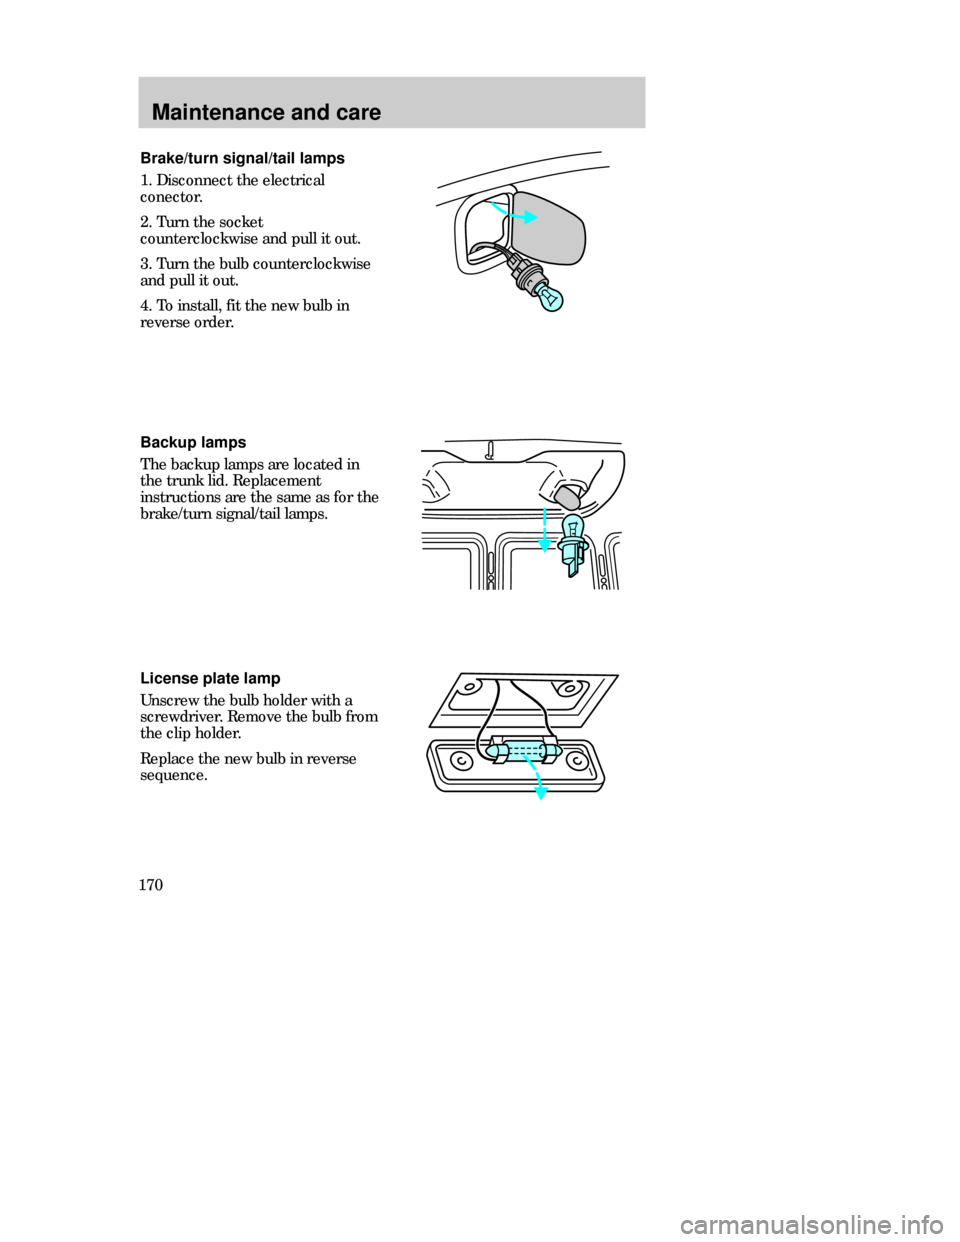
License plate lamp
Unscrew the bulb holder with a
screwdriver. Remove the bulb from
the clip holder.
Replace the new bulb in reverse
sequence. Brake/turn signal/tail lamps
1. Disconnect the electrical
conector.
2. Turn the socket
counterclockwise and pull it out.
3. Turn the bulb counterclockwise
and pull it out.
4. To install, fit the new bulb in
reverse order.
Backup lamps
The backup lamps are located in
the trunk lid. Replacement
instructions are the same as for the
brake/turn signal/tail lamps.
CDW VA1-19Maint en MM 5/15/97 7:56 PM Page 170