clock Mercury Mystique 1998 Owner's Manuals
[x] Cancel search | Manufacturer: MERCURY, Model Year: 1998, Model line: Mystique, Model: Mercury Mystique 1998Pages: 196, PDF Size: 1.65 MB
Page 5 of 196

5
Instrumentation
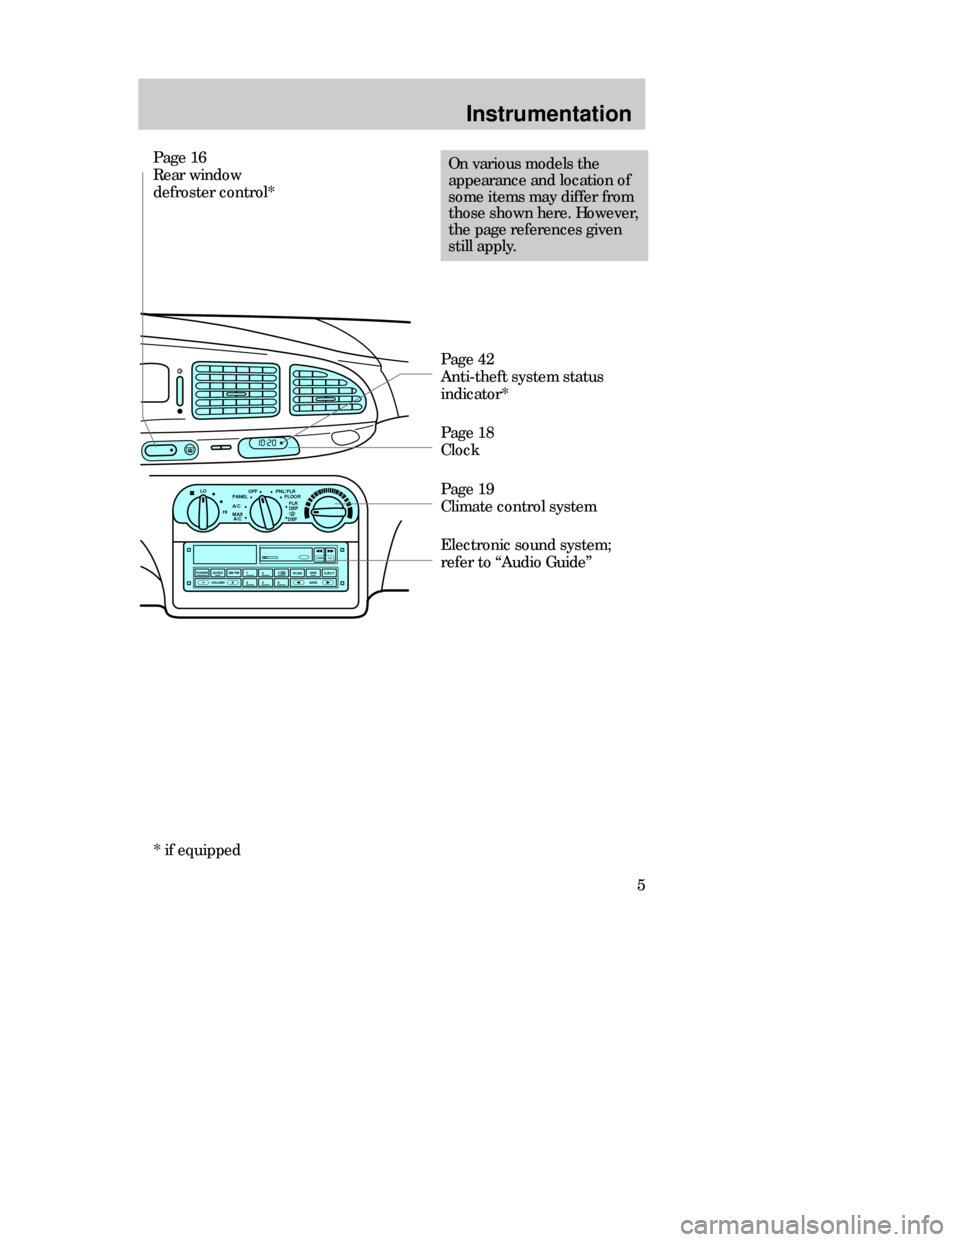
Page 18
Clock Page 16
Rear window
defroster control*
On various models the
appearance and location of
some items may differ from
those shown here. However,
the page references given
still apply.
POWERAUDIOAM/FM
SCAN
SEEK 312645ANSSIDE1-2EJECTVOLUME
DEF
LO
HIOFFPNL/FLR
PANEL
A/CFLOOR
FLR
DEF
MAX
A/C
:
I0 20
Page 19
Climate control system Page 42
Anti-theft system status
indicator*
Electronic sound system;
refer to “Audio Guide”
* if equipped
CDW IIA2Instrum_en MM 5/15/97 7:43 PM Page 5
Page 14 of 196

Controls and features
14
POWERAUDIOAM/FM
SCAN
SEEK 312645ANSSIDE1-2EJECTVOLUME
MIRRORSDEF
LO
HIOFFPNL/FLR
PANEL
A/CFLOOR
FLR
DEF
MAX
A/C
T/C OFF
000123
000010 20 3040506070
80
90
100
110
120
130MPH20 406055
80120 100
140
160
180
200EF 1
/
2UNLEADED FUEL ONLY
12
03x 1000
4
5
6
7
8
NORMALBRAKE
CHECK
ENGINE TRACTION
CONTROLO/D
OFF
:
I0 20
Off
Res
Set
AccCoast
On
INSTRUMENT PANEL
CONTROLS
Headlamp control
Lamps off.
Turn one position clockwise:
Parking lamps, instrument panel
lamps, license plate lamps and tail
lamps on
Turn two positions clockwise:
Headlamps on.
CDW IIIC3Cont en MM 5/15/97 7:45 PM Page 14
Page 17 of 196

Controls and features
17 Power mirrors
The control can be swivelled and
turned.
Turn the control counterclockwise
to adjust the driver’s side mirror,
clockwise to adjust the passenger’s
side mirror. Adjust the selected
mirror by moving the center
control in the desired direction.
Then turn the control back to the
center position.
MIRRORS
MIRRORS
POWERAUDIOAM/FM
SCAN
SEEK 312645ANSSIDE1-2EJECTVOLUME
DEF
LO
HIOFFPNL/FLR
PANEL
A/CFLOOR
FLR
DEF
MAX
A/C
000123
000010 20 3040506070
80
90
100
110
120
130MPH20 406055
80120 100
140
160
180
200EF 1
/
2UNLEADED FUEL ONLY
12
03x 1000
4
5
6
7
8
NORMALBRAKE
CHECK
ENGINE TRACTION
CONTROLO/D
OFF
:
I0 20
Off
Res
Set
AccCoast
On
MIRRORS
CDW IIIC3Cont en MM 5/15/97 7:45 PM Page 17
Page 18 of 196

To toggle between 12 or 24 hour
format, depress the H button and
the M button simultaneously and
then release them.
To advance the hours, press the H
button; to advance the minutes
press the M button. To advance
rapidly, depress and hold the
corresponding button.HoursMinutes
:
I0 20
Audio system
For information on the audio
system, refer to the “Audio Guide”. Digital clock
Switch the ignition on: The clock
can be set to either 12 or 24 hour
format.
Controls and features
18
CDW IIIC3Cont en MM 5/15/97 7:45 PM Page 18
Page 42 of 196

Controls and features
42
:
I0 20
Functional check
When the ignition is switched on,
the control light in the digital clock
will illuminate for approximately
threeseconds to indicate that the
system is operating correctly.
If the control light flashes rapidly
for approximately one minute and
then repeatedly at irregular
intervals, the system did not
recognize the key code. Remove
the key and try again.
If the control light illuminates
continuously for approximately
oneminute and then flashes
repeatedly at irregular intervals, a
system malfunction has occurred.
Have the malfunction repaired by
your dealer or a qualified
technician as soon as possible.
To ensure a trouble-free exchange
between vehicle and key, do not
shield the keys with any metal
objects.
CDW IIIC3Cont en MM 5/15/97 7:45 PM Page 42
Page 114 of 196

Roadside emergencies
114
Passenger compartment fuse panel (below instrument panel)
FuseAmpere
ratingColorCircuits protected
19
20
21
22
23
24
25
26
27
28
29
30
31
32
33
34
35
36
37
38—
C10
40
7.5
15
15
20
7.5
15
30
30
7.5
7.5
7.5
7.5
7.5
7.5
10
30
——
black
orange
brown
light blue
light blue
yellow
brown
light blue
light green
light green
brown
brown
brown
brown
brown
brown
red
light green
–Not used
Wiper motors (circuit breaker)
Power windows
ABS module
Backup lamps
Brake lamps
Door locks
Main light
Cigar lighter
Electric seats
Rear window defrost
Engine management system
Instrument panel illumination
Radio
Parking lamps - driver’s side
Interior lighting/electric mirror
adjustment/clock
Parking lamps - passenger’s side
Air bag
Heater blower motor
Not used
CDW IVC1-6Roads en MM 5/15/97 7:53 PM Page 114
Page 120 of 196

Roadside emergencies
120
Replacing a tire
1. Push the spare tire onto the
wheel studs.
2.Screw on the wheel nuts,
ensuring the tapered end of the
wheel nuts are facing the wheel,
and secure in a clockwise direction.
3. Lower the vehicle and remove
the jack by turning the handle
counterclockwise.
4. Fully tighten the wheel nuts in a
crosswise pattern.
5. Align the hub cap with the valve
and push firmly into position with
the ball of the hand.
6. Stow the jack and damaged tire
in the luggage compartment by
reversing the spare tire removal
instructions.
3
42 1
CDW IVC1-6Roads en MM 5/15/97 7:53 PM Page 120
Page 146 of 196

Maintenance and care
146Relearning the idle function
Because your vehicle’s engine is
electronically controlled, some
control conditions are maintained
by power from the battery. When
the battery is disconnected or a
new battery is installed, the
computer must “relearn” its idle
conditions before your vehicle can
drive properly. To begin this
process:
1. Put the automatic transaxle
gearshift in P (Park). Put the
manual transaxle gearshift in
neutral.
2. Turn off all accessories and start
the vehicle.
3. Let the engine idle for at least
one minute.
4. The “relearning” process will
automatically complete as you
drive the vehicle.
•If you do not allow the engine to
“relearn” its idle, the idle quality
of your vehicle may be adversely
affected until the idle is
eventually “relearned”.
•If the battery has been
disconnected or if a new battery
has been installed, the clock and
preset radio stations must be
reset once the battery is
reconnected.
CDW VA1-19Maint en MM 5/15/97 7:56 PM Page 146
Page 169 of 196

Maintenance and care
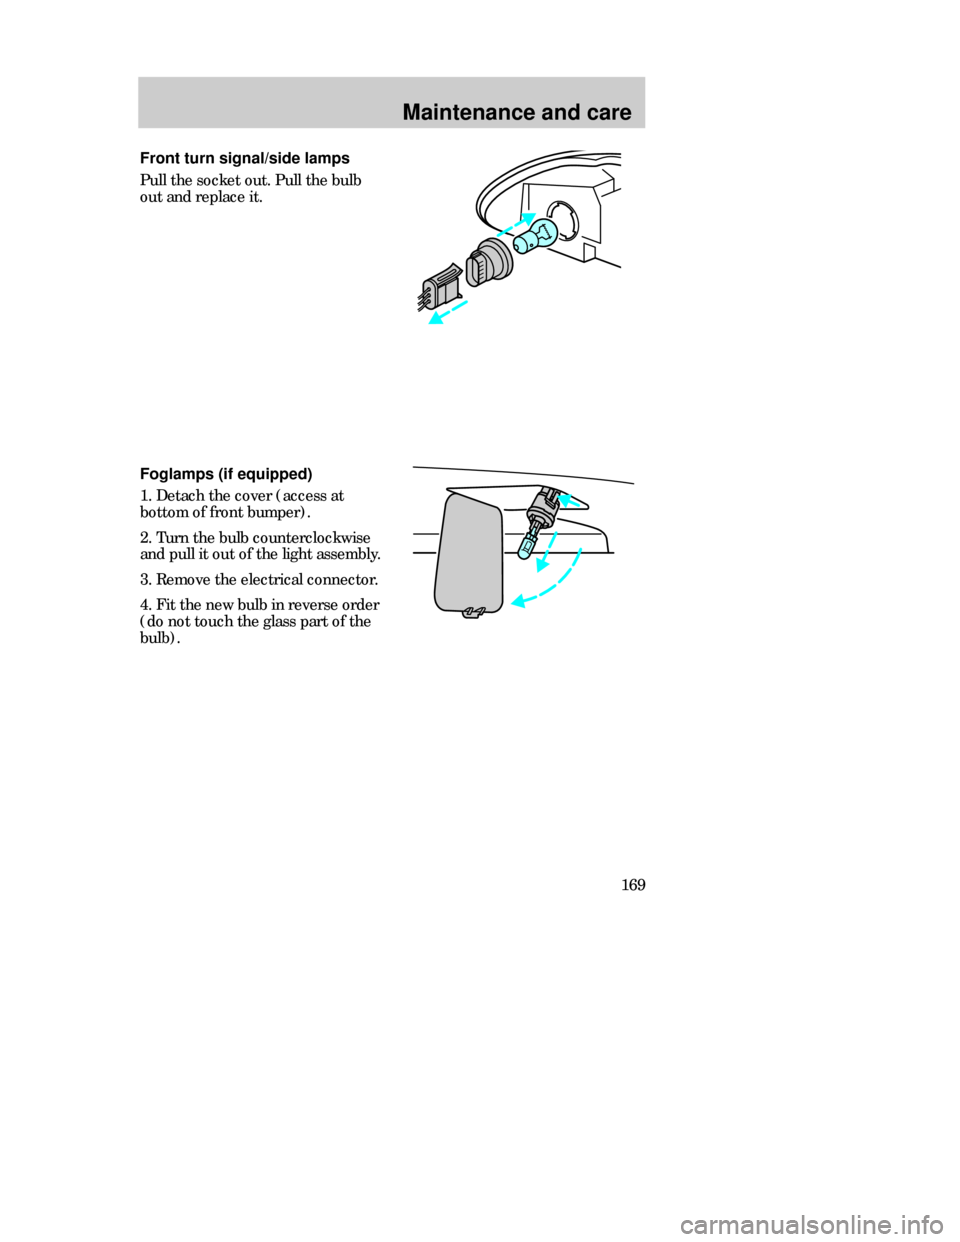
169 Front turn signal/side lamps
Pull the socket out. Pull the bulb
out and replace it.
Foglamps (if equipped)
1. Detach the cover (access at
bottom of front bumper).
2. Turn the bulb counterclockwise
and pull it out of the light assembly.
3. Remove the electrical connector.
4. Fit the new bulb in reverse order
(do not touch the glass part of the
bulb).
CDW VA1-19Maint en MM 5/15/97 7:56 PM Page 169
Page 170 of 196

Maintenance and care
170
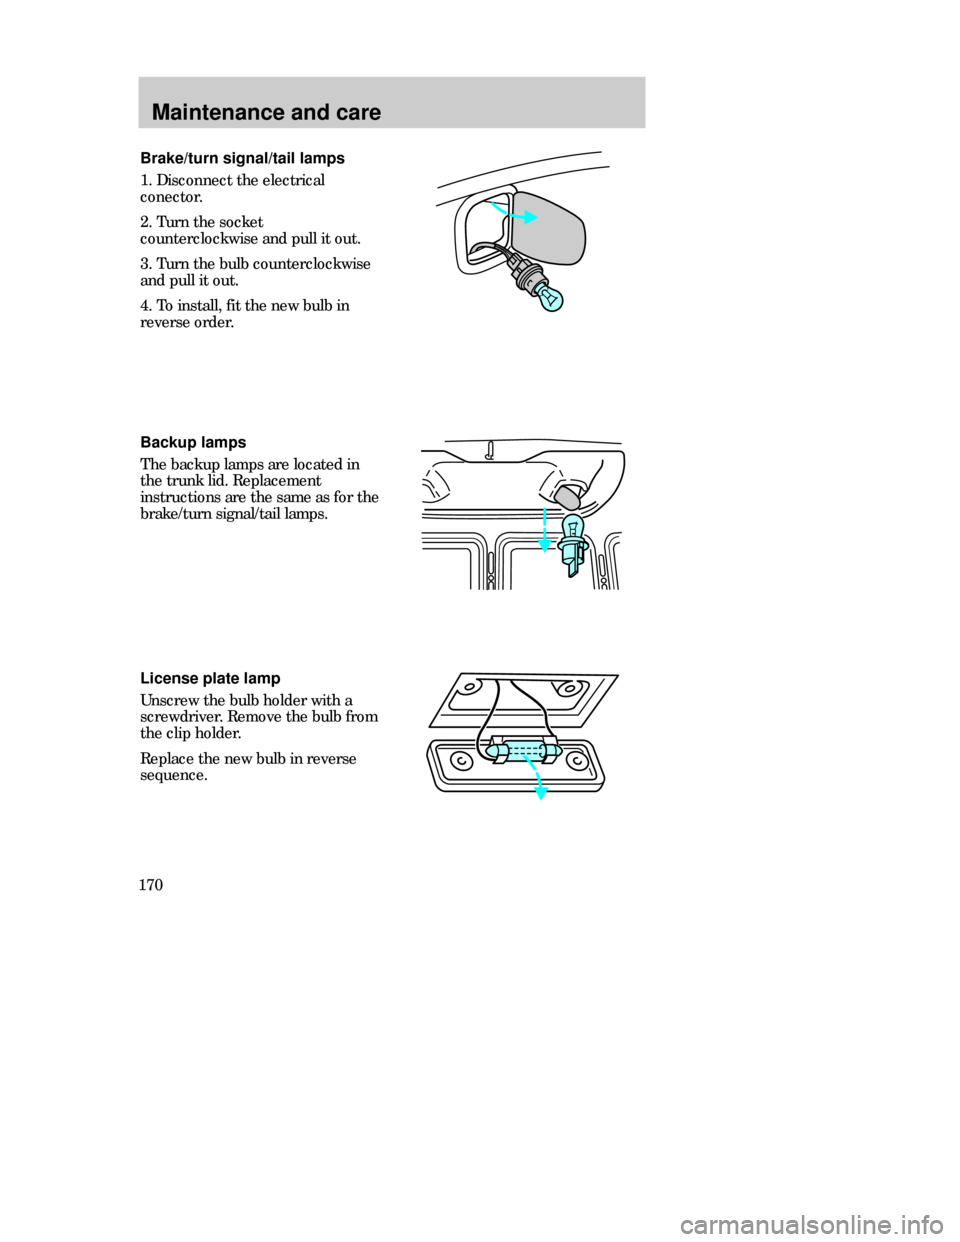
License plate lamp
Unscrew the bulb holder with a
screwdriver. Remove the bulb from
the clip holder.
Replace the new bulb in reverse
sequence. Brake/turn signal/tail lamps
1. Disconnect the electrical
conector.
2. Turn the socket
counterclockwise and pull it out.
3. Turn the bulb counterclockwise
and pull it out.
4. To install, fit the new bulb in
reverse order.
Backup lamps
The backup lamps are located in
the trunk lid. Replacement
instructions are the same as for the
brake/turn signal/tail lamps.
CDW VA1-19Maint en MM 5/15/97 7:56 PM Page 170