instrument cluster Mercury Mystique 1998 Owner's Manuals
[x] Cancel search | Manufacturer: MERCURY, Model Year: 1998, Model line: Mystique, Model: Mercury Mystique 1998Pages: 196, PDF Size: 1.65 MB
Page 4 of 196

4
Instrumentation
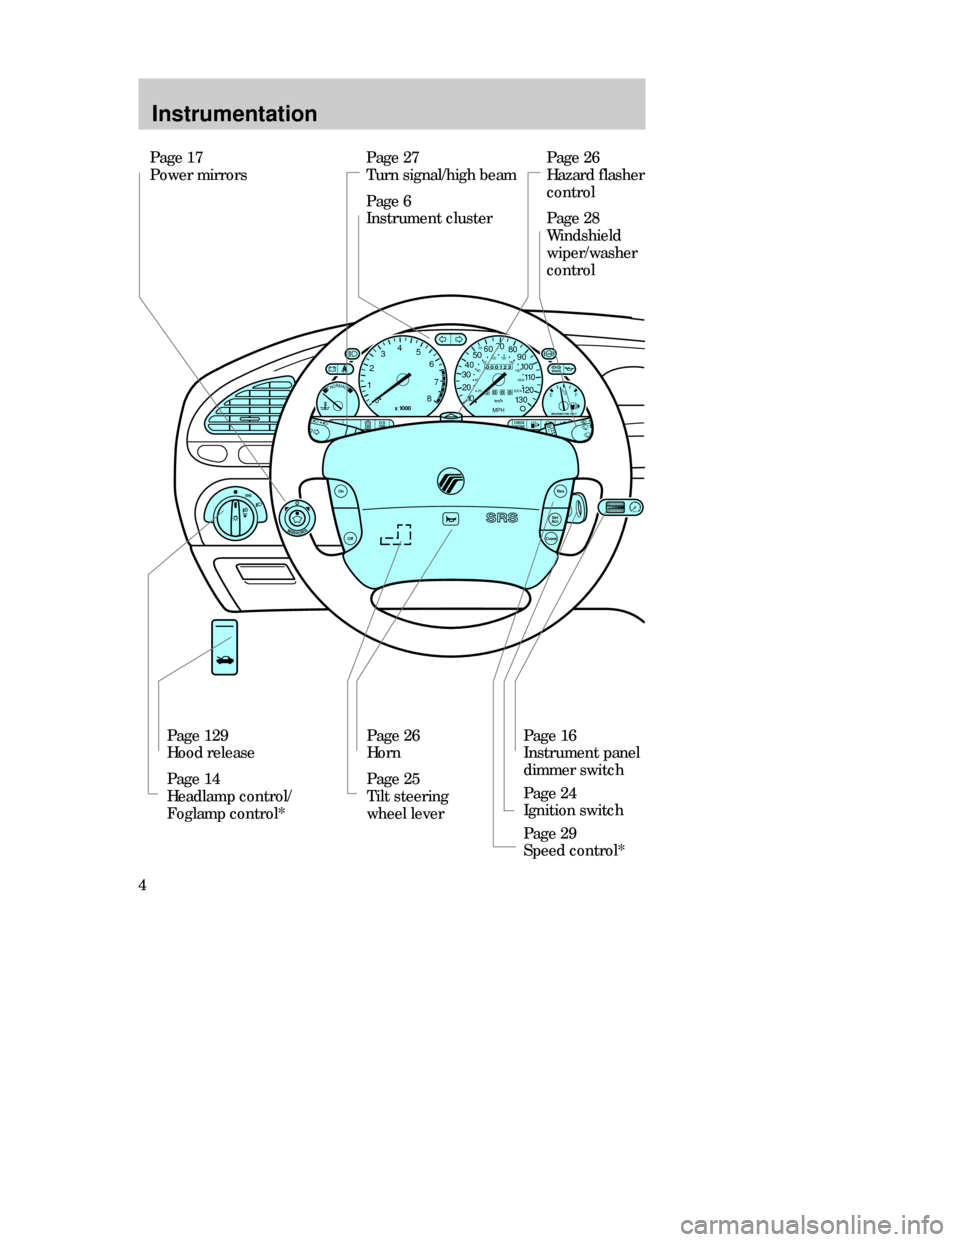
Page 27
Turn signal/high beam
Page 6
Instrument clusterPage 26
Hazard flasher
control
Page 28
Windshield
wiper/washer
control
Page 129
Hood release
Page 14
Headlamp control/
Foglamp control*Page 26
Horn
Page 25
Tilt steering
wheel leverPage 16
Instrument panel
dimmer switch
Page 24
Ignition switch
Page 29
Speed control* Page 17
Power mirrors
CHECK
ENGINEO/D
OFF
Off
Res
Set
Acc
Coast
On
MIRRORS
NORMAL12
03
x 1000
4
5
6
7
8
000123
000010 20 3040506070
80
90
100
110
120
130MPH
20 4060
55
80120 100
140
160
180
200
EF 1
/
2
UNLEADED FUEL ONLY
BRAKE
CDW IIA2Instrum_en MM 5/15/97 7:43 PM Page 4
Page 6 of 196

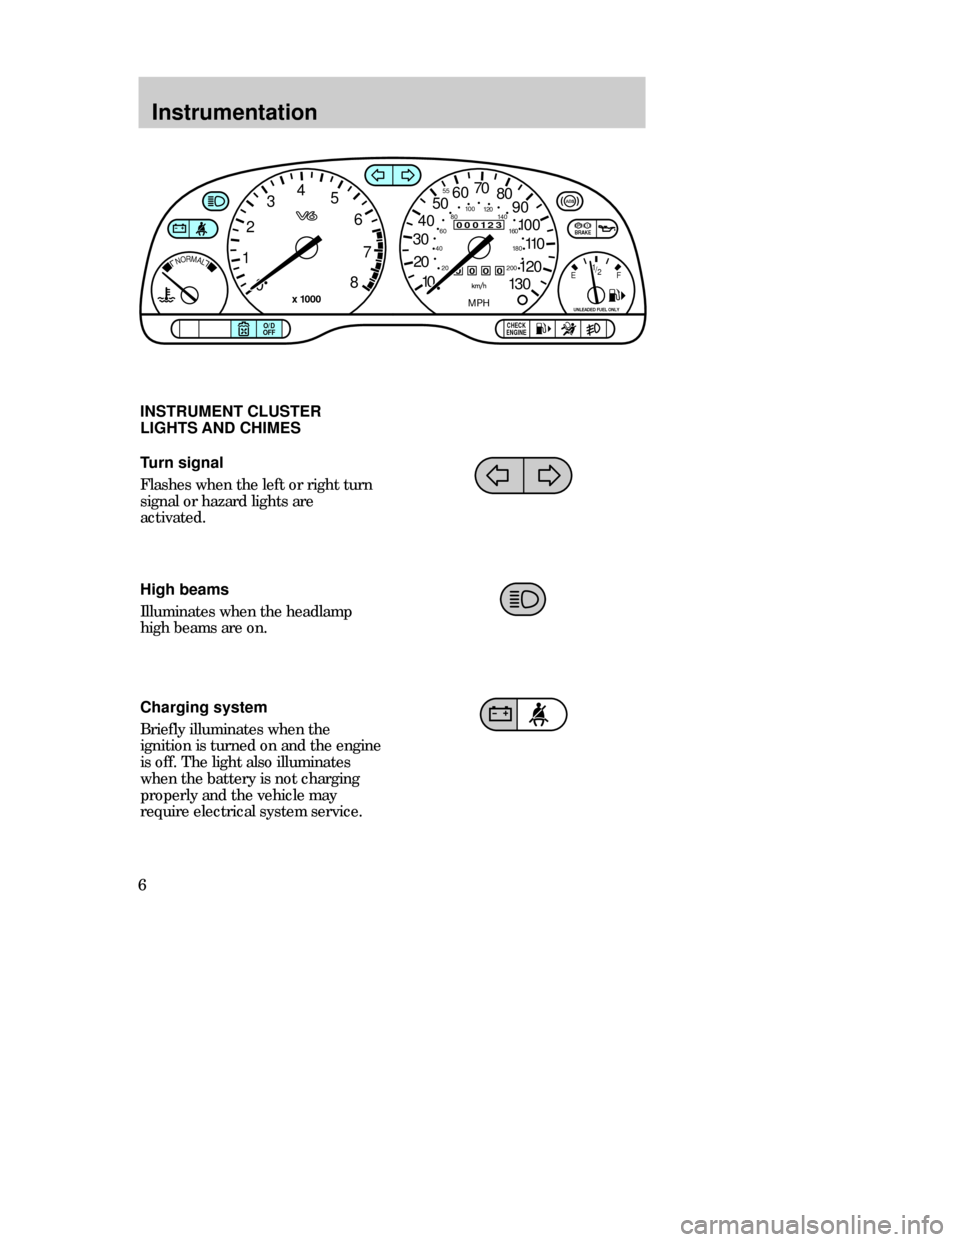
High beams
Illuminates when the headlamp
high beams are on.
Instrumentation
6Turn signal
Flashes when the left or right turn
signal or hazard lights are
activated.
Charging system
Briefly illuminates when the
ignition is turned on and the engine
is off. The light also illuminates
when the battery is not charging
properly and the vehicle may
require electrical system service.
000123
000010 20 3040506070
80
90
110
120
130
MPH
20 4060
55
80120 100
140
160
180
200100
EF 1
/
2
UNLEADED FUEL ONLY
12
03
x 1000
4
5
6
7
8
NORMAL
BRAKE
CHECK
ENGINE TRACTION
CONTROLO/D
OFF
INSTRUMENT CLUSTER
LIGHTS AND CHIMES
CDW IIA2Instrum_en MM 5/15/97 7:43 PM Page 6
Page 12 of 196

Instrumentation
12
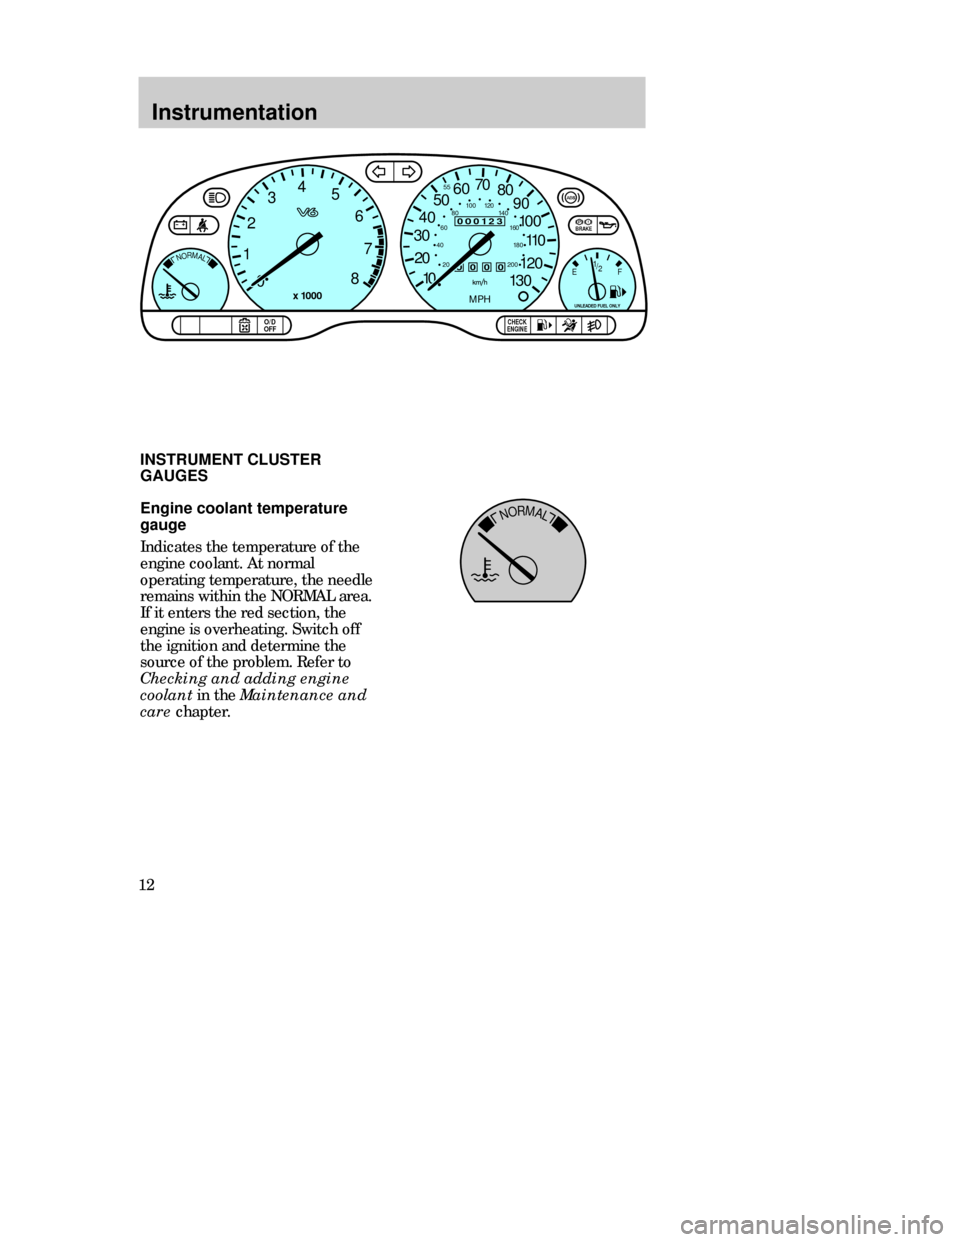
NORMALEngine coolant temperature
gauge
Indicates the temperature of the
engine coolant. At normal
operating temperature, the needle
remains within the NORMAL area.
If it enters the red section, the
engine is overheating. Switch off
the ignition and determine the
source of the problem. Refer to
Checking and adding engine
coolant in the Maintenance and
care chapter.
000123
000010 20 3040506070
80
90
110
120
130
MPH
20 4060
55
80120 100
140
160
180
200100
EF 1
/
2
UNLEADED FUEL ONLY
12
03
x 1000
4
5
6
7
8
NORMAL
BRAKE
CHECK
ENGINE TRACTION
CONTROLO/D
OFF
INSTRUMENT CLUSTER
GAUGES
CDW IIA2Instrum_en MM 5/15/97 7:43 PM Page 12
Page 52 of 196

Seating and safety restraints
52
Safety belt indicator light and
warning chime
Illuminates in the instrument
cluster and a chime sounds to
remind the occupants to fasten
their safety belts.
Center position three-point
safety belts
If the lower end of the belt has
been unbuckled, pull the belt
steadily from the reel and insert
the small tongue into the small
buckle until a distinct “click” is
heard.
This buckle should be left buckled
except when the seatback is folded
down and cargo that might damage
the seatbelt or get it dirty is being
hauled.
Pull the seat belt across the hips
and insert the big (sliding) tongue
into the appropriate buckle until a
distinct “click” is heard.
Should the center rear belt need to
be unlatched from its anchorage, a
thin probe is required to be
inserted into the hole located on
the underside of the floor mounted
buckle. If the buckle and tongue
are not reconnected, then the belt
is not save to be used.
CDW IIID Seat en MM 5/15/97 7:48 PM Page 52
Page 59 of 196

Seating and safety restraints
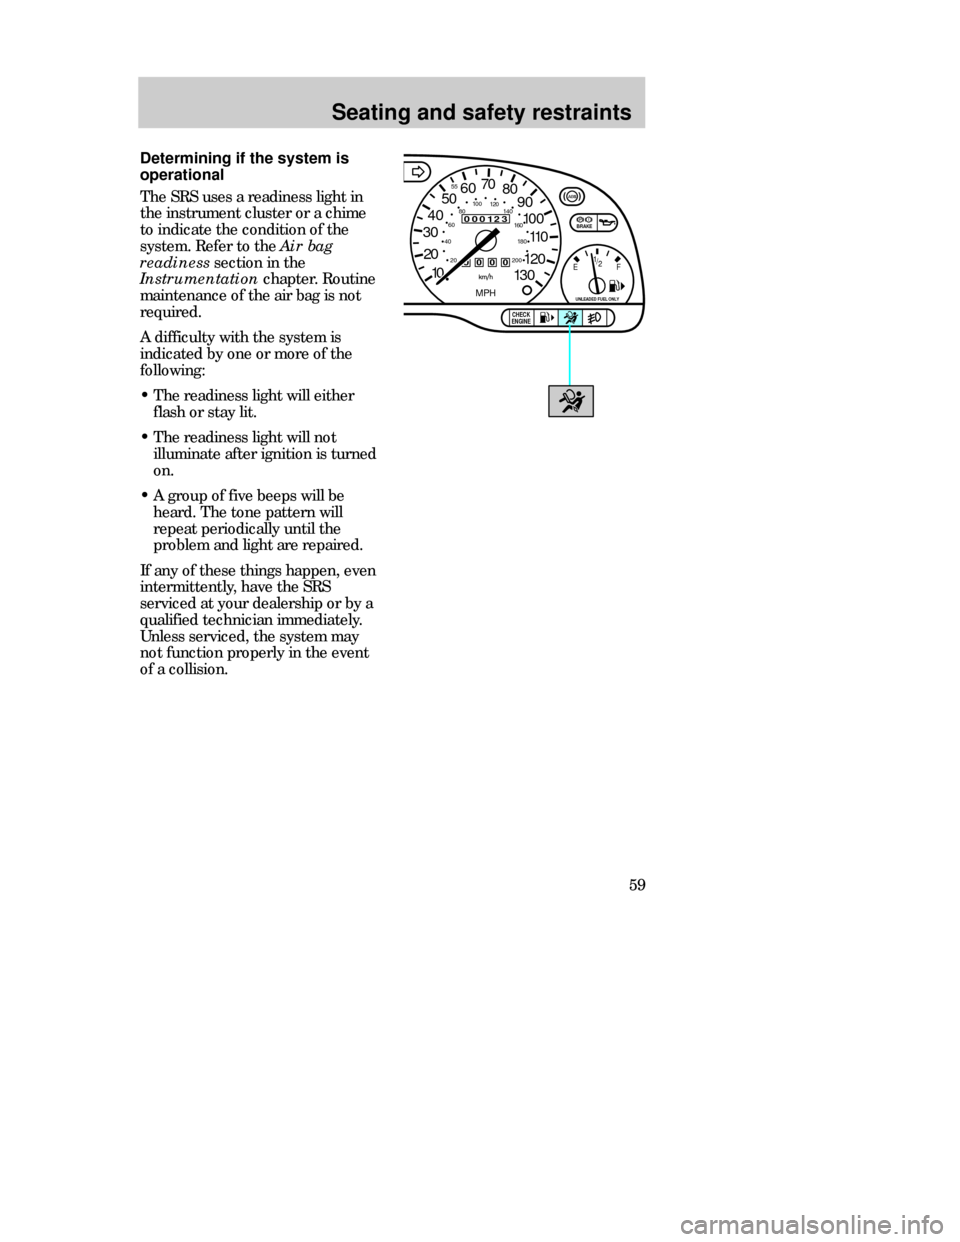
59 Determining if the system is
operational
The SRS uses a readiness light in
the instrument cluster or a chime
to indicate the condition of the
system. Refer to the Air bag
readinesssection in the
Instrumentationchapter. Routine
maintenance of the air bag is not
required.
A difficulty with the system is
indicated by one or more of the
following:
•The readiness light will either
flash or stay lit.
•The readiness light will not
illuminate after ignition is turned
on.
•A group of five beeps will be
heard. The tone pattern will
repeat periodically until the
problem and light are repaired.
If any of these things happen, even
intermittently, have the SRS
serviced at your dealership or by a
qualified technician immediately.
Unless serviced, the system may
not function properly in the event
of a collision.
000123
000010 20 3040506070
80
90
110
120
130
MPH
20 4060
55
80120 100
140
160
180
200100
EF 1
/
2
UNLEADED FUEL ONLY
BRAKE
CHECK
ENGINE
CDW IIID Seat en MM 5/15/97 7:48 PM Page 59
Page 90 of 196

Driving
90
•D (Overdrive)
Note that the vehicle’s gearshift is
console-mounted on the floor. The
transaxle control switch (TCS) is
located on the gearshift handle.
The transaxle control indicator
light (O/D light) is located on the
instrument panel.
Overdrive is not shown on the
display, but is the default mode for
the D gearshift position. This is the
normal driving mode for the best
fuel economy. The transaxle
operates in gears one through four.
The O/D light is off (not
illuminated) during normal vehicle
operation.
Overdrive can be deactivated by
pressing the transaxle control
switch (TCS) located on the
gearshift handle. The O/D OFF
indicator light will illuminate in the
instrument cluster.
•N(Neutral)
The wheels of the transaxle are not
locked. Your vehicle will roll freely,
even on the slightest incline, unless
the parking brake or brakes are on.
CDW IVB1-10Driving en MM 5/15/97 7:51 PM Page 90
Page 91 of 196

Driving
91
TRACTION
CONTROLO/D
OFF
•D (Drive)
D (Drive) provides more engine
braking than overdrive and is
useful when driving through hilly
terrain or if your vehicle requires
additional power for climbing hills.
Activate by pressing the transaxle
control switch (TCS) located on
the gearshift handle. The O/DOFF
indicator light will illuminate in the
instrument cluster. Transaxle
operates in gears one through
three.
To return to overdrive mode, press
the transaxle control switch.The
O/DOFF indicator light will
extinguish.
When starting your vehicle, the
transaxle will automatically return
to normal overdrive mode when the
D (Drive) gearshift position is
selected.
CDW IVB1-10Driving en MM 5/15/97 7:51 PM Page 91
Page 103 of 196

Driving
103 Using a hitch
Do not use hitches that:
•Clamp onto the vehicle bumper.
•Attach to the axle.
Distribute the load so that only 10
to 15% of the total weight of the
trailer is on the tongue. Tie down
the load so that it does not shift
and change weight on the hitch.
Follow the instructions of a
reputable rental agency.
Using trailer lamps
See your local trailer retailer or
rental agency for proper
instructions and equipment for
hooking up trailer lamps.
Do not hook the trailer lamps
directly into the vehicle’s wiring
system. If the trailer lamps are not
working properly, the warning
lights in the instrument cluster may
not work properly.
CDW IVB1-10Driving en MM 5/15/97 7:51 PM Page 103
Page 164 of 196

Maintenance and care
164
BRAKE
TRACTION
CONTROLO/D
OFF
If you notice one or more of the
following, the emission system may
not be functioning properly; have
the vehicle serviced as soon as
possible:
•Fluid leaks.
•The charging system, engine oil
pressure or low coolant warning
lights illuminate in the
instrument cluster and remain lit.
•Strange odors.
•Engine runs for more than five
seconds after shut off or engine
misfires, surges, stalls or
backfires.
•Loss of oil pressure.
CDW VA1-19Maint en MM 5/15/97 7:56 PM Page 164
Page 193 of 196

Index
193 HPage
High-mount brakelamp . . . . . . .171
Hood
latch location . . . . . . . . . . . . . .129
release lever . . . . . . . . . . . . . .129
Horn . . . . . . . . . . . . . . . . . . . . . . .26
I
Identification Number, Vehicle
(VIN) . . . . . . . . . . . . . . . . . . . . .188
Idle, relearning . . . . . . . . . . . . .146
Idle, speed . . . . . . . . . . . . .146, 186
Ignition
chime . . . . . . . . . . . . . . . . . . . . .11
positions on the ignition . . . . . .24
Instrument cluster . . . . . . . . . . . . .6
Instrument panel
cleaning . . . . . . . . . . . . . . . . . .181
lighting up the panel . . . . . . . . .16
Integrated child seat (see Built-in
child seat)
Intermittent wipers . . . . . . . . . . .28
Introduction . . . . . . . . . . . . . . . . . .2
J
Jack
positioning . . . . . . . . . . . . . . . .119
storage . . . . . . . . . . . . . . . . . . .118
Jump starting your vehicle
attaching cables . . . . . . . . . . . .122
disconnecting cables . . . . . . . .123
K
Keys
key in ignition warning chime .11
positions of the ignition . . . . . .24LPage
Lamps
bulb replacement specification
chart . . . . . . . . . . . . . . . . . . . . .172
daytime running light system . .15
flashing the lamps . . . . . . . . . . .27
foglamps . . . . . . . . . . . . . .15, 169
hazard flashers . . . . . . . . .26, 107
headlamps . . . . . . . . . . . . . . . . .14
high beams . . . . . . . . . . . . . . . . .27
high-mounted brake lamp . . . .171
instrument panel, dimming . . .16
interior lamps . . . . . . . . . . . . . .33
reading lamps . . . . . . . . . . . . . .33
replacing bulbs . . . . . . . . . . . .167
rear lamps . . . . . . . . . . . . . . . .170
Lights, warning and indicator
air bag . . . . . . . . . . . . . . . . . . . . .8
anti-lock brakes (ABS) . . . . . . . .9
brake . . . . . . . . . . . . . . . . . . . . . .9
charging system . . . . . . . . . . . . .6
check engine . . . . . . . . . . . . . . . .8
engine oil pressure . . . . . . . . . . .9
high beam . . . . . . . . . . . . . . . . . .6
low coolant . . . . . . . . . . . . . . . . .7
low fuel . . . . . . . . . . . . . . . . . . . .8
overdrive off . . . . . . . . . . . . . . . .7
safety belt . . . . . . . . . . . . . . . . . .7
testing the warning lights . . . . .10
turn signal indicator . . . . . . . . . .6
Load limits . . . . . . . . . . . . . . . . . .96
Lubricant specifications . . . . . .187
Luggage compartment . . . . . . . .36
CDW_Index_en _MM 5/15/97 8:00 PM Page 193