ECO mode Mercury Sable 1997 Owner's Manuals
[x] Cancel search | Manufacturer: MERCURY, Model Year: 1997, Model line: Sable, Model: Mercury Sable 1997Pages: 167, PDF Size: 1.59 MB
Page 15 of 167

Mode selector control
Controls the direction
of the airflow to the
inside of the vehicle.
²MAX A/C - Uses recirculated air to cool the
vehicle. It allows for faster cooling but is noisier
than A/C. The air conditioning compressor will
operate in this mode.
²A/C - Uses outside air to cool the vehicle. It is
quieter than MAX A/C but not as economical. The
air conditioning compressor will operate in this
mode.
²VENT - Distributes outside air through the
instrument panel registers.
²OFF - Outside air is shut out and the fan will not
operate.
²
(Panel and floor) - Distributes outside air
through the instrument panel registers and the
front and rear floor ducts. The air conditioning
compressor will operate in this mode.
²
(Floor) - Allows for maximum heating. The
airflow is from the front and rear floor ducts.
²
(Floor and defrost) - Distributes outside air
through the floor ducts and the windshield
defroster ducts. The air conditioning compressor
will operate in this mode.
²
(Front defrost) - Distributes outside air
through the windshield defroster ducts. It can be
used to clear ice or fog from the windshield. The
air conditioning compressor will operate in this
mode.
Temperature control knob
Turn the dial to the
desired mix of warm
(red) and cool (blue)
air.
R-DEFLO
HIOFF
A/C
MAX
A/CVENT
R-DEFLO
HIOFF
A/C
MAX
A/CVENT
Controls and features
15
Page 19 of 167

(60ÉF).To exit, press AUTO or any of the other
override controls. MAX A/C is noisier but more
economical than A/C. The airflow will be from the
instrument panel registers. The air conditioning
compressor will operate in this mode.
²VENT - Distributes outside air through the
instrument panel registers. However, the air will
not be cooled below the outside temperature.
²
(Panel and floor) - Distributes outside air
through the instrument panel registers and the
front and rear seat floor ducts. The air will be
heated or cooled based on temperature selection.
The air conditioning compressor will operate in
this mode.
²
(Floor) - Allows for maximum heating
through the front and rear seat floor ducts.
²
(Floor and defrost) - Distributes outside air
through the floor ducts and the windshield
defroster ducts. If the outside temperature is
about 10ÉC (50ÉF) or higher, the air conditioner
will dehumidify the air to prevent fogging. The air
conditioning compressor will operate in this mode.
²
F-DEF (Defrost) - Distributes outside air
through the windshield defroster ducts. It can be
used to clear ice or fog from the windshield. If the
outside temperature is about 10ÉC (50ÉF) or
higher, the air conditioner will dehumidify the air
to prevent fogging. The air conditioning
compressor will operate in this mode.
²OFF - Outside air is shut out and the fan will not
operate.
Displaying outside temperature
²OUTSIDE TEMP - Outside air temperature will be
displayed. If the EATC is off, the display will go
blank after four seconds. If the EATC is on, the
display will show the outside temperature until
the button is pressed again.
Controls and features
19
Page 66 of 167

You may wish to discuss the special needs of your
child with your pediatrician.
SAFETY SEATS FOR CHILDREN
Child and infant or child safety seats
Use a safety seat that is recommended for the size
and weight of the child. Carefully follow all of the
manufacturer's instructions with the cafety seat you
put in your vehicle. If you do not install and use the
safety seat properly, the child may be injured in a
sudden stop or collision.
When installing a child safety seat:
²Use the correct
safety belt buckle
for that seating
position.
²Make sure the
tongue is securely
fastened in the
buckle.
²Keep the buckle release button pointing up and
away from the safety seat, with the tongue
between the child seat and the release button, to
prevent accidental unbuckling.
²Place seatback in upright position.
²Put the safety belt in the automatic locking mode.
Refer toUsing the automatic locking mode.
Ford recommends the use of a child safety seat
having a top tether strap. Install the child safety seat
in a seating position which is capable of providing a
tether anchorage. For more information on top
tether straps, refer toAttaching safety seats with
tether straps.dno_child-belt
dno_child-safety-seats
Seating and safety restraints
66
Page 92 of 167

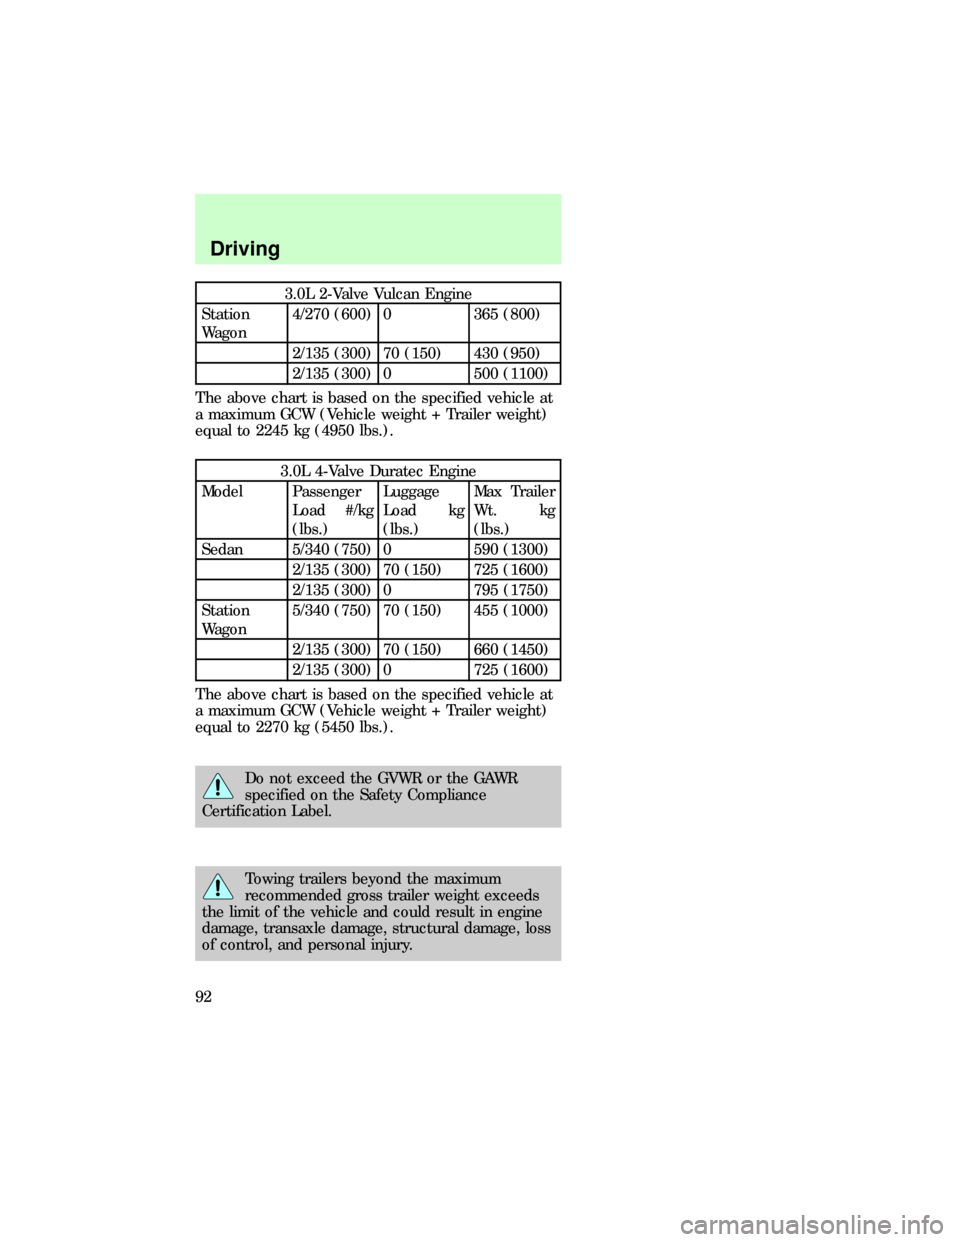
3.0L 2-Valve Vulcan Engine
Station
Wagon4/270 (600) 0 365 (800)
2/135 (300) 70 (150) 430 (950)
2/135 (300) 0 500 (1100)
The above chart is based on the specified vehicle at
a maximum GCW (Vehicle weight + Trailer weight)
equal to 2245 kg (4950 lbs.).
3.0L 4-Valve Duratec Engine
Model Passenger
Load #/kg
(lbs.)Luggage
Load kg
(lbs.)Max Trailer
Wt. kg
(lbs.)
Sedan 5/340 (750) 0 590 (1300)
2/135 (300) 70 (150) 725 (1600)
2/135 (300) 0 795 (1750)
Station
Wagon5/340 (750) 70 (150) 455 (1000)
2/135 (300) 70 (150) 660 (1450)
2/135 (300) 0 725 (1600)
The above chart is based on the specified vehicle at
a maximum GCW (Vehicle weight + Trailer weight)
equal to 2270 kg (5450 lbs.).
Do not exceed the GVWR or the GAWR
specified on the Safety Compliance
Certification Label.
Towing trailers beyond the maximum
recommended gross trailer weight exceeds
the limit of the vehicle and could result in engine
damage, transaxle damage, structural damage, loss
of control, and personal injury.
dno_preparing-to-tow
Driving
92
Page 111 of 167

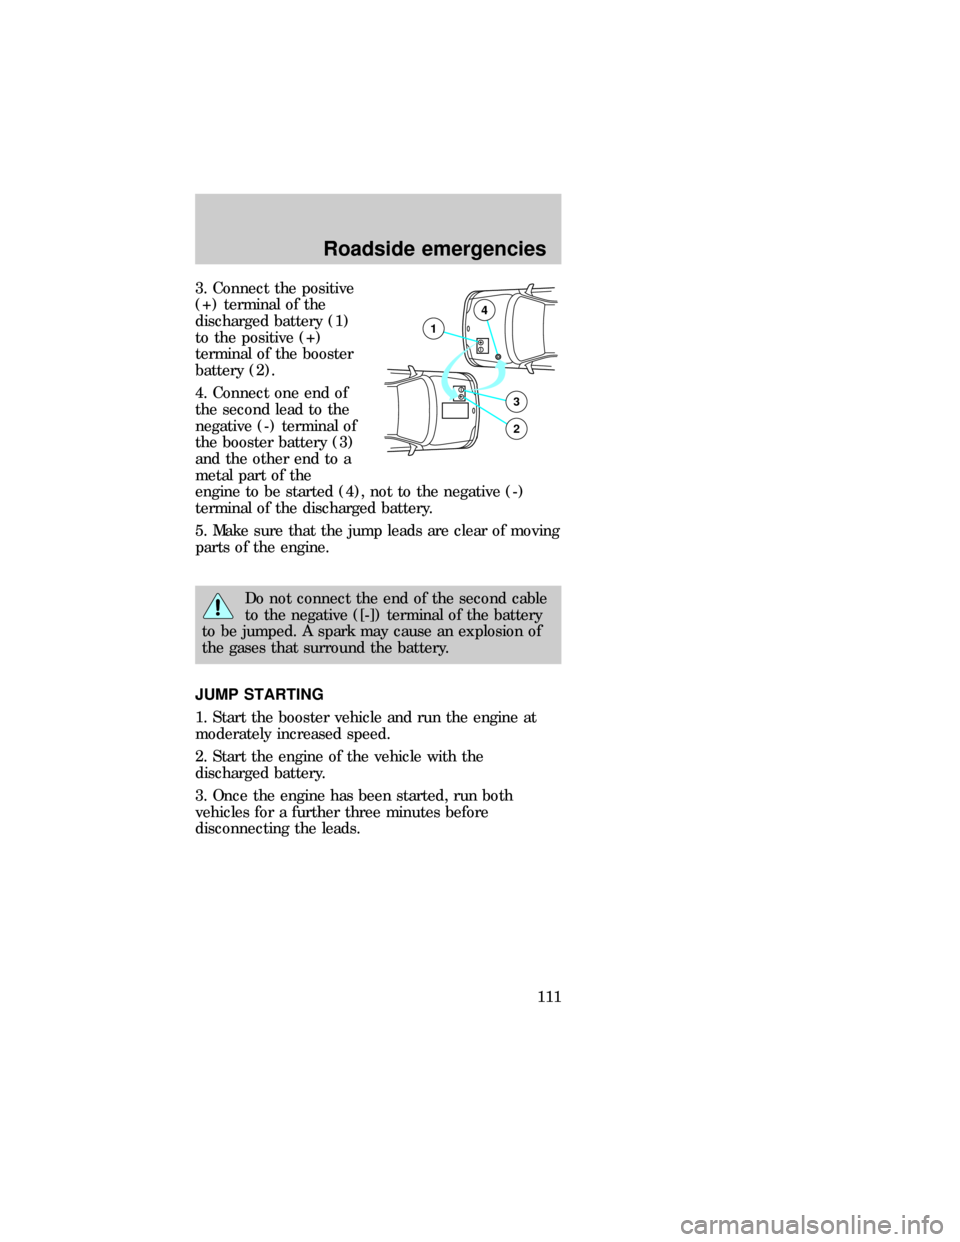
3. Connect the positive
(+) terminal of the
discharged battery (1)
to the positive (+)
terminal of the booster
battery (2).
4. Connect one end of
the second lead to the
negative (-) terminal of
the booster battery (3)
and the other end to a
metal part of the
engine to be started (4), not to the negative (-)
terminal of the discharged battery.
5. Make sure that the jump leads are clear of moving
parts of the engine.
Do not connect the end of the second cable
to the negative ([-]) terminal of the battery
to be jumped. A spark may cause an explosion of
the gases that surround the battery.
JUMP STARTING
1. Start the booster vehicle and run the engine at
moderately increased speed.
2. Start the engine of the vehicle with the
discharged battery.
3. Once the engine has been started, run both
vehicles for a further three minutes before
disconnecting the leads.
+–
+–3
2
1
4
com_jump_starting.01
com_removing_cables.01
Roadside emergencies
111
Page 139 of 167

unburned fuel to reach the exhaust system can
increase the temperature of the engine or exhaust
system.
By law, anyone who manufactures, repairs, services,
sells, leases, trades vehicles, or supervises a fleet of
vehicles is not permitted to intentionally remove an
emission control device or prevent it from working.
In some of the United States and Canada, vehicle
owners may be liable if their emission control device
is removed or prevented from working.
Never use a metal exhaust collector when you
service your vehicle. If the metal collector contacts
any of your vehicle's plastic trim or bumper parts
they could melt or deform.
Do not drive your vehicle if it does not operate
properly. See your dealer if the engine runs on for
more than five seconds after you shut it off or if it
misfires, surged, stalls or backfires.
Information about your vehicle's emission system is
on the Vehicle Emission Control Information decal
located on or near the engine. This decal identifies
engine displacement and gives some tune up
specifications.
Readiness for inspection/maintenance testing
In some localities, it may become a legal
requirement to pass an Inspection/Maintenance (I/M)
test of the On-board Diagnostic (OBD) II system. If
the vehicle's powertrain system or its battery has
just been serviced, the OBD II system is reset to a
not ready for I/M testing condition. To prepare for
I/M testing, the law specifies that additional mixed
city and highway driving is required to complete the
check of the OBD II system.
The driving modes required to reach the ready
condition consist of a minimum of 30 minutes of city
and highway driving as described below:
²At least twenty minutes driving in stop and go,
city type traffic with at least four idle periods.
dno_ready-test
Maintenance and care
139
Page 165 of 167

arming and disarming
the anti-theft
system ..................... 42
locking/unlocking
doors ................... 41,42
opening the trunk ... 41
panic alarm ............. 42
replacement/additional
transmitters ............. 43
replacing the
batteries .................. 43
Reporting safety
defects ..................... 162
Safety restraints
automatic locking
mode (retractor) 53,54
center rear lap belt 55
extension assembly 58
for children ............. 64
for second row bench
seats ............... 71,72,74
lap and shoulder
belts ......................... 52
maintenance ............ 60
proper use ............... 52
warning light and
chime ....................... 59
Safety seats for children
attaching with tether
straps .................. 69,70
automatic locking
mode (retractor) .... 67
tether anchorage
hardware ................. 70
Seats
adjusting the seat,
manual ..................... 48
adjusting the seat,
power ....................... 49
folding rear seats .... 50
head restraints ........ 48Servicing your
vehicle ...................... 114
precautions when
servicing ................ 114
Spare tire ................. 105
Speed control ............ 22
Speedometer ............. 10
Starting your vehicle 77
preparing to start your
vehicle ..................... 76
starting a warm
engine ...................... 78
Storage
compartments ........... 35
Tachometer
mechanical cluster . 11
Tilt steering wheel .... 27
Tires ......................... 132
changing ................ 106
checking the
pressure ................. 132
replacing ................ 133
rotating .................. 132
snow tires and
chains .................... 133
tire grades ............. 130
treadwear .............. 130
Towing your vehicle 113
Trailer towing ............ 91
tips ........................... 94
Transaxle ................... 83
automatic
operation ...... 84,85,86,
87,88,89
fluid, checking and
adding
(automatic) ... 125,126,
127
Trip odometer ........... 12
Trunk
using the remote entry
system to open ....... 34
Turn signal ................ 25
Index
165