steering Mercury Sable 1997 Owner's Manuals
[x] Cancel search | Manufacturer: MERCURY, Model Year: 1997, Model line: Sable, Model: Mercury Sable 1997Pages: 167, PDF Size: 1.59 MB
Page 21 of 167

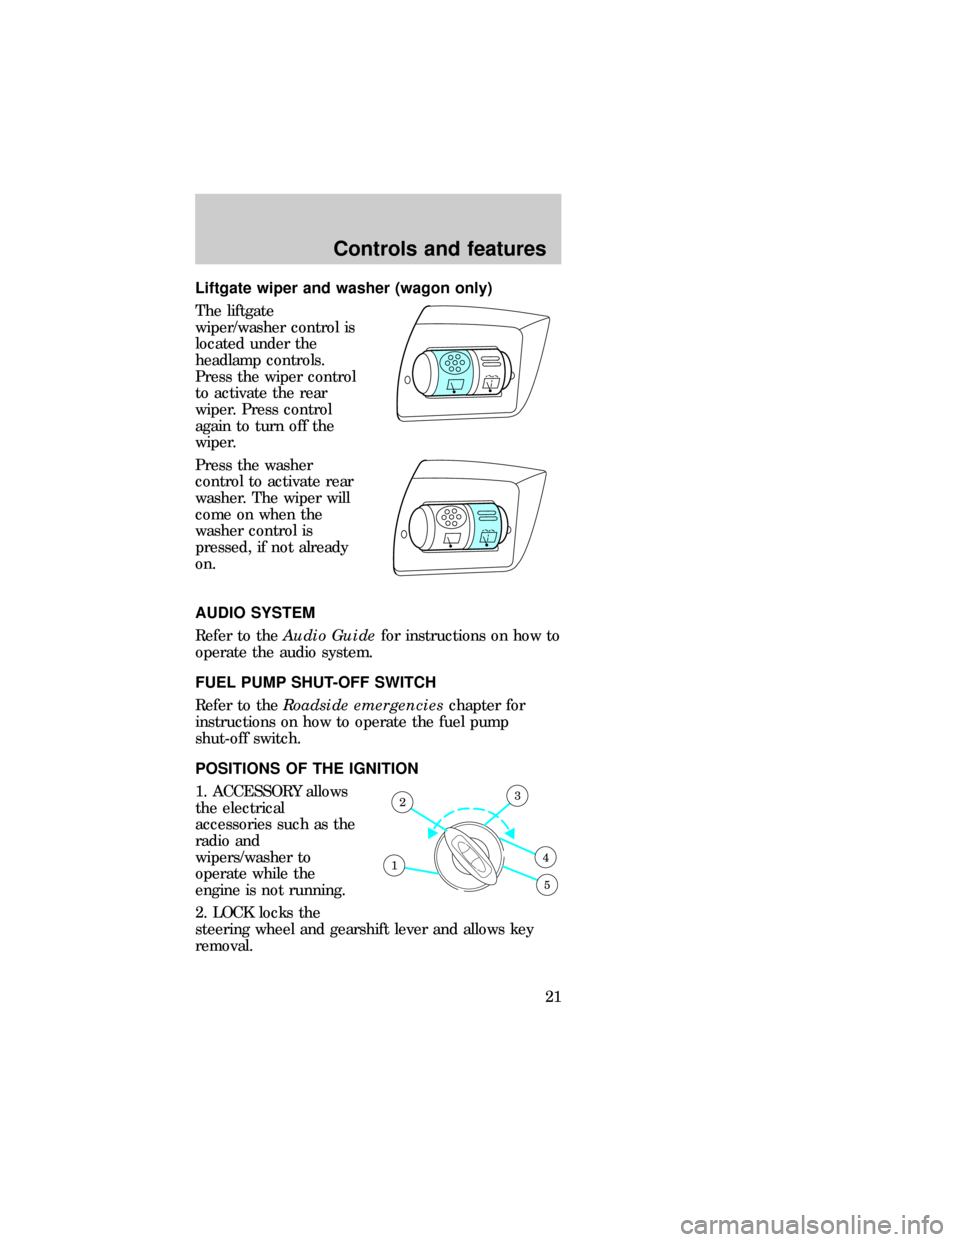
Liftgate wiper and washer (wagon only)
The liftgate
wiper/washer control is
located under the
headlamp controls.
Press the wiper control
to activate the rear
wiper. Press control
again to turn off the
wiper.
Press the washer
control to activate rear
washer. The wiper will
come on when the
washer control is
pressed, if not already
on.
AUDIO SYSTEM
Refer to theAudio Guidefor instructions on how to
operate the audio system.
FUEL PUMP SHUT-OFF SWITCH
Refer to theRoadside emergencieschapter for
instructions on how to operate the fuel pump
shut-off switch.
POSITIONS OF THE IGNITION
1. ACCESSORY allows
the electrical
accessories such as the
radio and
wipers/washer to
operate while the
engine is not running.
2. LOCK locks the
steering wheel and gearshift lever and allows key
removal.
1
23
4
5
dno_audio
dno_shut-off-switch
dno_steering-controls
Controls and features
21
Page 22 of 167

3. OFF shuts off the ignition and accessories and
allows the gearshift and steering wheel to move.
4. ON tests the warning lights. The key must remain
here when the engine is running.
5. START cranks the engine. The key must return to
ON when running.
CRUISE CONTROL
To turn cruise control on
Press ON.
Vehicle speed cannot
be controlled until the
vehicle is travelling at
or above 48 km/h (30
mph).
Do not use the cruise control in heavy traffic or
winding, slippery or unpaved roads.
Do not shift into N (Neutral) while the cruise
control is on.
To turn cruise control off
Press OFF or turn off
the vehicle ignition.
Once cruise control is switched off, the previously
programmed set speed will be erased.
ON
OFF
COASTRESUMESET
ACCEL
ON
OFF
COASTRESUMESET
ACCEL
dno_cruise
dno_turning-cruise-on
dno_turning-cruise-off
dno_setting-a-speed
Controls and features
22
Page 26 of 167

Flash-to-pass
Pull the control toward
you to activate the
flash-to-pass function.
WINDSHIELD WIPERS AND WASHER
Push the control on
the end of the turn
signal control to
activate washer. Push
the control once for a single wipe. Push and hold for
a longer wash cycle.
Turn the dial at end of
the turn signal control
to adjust wiper interval
and speed.
HAZARD FLASHER
Push the control
located on top of the
steering column to
activate four-way
flashers. Push control
again to turn flashers
off.
LOF
OFFS
HI
LOF
OFFS
HI
dno_wipers
dno_hazard
dno_tilt-steer
Controls and features
26
Page 27 of 167

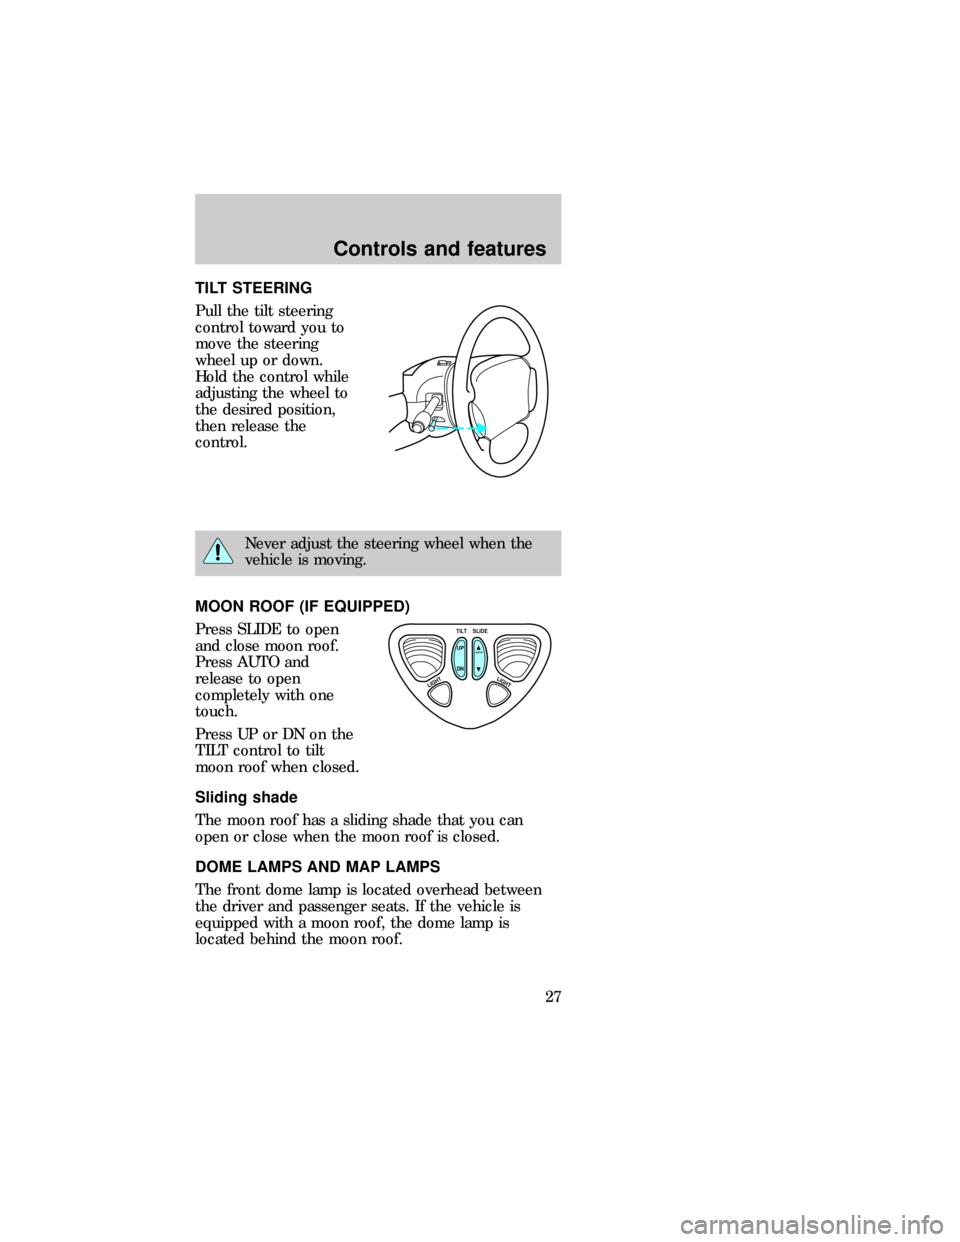
TILT STEERING
Pull the tilt steering
control toward you to
move the steering
wheel up or down.
Hold the control while
adjusting the wheel to
the desired position,
then release the
control.
Never adjust the steering wheel when the
vehicle is moving.
MOON ROOF (IF EQUIPPED)
Press SLIDE to open
and close moon roof.
Press AUTO and
release to open
completely with one
touch.
Press UP or DN on the
TILT control to tilt
moon roof when closed.
Sliding shade
The moon roof has a sliding shade that you can
open or close when the moon roof is closed.
DOME LAMPS AND MAP LAMPS
The front dome lamp is located overhead between
the driver and passenger seats. If the vehicle is
equipped with a moon roof, the dome lamp is
located behind the moon roof.
TILT
UP
LIGHTLIGHT
AUTO
DNSLIDE
dno_moonroof
dno_slide-shade
dno_dome-map
Controls and features
27
Page 34 of 167

OPENING THE TRUNK WITH REMOTE
CONTROL (IF EQUIPPED)
Press the remote
release control on the
instrument panel to the
left of the steering
wheel.
LIFTGATE (WAGON ONLY)
You can open the
entire liftgate or just
the liftgate window. To
open the entire liftgate,
press the release
button hidden under
the exterior trim panel
just above the license
plate.
You must lock the liftgate with the key or power
lock control; it does not lock automatically.
The window locks when the liftgate is locked. To
open the window, make sure the liftgate and window
are unlocked, then press the outside lock cylinder.
The window can only be opened from the outside.
To prevent any damage to the liftgate and window,
close them completely before driving.
dno_opening-liftgate
dno_storage-compControls and features
34
Page 81 of 167

BRAKES
Your brakes are self-adjusting. Refer to the ªService
Guideº for maintenance scheduling.
Anti-lock brake system (ABS) (if equipped)
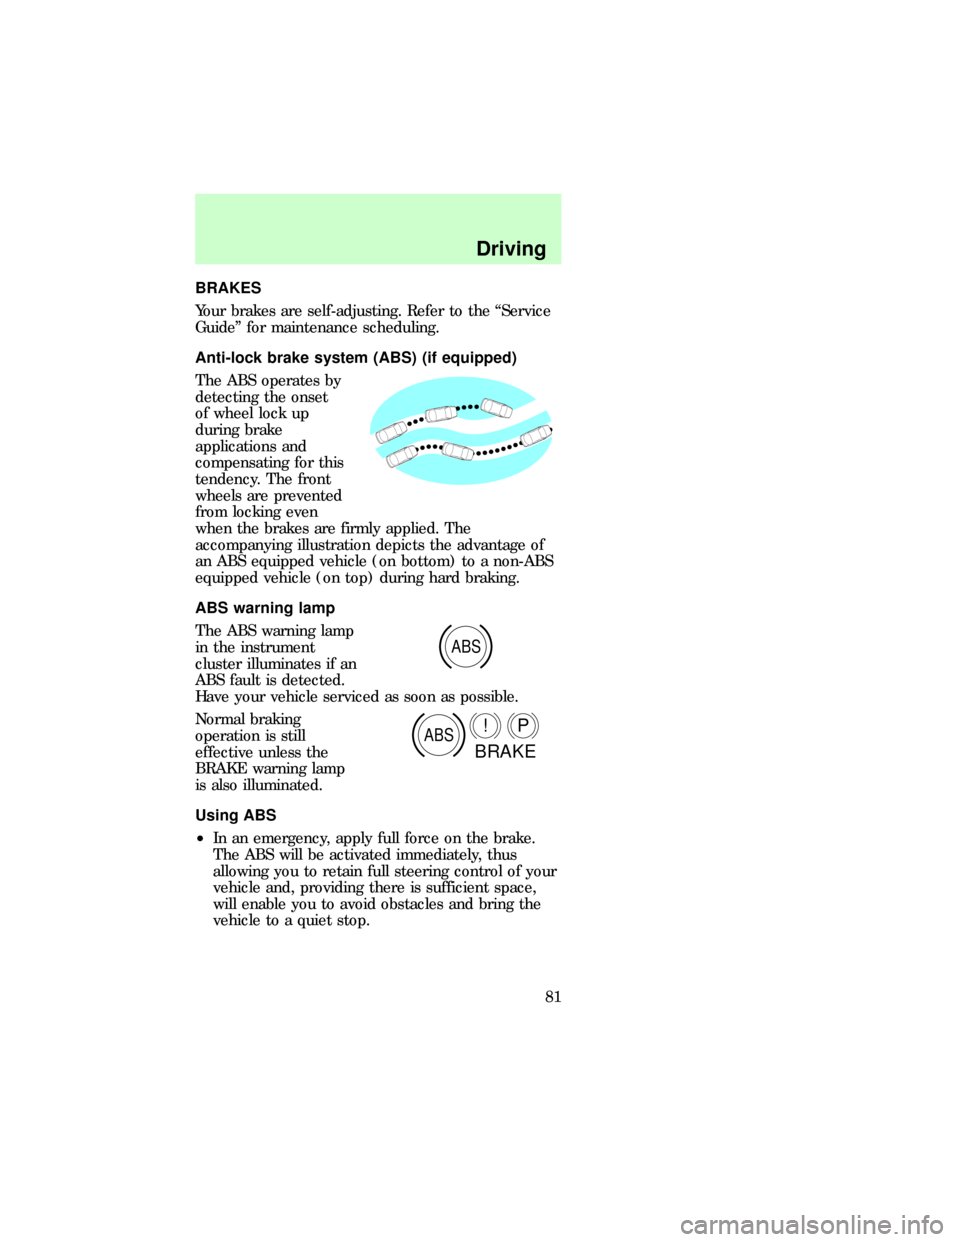
The ABS operates by
detecting the onset
of wheel lock up
during brake
applications and
compensating for this
tendency. The front
wheels are prevented
from locking even
when the brakes are firmly applied. The
accompanying illustration depicts the advantage of
an ABS equipped vehicle (on bottom) to a non-ABS
equipped vehicle (on top) during hard braking.
ABS warning lamp
The ABS warning lamp
in the instrument
cluster illuminates if an
ABS fault is detected.
Have your vehicle serviced as soon as possible.
Normal braking
operation is still
effective unless the
BRAKE warning lamp
is also illuminated.
Using ABS
²In an emergency, apply full force on the brake.
The ABS will be activated immediately, thus
allowing you to retain full steering control of your
vehicle and, providing there is sufficient space,
will enable you to avoid obstacles and bring the
vehicle to a quiet stop.
ABS
ABSP!
BRAKE
com_brakes.01
com_abs.01
dno_ABS-warning-light
com_using_abs.01
Driving
81
Page 98 of 167

Standard fuse amperage rating and color
Fuse rating Color
10 amp Red
15 amp Blue
20 amp Yellow
30 amp Light Green
30 amp fuse link Pink
40 amp Amber
Passenger compartment fuse panel
The fuse panel is
located below and to
the left of the steering
wheel by the brake
pedal. Pull the panel
cover outward to
access the fuses.
To remove a fuse, use the fuse puller tool provided
on the fuse panel cover.
The fuses are coded as follows:
sab_pass-fuse-panel
Roadside emergencies
98
Page 113 of 167

TOWING YOUR VEHICLE BEHIND ANOTHER
VEHICLE
At times, you may want to tow your vehicle behind
another vehicle, such as a recreational vehicle, car
or a truck.
Before you have your vehicle towed:
²Release the parking brake.
²Move the gearshift to N (Neutral).
²Turn the key in the ignition to OFF.
²Unlock the steering wheel.
Do not tow your vehicle at a speed faster than 56
km/h (35 mph) or for a distance greater than 80 km
(50 miles), unless the drive wheels are placed on
dollies.
Never use a tow bar that attaches to the
bumper when you tow your vehicle. This
could damage the bumper and cause an accident.
Roadside emergencies
113
Page 117 of 167

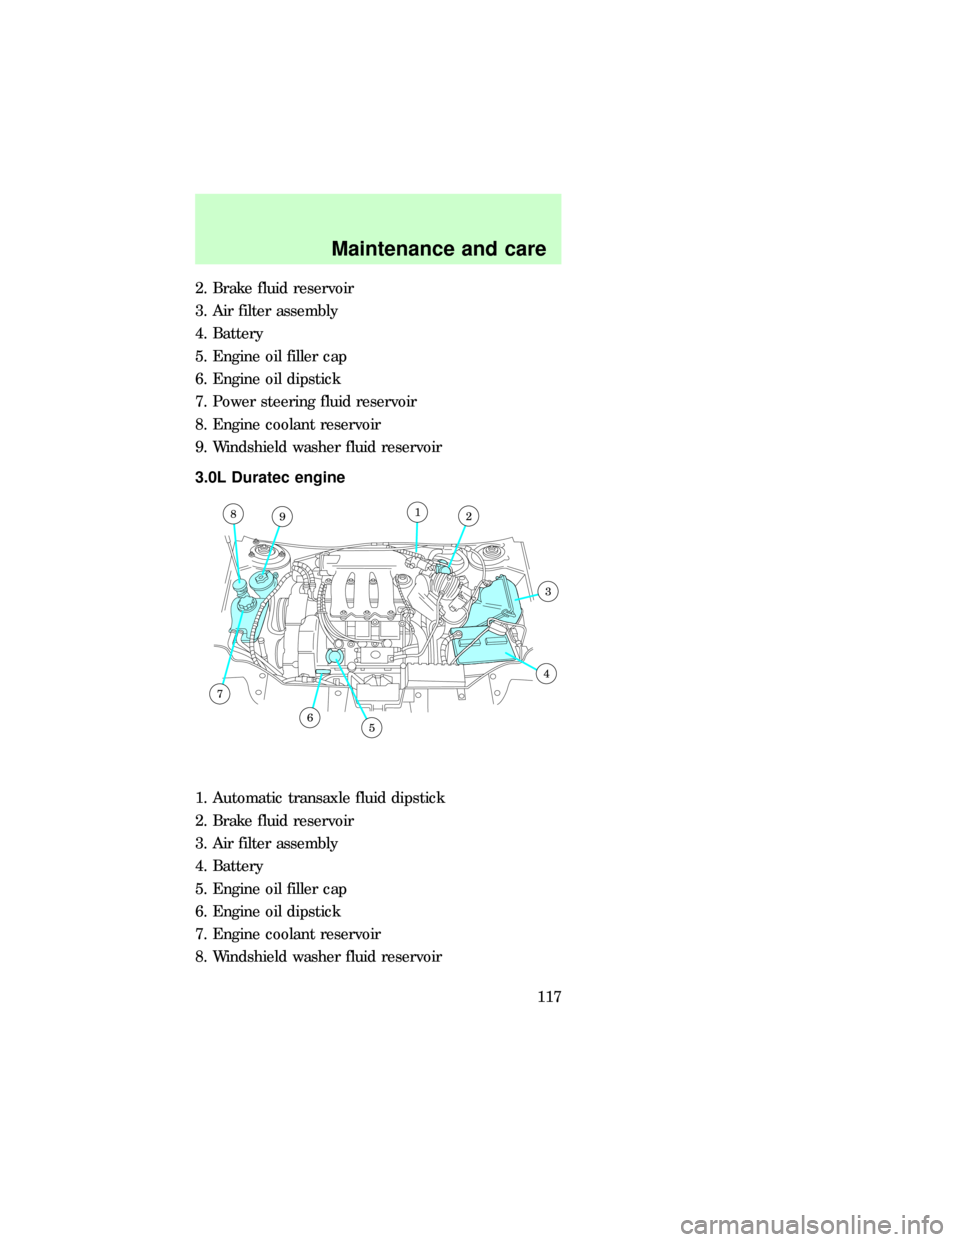
2. Brake fluid reservoir
3. Air filter assembly
4. Battery
5. Engine oil filler cap
6. Engine oil dipstick
7. Power steering fluid reservoir
8. Engine coolant reservoir
9. Windshield washer fluid reservoir
3.0L Duratec engine
1. Automatic transaxle fluid dipstick
2. Brake fluid reservoir
3. Air filter assembly
4. Battery
5. Engine oil filler cap
6. Engine oil dipstick
7. Engine coolant reservoir
8. Windshield washer fluid reservoir
8912
3
4
56
7
dno_duratec
Maintenance and care
117
Page 118 of 167

9. Power steering fluid reservoir
CHECKING AND ADDING ENGINE OIL
Checking the engine oil
Check the engine oil each time you fuel your
vehicle.
To check the oil:
1. Make sure the vehicle is on level ground. If the
engine is warm, turn the engine off and wait a few
minutes for the oil to drain into the oil pan.
2. Set the parking brake and ensure the gearshift is
securely latched in P (Park).
3. Open the hood. Protect yourself from engine heat.
4. Locate and carefully
remove the engine oil
dipstick.
5. Wipe the dipstick clean. Insert the dipstick fully,
then remove it again. The oil level should be in the
range shown on the dipstick.
6. If the oil level is below the MIN line or the ADD 1
QUART line, add oil as necessary. If the oil level is
beyond the MAX or FULL line, engine damage or
high engine oil consumption may occur and some oil
must be removed from the engine by a service
technician.
7. Put the dipstick back in and ensure it is fully
seated.
Adding engine oil
1. Check the engine oil. For instructions, refer to
Checking the engine oilin this chapter.
ADD 1 QTFULL
dno_engine-oils
dno_check-oil
dno_add-oil
Maintenance and care
118