clock Mercury Sable 1998 Owner's Manuals
[x] Cancel search | Manufacturer: MERCURY, Model Year: 1998, Model line: Sable, Model: Mercury Sable 1998Pages: 190, PDF Size: 1.29 MB
Page 118 of 190

Removing the anti-theft lug nut
1. Insert the key over the locking lug nut. Make sure
you hold the key square to the lug nut. If you hold
the key at an angle, you could damage the key and
the lug nut.
2. Place the lug nut wrench over the lug nut key and
apply pressure on the key with the wrench.
3. Turn the wrench in a counterclockwise direction
to remove the lug nut.
Reinstalling the anti-theft lug nut
1. Insert the key over the locking lug nut.
2. Place the lug nut wrench over the lug nut key and
apply pressure on the key with the wrench.
3. Install the lug nut.
Tire change procedure
1. Park on a level surface, activate hazard flashers
and set parking brake.
When one of the front wheels is off the
ground, the transaxle alone will not prevent
the vehicle from moving or slipping off the jack,
even if the vehicle is in P (Park).
To prevent the vehicle from moving when
you change a tire, be sure the parking brake
is set, then block (in both directions) the wheel
that is diagonally opposite (other side and end of
the vehicle) to the tire being changed.
Roadside emergencies
118
Page 119 of 190

If the vehicle slips off the jack, you or
someone else could be seriously injured.
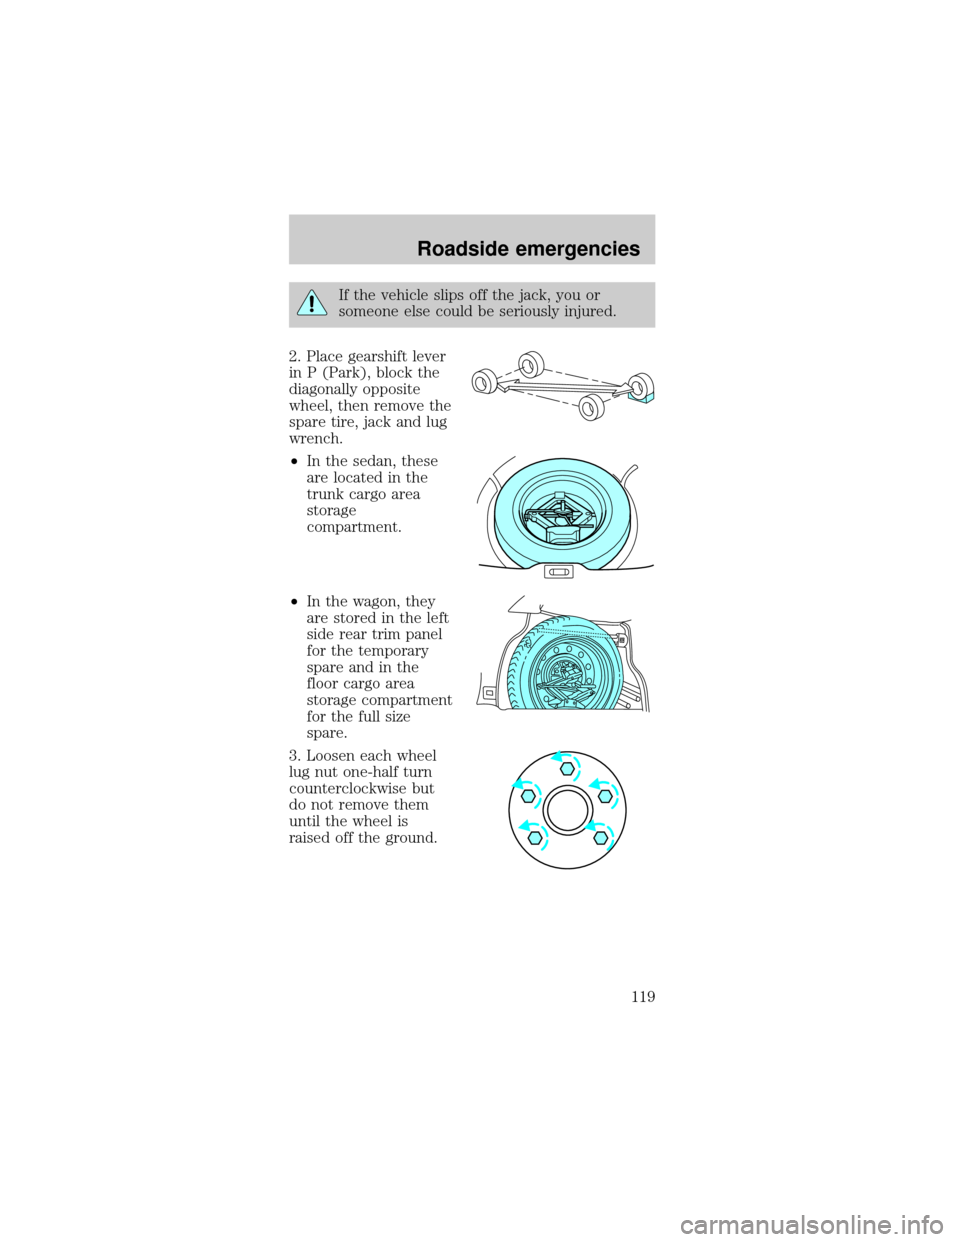
2. Place gearshift lever
in P (Park), block the
diagonally opposite
wheel, then remove the
spare tire, jack and lug
wrench.
²In the sedan, these
are located in the
trunk cargo area
storage
compartment.
²In the wagon, they
are stored in the left
side rear trim panel
for the temporary
spare and in the
floor cargo area
storage compartment
for the full size
spare.
3. Loosen each wheel
lug nut one-half turn
counterclockwise but
do not remove them
until the wheel is
raised off the ground.
Roadside emergencies
119
Page 120 of 190

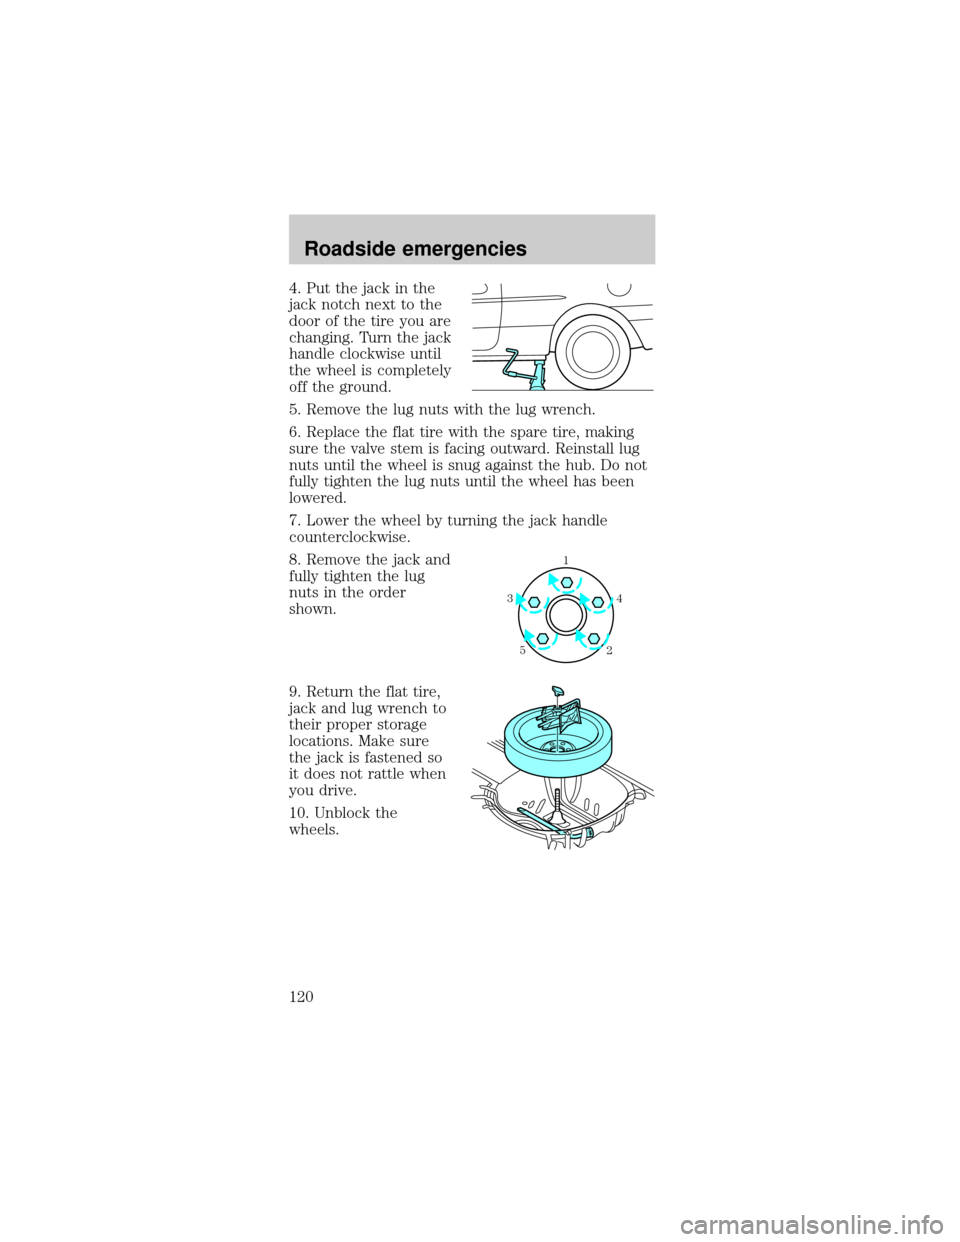
4. Put the jack in the
jack notch next to the
door of the tire you are
changing. Turn the jack
handle clockwise until
the wheel is completely
off the ground.
5. Remove the lug nuts with the lug wrench.
6. Replace the flat tire with the spare tire, making
sure the valve stem is facing outward. Reinstall lug
nuts until the wheel is snug against the hub. Do not
fully tighten the lug nuts until the wheel has been
lowered.
7. Lower the wheel by turning the jack handle
counterclockwise.
8. Remove the jack and
fully tighten the lug
nuts in the order
shown.
9. Return the flat tire,
jack and lug wrench to
their proper storage
locations. Make sure
the jack is fastened so
it does not rattle when
you drive.
10. Unblock the
wheels.
1
4 3
52
Roadside emergencies
120
Page 136 of 190

Never remove the coolant reservoir cap
while the engine is running or hot.
If you must remove the coolant reservoir cap, follow
these steps to avoid personal injury:
1. Before you remove the cap, turn the engine off
and let it cool.
2. When the engine is cool, wrap a thick cloth
around the cap. Slowly turn cap counterclockwise
until pressure begins to release.
3. Step back while the pressure releases.
4. When you are sure that all the pressure has been
released, use the cloth to turn it counterclockwise
and remove the cap.
Change your engine coolant according to the
appropriate schedule listed in the ªService Guideº.
Before adding engine coolant, check the color of the
coolant in your vehicle.
For vehicles with green coolant,use Ford
Premium Cooling System Fluid E2FZ-19549±AA (in
Canada, Motorcraft CXC-8±B) or an equivalent
premium engine coolant that meets Ford
specification ESE-M97B44±A.
Do not add orange coolant or recycled coolant
to your vehicle originally equipped with
conventional green coolant .
For vehicles with orange coolant,use Ford
Extended Life Engine Coolant F6AZ-19544±AA or a
DEX-COOLtequivalent that meets Ford
specification WSS-M97B44±D.
Do not add conventional green coolant or
recycled coolant to your vehicle originally
equipped with orange coolant.
Do not use alcohol or methanol antifreeze or any
engine coolants mixed with alcohol or methanol
antifreeze. Do not use supplemental coolant
Maintenance and care
136
Page 144 of 190

Because your vehicle's engine is electronically
controlled by a computer, some control conditions
are maintained by power from the battery. When the
battery is disconnected or a new battery is installed,
the engine must relearn its idle conditions before
your vehicle will drive properly. To begin this
process:
1. Set your parking brake.
2. Put the gearshift in P (Park), turn off all
accessories and start the engine.
3. Let the engine idle for at least one minute.
4. The relearning process will automatically
complete as you drive the vehicle.
²If you do not allow the engine to relearn its idle,
the idle quality of your vehicle may be adversely
affected until the idle is eventually relearned.
²If the battery has been disconnected or a new
battery has been installed, the clock and the
preset radio stations must be reset once the
battery is reconnected.
²Always dispose of
automotive batteries
in a responsible
manner. Follow your
local authorized
standards for
disposal. Call your
local authorized
authorized recycling center to find out more
about recycling automotive batteries.
LEAD
RETURN
RECYCLE
Maintenance and care
144
Page 155 of 190

Fuel Filler Cap
Your fuel tank filler cap has an indexed design with
a one-eighth turn on/off feature.
When fueling your vehicle:
1. Turn the engine off.
2. Carefully turn the filler cap counterclockwise 1/8
of a turn until it stops.
3. Pull to remove the cap from the fuel filler pipe.
4. To install the cap, align the tabs on the cap with
the notches on the filler pipe.
5. Turn the filler cap clockwise 1/8 of a turn until it
stops.
If the ªService Engine Soon/Check Engine ª indicator
comes on and stays on when you start the engine,
the fuel filler cap may not be properly installed.
Turn off the engine, remove the fuel filler cap and
reinstall it being careful to align the cap properly.
If you must replace the fuel filler cap, replace
it with an authorized Motorcraft part. The
customer warranty may be void for any damage
to the fuel tank or fuel system if an authorized
Motorcraft fuel filler cap is not used.
The fuel system may be under pressure. If
the fuel filler cap is venting vapor or if you
hear a hissing sound, wait until it stops before
completely removing the fuel filler cap. Otherwise,
fuel may spray out and injure you or others.
If you do not use the proper fuel filler cap,
the pressure in the fuel tank can damage
the fuel system or cause it to work improperly in a
collision.
Maintenance and care
155
Page 161 of 190

Replacing headlamp bulbs
Handle a halogen headlamp bulb carefully
and keep out of children's reach. Grasp the
bulb only by its plastic base and do not touch the
glass. The oil from your hand could cause the bulb
to break the next time the headlamps are
operated.
If the bulb is accidentally touched, it should be
cleaned with rubbing alcohol before being used.
To remove the headlamp bulb:
1. Make sure headlamp switch is in OFF position,
then open the hood. If you are replacing the driver
side headlamp, unclip the electronic module on the
right side of the battery and move it out of the way.
2. Locate the headlamp bulb through the hole in the
upper radiator support assembly.
3. Release clip and
disconnect the
electrical connector
from the bulb.
4. Remove the bulb
retaining ring by
rotating it
counterclockwise
(when viewed from the
rear) about 1/8 turn to
free it from the bulb socket, and slide the ring off
the plastic base. Keep the ring to retain the new
bulb.
5. With out turning, remove the old bulb from the
lamp assembly by gently pulling it straight out of the
lamp assembly.
Maintenance and care
161
Page 162 of 190

To install the new bulb:
1. With the flat side of
the bulb's plastic base
facing upward, insert
the glass end of the
bulb into the lamp
assembly. You may
need to turn the bulb left or right to align the
grooves in the plastic base with the tabs in the lamp
assembly. When the grooves are aligned, push the
bulb into the lamp assembly until the plastic base
contacts the rear of the lamp assembly.
2. Install the bulb retaining ring over the plastic base
until it contacts the rear of the socket by rotating
clockwise until you feel a ªstop.º
3. Install the electrical connector into the rear of the
plastic base until it snaps, locking it into position.
4. Turn the headlamps on and make sure they work
properly. If the headlamp was correctly aligned
before you changed the bulb, you should not need to
align it again.
High-mount brakelamp bulbs
The following
procedure is for sedans
only. For wagon, refer
to a qualified
technician.
1. Open trunk.
2. Inside trunk, locate
access hole under the
rear window
3. Remove the bulb
socket by rotating it 45 degrees and pulling it out of
the lamp assembly.
4. Carefully pull bulb straight out of socket and push
in new bulb.
5. To complete installation, follow the removal
procedure in reverse order.
Maintenance and care
162
Page 163 of 190

License plate lamp bulbs
To change the license plate bulbs:
Sedan
1. Remove two screws
and the license plate
lamp assembly from
the rear bumper.
2. Remove bulb socket
by turning
counterclockwise .
3. Carefully pull the
bulb out from the
socket and push in the
new bulb.
4. Install the lamp assembly on rear bumper with
two screws.
Wagon
1. Remove screw and
the license plate lamp
assembly from liftgate.
2. Remove bulb socket
by turning
counterclockwise .
3. Carefully pull the
bulb out from the
socket and push in the
new bulb.
4. Install the lamp assembly on liftgate with screw.
Replacing front parking lamp/turn signal bulbs
For bulb replacement, see a dealer or qualified
technician.
Replacing tail lamp/backup bulbs
For bulb replacement, see a dealer or qualified
technician.
Maintenance and care
163
Page 166 of 190

3. Turn the horizontal
adjusting screw in the
direction of the arrow
to change the
horizontal aim as
shown.
4.Usea7mmwrench
or socket to turn the
horizontal adjusting screw until the ª0º reference
mark on the view dial is aligned with the rearward
facing tab (as shown) on the plastic housing.
Vertical aim adjustment
1. Park the vehicle on a level surface.
2. With the hood open,
locate the bubble level
vertical aim indicator.
It is visible when
viewed from above
center rear of the
headlamp. Locate the
vertical adjusting
screw, located on the
outboard side of the headlamp adjacent to the
headlamp upper outboard attachment.
3. The ªUPº and ªDNº on the bubble label indicate
the directional change (up or down) of the vertical
aim.
4.Usea7mmwrench or socket to turn the vertical
adjusting screw clockwise or counterclockwise until
the bubble aligns with the ª0º reference mark on the
vertical indicator when viewed directly from above.
Repeat the above procedures to the other headlamp,
if necessary.
Maintenance and care
166