transmission Mercury Sable 1998 Owner's Manuals
[x] Cancel search | Manufacturer: MERCURY, Model Year: 1998, Model line: Sable, Model: Mercury Sable 1998Pages: 190, PDF Size: 1.29 MB
Page 9 of 190

This lamp will come on when the ignition is first
turned on, but then should turn off. If the lamp
stays on, you should check the coolant level inside
the reservoir. For instructions on adding coolant, see
Engine coolantin theMaintenance and care
chapter.
Anti-theft system (if equipped)
Refer toAnti-theft
systemin theControls
and featureschapter.
O/D off (if equipped)
Illuminates when the
transmission control
switch has been
pushed. When the light
is on, the transmission does not shift into overdrive.
If the light does not come on when the transmission
control switch is depressed or if the light flashes
when you are driving, have your vehicle serviced.
Anti-lock brake system (ABS) (If equipped)
Momentarily illuminates
when the ignition is
turned on and the
engine is off. If the
light does not illuminate momentarily at start up,
remains on or continues to flash, the ABS needs to
be serviced. With the ABS light on, the anti-lock
brake system is disabled and normal braking is still
effective unless the brake warning light also remains
illuminated with parking brake released.
THEFT
O/D
OFF
ABS
Instrumentation
9
Page 28 of 190

POSITIONS OF THE IGNITION
1. ACCESSORY, allows
the electrical
accessories such as the
radio to operate while
the engine is not
running.
2. LOCK, locks the
steering wheel,
automatic transmission gearshift lever and allows
key removal.
3. OFF, shuts off the engine and all accessories
without locking the steering wheel.
4. ON, all electrical circuits operational. Warning
lights illuminated. Key position when driving.
5. START, cranks the engine. Release the key as
soon as the engine starts.
SPEED CONTROL (IF EQUIPPED)
To turn speed control on
²Press ON.
Vehicle speed cannot
be controlled until the
vehicle is traveling at
or above 48 km/h (30
mph).
Do not use the speed control in heavy traffic
or on roads that are winding, slippery, or
unpaved.
Do not shift the gearshift lever into N
(Neutral) with the speed control on.
1
23
4
5
OFF ON
Controls and features
28
Page 101 of 190

(including passengers and cargo) and the trailer.
The GCWR indicates the maximum loaded weight
that the vehicle is designed to tow.
²Maximum Trailer Weight Rating: Maximum
weight of a trailer the vehicle is permitted to tow.
The maximum trailer weight rating is determined
by subtracting the vehicle curb weight for each
engine/transmission combination, any required
option weight for trailer towing and the weight of
the driver from the GCWR for the towing vehicle.
²Maximum Trailer Weight: maximum weight of
a trailer the loaded vehicle (including passengers
and cargo) is permitted to tow. It is determined
by subtracting the weight of the loaded trailer
towing vehicle from the GCWR for the towing
vehicle.
²Trailer Weight Range: Specified weight range
that the trailer must fall within that ranges from
zero to the maximum trailer weight rating.
Remember to figure in the tongue load of your
loaded trailer when figuring the total weight.
Do not exceed the GVWR or the GAWR
specified on the Safety Compliance
Certification Label.
Do not use replacement tires with lower load
carrying capacities than the originals because they
may lower the vehicle's GVWR and GAWR
limitations. Replacement tires with a higher limit
than the originals do not increase the GVWR and
GAWR limitations.
Driving
101
Page 111 of 190

The fuses are coded as follows.
Fuse/
Relay
LocationFuse
Amp
RatingDescription
1 Ð Not Used
2 5A Instrument Illumination
3 10A Left Low Beam Headlamp
4 10A Right Low Beam Headlamp
5 5A Brake Shift Interlock, Rear
Defrost
6 15A MLPS Switch, Backup Lamps,
Speed Control
7 10A MLPS Switch, Starter Relay
8 5A Power Antenna, RCU, GEM
9 10A ABS
10 20A PCM Relay, Ignition Coil,
PATS, Radio
11 5A Instrument Cluster
12 5A Instrument Cluster, Autolamps,
Transmission Control Switch,
ICP, GEM
13 5A Air Bag, Blower Motor, EATC
14 5A Air Suspension
15 10A Multi-Function Switch (Turn
Signal)
16 Ð Not Used
17 30A Front Wiper/Washer
18 5A Headlamp Switch
19 15A Rear Wiper/Washer
20 5A ICP, RAP, Phone
21 20A Cigar Lighter
22 5A Power Mirrors, Power
Antenna, Decklid Lamps,
Autolamp
Roadside emergencies
111
Page 129 of 190

IDENTIFYING COMPONENTS IN THE ENGINE
COMPARTMENT
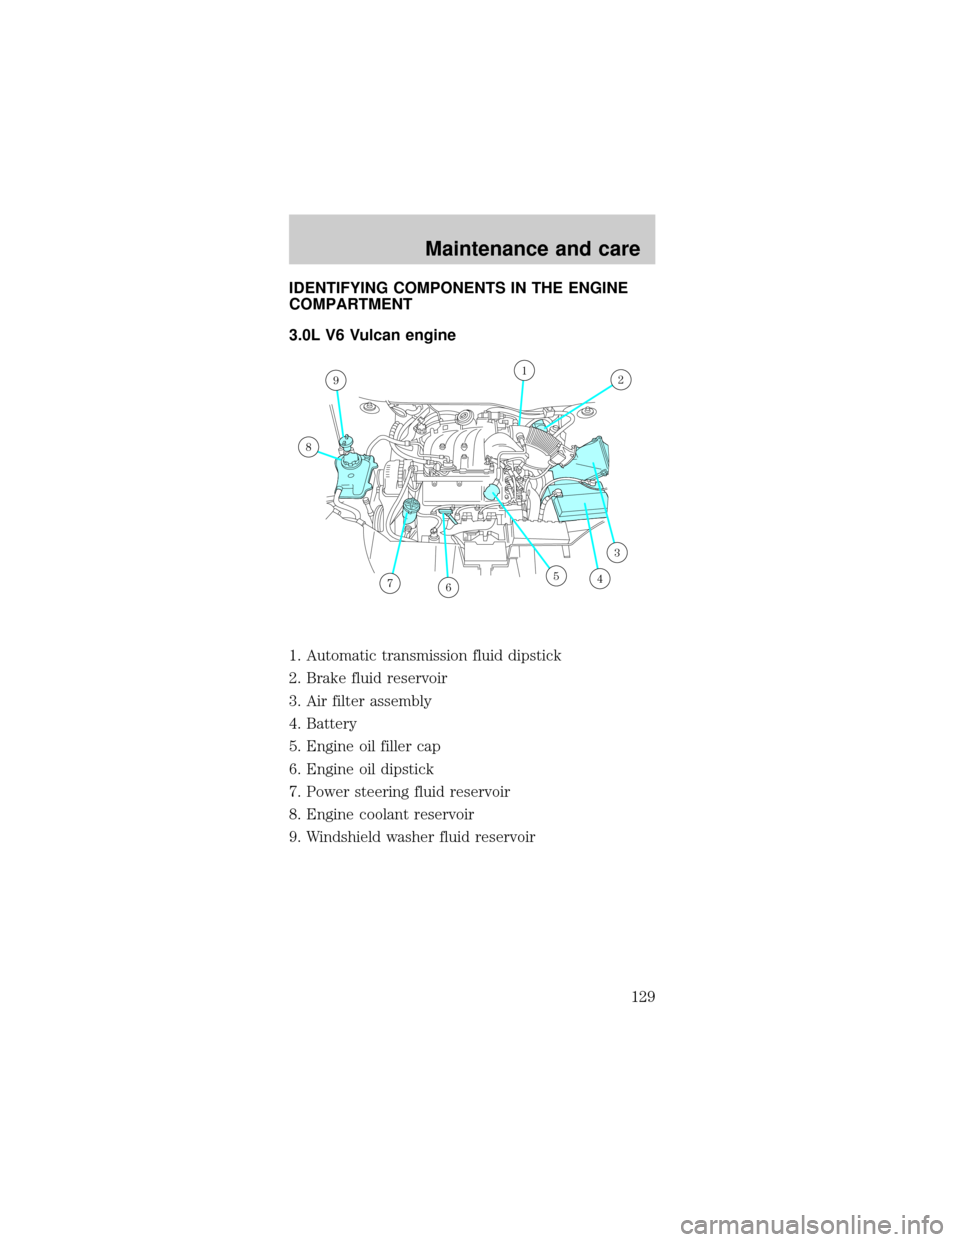
3.0L V6 Vulcan engine
1. Automatic transmission fluid dipstick
2. Brake fluid reservoir
3. Air filter assembly
4. Battery
5. Engine oil filler cap
6. Engine oil dipstick
7. Power steering fluid reservoir
8. Engine coolant reservoir
9. Windshield washer fluid reservoir
12
3
4567
8
9
Maintenance and care
129
Page 130 of 190

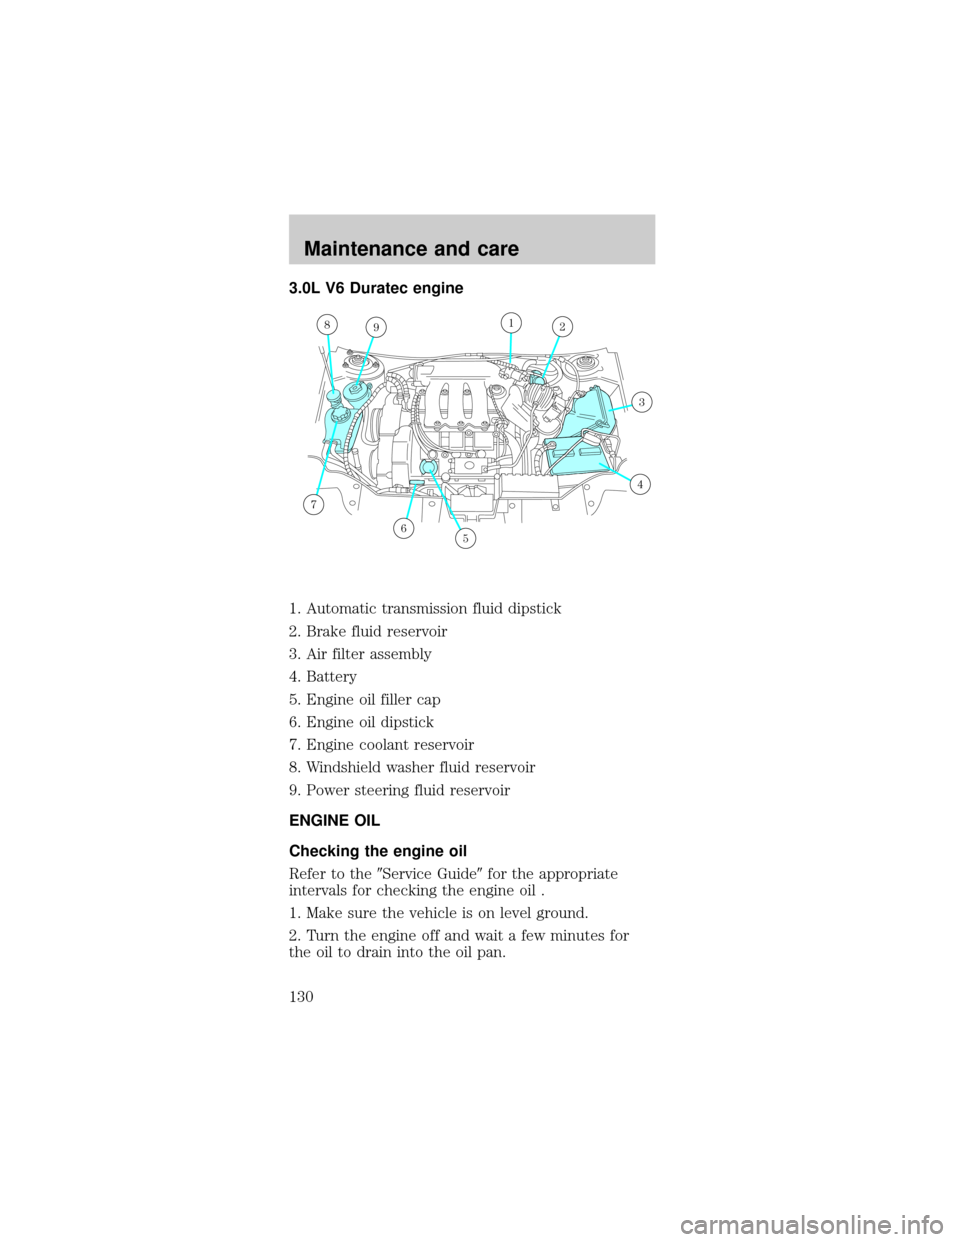
3.0L V6 Duratec engine
1. Automatic transmission fluid dipstick
2. Brake fluid reservoir
3. Air filter assembly
4. Battery
5. Engine oil filler cap
6. Engine oil dipstick
7. Engine coolant reservoir
8. Windshield washer fluid reservoir
9. Power steering fluid reservoir
ENGINE OIL
Checking the engine oil
Refer to the9Service Guide9for the appropriate
intervals for checking the engine oil .
1. Make sure the vehicle is on level ground.
2. Turn the engine off and wait a few minutes for
the oil to drain into the oil pan.
8912
3
4
56
7
Maintenance and care
130
Page 140 of 190

TRANSMISSION FLUID
Checking automatic transmission fluid
Refer to your ªService Guideº for scheduled intervals
for fluid checks and changes. Your transaxle does
not consume fluid. However, the fluid level should
be checked if the transaxle is not working properly,
i.e., if the transaxle slips or shifts slowly or if you
notice some sign of fluid leakage.
Automatic transmission fluid expands when
warmed. To obtain an accurate fluid check,
drive the vehicle until it is warmed up
(approximately 30 km [20 miles]). If your
vehicle has been operated for an extended
period at high speeds, in city traffic during hot
weather or pulling a trailer, the vehicle should
be turned off for about 30 minutes to allow
fluid to cool before checking.
1. Drive the vehicle 30 km (20 miles) or until it
reaches normal operating temperature.
2. Park the vehicle on a level surface and engage the
parking brake.
3. With the parking brake engaged and your foot on
the brake pedal, start the engine and move the
gearshift lever through all of the gear ranges. Allow
sufficient time for each gear to engage.
4. Latch the gearshift lever in P (Park) and leave the
engine running.
5. Remove the dipstick, wiping it clean with a clean,
dry lint free rag.
6. Install the dipstick making sure it is fully seated in
the filler tube.
7. Remove the dipstick and inspect the fluid level.
The fluid should be in the designated areas for
normal and room temperature.
Maintenance and care
140
Page 141 of 190

Low fluid level
Do not drive the
vehicle if the fluid level
is at the bottom of the
dipstick and the outside temperatures are above
10ÉC (50ÉF).
Correct fluid level
The transmission fluid should be checked at normal
operating temperatures 66ÉC-77ÉC (150ÉF-170ÉF) on
a level surface. The normal operating temperature
can be reached after approximately 30 km (20
miles) of driving.
The transmission fluid
should be in this range
if at normal operating
temperature (66ÉC-77ÉC [150ÉF-170ÉF]).
High fluid level
Fluid levels above the
safe range may result
in transaxle failure. An
overfill condition of transmission fluid may cause
shift and/or engagement concerns and/or possible
damage.
High fluid levels can be caused by an overheating
condition.
Adjusting automatic transmission fluid levels
Before adding any fluid, make sure the correct type
is used. The type of fluid used is normally indicated
on the dipstick and/or dipstick handle and also in
theLubricant specificationssection in the
Capacities and specificationschapter.
Use of a non-approved automatic transmission
fluid may cause internal transmission
component damage.
If necessary, add fluid in 250 mL (1/2 pint)
increments through the filler tube until the level is
correct.
DON’T ADD IF IN CROSSHATCH AREA--CHECH WHEN HOT-IDLING
DON’T ADD IF IN CROSSHATCH AREA--CHECH WHEN HOT-IDLING
DON’T ADD IF IN CROSSHATCH AREA--CHECH WHEN HOT-IDLING
Maintenance and care
141
Page 142 of 190

If an overfill occurs,
excess fluid should be
removed by a qualified
technician.
An overfill condition of transmission fluid may
cause shift and/or engagement concerns and/or
possible damage.
BATTERY
Your vehicle is
equipped with a
Motorcraft
maintenance-free
battery which normally
does not require
additional water during
its life of service.
However, for severe usage or in high temperature
climates, check the battery electrolyte level. Refer to
the ªService Guideº for the service interval
schedules.
If the electrolyte level in the battery is low, you can
add plain tap water to the battery, as long as you do
not use hard water (water with a high mineral or
alkali content). If possible, however, try to only fill
the battery cells with distilled water. If the battery
needs water often, have the charging system
checked.
Keep the electrolyte level in each cell up to the
ªlevel indicatorº. Do not overfill the battery
cells.
For longer, trouble-free operation, keep the top of
the battery clean and dry. Also, make certain the
battery cables are always tightly fastened to the
battery terminals.
If you see any corrosion on the battery or terminals,
remove the cables from the terminals and clean with
a wire brush. You can neutralize the acid with a
solution of baking soda and water. Reinstall the
DON’T ADD IF IN CROSSHATCH AREA--CHECH WHEN HOT-IDLING
Maintenance and care
142
Page 180 of 190

IDENTIFYING YOUR VEHICLE
Safety compliance label
The National Highway
Traffic Safety
Administration
Regulations require
that a Safety
Compliance
Certification Label be
affixed to a vehicle and
prescribe where the
Safety Compliance
Certification Label may
be located. The Safety Compliance Certification
Label is located on the front door latch pillar on the
driver's side.
Vehicle identification number
The vehicle
identification number
is attached to a metal
tag and is located on
the driver side
instrument panel.
Engine number
The engine number (the last eight numbers of the
vehicle identification number) is stamped on the
engine block, transmission, frame and transfer case
(if equipped).
MFD. BY FORD MOTOR CO. IN U.S.A.
EXT PNT: XXXXXX XXXXXX RC: XX DSO: XXXX F0000
BAR INT TR TP/PS R AXLE TR SPR T0000
X XX XXX X XX X XXXX
UTC
ÑFOHT-15294A10-GA
MAXIMUM LOAD=OCCUPANTS + LUGGAGE=XXXKG/XXXXLB
OCCUPANTS: X TOTAL X FR X 2ND X RR OCCUPANTS LUGGAGE
XX XXXKG/XXXXLB
TIRE: XXXX/XXXXX XXX X XXXKG/XXXXLB
PRESSURE (FR) XXX kPa/33 PSI COLD
PRESSURE (RR) XXX kPa/33 PSI COLD
TRAILER TOWING - SEE OWNER GUIDE
DATE: XXXXX GVWR:XXXXX LB/ XXXXX KG
VIN: XXXXXXXXXXXXXXXXX TYPE: XXXXXXXXXXXXXXX FGAWR: XXXXXX/XXXXXXX RGAWR: XXXXXXX/XXXXXXXTHIS VEHICLE CONFORMS TO ALL APPLICABLE FEDERAL
MOTOR VEHICLE SAFETY STANDARDS IN EFFECT ON THE
DATE OF MANUFACTURE SHOWN ABOVE.
XXXXXXXXXXXXXXXXXAIR BAG
Capacities and specifications
180