lock Mercury Sable 1999 s Service Manual
[x] Cancel search | Manufacturer: MERCURY, Model Year: 1999, Model line: Sable, Model: Mercury Sable 1999Pages: 216, PDF Size: 1.33 MB
Page 107 of 216

Understanding gearshift positions
P (Park)
Always come to a
complete stop before
shifting into P (Park).
Make sure the gearshift
is securely latched in P
(Park). This locks the
transaxle and prevent
the front wheels from
rotating.
Always set the
parking brake
fully and make sure
the gearshift is
securely latched in P
(Park).
Never leave your vehicle unattended while it
is running.
R (Reverse)
With the gearshift in R
(Reverse), the vehicle
will move backward.
You should always
come to a complete
stop before shifting
into and out of R
(Reverse).
PRNDD1
PRNDD1
Driving
107
Page 116 of 216

Trailer towing tips
²Practice turning, stopping and backing up in an
area before starting on a trip to get the feel of the
vehicle trailer combination. When turning, make
wider turns so the trailer wheels will clear curbs
and other obstacles.
²Allow more distance for stopping with a trailer
attached.
²The trailer tongue weight should be 10% of the
loaded trailer weight.
²After you have traveled 80 km (50 miles),
thoroughly check your hitch, electrical
connections and trailer wheel lug nuts.
²When stopped in traffic for long periods of time in
hot weather, place the gearshift in P (Park) and
increase idle speed. This aids engine cooling and
air conditioner efficiency.
²Vehicles with trailers should not be parked on a
grade. If you must park on a grade, place wheel
chocks under the trailer's wheels.
Towing your vehicle behind another vehicle
At times, you may want to tow your vehicle behind
another vehicle, such as a recreational vehicle, car
or a truck.
Before you have your vehicle towed:
²Release the parking brake.
²Turn the key in the ignition to OFF.
²Move the gearshift to N (Neutral).
²Unlock the steering wheel.
Do not tow your vehicle at a speed faster than
56 km/h (35 mph) or for a distance greater than
80 km (50 miles), unless the drive wheels are placed
on dollies.
Driving
116
Page 121 of 216

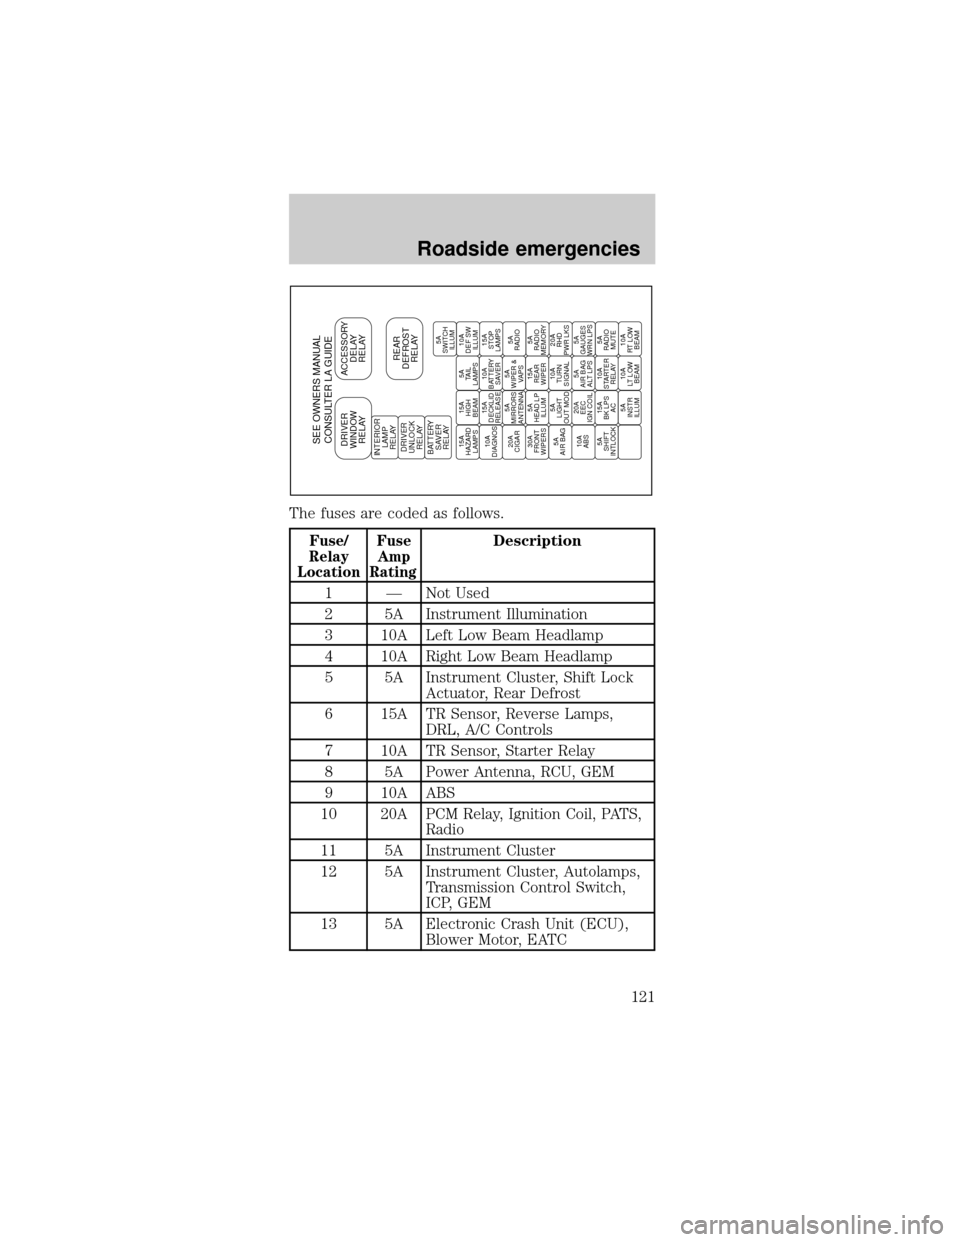
The fuses are coded as follows.
Fuse/
Relay
LocationFuse
Amp
RatingDescription
1 Ð Not Used
2 5A Instrument Illumination
3 10A Left Low Beam Headlamp
4 10A Right Low Beam Headlamp
5 5A Instrument Cluster, Shift Lock
Actuator, Rear Defrost
6 15A TR Sensor, Reverse Lamps,
DRL, A/C Controls
7 10A TR Sensor, Starter Relay
8 5A Power Antenna, RCU, GEM
9 10A ABS
10 20A PCM Relay, Ignition Coil, PATS,
Radio
11 5A Instrument Cluster
12 5A Instrument Cluster, Autolamps,
Transmission Control Switch,
ICP, GEM
13 5A Electronic Crash Unit (ECU),
Blower Motor, EATC
SEE OWNERS MANUAL
CONSULTER LA GUIDEDRIVER
WINDOW
RELAYACCESSORY
DELAY
RELAY
REAR
DEFROST
RELAYINTERIOR
LAMP
RELAY
DRIVER
UNLOCK
RELAY
BATTERY
SAVER
RELAY15A
HAZARD
LAMPS15A
HIGH
BEAM5A
TAIL
LAMPS10A
DEF SW
ILLUM
10A
DIAGNOS15A
DECKLID
RELEASE10A
BATTERY
SAVER15A
STOP
LAMPS
20A
CIGAR5A
MIRRORS
ANTENNA5A
WIPER &
VAPS5A
RADIO
30A
FRONT
WIPERS5A
HEAD LP
ILLUM15A
REAR
WIPER5A
RADIO
MEMORY
5A
AIR BAG5A
LIGHT
OUT MOD10A
TURN
SIGNAL20A
RHD
PWR LKS
10A
ABS20A
EEC
IGN COIL5A
AIR BAG
ALT LPS5A
GAUGES
WRN LPS
5A
SHIFT
INTLOCK15A
BK LPS
AC10A
STARTER
RELAY5A
RADIO
MUTE
5A
INSTR
ILLUM10A
LT LOW
BEAM10A
RT LOW
BEAM5A
SWITCH
ILLUM
Roadside emergencies
121
Page 122 of 216

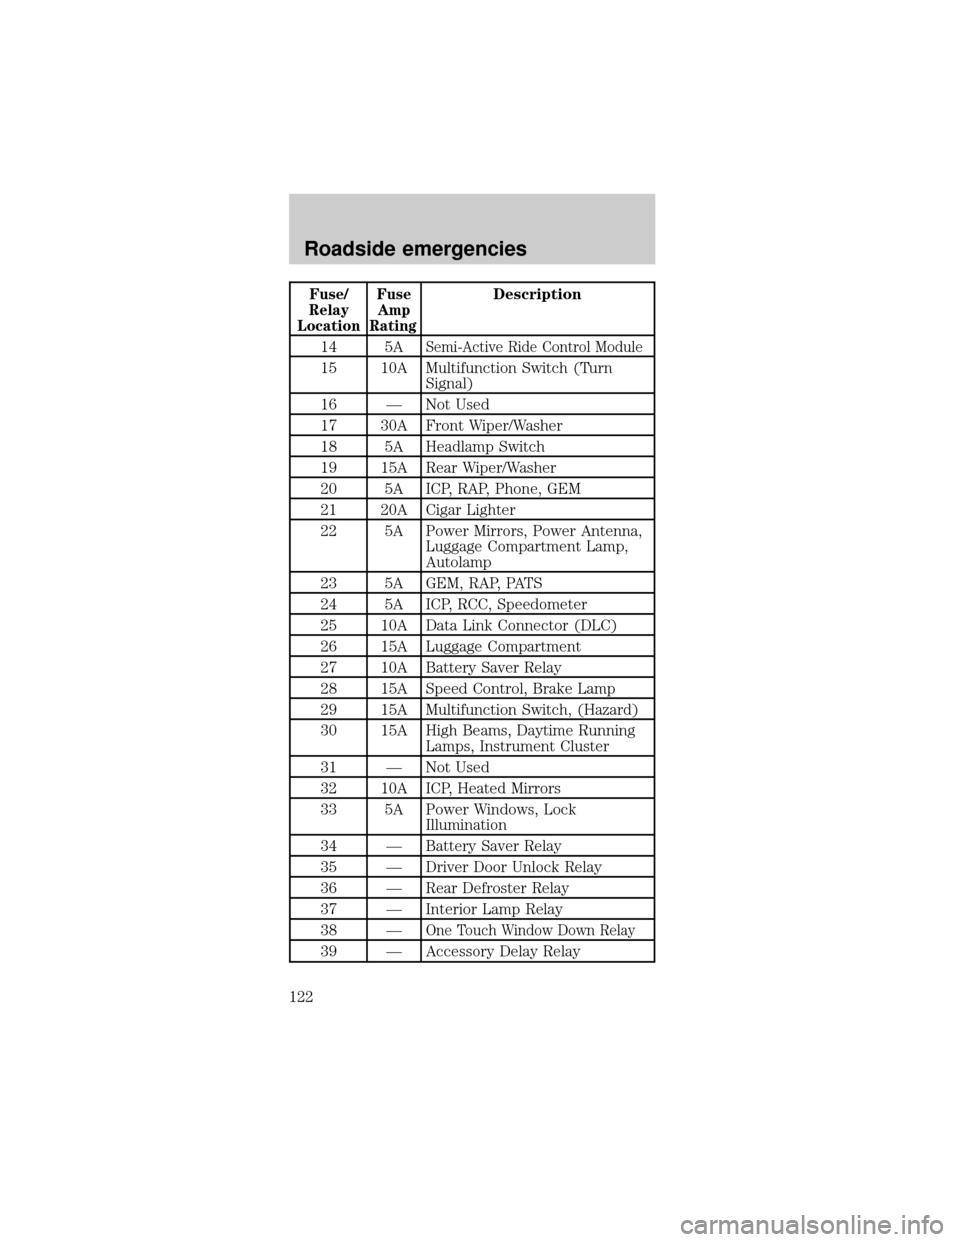
Fuse/
Relay
LocationFuse
Amp
RatingDescription
14 5A
Semi-Active Ride Control Module
15 10A Multifunction Switch (Turn
Signal)
16 Ð Not Used
17 30A Front Wiper/Washer
18 5A Headlamp Switch
19 15A Rear Wiper/Washer
20 5A ICP, RAP, Phone, GEM
21 20A Cigar Lighter
22 5A Power Mirrors, Power Antenna,
Luggage Compartment Lamp,
Autolamp
23 5A GEM, RAP, PATS
24 5A ICP, RCC, Speedometer
25 10A Data Link Connector (DLC)
26 15A Luggage Compartment
27 10A Battery Saver Relay
28 15A Speed Control, Brake Lamp
29 15A Multifunction Switch, (Hazard)
30 15A High Beams, Daytime Running
Lamps, Instrument Cluster
31 Ð Not Used
32 10A ICP, Heated Mirrors
33 5A Power Windows, Lock
Illumination
34 Ð Battery Saver Relay
35 Ð Driver Door Unlock Relay
36 Ð Rear Defroster Relay
37 Ð Interior Lamp Relay
38 Ð
One Touch Window Down Relay
39 Ð Accessory Delay Relay
Roadside emergencies
122
Page 124 of 216

The high-current fuses are coded as follows.
Fuse/
Relay
LocationFuse
Amp
RatingDescription
1 40A** Fuse Junction Panel
2 30A** PCM Relay
3 40A** Ignition Switch, Starter Relay
4 30A
C.B.Accessory Delay Relay, Power
Seat
5 40A** Ignition Switch
6 Ð Not Used
7 40A** Rear Window Defrost Relay
8 30A** Thermactor Air ByPass
Solenoid, EAM Solid State Relay
9 40A** High Speed Cooling Fan Relay,
Low Speed Cooling Fan Relay
10 20A** Fuel Pump Relay
11 40A** Blower Motor Relay
12 Ð Not Used
13 40A** Anti-Lock Brake Module
14 Ð Not Used
15 15A* Daytime Running Lamps (DRL)
Module
16 10A* Electronic Control Unit (ECU)
17 20A* Rear Control Unit, CD Changer
22
14 13
12 11
10 9
87
175A MEGA-FUSE
65
43
2121 24 23 28 27 26 2530 2931
33 3432
20 19
18 17 16 15
Roadside emergencies
124
Page 125 of 216

Fuse/
Relay
LocationFuse
Amp
RatingDescription
18 30A* Anti-Lock Brake Module
19 15A* Horn Relay, Powertrain Control
Module (PCM)
20 15A* Headlamp Switch, Autolamp
Park Relay
21 Ð Not Used
22 30A* Autolamps Relay, Multifunction
Switch, Headlamp Switch
23 Ð Blower Motor Relay
24 Ð Starter Relay
25 Ð A/C Clutch Relay
26 30A* Generator
27 10A* A/C Clutch Relay
28 15A* Heated Oxygen Sensors,
Canister Vent
29 Ð Fuel Pump Relay
30 Ð PCM Relay
31 Ð Low Speed Cooling Fan Relay
32 Ð PCM Diode
33 Ð A/C Clutch Diode
34 Ð Not Used
* Mini Fuses ** Maxi Fuses
Relays
Relays are located in the power distribution box and
should be replaced by qualified technicians.
Roadside emergencies
125
Page 127 of 216

When one of the front wheels is off the
ground, the transaxle alone will not prevent
the vehicle from moving or slipping off the jack,
even if the vehicle is in P (Park).
To prevent the vehicle from moving when
you change a tire, be sure the parking brake
is set, then block (in both directions) the wheel
that is diagonally opposite (other side and end of
the vehicle) to the tire being changed.
If the vehicle slips off the jack, you or
someone else could be seriously injured.
2. Place gearshift lever
in P (Park), turn
engine OFF, block the
diagonally opposite
wheel, then remove the
spare tire, jack and lug wrench.
²In the sedan, these
are located in the
trunk cargo area
storage
compartment.
²In the wagon, they
are stored in the left
side rear trim panel
for the temporary
spare and in the
floor cargo area
storage compartment
for the full size
spare.
Roadside emergencies
127
Page 128 of 216

3. Remove the center ornament or wheel cover from
the wheel with the tapered end of the wheel nut
wrench that came with your vehicle. Insert and twist
the handle, then pry against the wheel.
4. Loosen each wheel
lug nut one-half turn
counterclockwise but
do not remove them
until the wheel is
raised off the ground.
5. Put the jack in the
jack notch next to the
door of the tire you are
changing. Turn the jack
handle clockwise until
the wheel is completely
off the ground.
6. Remove the lug nuts with the lug wrench.
7. Replace the flat tire with the spare tire, making
sure the valve stem is facing outward. Reinstall lug
nuts until the wheel is snug against the hub. Do not
fully tighten the lug nuts until the wheel has been
lowered.
8. Lower the wheel by turning the jack handle
counterclockwise.
9. Remove the jack and
fully tighten the lug
nuts in the order
shown.
1
4 3
52
Roadside emergencies
128
Page 129 of 216

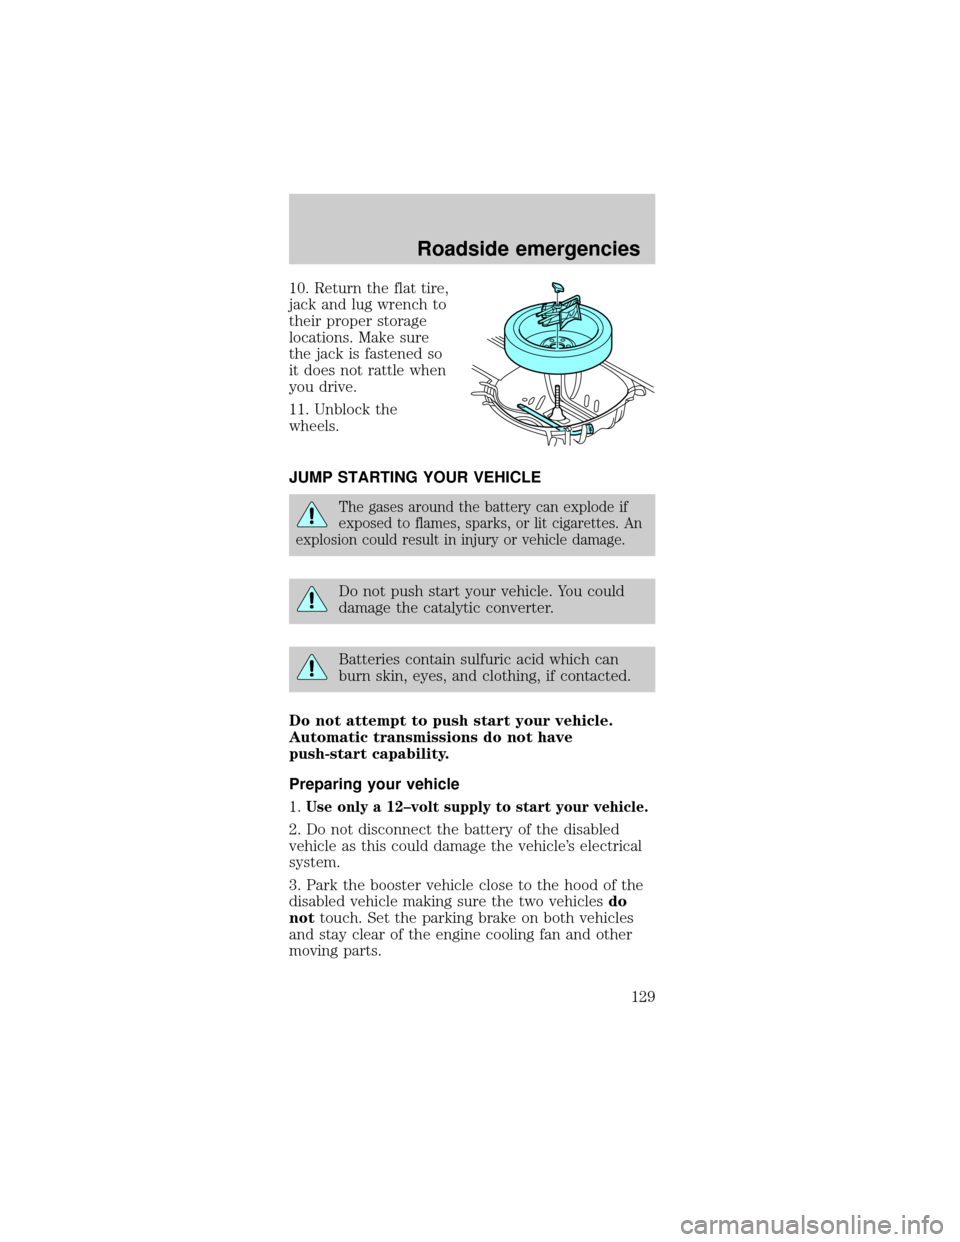
10. Return the flat tire,
jack and lug wrench to
their proper storage
locations. Make sure
the jack is fastened so
it does not rattle when
you drive.
11. Unblock the
wheels.
JUMP STARTING YOUR VEHICLE
The gases around the battery can explode if
exposed to flames, sparks, or lit cigarettes. An
explosion could result in injury or vehicle damage.
Do not push start your vehicle. You could
damage the catalytic converter.
Batteries contain sulfuric acid which can
burn skin, eyes, and clothing, if contacted.
Do not attempt to push start your vehicle.
Automatic transmissions do not have
push-start capability.
Preparing your vehicle
1.
Use only a 12±volt supply to start your vehicle.
2. Do not disconnect the battery of the disabled
vehicle as this could damage the vehicle's electrical
system.
3. Park the booster vehicle close to the hood of the
disabled vehicle making sure the two vehiclesdo
nottouch. Set the parking brake on both vehicles
and stay clear of the engine cooling fan and other
moving parts.
Roadside emergencies
129
Page 136 of 216

3. Block the wheels to prevent the vehicle from
moving unexpectedly.
Working with the engine on
1. Set the parking brake and ensure the gearshift is
securely latched in P (Park).
2. Block the wheels to prevent the vehicle from
moving unexpectedly.
Do not start your engine with the air cleaner
removed and do not remove it while the
engine is running.
OPENING THE HOOD
1. Inside the vehicle,
pull the hood release
handle located under
the bottom of the
instrument panel.
2. Go to the front of
the vehicle and release
the auxiliary latch that
is located under the
front center of the
hood.
3. Lift the hood until
the lift cylinders hold it open.
Maintenance and care
136