window Mercury Sable 2001 s User Guide
[x] Cancel search | Manufacturer: MERCURY, Model Year: 2001, Model line: Sable, Model: Mercury Sable 2001Pages: 240, PDF Size: 2.22 MB
Page 57 of 240

Window lock
The window lock feature allows only
the driver to operate the power
windows.
To lock out all the window controls
except for the driver's press the left
side of the control. Press the right side to restore the window controls.
Accessory delay (if equipped)
With accessory delay, the window switches may be used for up to ten
minutes after the ignition switch is turned to the OFF position or until
any door is opened.
POWER DOOR LOCKS (IF EQUIPPED)
Press control to unlock or lock all
doors.
CHILDPROOF DOOR LOCKS
When these locks are set, the rear
doors cannot be opened from the
inside. The rear doors can be
opened from the outside when the
doors are unlocked.
The childproof locks are located on
rear edge of each rear door and
must be set separately for each
door. Setting the lock for one door
will not automatically set the lock
for both doors.
Move lock control up to engage the childproof lock. Move control down
to disengage childproof locks.
Controls and features
57
Page 58 of 240

POWER SIDE VIEW MIRRORS
To adjust your mirrors:
1. Select
to adjust the left
mirror or
to adjust the right
mirror.
2. Move the control in the direction
you wish to tilt the mirror.
3. Return to the center position to disable adjust function.
Heated outside mirrors (if equipped)
Both mirrors are heated
automatically to remove ice, mist
and fog when the rear window
defrost is activated.
Do not remove ice from the mirrors
with a scraper or attempt to
readjust the mirror glass if it is
frozen in place. These actions could
cause damage to the glass and
mirrors.
Controls and features
58
Page 60 of 240

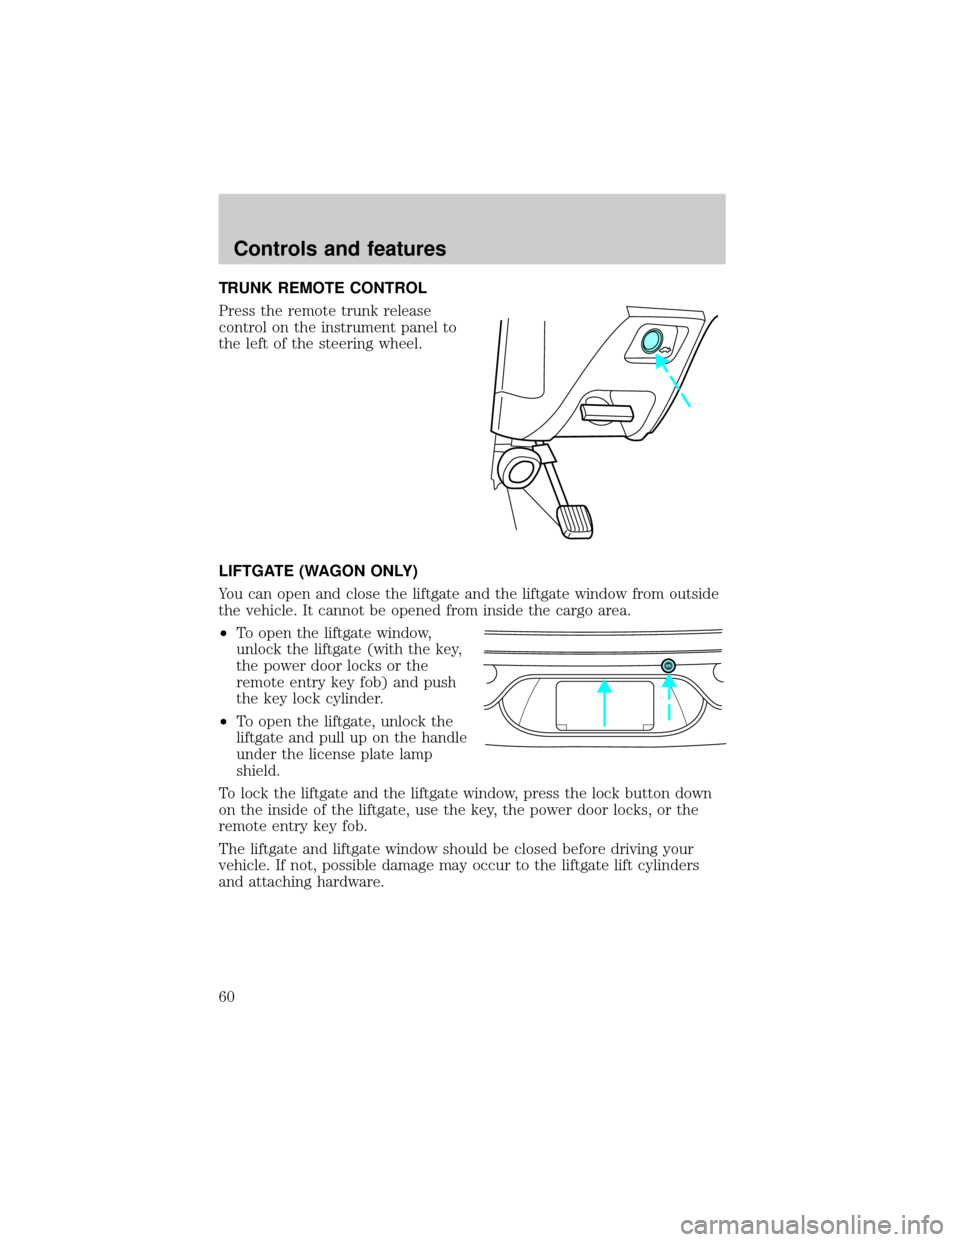
TRUNK REMOTE CONTROL
Press the remote trunk release
control on the instrument panel to
the left of the steering wheel.
LIFTGATE (WAGON ONLY)
You can open and close the liftgate and the liftgate window from outside
the vehicle. It cannot be opened from inside the cargo area.
²To open the liftgate window,
unlock the liftgate (with the key,
the power door locks or the
remote entry key fob) and push
the key lock cylinder.
²To open the liftgate, unlock the
liftgate and pull up on the handle
under the license plate lamp
shield.
To lock the liftgate and the liftgate window, press the lock button down
on the inside of the liftgate, use the key, the power door locks, or the
remote entry key fob.
The liftgate and liftgate window should be closed before driving your
vehicle. If not, possible damage may occur to the liftgate lift cylinders
and attaching hardware.
Controls and features
60
Page 117 of 240

Important ventilating information
If the engine is idling while the vehicle is stopped in an open area for
long periods of time, open the windows at least 2.5 cm (one inch).
Adjust the heating or air conditioning (if equipped) to bring in fresh air.
Improve vehicle ventilation by keeping all air inlet vents clear of snow,
leaves and other debris.
Starting
117
Page 178 of 240

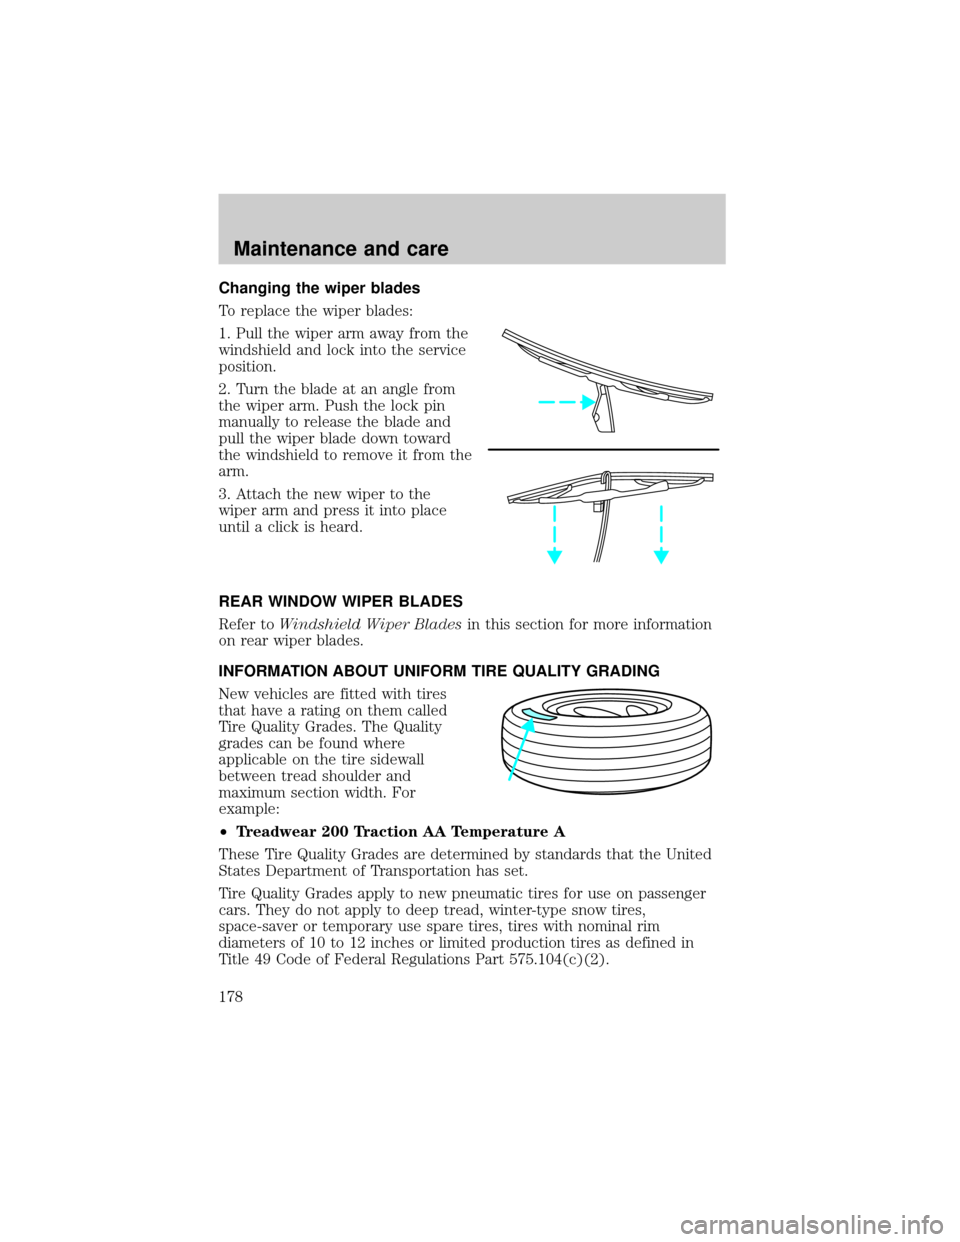
Changing the wiper blades
To replace the wiper blades:
1. Pull the wiper arm away from the
windshield and lock into the service
position.
2. Turn the blade at an angle from
the wiper arm. Push the lock pin
manually to release the blade and
pull the wiper blade down toward
the windshield to remove it from the
arm.
3. Attach the new wiper to the
wiper arm and press it into place
until a click is heard.
REAR WINDOW WIPER BLADES
Refer toWindshield Wiper Bladesin this section for more information
on rear wiper blades.
INFORMATION ABOUT UNIFORM TIRE QUALITY GRADING
New vehicles are fitted with tires
that have a rating on them called
Tire Quality Grades. The Quality
grades can be found where
applicable on the tire sidewall
between tread shoulder and
maximum section width. For
example:
²Treadwear 200 Traction AA Temperature A
These Tire Quality Grades are determined by standards that the United
States Department of Transportation has set.
Tire Quality Grades apply to new pneumatic tires for use on passenger
cars. They do not apply to deep tread, winter-type snow tires,
space-saver or temporary use spare tires, tires with nominal rim
diameters of 10 to 12 inches or limited production tires as defined in
Title 49 Code of Federal Regulations Part 575.104(c)(2).
Maintenance and care
178
Page 190 of 240

²Driving on flat terrain offers improved fuel economy as compared to
driving on hilly terrain.
²Transmissions give their best fuel economy when operated in the top
cruise gear and with steady pressure on the gas pedal.
²Close windows for high speed driving.
EPA window sticker
Every new vehicle should have the EPA window sticker. Contact your
dealer if the window sticker is not supplied with your vehicle. The EPA
window sticker should be your guide for the fuel economy comparisons
with other vehicles.
It is important to note the box in the lower left corner of the window
sticker. These numbers represent the Range of L/100 km (MPG)
expected on the vehicle under optimum conditions. Your fuel economy
may vary depending upon the method of operation and conditions.
EMISSION CONTROL SYSTEM
Your vehicle is equipped with various emission control components and a
catalytic converter which will enable your vehicle to comply with
applicable exhaust emission standards. To make sure that the catalytic
converter and other emission control components continue to work
properly:
²Use only the specified fuel listed.
²Avoid running out of fuel.
²Do not turn off the ignition while your vehicle is moving, especially at
high speeds.
²Have the items listed in your scheduled maintenance guide performed
according to the specified schedule.
The scheduled maintenance items listed in the scheduled maintenance
guide are essential to the life and performance of your vehicle and to its
emissions system.
If other than Ford, Motorcraft or Ford-authorized parts are used for
maintenance replacements or for service of components affecting
emission control, such non-Ford parts should be equivalent to genuine
Ford Motor Company parts in performance and durability.
Maintenance and care
190
Page 196 of 240

5. Carefully pull bulb straight out of
the socket and push in the new
bulb.
6. Install the bulb socket into the
lamp assembly by rotating it
clockwise.
7. Carefully position the headlamp
assembly onto the vehicle.
8. Hold the headlamp assembly
snugly against the vehicle and install
the retainer pins straight down to lock the lamp into place.
9. Before reinstalling the bolt, make sure the retainer pins are fully
seated, and install bolt on headlamp housing.
10. Turn the headlamps on and make sure they work properly. If the
headlamp was correctly aligned before you changed the bulb, you should
not need to align it again.
Replacing high-mount brakelamp bulbs Ð Sedan only
²TYPE A
1. Open trunk and locate the
insulator under the rear window.
Maintenance and care
196
Page 206 of 240

Cleaning the wheels
Wash with the same detergent as the body of your vehicle. Do not use
acid-based or alcohol-based wheel cleaners, steel wool, fuel or strong
detergents. Never use abrasives that will damage the finish of special
wheel surfaces. Use a tar remover to remove grease and tar.
The brushes used in some automatic car washes may damage the finish
on your wheels. Before going to a car wash, find out if the brushes are
abrasive.
Cleaning non-painted plastic exterior parts
Use vinyl cleaner for routine cleaning. Clean with a tar remover if
necessary. Do not clean plastic parts with thinners, solvents or
petroleum-based cleaners.
Cleaning mirrors
Do not clean your mirrors with a dry cloth or abrasive materials. Use a
soft cloth and mild detergent and water. Be careful when removing ice
from outside mirrors because you may damage the reflective surface.
Cleaning the exterior lamps
Wash with the same detergent as the exterior of your vehicle. If
necessary, use a tar remover such as Ford Extra Strength Tar and Road
Oil Remover (B7A-19520±AA).
To avoid scratching the lamps, do not use a dry paper towel, chemical
solvents or abrasive cleaners.
Cleaning the windshield, wiper blades and rear window
If the wiper blades do not wipe properly, clean the wiper blade rubber
element with undiluted windshield washer solution or a mild detergent.
To avoid damaging the blades, do not use fuel, kerosene, paint thinner or
other solvents.
If the wiper still does not wipe properly, this could be caused by
substances on the windshield or rear window such as tree sap and some
hot wax treatments used by commercial car washes. Clean the outside of
the windshield or rear window with a non-abrasive cleaner such as Ford
Ultra-Clear Spray Glass Cleaner, (E4AZ-19C507±AA), available from your
Ford Dealer.Do notuse abrasive cleansers on glass as they may cause
scratches. The windshield or rear window is clean if beads do not form
when you rinse it with water. The windshield, rear window and wiper
Maintenance and care
206
Page 209 of 240

Do not use chemical solvents or strong detergents when cleaning
the seat mounted side air bag. Such products could contaminate
the side air bag system and affect performance of the side air bag in a
collision.
Woodtone trim
Wipe stains with a soft cloth and a multi-purpose cleaning solution.
Inside windows
Use Ultra-Clear Spray Glass Cleaner (E4AZ-19C507±AA) for the inside
windows if they become fogged.
Cleaning and maintaining the safety belts
Clean the safety belts with a mild soap solution recommended for
cleaning upholstery or carpets. Do not bleach or dye the belts, because
these actions may weaken the belt webbing.
Check the safety belt system periodically to make sure there are no
nicks, tears or cuts. If your vehicle has been involved in an accident,
refer to theSafety belt maintenancesection in theSeating and safety
restraintschapter.
Cleaning leather seats (if equipped)
To clean, simply use a soft cloth dampened with water and a mild soap.
Wipe the leather again with a damp cloth to remove soap residue. Dry
with a soft cloth. For tougher soiling concerns, Ford recommends using
the Deluxe Leather Care Kit F8AZ-19G253±AA, which is available from
your Ford Dealer. This mild cleaner and special pad, cleans the leather
and maintains its natural beauty. Follow the instructions on the cleaner
label. Regular cleaning of your leather upholstery helps maintain its
resiliency and color.
Do not use household cleaning products, alcohol solutions,
solvents or cleaners intended for rubber, vinyl or plastics.
Cleaning the interior fabric
Remove dust and loose dirt with a whisk broom or a vacuum cleaner.
Remove fresh spots immediately. Do not use household or glass cleaners.
These agents can stain and discolor the fabric. Use a mild soap and
water solution if necessary.
Maintenance and care
209
Page 232 of 240

Child safety seats ......................105
attaching with tether straps ..109
in front seat ............................106
in rear seat ......................106, 109
LATCH .....................................111
Cleaning your vehicle ...............204
engine compartment ..............207
exterior ....................................205
exterior lamps .........................206
instrument cluster lens ..........208
instrument panel ....................208
interior .............................208±209
mirrors .....................................206
plastic parts ............................206
safety belts ..............................209
washing ....................................204
waxing .....................................205
wheels ......................................206
windows ..................................209
wiper blades ............................206
woodtone trim ........................209
Climate control (see Air
conditioning or Heating) ............19
Clock ......................................35, 41
Console ........................................59
Controls
power seat .................................78
Coolant
checking and adding ..............162
refill capacities ................165, 211
specifications ..................212±213
Cruise control
(see Speed control) ....................47
Customer Assistance ................135
Ford accessories
for your vehicle ......................225
Ford Extended
Service Plan ............................217Getting assistance outside
the U.S. and Canada ..............224
Getting roadside assistance ...135
Getting the
service you need ....................217
Ordering additional
owner's literature ...................228
The Dispute
Settlement Board ...................220
Utilizing the Mediation/
Arbitration Program ...............223
D
Daytime running lamps
(see Lamps) ................................17
Defrost
rear window ..............................19
Dipstick
automatic
transmission fluid ...................168
engine oil .................................157
Doors
door ajar warning .......................9
lubricant specifications ..........212
Driving under special
conditions
through water .........................129
E
Emergencies, roadside
jump-starting ..........................147
Emission control system ..........190
Engine ........................................213
check engine/
service engine soon light ...........9
cleaning ...................................207
coolant .....................................162
Index
232