spare tire Mercury Sable 2001 Owner's Manuals
[x] Cancel search | Manufacturer: MERCURY, Model Year: 2001, Model line: Sable, Model: Mercury Sable 2001Pages: 240, PDF Size: 2.22 MB
Page 75 of 240

Programming spare keys
A maximum of eight keys can be coded to your vehicle. Only
SecuriLockykeys can be used. To program acoded keyyourself, you
will need two previously programmedcoded keys(keys that already
operate your vehicle's engine) and the new unprogrammed key(s) readily
accessible for timely implementation of each step in the procedure.
If two previously programmed coded keys are not available (one or both
of your original keys were lost or stolen), you must bring your vehicle to
your dealership to have the spare coded key(s) programmed.
Please read and understand the entire procedure before you begin.
1. Insert the first previously
programmedcoded keyinto the
ignition and turn the ignition from 3
(OFF) to 4 (ON) (maintain ignition
in 4 (ON) for at least one second).
2. Turn ignition to 3 (OFF) then 2
(LOCK) and remove the firstcoded
keyfrom the ignition.
3. Within ten seconds of removing
the firstcoded key,insert the
second previously programmedcoded keyinto the ignition and turn the
ignition from 3 (OFF) to 4 (ON) (maintain ignition in 4 (ON) for at least
one second but no more than ten seconds).
4. Turn the ignition to 3 (OFF) then 2 (LOCK) and remove the second
coded keyfrom the ignition.
5. Within 20 seconds of removing the secondcoded key,insert the new
unprogrammed key (new key/valet key) into the ignition and turn the
ignition from 3 (OFF) to 4 (ON) (maintain ignition in 4 (ON) for at least
one second). This step will program your new key to a coded key.
6. To program additional new unprogrammed key(s), repeat this
procedure from step 1.
If successful, the new coded key(s) will start the vehicle's engine and the
theft indicator will illuminate for three seconds and then go out.
If not successful, the new coded key(s) will not start the vehicle's engine
and the theft indicator will flash on and off. If failure repeats, bring your
vehicle to your dealership to have the new spare key(s) programmed.
3
2
1
5
4
Controls and features
75
Page 143 of 240

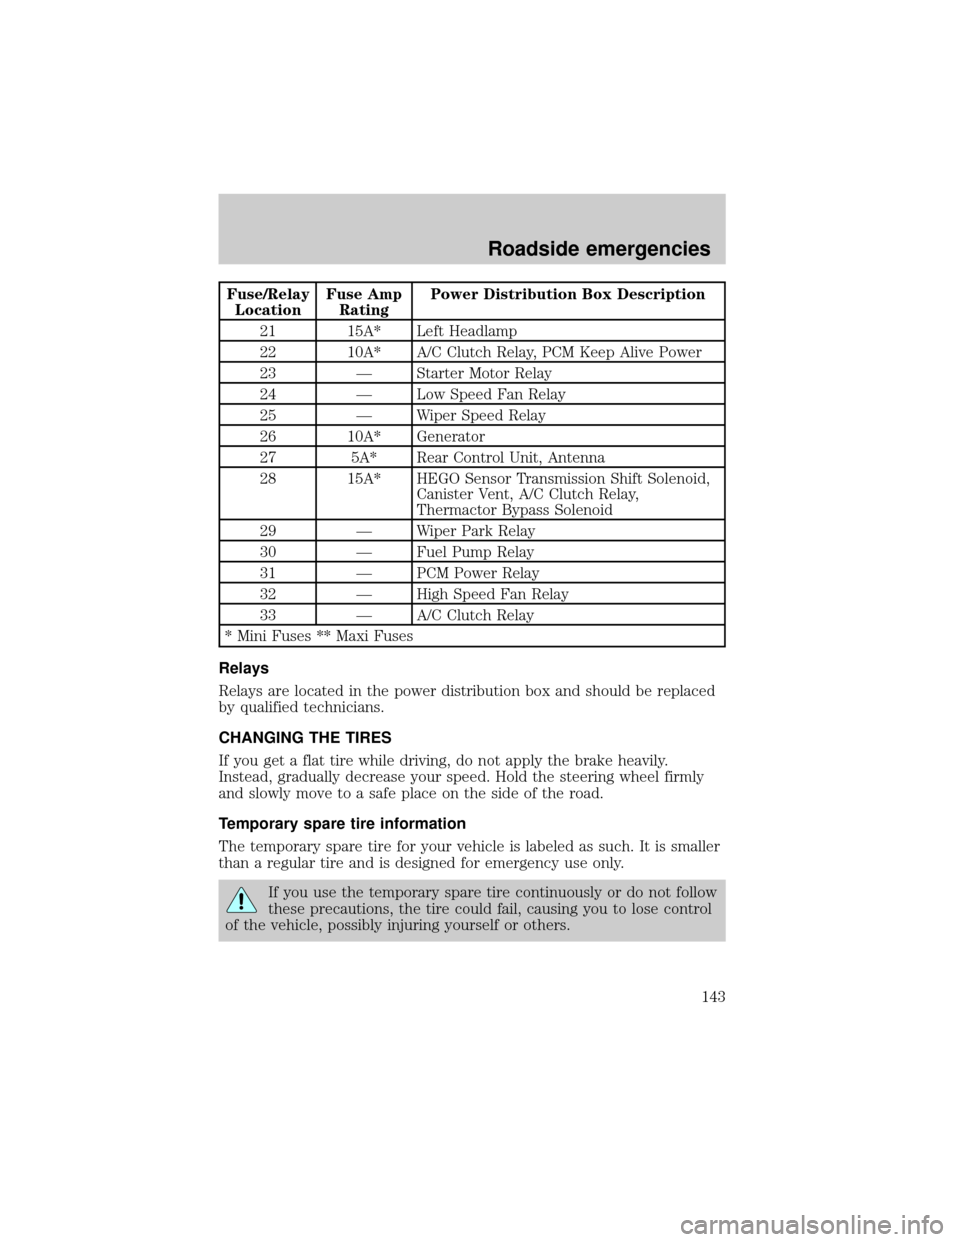
Fuse/Relay
LocationFuse Amp
RatingPower Distribution Box Description
21 15A* Left Headlamp
22 10A* A/C Clutch Relay, PCM Keep Alive Power
23 Ð Starter Motor Relay
24 Ð Low Speed Fan Relay
25 Ð Wiper Speed Relay
26 10A* Generator
27 5A* Rear Control Unit, Antenna
28 15A* HEGO Sensor Transmission Shift Solenoid,
Canister Vent, A/C Clutch Relay,
Thermactor Bypass Solenoid
29 Ð Wiper Park Relay
30 Ð Fuel Pump Relay
31 Ð PCM Power Relay
32 Ð High Speed Fan Relay
33 Ð A/C Clutch Relay
* Mini Fuses ** Maxi Fuses
Relays
Relays are located in the power distribution box and should be replaced
by qualified technicians.
CHANGING THE TIRES
If you get a flat tire while driving, do not apply the brake heavily.
Instead, gradually decrease your speed. Hold the steering wheel firmly
and slowly move to a safe place on the side of the road.
Temporary spare tire information
The temporary spare tire for your vehicle is labeled as such. It is smaller
than a regular tire and is designed for emergency use only.
If you use the temporary spare tire continuously or do not follow
these precautions, the tire could fail, causing you to lose control
of the vehicle, possibly injuring yourself or others.
Roadside emergencies
143
Page 144 of 240

When driving with the temporary spare tiredo not:
²exceed 80 km/h (50 mph) under any circumstances
²load the vehicle beyond maximum vehicle load rating listed on the
Safety Compliance Label
²tow a trailer
²use tire chains
²drive through an automatic car wash, because of the vehicle's reduced
ground clearance
²try to repair the temporary spare tire or remove it from its wheel
²use the wheel for any other type of vehicle
Tire change procedure
1. Park on a level surface, activate hazard flashers and set parking brake.
When one of the front wheels is off the ground, the transaxle
alone will not prevent the vehicle from moving or slipping off the
jack, even if the vehicle is in P (Park).
To prevent the vehicle from moving when you change a tire, be
sure the parking brake is set, then block (in both directions) the
wheel that is diagonally opposite (other side and end of the vehicle) to
the tire being changed.
If the vehicle slips off the jack, you or someone else could be
seriously injured.
2. Place gearshift lever in P (Park),
turn engine OFF, block the
diagonally opposite wheel, then
remove the spare tire, jack and lug
wrench.
Roadside emergencies
144
Page 146 of 240

5. Loosen each wheel lug nut
one-half turn counterclockwise but
do not remove them until the wheel
is raised off the ground.
6. Put the jack in the jack notch
next to the door of the tire you are
changing. Turn the jack handle
clockwise until the wheel is
completely off the ground.
7. Remove the lug nuts with the lug
nut wrench.
8. Replace the flat tire with the spare tire, making sure the valve stem is
facing outward. Reinstall lug nuts until the wheel is snug against the hub.
Do not fully tighten the lug nuts until the wheel has been lowered.
9. Lower the wheel by turning the jack handle counterclockwise.
10. Remove the jack and fully
tighten the lug nuts in the order
shown.
1
4 3
2 5
Roadside emergencies
146
Page 178 of 240

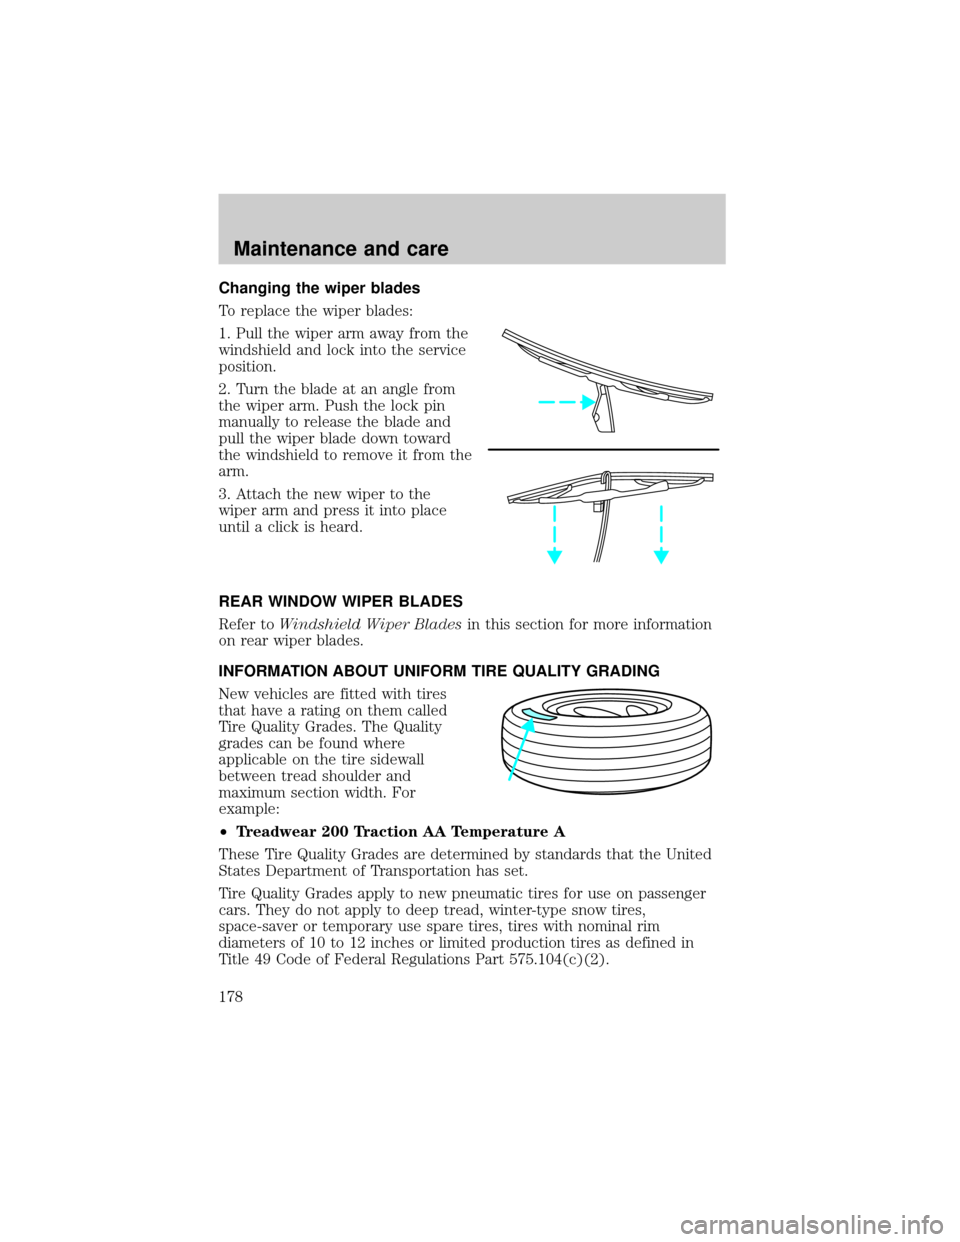
Changing the wiper blades
To replace the wiper blades:
1. Pull the wiper arm away from the
windshield and lock into the service
position.
2. Turn the blade at an angle from
the wiper arm. Push the lock pin
manually to release the blade and
pull the wiper blade down toward
the windshield to remove it from the
arm.
3. Attach the new wiper to the
wiper arm and press it into place
until a click is heard.
REAR WINDOW WIPER BLADES
Refer toWindshield Wiper Bladesin this section for more information
on rear wiper blades.
INFORMATION ABOUT UNIFORM TIRE QUALITY GRADING
New vehicles are fitted with tires
that have a rating on them called
Tire Quality Grades. The Quality
grades can be found where
applicable on the tire sidewall
between tread shoulder and
maximum section width. For
example:
²Treadwear 200 Traction AA Temperature A
These Tire Quality Grades are determined by standards that the United
States Department of Transportation has set.
Tire Quality Grades apply to new pneumatic tires for use on passenger
cars. They do not apply to deep tread, winter-type snow tires,
space-saver or temporary use spare tires, tires with nominal rim
diameters of 10 to 12 inches or limited production tires as defined in
Title 49 Code of Federal Regulations Part 575.104(c)(2).
Maintenance and care
178
Page 239 of 240

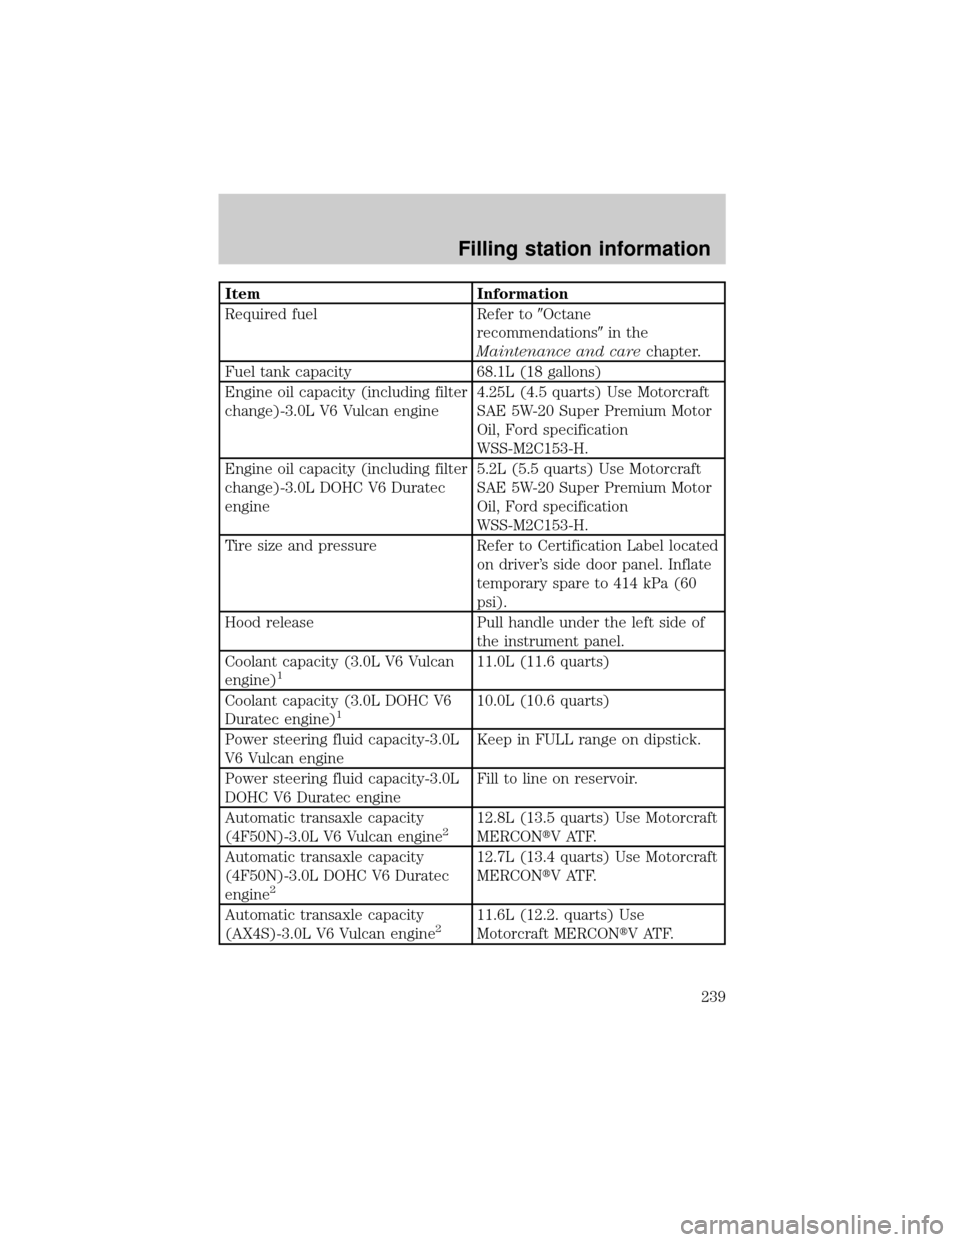
Item Information
Required fuel Refer to9Octane
recommendations9in the
Maintenance and carechapter.
Fuel tank capacity 68.1L (18 gallons)
Engine oil capacity (including filter
change)-3.0L V6 Vulcan engine4.25L (4.5 quarts) Use Motorcraft
SAE 5W-20 Super Premium Motor
Oil, Ford specification
WSS-M2C153-H.
Engine oil capacity (including filter
change)-3.0L DOHC V6 Duratec
engine5.2L (5.5 quarts) Use Motorcraft
SAE 5W-20 Super Premium Motor
Oil, Ford specification
WSS-M2C153-H.
Tire size and pressure Refer to Certification Label located
on driver's side door panel. Inflate
temporary spare to 414 kPa (60
psi).
Hood release Pull handle under the left side of
the instrument panel.
Coolant capacity (3.0L V6 Vulcan
engine)
111.0L (11.6 quarts)
Coolant capacity (3.0L DOHC V6
Duratec engine)
110.0L (10.6 quarts)
Power steering fluid capacity-3.0L
V6 Vulcan engineKeep in FULL range on dipstick.
Power steering fluid capacity-3.0L
DOHC V6 Duratec engineFill to line on reservoir.
Automatic transaxle capacity
(4F50N)-3.0L V6 Vulcan engine
212.8L (13.5 quarts) Use Motorcraft
MERCONtV ATF.
Automatic transaxle capacity
(4F50N)-3.0L DOHC V6 Duratec
engine
2
12.7L (13.4 quarts) Use Motorcraft
MERCONtV ATF.
Automatic transaxle capacity
(AX4S)-3.0L V6 Vulcan engine
211.6L (12.2. quarts) Use
Motorcraft MERCONtV ATF.
Filling station information
239