lock Mercury Sable 2005 s User Guide
[x] Cancel search | Manufacturer: MERCURY, Model Year: 2005, Model line: Sable, Model: Mercury Sable 2005Pages: 248, PDF Size: 2.46 MB
Page 36 of 248

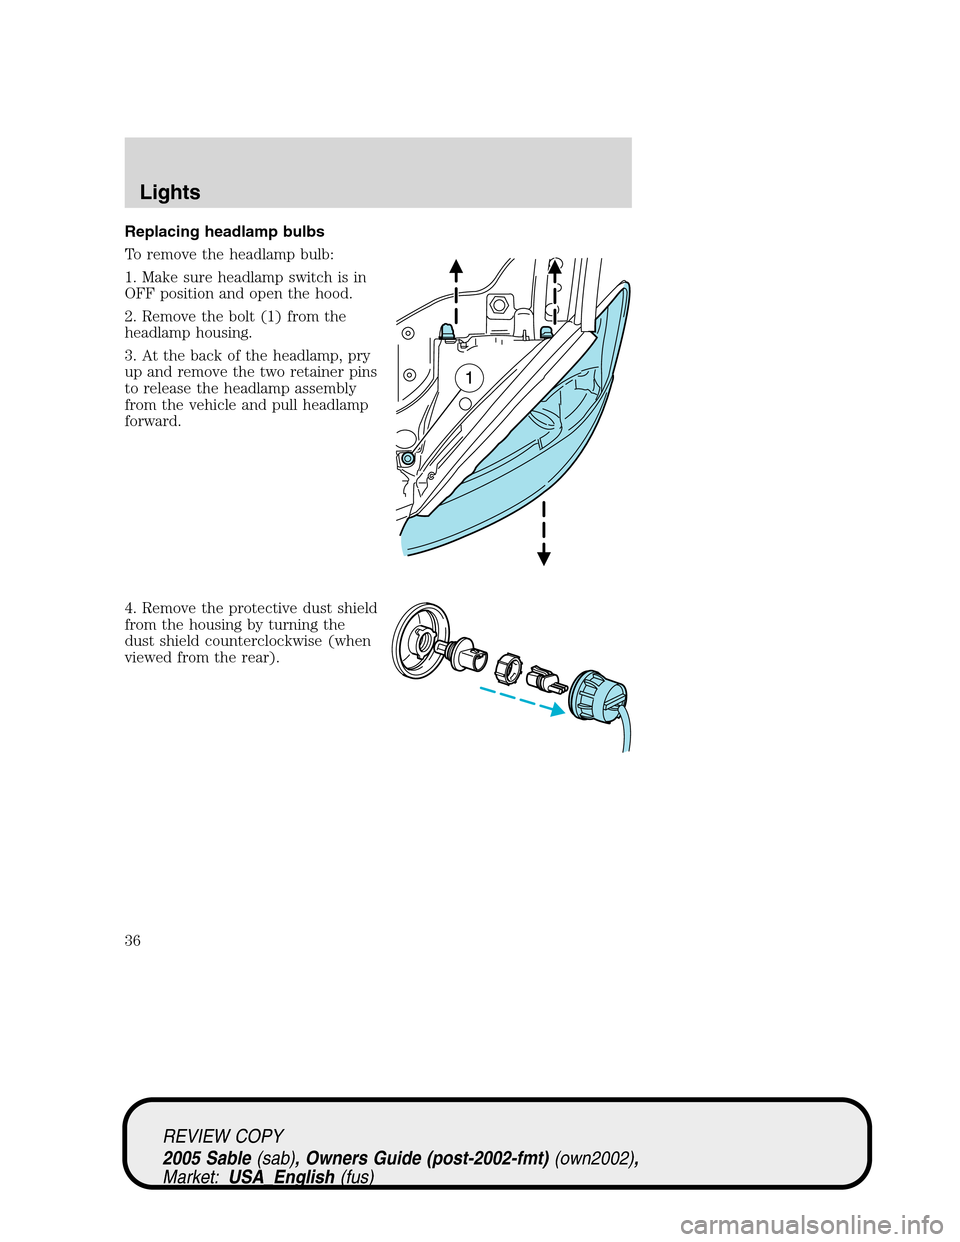
Replacing headlamp bulbs
To remove the headlamp bulb:
1. Make sure headlamp switch is in
OFF position and open the hood.
2. Remove the bolt (1) from the
headlamp housing.
3. At the back of the headlamp, pry
up and remove the two retainer pins
to release the headlamp assembly
from the vehicle and pull headlamp
forward.
4. Remove the protective dust shield
from the housing by turning the
dust shield counterclockwise (when
viewed from the rear).
REVIEW COPY
2005 Sable(sab), Owners Guide (post-2002-fmt)(own2002),
Market:USA_English(fus)
Lights
36
Page 37 of 248

5. Disconnect the electrical
connector from the bulb by pulling
rearward.
6. Remove the bulb retaining ring by
rotating it counterclockwise.
7. Remove the old bulb from the
lamp assembly by pulling it straight
out of the lamp assembly.
To install the new bulb:
Handle a halogen headlamp bulb carefully and keep out of
children’s reach. Grasp the bulb only by its plastic base and do
not touch the glass. The oil from your hand could cause the bulb to
break the next time the headlamps are operated.
1. Install the new bulb in lamp assembly by pushing straight in with the
flat surface of the bulb’s plastic base facing upward. You may need to
turn the bulb slightly to align the grooves in the plastic base with the
tabs in the lamp assembly.
REVIEW COPY
2005 Sable(sab), Owners Guide (post-2002-fmt)(own2002),
Market:USA_English(fus)
Lights
37
Page 38 of 248

2. Install the bulb retaining ring over the plastic base and lock the ring
by rotating clockwise until it snaps into place.
3. Connect the electrical connector to the bulb.
4. Install the protective dust shield and lock the shield by rotating it
clockwise until it locks into position.
5. Carefully position the headlamp assembly onto the vehicle.
6. Hold the headlamp assembly snugly against the vehicle and install the
retainer pins straight down to lock the lamp into place.
7. Before reinstalling the bolt, make sure the retainer pins are fully
seated, and install bolt on headlamp housing.
8. Turn the headlamps on and make sure they work properly. If the
headlamp was correctly aligned before you changed the bulb, you should
not need to align it again.
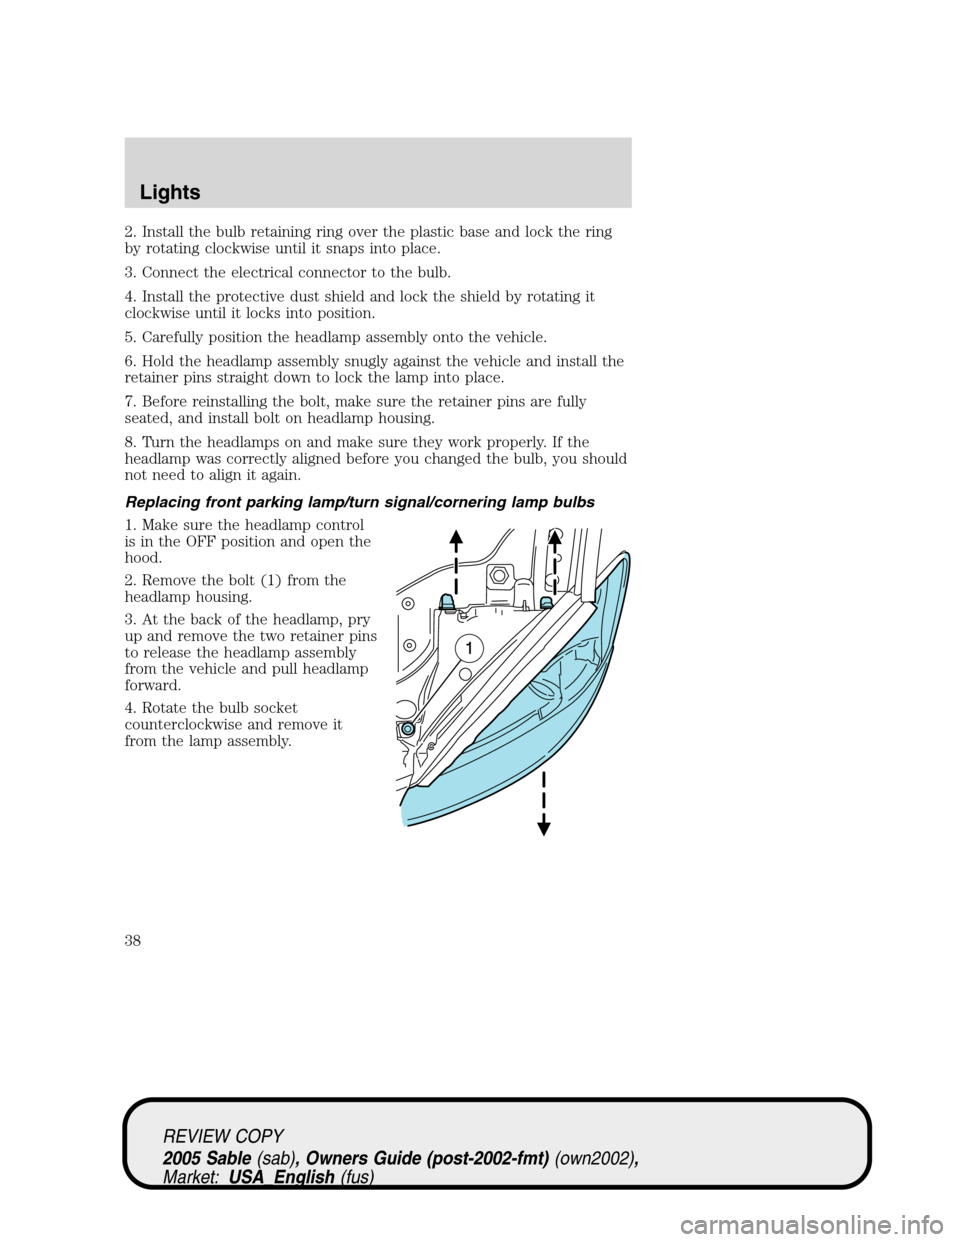
Replacing front parking lamp/turn signal/cornering lamp bulbs
1. Make sure the headlamp control
is in the OFF position and open the
hood.
2. Remove the bolt (1) from the
headlamp housing.
3. At the back of the headlamp, pry
up and remove the two retainer pins
to release the headlamp assembly
from the vehicle and pull headlamp
forward.
4. Rotate the bulb socket
counterclockwise and remove it
from the lamp assembly.
REVIEW COPY
2005 Sable(sab), Owners Guide (post-2002-fmt)(own2002),
Market:USA_English(fus)
Lights
38
Page 39 of 248

5. Carefully pull bulb straight out of
the socket and push in the new
bulb.
6. Install the bulb socket into the
lamp assembly by rotating it
clockwise.
7. Carefully position the headlamp
assembly onto the vehicle.
8. Hold the headlamp assembly snugly against the vehicle and install the
retainer pins straight down to lock the lamp into place.
9. Before reinstalling the bolt, make sure the retainer pins are fully
seated, and install bolt on headlamp housing.
10. Turn the headlamps on and make sure they work properly. If the
headlamp was correctly aligned before you changed the bulb, you should
not need to align it again.
Replacing high-mount brakelamp assembly — Sedan only
To change the high-mount brake
lamp assembly:
1. Pry the light assembly away from
its housing and push rearward to
disengage it from the retaining clips.
2. Lift the front of the light
assembly from the parcel shelf.
3. Disconnect the light assembly
wiring and replace the light
assembly.
REVIEW COPY
2005 Sable(sab), Owners Guide (post-2002-fmt)(own2002),
Market:USA_English(fus)
Lights
39
Page 41 of 248

7. Carefully lift the lamp assembly
away from the liftgate.
8. Remove the bulb socket by
rotating it counterclockwise and
pulling it out from the lamp
assembly.
9. Carefully pull the bulb straight
out of the socket and push in the
new bulb.
10. To complete installation, follow
the removal procedure in reverse order.
Replacing high-mount brakelamp bulbs—Decklid spoiler
Your vehicle may be equipped with a decklid spoiler that has a high
mount stop lamp module containing integral multiple light emitting
diodes (LED). If one or more LEDs burn out, the complete lamp module
has to be replaced. See your dealer for the replacement LED module.
To replace the LED module:
1. Remove the two outboard
grommets from the inside of the
decklid.
2. On the inside of the decklid,
remove the three nuts that hold the
spoiler on and remove the spoiler.
3. On the underside of the spoiler,
remove the two decorative screw
covers (on the LED module).
4. Remove the two screws that are
holding the LED module in place.
5. Remove the wiring harness
grommet and disengage the
electrical connector.
6. Replace the LED module.
7. To complete installation, follow
the removal procedure in reverse order.
REVIEW COPY
2005 Sable(sab), Owners Guide (post-2002-fmt)(own2002),
Market:USA_English(fus)
Lights
41
Page 42 of 248

Replacing license plate lamp bulbs
Wagon
1. Make sure headlamp switch is in
OFF position and remove screw and
the license plate lamp assembly
from liftgate.
2. Remove bulb socket by turning
counterclockwise.
3. Carefully pull the bulb out from
the socket and push in the new
bulb.
4. Install the lamp assembly on
liftgate with screw.
Sedan
1. Make sure headlamp switch is in
OFF position and remove two
screws, grommets and the license
plate lamp assembly from the trunk
lid.
2. Carefully pull the bulb from the
socket and push in the new bulb.
3. Install the lamp assembly on
trunk lid with two grommets,
ensuring the grommets are pushed all the way in to the trunk lid and
secure with two screws.
REVIEW COPY
2005 Sable(sab), Owners Guide (post-2002-fmt)(own2002),
Market:USA_English(fus)
Lights
42
Page 43 of 248

Replacing tail/brake/turn signal/backup lamp bulbs
Sedan
The tail lamp, brake lamp, turn
signal lamp and backup lamp bulbs
are located in the same portion of
the tail lamp assembly. Follow the
same steps to replace either bulb.
1. Make sure headlamp switch is in
OFF position and open trunk and
remove two plastic mushroom nuts,
three push pins and the plastic
cover from inside the trunk to
access the lamp assembly.
2. Carefully pull the carpet away to
expose the lamp assembly hardware.
3. Remove four nut and washer
assemblies and the lamp assembly
from the vehicle.
4. Remove the bulb socket by
rotating it counterclockwise, then
pulling it out of the lamp assembly.
5. Pull the bulb from the socket and
push in the new bulb.
6. Install the bulb socket into the
lamp assembly by rotating it
clockwise.
7. Install the lamp assembly on the vehicle with four nut and washer
assemblies ensuring the washers on the nuts are flush with the body to
prevent water from entering the trunk.
8. Carefully push the carpet back in to place and install the plastic cover
inside the trunk with three push pins and two plastic mushroom nuts.
REVIEW COPY
2005 Sable(sab), Owners Guide (post-2002-fmt)(own2002),
Market:USA_English(fus)
Lights
43
Page 44 of 248

Wagon
The tail lamp/turn lamp/brake
lamp/backup bulbs are located in
the same portion of the tail lamp
assembly, one just below the other.
Follow the same steps to replace
either bulb:
1. Make sure headlamp switch is in
OFF position and open the liftgate
to expose the lamp assemblies.
2. Remove the two bolts from the
tail lamp assembly.
3. Carefully pull the lamp assembly
outwards from the body side panel.
When pulling you will feel a slight
resistance at the forward edge of
the lamp from a hidden snap
attachment holding the lamp to the
body side panel; pull the lamp
outwards firmly to release the attachment.
4. Twist the bulb socket counterclockwise and remove from lamp
assembly.
5. Pull the bulb straight out of the socket and push in the new bulb.
6. Install bulb socket in lamp assembly by turning clockwise.
7. Carefully install the tail lamp assembly on the body side panel and
secure it with two bolts.
REVIEW COPY
2005 Sable(sab), Owners Guide (post-2002-fmt)(own2002),
Market:USA_English(fus)
Lights
44
Page 46 of 248

Press the washer control to activate
the rear washer. The wiper will
come on when the washer control is
pressed, if it is not already on.
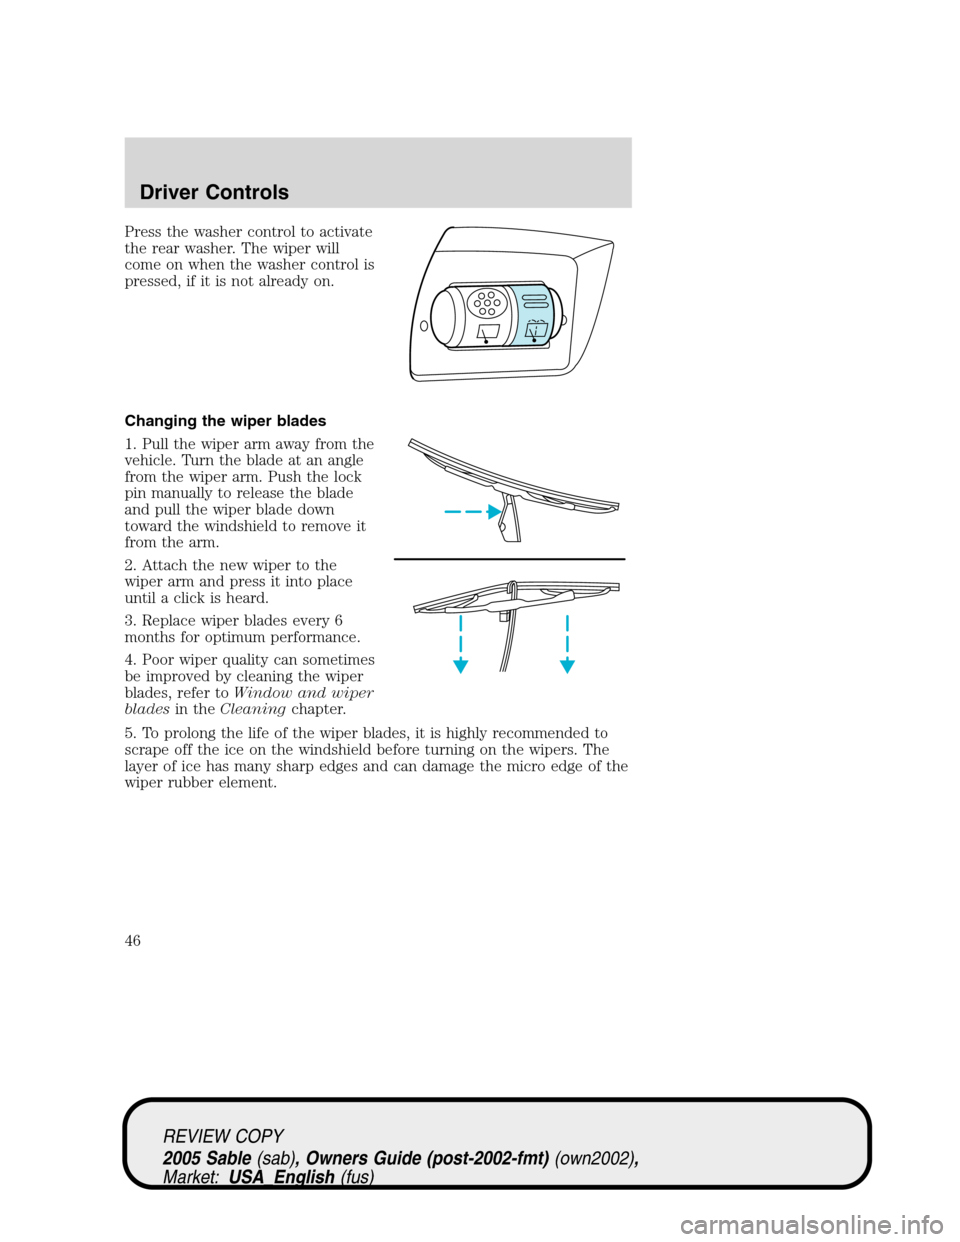
Changing the wiper blades
1. Pull the wiper arm away from the
vehicle. Turn the blade at an angle
from the wiper arm. Push the lock
pin manually to release the blade
and pull the wiper blade down
toward the windshield to remove it
from the arm.
2. Attach the new wiper to the
wiper arm and press it into place
until a click is heard.
3. Replace wiper blades every 6
months for optimum performance.
4. Poor wiper quality can sometimes
be improved by cleaning the wiper
blades, refer toWindow and wiper
bladesin theCleaningchapter.
5. To prolong the life of the wiper blades, it is highly recommended to
scrape off the ice on the windshield before turning on the wipers. The
layer of ice has many sharp edges and can damage the micro edge of the
wiper rubber element.
REVIEW COPY
2005 Sable(sab), Owners Guide (post-2002-fmt)(own2002),
Market:USA_English(fus)
Driver Controls
46
Page 47 of 248

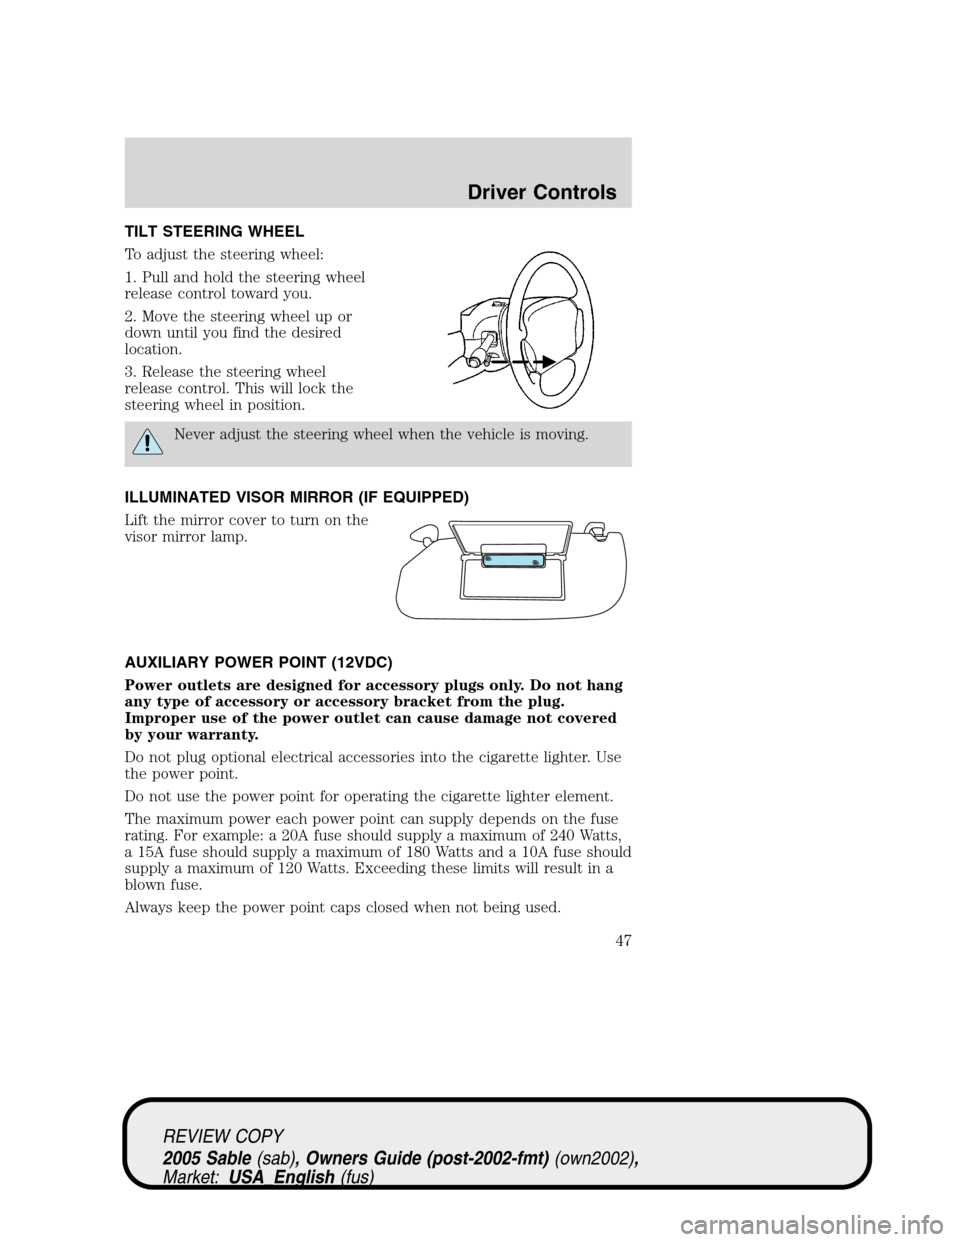
TILT STEERING WHEEL
To adjust the steering wheel:
1. Pull and hold the steering wheel
release control toward you.
2. Move the steering wheel up or
down until you find the desired
location.
3. Release the steering wheel
release control. This will lock the
steering wheel in position.
Never adjust the steering wheel when the vehicle is moving.
ILLUMINATED VISOR MIRROR (IF EQUIPPED)
Lift the mirror cover to turn on the
visor mirror lamp.
AUXILIARY POWER POINT (12VDC)
Power outlets are designed for accessory plugs only. Do not hang
any type of accessory or accessory bracket from the plug.
Improper use of the power outlet can cause damage not covered
by your warranty.
Do not plug optional electrical accessories into the cigarette lighter. Use
the power point.
Do not use the power point for operating the cigarette lighter element.
The maximum power each power point can supply depends on the fuse
rating. For example: a 20A fuse should supply a maximum of 240 Watts,
a 15A fuse should supply a maximum of 180 Watts and a 10A fuse should
supply a maximum of 120 Watts. Exceeding these limits will result in a
blown fuse.
Always keep the power point caps closed when not being used.
REVIEW COPY
2005 Sable(sab), Owners Guide (post-2002-fmt)(own2002),
Market:USA_English(fus)
Driver Controls
47