spare wheel Mercury Sable 2009 s User Guide
[x] Cancel search | Manufacturer: MERCURY, Model Year: 2009, Model line: Sable, Model: Mercury Sable 2009Pages: 310, PDF Size: 2.1 MB
Page 191 of 310

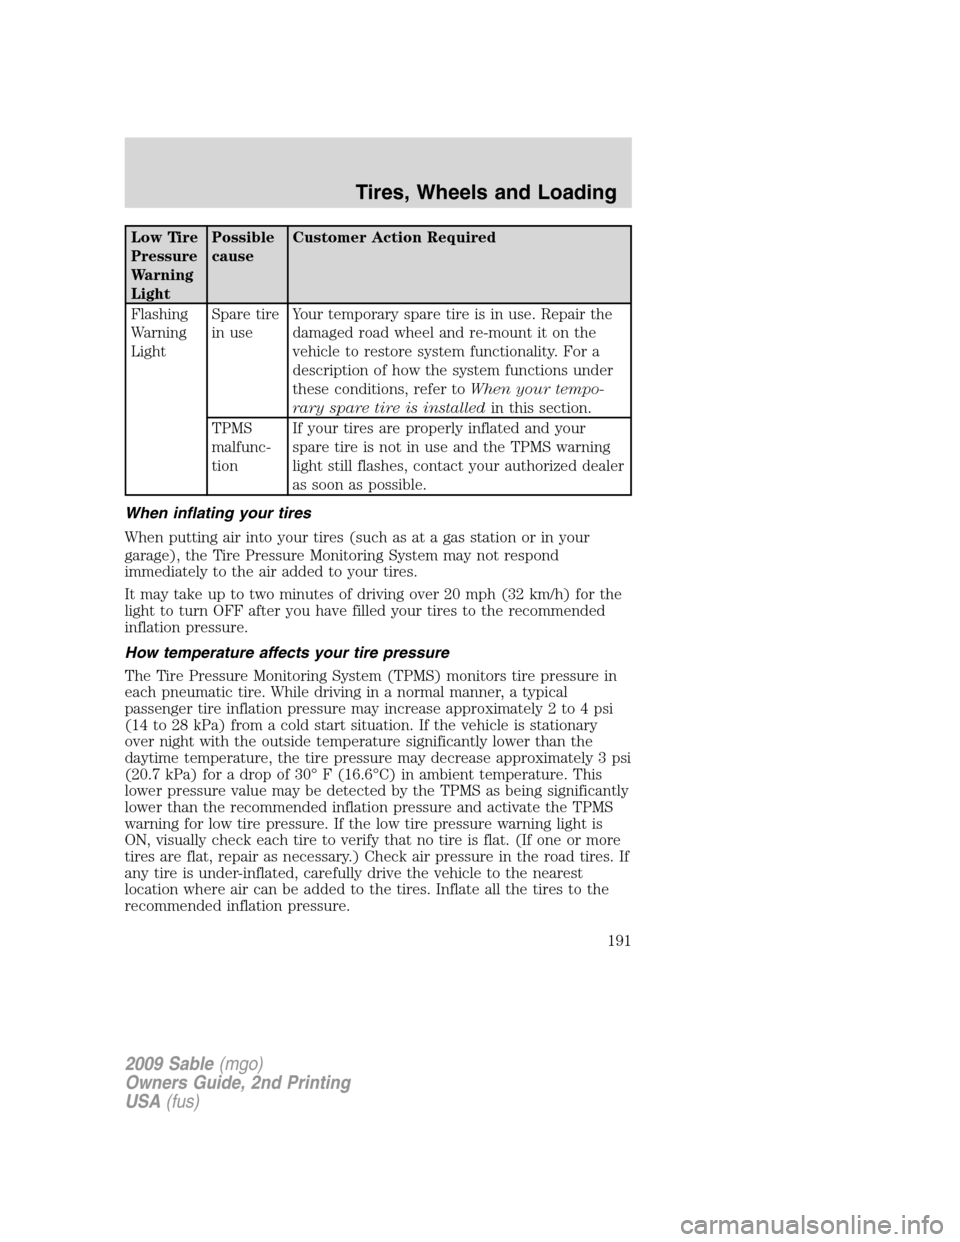
Low Tire
Pressure
Warning
LightPossible
causeCustomer Action Required
Flashing
Warning
LightSpare tire
in useYour temporary spare tire is in use. Repair the
damaged road wheel and re-mount it on the
vehicle to restore system functionality. For a
description of how the system functions under
these conditions, refer toWhen your tempo-
rary spare tire is installedin this section.
TPMS
malfunc-
tionIf your tires are properly inflated and your
spare tire is not in use and the TPMS warning
light still flashes, contact your authorized dealer
as soon as possible.
When inflating your tires
When putting air into your tires (such as at a gas station or in your
garage), the Tire Pressure Monitoring System may not respond
immediately to the air added to your tires.
It may take up to two minutes of driving over 20 mph (32 km/h) for the
light to turn OFF after you have filled your tires to the recommended
inflation pressure.
How temperature affects your tire pressure
The Tire Pressure Monitoring System (TPMS) monitors tire pressure in
each pneumatic tire. While driving in a normal manner, a typical
passenger tire inflation pressure may increase approximately 2 to 4 psi
(14 to 28 kPa) from a cold start situation. If the vehicle is stationary
over night with the outside temperature significantly lower than the
daytime temperature, the tire pressure may decrease approximately 3 psi
(20.7 kPa) for a drop of 30° F (16.6°C) in ambient temperature. This
lower pressure value may be detected by the TPMS as being significantly
lower than the recommended inflation pressure and activate the TPMS
warning for low tire pressure. If the low tire pressure warning light is
ON, visually check each tire to verify that no tire is flat. (If one or more
tires are flat, repair as necessary.) Check air pressure in the road tires. If
any tire is under-inflated, carefully drive the vehicle to the nearest
location where air can be added to the tires. Inflate all the tires to the
recommended inflation pressure.
2009 Sable(mgo)
Owners Guide, 2nd Printing
USA(fus)
Tires, Wheels and Loading
191
Page 221 of 310

ALL WHEEL DRIVE (AWD) SYSTEM (IF EQUIPPED)
Your vehicle may be equipped with a full-time All Wheel Drive (AWD)
system. The AWD system is an active system, meaning it not only
responds to wheel slip between the front and rear axles but also has the
ability to anticipate wheel slip and transfer torque to the rear wheels
before slip occurs. The AWD system is active all the time and requires no
input from the operator.
All components of the AWD system are sealed for life and require no
maintenance.
If your vehicle is equipped with AWD, a spare tire of a different size
other than the tire provided should never be used. A dissimilar spare tire
size (other than the spare tire provided) or major dissimilar tire sizes
between the front and rear axles could cause the AWD system to stop
functioning and default to front wheel drive.
Note:Your AWD vehicle is not intended for off-road use. The AWD
feature gives your vehicle some limited off-road capabilities in which
driving surfaces are relatively level, obstruction-free and otherwise
similar to normal on-road driving conditions. Operating your vehicle
under other than those conditions could subject the vehicle to excessive
stress which might result in damage which is not covered under your
warranty.
Driving on slippery surfaces with AWD vehicles
AWD vehicles are specially equipped for driving on sand, snow, mud and
rough roads and have operating characteristics that are somewhat
different from conventional vehicles, both on and off the highway.
When driving at slow speeds off-highway under high outside
temperatures, use L (Low) gear when possible. L (Low) gear operation
will maximize the engine and transmission cooling capability.
Under severe operating conditions, the A/C may cycle on and off to
protect overheating of the engine.
Basic operating principles
•Drive slower in strong crosswinds which can affect the normal steering
characteristics of your vehicle.
•Be extremely careful when driving on pavement made slippery by
loose sand, water, gravel, snow or ice.
If your vehicle goes off the edge of the pavement
•If your vehicle goes off the edge of the pavement, slow down, but
avoid severe brake application, ease the vehicle back onto the
2009 Sable(mgo)
Owners Guide, 2nd Printing
USA(fus)
Driving
221
Page 231 of 310

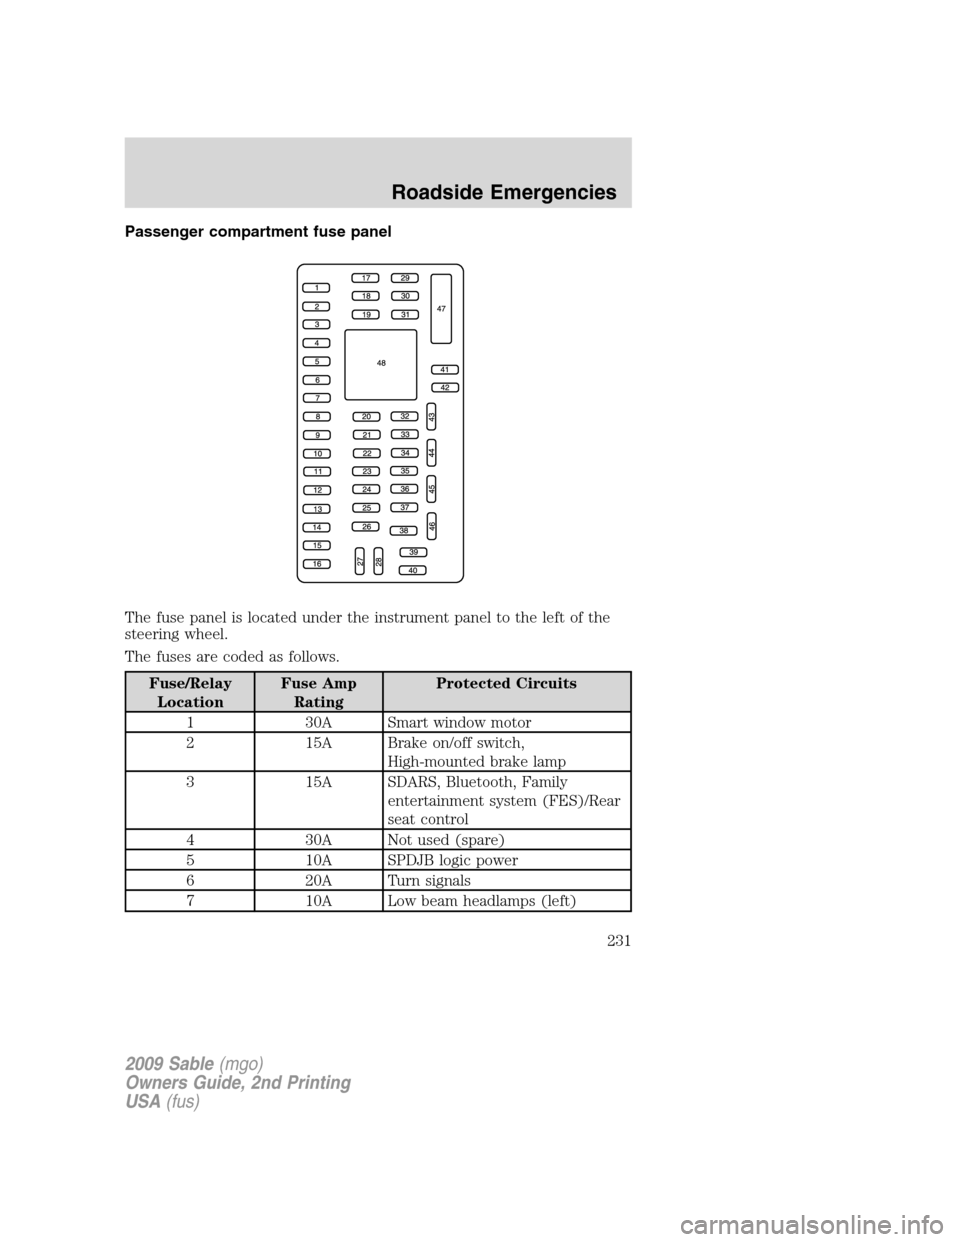
Passenger compartment fuse panel
The fuse panel is located under the instrument panel to the left of the
steering wheel.
The fuses are coded as follows.
Fuse/Relay
LocationFuse Amp
RatingProtected Circuits
1 30A Smart window motor
2 15A Brake on/off switch,
High-mounted brake lamp
3 15A SDARS, Bluetooth, Family
entertainment system (FES)/Rear
seat control
4 30A Not used (spare)
5 10A SPDJB logic power
6 20A Turn signals
7 10A Low beam headlamps (left)
2009 Sable(mgo)
Owners Guide, 2nd Printing
USA(fus)
Roadside Emergencies
231
Page 232 of 310

Fuse/Relay
LocationFuse Amp
RatingProtected Circuits
8 10A Low beam headlamps (right)
9 15A Interior lights, Cargo lamps
10 15A Backlighting, Puddle lamps
11 10A All wheel drive
12 7.5A Memory seat/mirror switches,
Memory module
13 5A FEPS module
14 10A Analog clock
15 10A Climate control
16 15A Not used (spare)
17 20A All power lock motor feeds,
Decklid release
18 20A Not used (spare)
19 25A Moon roof
20 15A OBDII connector
21 15A Fog lamps
22 15A Park lamps, License lamps
23 15A High beam headlamps
24 20A Horn relay
25 10A Demand lamps/Interior lamps
26 10A Instrument panel cluster
27 20A Adjustable pedal switch
28 5A Radio, Radio start signal
29 5A Instrument panel cluster
30 5A Overdrive cancel switch
31 10A Not used (spare)
32 10A Not used (spare)
33 10A Restraint control module
34 5A AWD module
35 10A Steering rotation sensor, FEPS,
Rear park assist, Heated seat
modules
2009 Sable(mgo)
Owners Guide, 2nd Printing
USA(fus)
Roadside Emergencies
232
Page 236 of 310

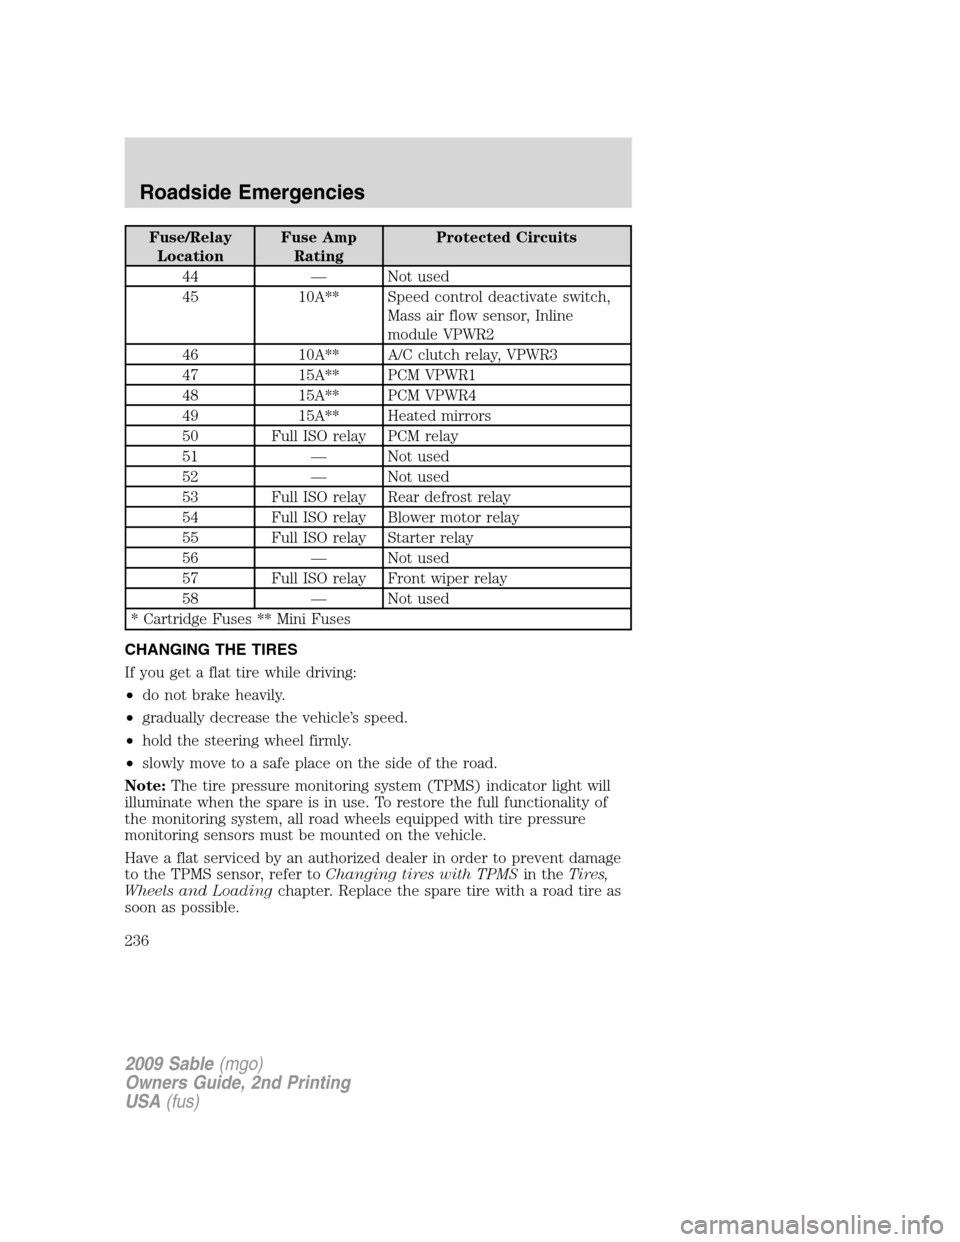
Fuse/Relay
LocationFuse Amp
RatingProtected Circuits
44 — Not used
45 10A** Speed control deactivate switch,
Mass air flow sensor, Inline
module VPWR2
46 10A** A/C clutch relay, VPWR3
47 15A** PCM VPWR1
48 15A** PCM VPWR4
49 15A** Heated mirrors
50 Full ISO relay PCM relay
51 — Not used
52 — Not used
53 Full ISO relay Rear defrost relay
54 Full ISO relay Blower motor relay
55 Full ISO relay Starter relay
56 — Not used
57 Full ISO relay Front wiper relay
58 — Not used
* Cartridge Fuses ** Mini Fuses
CHANGING THE TIRES
If you get a flat tire while driving:
•do not brake heavily.
•gradually decrease the vehicle’s speed.
•hold the steering wheel firmly.
•slowly move to a safe place on the side of the road.
Note:The tire pressure monitoring system (TPMS) indicator light will
illuminate when the spare is in use. To restore the full functionality of
the monitoring system, all road wheels equipped with tire pressure
monitoring sensors must be mounted on the vehicle.
Have a flat serviced by an authorized dealer in order to prevent damage
to the TPMS sensor, refer toChanging tires with TPMSin theTires,
Wheels and Loadingchapter. Replace the spare tire with a road tire as
soon as possible.
2009 Sable(mgo)
Owners Guide, 2nd Printing
USA(fus)
Roadside Emergencies
236
Page 237 of 310

WARNING:The use of tire sealants may damage your Tire
Pressure Monitoring System and should not be used.
WARNING:Refer toTire Pressure Monitoring System (TPMS)
in theTires, Wheels and Loadingchapter for important
information. If the tire pressure monitor sensor becomes damaged, it
will no longer function.
Dissimilar spare tire/wheel information
WARNING:Failure to follow these guidelines could result in an
increased risk of loss of vehicle control, injury or death.
If you have a dissimilar spare tire/wheel, then it is intended for
temporary use only. This means that if you need to use it, you should
replace it as soon as possible with a road tire/wheel that is the same size
and type as the road tires and wheels that were originally provided by
Ford. If the dissimilar spare tire or wheel is damaged, it should be
replaced rather than repaired.
A dissimilar spare tire/wheel is defined as a spare tire and/or wheel that
is different in brand, size or appearance from the road tires and wheels
and can be one of three types:
1.T-type mini-spare:This spare tire begins with the letter “T” for tire
size and may have “Temporary Use Only” molded in the sidewall
2.Full-size dissimilar spare with label on wheel:This spare tire has
a label on the wheel that states: “THIS TIRE AND WHEEL FOR
TEMPORARY USE ONLY”
When driving with one of the dissimilar spare tires listed above,do not:
•Exceed 50 mph (80 km/h)
•Load the vehicle beyond maximum vehicle load rating listed on the
Safety Compliance Label
•Tow a trailer
•Use snow chains on the end of the vehicle with the dissimilar spare
tire
•Use more than one dissimilar spare tire at a time
•Use commercial car washing equipment
•Try to repair the dissimilar spare tire
2009 Sable(mgo)
Owners Guide, 2nd Printing
USA(fus)
Roadside Emergencies
237
Page 238 of 310

Use of one of the dissimilar spare tires listed above at any one wheel
location can lead to impairment of the following:
•Handling, stability and braking performance
•Comfort and noise
•Ground clearance and parking at curbs
•Winter weather driving capability
•Wet weather driving capability
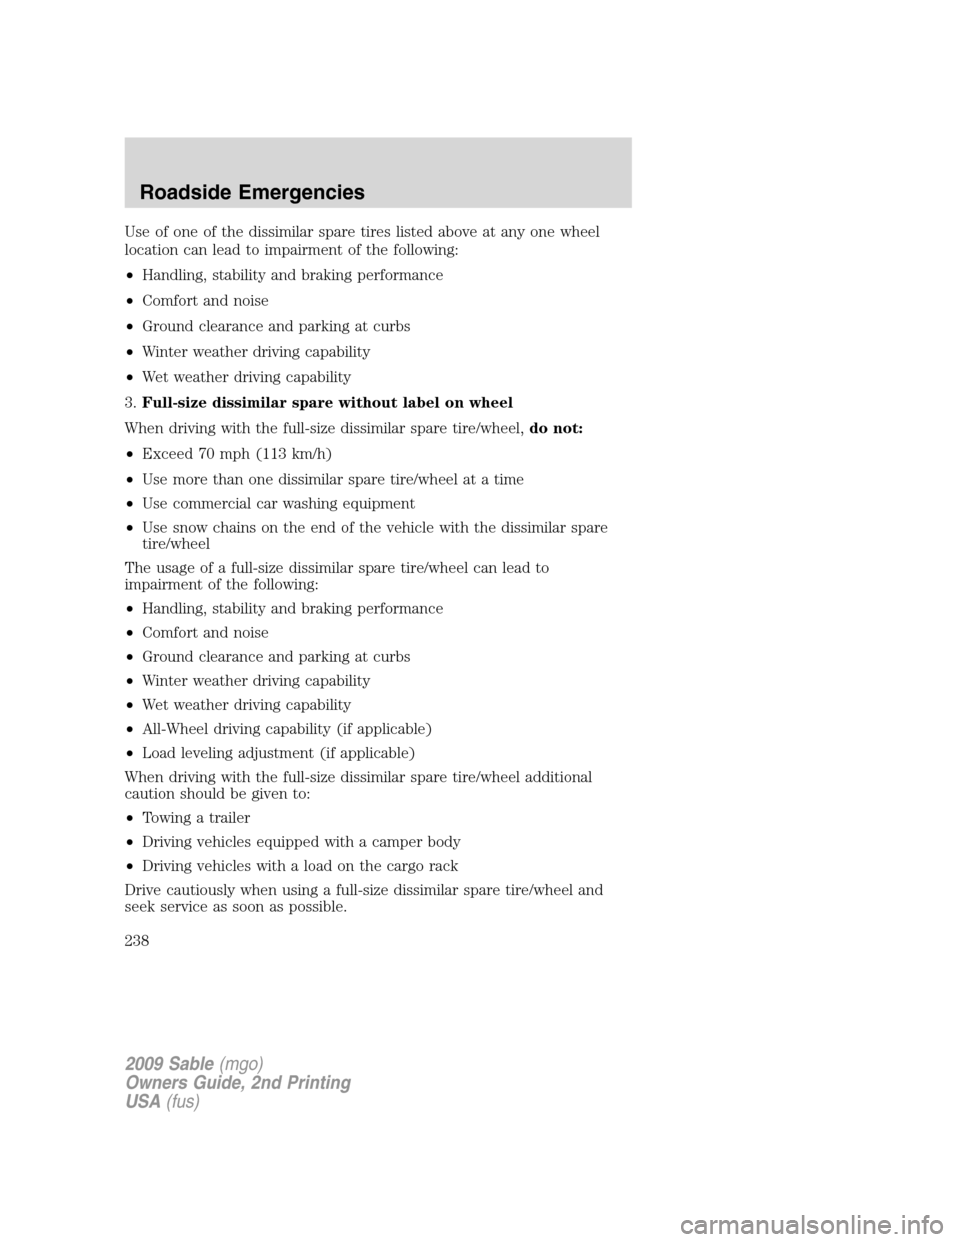
3.Full-size dissimilar spare without label on wheel
When driving with the full-size dissimilar spare tire/wheel,do not:
•Exceed 70 mph (113 km/h)
•Use more than one dissimilar spare tire/wheel at a time
•Use commercial car washing equipment
•Use snow chains on the end of the vehicle with the dissimilar spare
tire/wheel
The usage of a full-size dissimilar spare tire/wheel can lead to
impairment of the following:
•Handling, stability and braking performance
•Comfort and noise
•Ground clearance and parking at curbs
•Winter weather driving capability
•Wet weather driving capability
•All-Wheel driving capability (if applicable)
•Load leveling adjustment (if applicable)
When driving with the full-size dissimilar spare tire/wheel additional
caution should be given to:
•Towing a trailer
•Driving vehicles equipped with a camper body
•Driving vehicles with a load on the cargo rack
Drive cautiously when using a full-size dissimilar spare tire/wheel and
seek service as soon as possible.
2009 Sable(mgo)
Owners Guide, 2nd Printing
USA(fus)
Roadside Emergencies
238
Page 239 of 310

Stopping and securing the vehicle
1. Park on a level surface, set the
parking brake and activate hazard
flashers.
2. Place gearshift lever in P (Park)
and turn engine off.
Removing the spare tire and jack
1. Lift the trunk cargo cover, and
remove the wing nut that secures
the spare tire by turning it
counterclockwise.
2. Lift and remove the spare tire
from the trunk.
3. Remove the second wing nut that
secures the jack retention bracket
by turning it counterclockwise,
remove the jack kit from the
vehicle.
4. Remove the jack and the wrench
from the felt bag. Fold down the
wrench socket to use to loosen the
lug nuts and to operate the jack.
Tire change procedure
WARNING:When one of the front wheels is off the ground, the
transmission alone will not prevent the vehicle from moving or
slipping off the jack, even if the vehicle is in P (Park).
2009 Sable(mgo)
Owners Guide, 2nd Printing
USA(fus)
Roadside Emergencies
239
Page 241 of 310

3. Put the jack in the jack notch
next to the tire you are changing.
Turn the jack handle clockwise until
the wheel is completely off the
ground.
Note: DO NOT LIFT ON THE
PLASTIC MOLDING, as this could
damage the molding. ONLY LIFT ON
THE SHEET METAL NOTCH.
4. Remove the lug nuts with the lug
wrench.
5. Replace the flat tire with the
spare tire, making sure the valve
stem is facing outward. Reinstall the
lug nuts until the wheel is snug
against the hub. Do not fully tighten
the lug nuts until the wheel has been lowered.
6. Lower the wheel by turning the jack handle counterclockwise.
7. Remove the jack and fully tighten
the lug nuts in the order shown.
Refer toWheel lug nut torque
specificationslater in this chapter
for the proper lug nut torque
specification.
8. Install the wheel cover (if
equipped). The wheel cover will
only install if the Ford/Mercury logo
is aligned over the valve stem on the
wheel.
1
4 3
2 5
2009 Sable(mgo)
Owners Guide, 2nd Printing
USA(fus)
Roadside Emergencies
241
Page 243 of 310

If you are stowing the flat tire:
1. Remove the extension bolt from
the exterior pocket of the felt bag.
2. Install the jack as shown in
Step 4 underStowing the tire and
jack.
3. Screw the extension bolt onto the
threaded stud of the jack retention
bracket.
4. With the temporary spare tire on
the vehicle, place the flat tire in the
spare tire well with the wheel facing up.
5. Safely secure the wheel by screwing the large wing nut onto the
extension bolt.
If you are stowing the temporary spare tire,place the tire over the
jack and secure it with the large wing nut.
WHEEL LUG NUT TORQUE SPECIFICATIONS
Retighten the lug nuts to the specified torque at 100 miles (160 km)
after any wheel disturbance (tire rotation, changing a flat tire, wheel
removal, etc.).
Bolt size Wheel lug nut torque*
lb.ft. N•m
1/2-20 UNF 100 135
* Torque specifications are for nut and bolt threads free of dirt and
rust. Use only Ford recommended replacement fasteners.
WARNING:When a wheel is installed, always remove any
corrosion, dirt or foreign materials present on the mounting
surfaces of the wheel or the surface of the wheel hub, brake drum or
brake disc that contacts the wheel. Ensure that any fasteners that
attach the rotor to the hub are secured so they do not interfere with
the mounting surfaces of the wheel. Installing wheels without correct
metal-to-metal contact at the wheel mounting surfaces can cause the
wheel nuts to loosen and the wheel to come off while the vehicle is in
motion, resulting in loss of control.
2009 Sable(mgo)
Owners Guide, 2nd Printing
USA(fus)
Roadside Emergencies
243