warning Mercury Sable 2009 s User Guide
[x] Cancel search | Manufacturer: MERCURY, Model Year: 2009, Model line: Sable, Model: Mercury Sable 2009Pages: 310, PDF Size: 2.1 MB
Page 15 of 310
more information on this system, refer toTire pressure monitoring
system (TPMS)in theTires, Wheels and Loadingchapter.
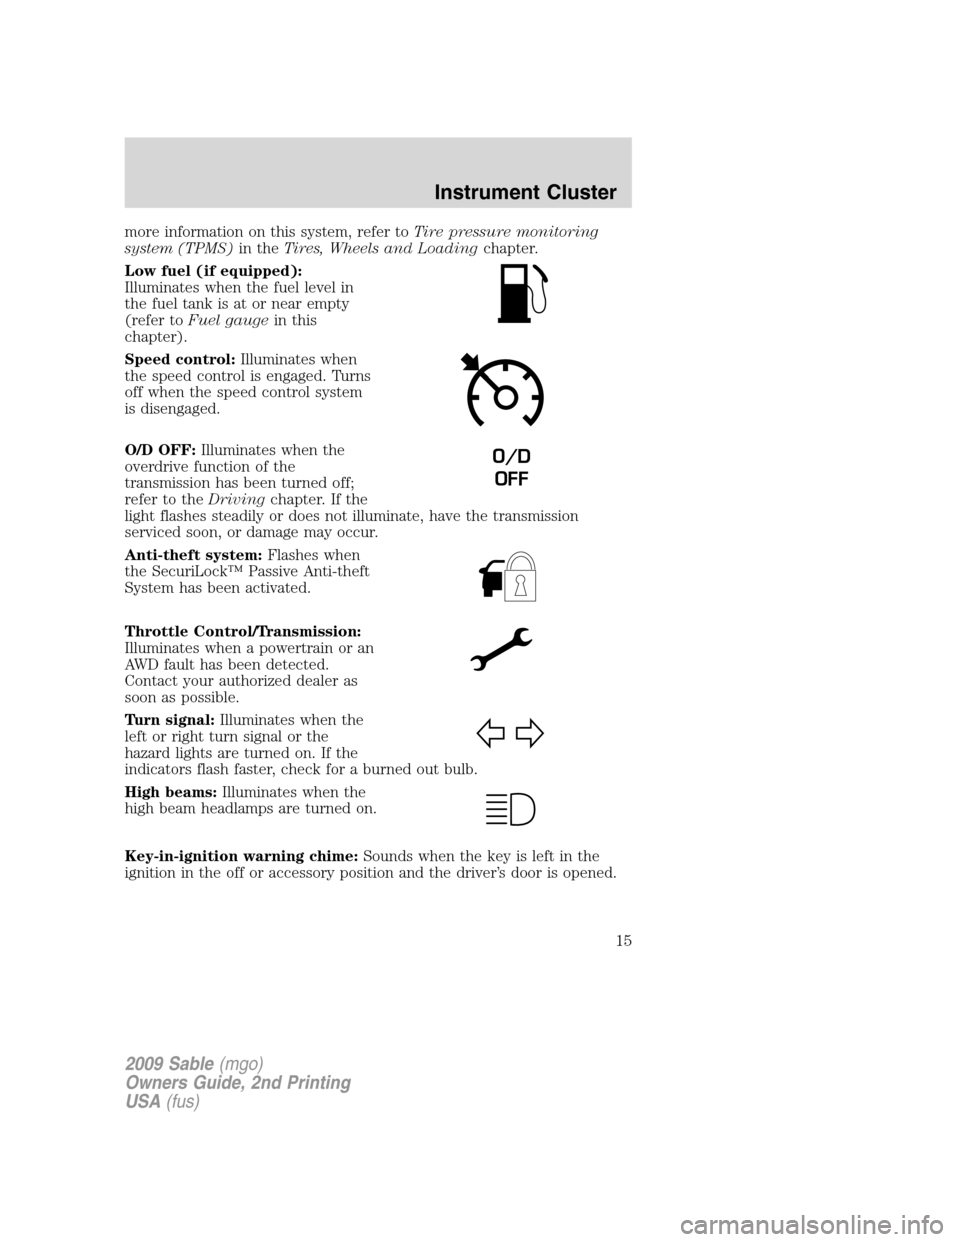
Low fuel (if equipped):
Illuminates when the fuel level in
the fuel tank is at or near empty
(refer toFuel gaugein this
chapter).
Speed control:Illuminates when
the speed control is engaged. Turns
off when the speed control system
is disengaged.
O/D OFF:Illuminates when the
overdrive function of the
transmission has been turned off;
refer to theDrivingchapter. If the
light flashes steadily or does not illuminate, have the transmission
serviced soon, or damage may occur.
Anti-theft system:Flashes when
the SecuriLock™ Passive Anti-theft
System has been activated.
Throttle Control/Transmission:
Illuminates when a powertrain or an
AWD fault has been detected.
Contact your authorized dealer as
soon as possible.
Turn signal:Illuminates when the
left or right turn signal or the
hazard lights are turned on. If the
indicators flash faster, check for a burned out bulb.
High beams:Illuminates when the
high beam headlamps are turned on.
Key-in-ignition warning chime:Sounds when the key is left in the
ignition in the off or accessory position and the driver’s door is opened.
O/D
OFF
2009 Sable(mgo)
Owners Guide, 2nd Printing
USA(fus)
Instrument Cluster
15
Page 16 of 310
Headlamps on warning chime:Sounds when the headlamps or parking
lamps are on, the ignition is off (the key is not in the ignition) and the
driver’s door is opened.
GAUGES
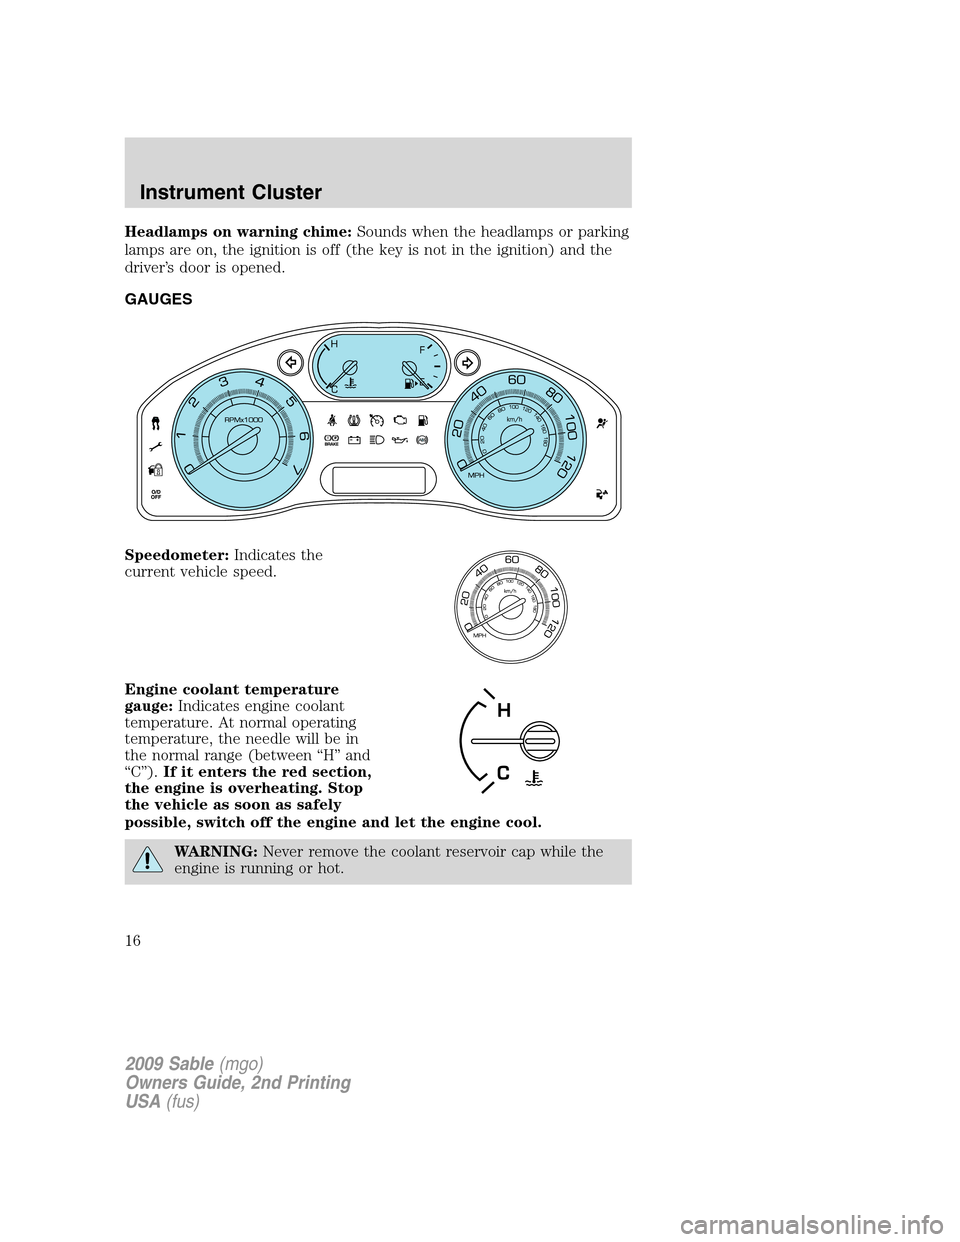
Speedometer:Indicates the
current vehicle speed.
Engine coolant temperature
gauge:Indicates engine coolant
temperature. At normal operating
temperature, the needle will be in
the normal range (between “H” and
“C”).If it enters the red section,
the engine is overheating. Stop
the vehicle as soon as safely
possible, switch off the engine and let the engine cool.
WARNING:Never remove the coolant reservoir cap while the
engine is running or hot.
2009 Sable(mgo)
Owners Guide, 2nd Printing
USA(fus)
Instrument Cluster
16
Page 18 of 310
AUDIO SYSTEMS
Quick start — How to get going
WARNING:Driving while distracted can result in loss of vehicle
control, accident and injury. Ford strongly recommends that
drivers use extreme caution when using any device that may take their
focus off the road. The drivers primary responsibility is the safe
operation of their vehicle. Only use cell phones and other devices not
essential to the driving task when it is safe to do so.
Listening to the radio
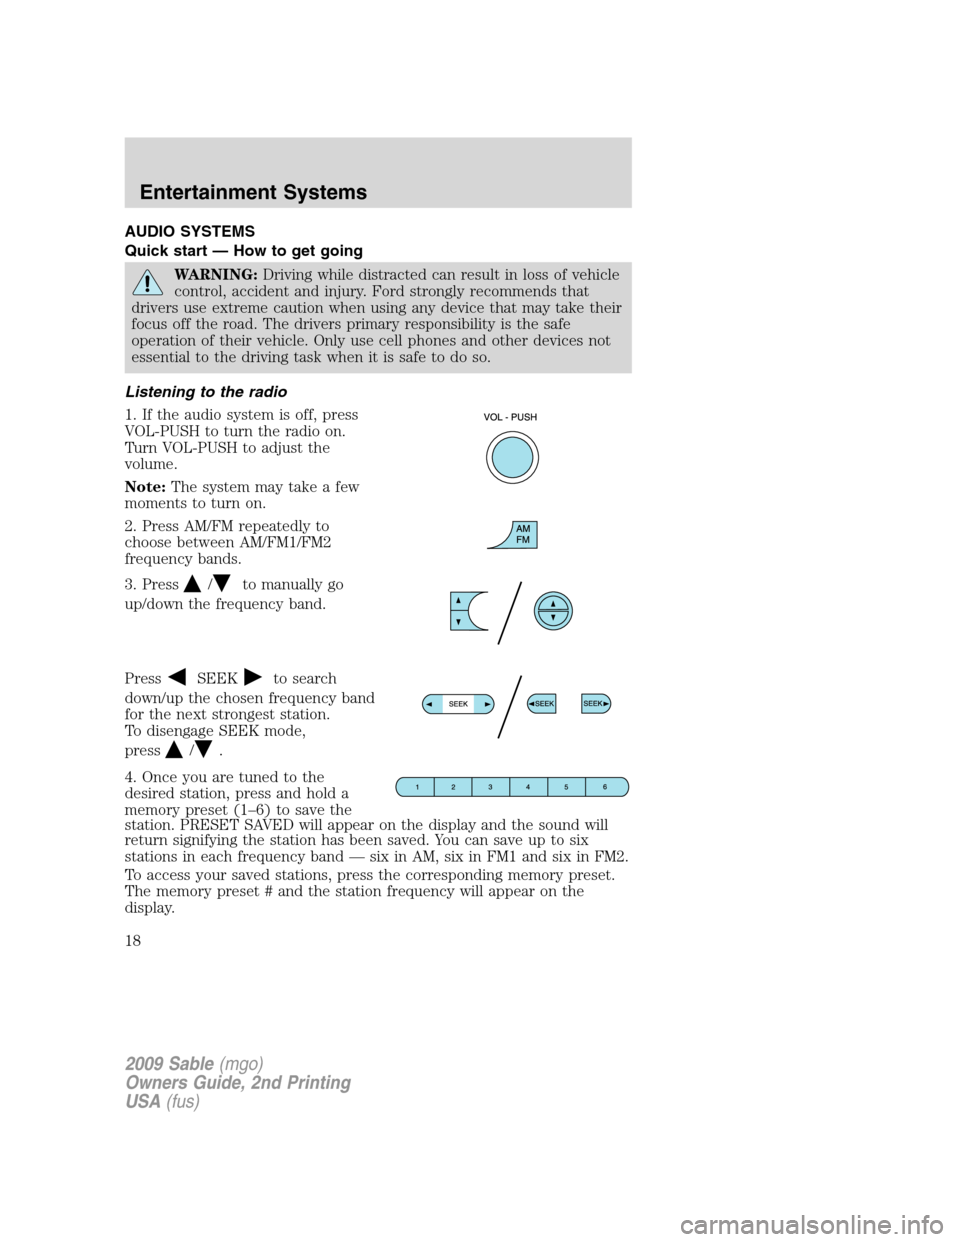
1. If the audio system is off, press
VOL-PUSH to turn the radio on.
Turn VOL-PUSH to adjust the
volume.
Note:The system may take a few
moments to turn on.
2. Press AM/FM repeatedly to
choose between AM/FM1/FM2
frequency bands.
3. Press
/to manually go
up/down the frequency band.
Press
SEEKto search
down/up the chosen frequency band
for the next strongest station.
To disengage SEEK mode,
press
/.
4. Once you are tuned to the
desired station, press and hold a
memory preset (1–6) to save the
station. PRESET SAVED will appear on the display and the sound will
return signifying the station has been saved. You can save up to six
stations in each frequency band — six in AM, six in FM1 and six in FM2.
To access your saved stations, press the corresponding memory preset.
The memory preset # and the station frequency will appear on the
display.
2009 Sable(mgo)
Owners Guide, 2nd Printing
USA(fus)
Entertainment Systems
18
Page 22 of 310
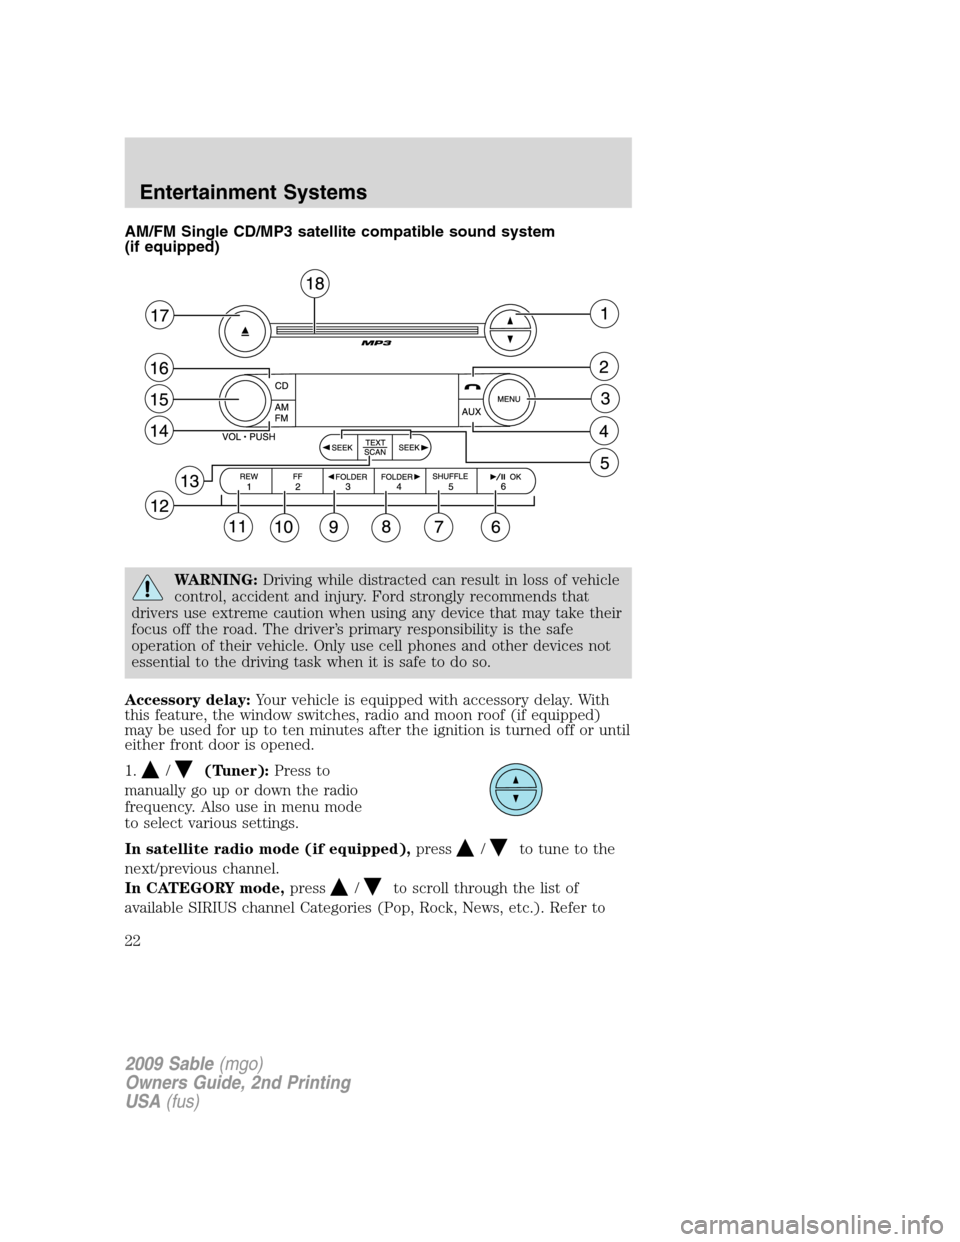
AM/FM Single CD/MP3 satellite compatible sound system
(if equipped)
WARNING:Driving while distracted can result in loss of vehicle
control, accident and injury. Ford strongly recommends that
drivers use extreme caution when using any device that may take their
focus off the road. The driver’s primary responsibility is the safe
operation of their vehicle. Only use cell phones and other devices not
essential to the driving task when it is safe to do so.
Accessory delay:Your vehicle is equipped with accessory delay. With
this feature, the window switches, radio and moon roof (if equipped)
may be used for up to ten minutes after the ignition is turned off or until
either front door is opened.
1.
/(Tuner):Press to
manually go up or down the radio
frequency. Also use in menu mode
to select various settings.
In satellite radio mode (if equipped),press
/to tune to the
next/previous channel.
In CATEGORY mode,press
/to scroll through the list of
available SIRIUS channel Categories (Pop, Rock, News, etc.). Refer to
2009 Sable(mgo)
Owners Guide, 2nd Printing
USA(fus)
Entertainment Systems
22
Page 29 of 310
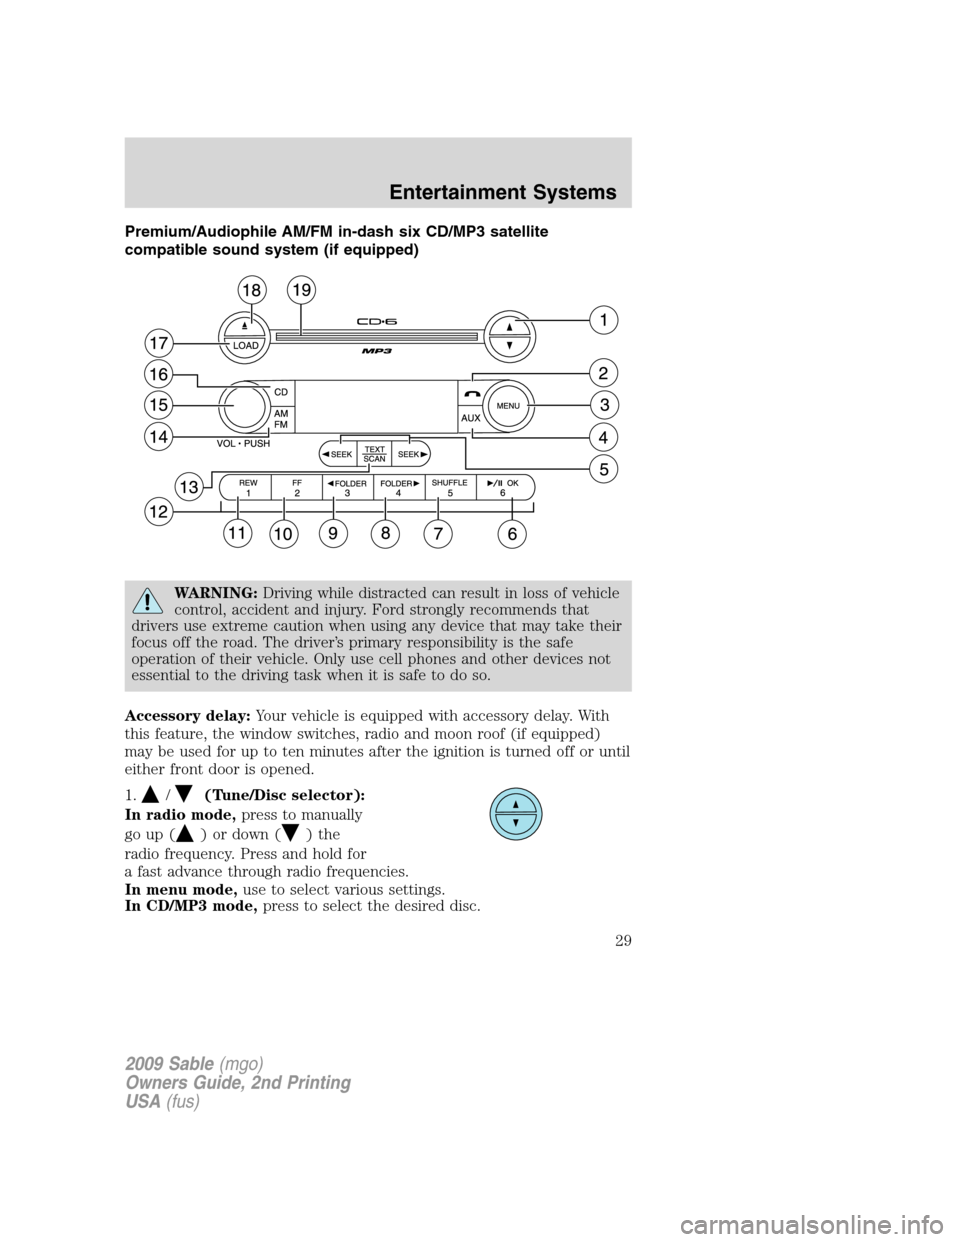
Premium/Audiophile AM/FM in-dash six CD/MP3 satellite
compatible sound system (if equipped)
WARNING:Driving while distracted can result in loss of vehicle
control, accident and injury. Ford strongly recommends that
drivers use extreme caution when using any device that may take their
focus off the road. The driver’s primary responsibility is the safe
operation of their vehicle. Only use cell phones and other devices not
essential to the driving task when it is safe to do so.
Accessory delay:Your vehicle is equipped with accessory delay. With
this feature, the window switches, radio and moon roof (if equipped)
may be used for up to ten minutes after the ignition is turned off or until
either front door is opened.
1.
/(Tune/Disc selector):
In radio mode,press to manually
go up (
) or down ()the
radio frequency. Press and hold for
a fast advance through radio frequencies.
In menu mode,use to select various settings.
In CD/MP3 mode,press to select the desired disc.
2009 Sable(mgo)
Owners Guide, 2nd Printing
USA(fus)
Entertainment Systems
29
Page 36 of 310

If you do not choose a slot within five seconds, the system will choose
for you.
To auto load up to six discs,press and hold LOAD until the display
reads AUTOLOAD#. Load the desired disc, label side up. The system will
prompt you to load discs for the remaining available slots. Insert the
discs, one at a time, label side up, when prompted.
Note:An MP3 disc with folders will show F001 (folder #) T001 (track #)
in the display. An MP3 disc without folders will show T001 (track#) in
the display. Refer toMP3 track and folder structurelater in this
chapter for further information.
18.
(CD eject):To eject a disc
from the system, press
. Select
the correct slot number using
memory presets 1–6. When ready, the system will eject the disc and the
display will read REMOVE CD. If the disc is not removed in 15 seconds,
the system will reload the disc.
If there is only one disc present in the system, press
.
To auto eject up to six CDs,press and hold
until the system
begins ejecting all loaded discs. If the discs are not removed, the system
will reload the discs.
19.CD slot:Insert a CD label side
up.
Auxiliary input jack (Line in)
WARNING:Driving while distracted can result in loss of vehicle
control, accident and injury. Ford strongly recommends that
drivers use extreme caution when using any device that may take their
focus off the road. The driver’s primary responsibility is the safe
operation of their vehicle. Only use cell phones and other devices not
essential to the driving task when it is safe to do so.
2009 Sable(mgo)
Owners Guide, 2nd Printing
USA(fus)
Entertainment Systems
36
Page 38 of 310

Troubleshooting:
1. Do not connect the audio input jack to a line level output. Line level
outputs are intended for connection to a home stereo and are not
compatible with the AIJ. The AIJ will only work correctly with devices
that have a headphone output with a volume control.
2. Do not set the portable music player’s volume level higher than is
necessary to match the volume of the CD or FM radio in your audio
system as this will cause distortion and will reduce sound quality. Many
portable music players have different output levels, so not all players
should be set at the same levels. Some players will sound best at full
volume and others will need to be set at a lower volume.
3. If the music sounds distorted at lower listening levels, turn the
portable music player volume down. If the problems persists, replace or
recharge the batteries in the portable music player.
4. The portable music player must be controlled in the same manner
when it is used with headphones as the AIJ does not provide control
(play, pause, etc.) over the attached portable music player.
5. For safety reasons, connecting or adjusting the settings on your
portable music player should not be attempted while the vehicle is
moving. Also, the portable music player should be stored in a secure
location, such as the center console or the glove box, when the vehicle is
in motion. The audio extension cable must be long enough to allow the
portable music player to be safely stored while the vehicle is in motion.
USB port (if equipped)
WARNING:Driving while distracted can result in loss of vehicle
control, accident and injury. Ford strongly recommends that
drivers use extreme caution when using any device that may take their
focus off the road. The driver’s primary responsibility is the safe
operation of their vehicle. Only use cell phones and other devices not
essential to the driving task when it is safe to do so.
2009 Sable(mgo)
Owners Guide, 2nd Printing
USA(fus)
Entertainment Systems
38
Page 56 of 310

Flash to pass
Pull toward you to activate and
release to deactivate.
Daytime running lamps (DRL) (if equipped)
Turns the headlamps on with a reduced output.
To activate:
•the ignition must be in the on position,
•the headlamp control is in the off, autolamps or parking lamp position
and
•the transmission must be out of the P (Park) position.
WARNING:Always remember to turn on your headlamps at
dusk or during inclement weather. The Daytime Running Lamp
(DRL) system does not activate the tail lamps and generally may not
provide adequate lighting during these conditions. Failure to activate
your headlamps under these conditions may result in a collision.
PANEL DIMMER CONTROL
Use to adjust the brightness of the
instrument panel and all applicable
switches in the vehicle during
headlamp and parking lamp
operation.
Move the control to the full upright
position, past detent, to turn on the
interior lamps. Move the control to
the full downward position, past
detent, to turn off the interior lights.
The instrument panel/switch lighting
remains lit.
Note:If the battery is disconnected, discharged, or a new battery is
installed, the dimmer switch requires re-calibration. Rotate the dimmer
2009 Sable(mgo)
Owners Guide, 2nd Printing
USA(fus)
Lights
56
Page 61 of 310

3. Locate the outboard (low beam)
or inboard (high beam) electrical
connector and remove it by
releasing the locking tab and pulling
it straight down.
4. Remove the bulb socket by
turning it counterclockwise and
pulling it straight out.
WARNING:Handle a halogen headlamp bulb carefully and keep
out of children’s reach. Grasp the bulb only by its plastic base
and do not touch the glass. The oil from your hand could cause the
bulb to break the next time the headlamps are operated.
Install the new bulb(s) in reverse order.
Replacing front parking lamp/turn signal bulbs
1. Make sure the headlamp switch is in the off position, then open the
hood.
2. Reach in behind the headlamp assembly to access the bulb sockets
and connectors.
3. Locate the electrical connector
and remove it by releasing the
locking tab and pulling it straight
down.
4. Remove the bulb socket by
turning it counterclockwise and
pulling it straight out.
5. To remove the bulb, pull it
straight out of the bulb socket.
Install the new bulb(s) in reverse order.
2009 Sable(mgo)
Owners Guide, 2nd Printing
USA(fus)
Lights
61
Page 66 of 310

TILT STEERING WHEEL
To adjust the steering wheel:
1. Pull down and hold the steering
wheel release control.
2. Move the steering wheel up or
down until you find the desired
location.
3. Pull the steering wheel release
control up. This will lock the
steering wheel in position.
WARNING:Never adjust the steering wheel when the vehicle is
moving.
ILLUMINATED VISOR MIRROR
Lift the mirror cover to turn on the
visor mirror lamp.
Slide on rod feature
The visor will slide back and forth
on the rod for increased sunlight
coverage. Rotate the visor towards
the side window and extend it
rearward for additional sunlight
coverage.
Note:To stow the visor back into
the headliner, visor must be
retracted before moving it back
towards the windshield.
2009 Sable(mgo)
Owners Guide, 2nd Printing
USA(fus)
Driver Controls
66