service indicator Mercury Villager 2001 Owner's Manuals
[x] Cancel search | Manufacturer: MERCURY, Model Year: 2001, Model line: Villager, Model: Mercury Villager 2001Pages: 256, PDF Size: 2.35 MB
Page 6 of 256

OFFAUTO
1
AUTO
2
PUSH INTERIOR
CANCELRES
ACCEL
COAST
SETVOL
NEXT
VOL
DIM
km/h1020304050
60
70
80
90
100MPHTRIP A
RPM x 100020406080
100
120
140
1600 1234
5
6
7
8F
H
CE
SERVICE
ENGINE
SOON
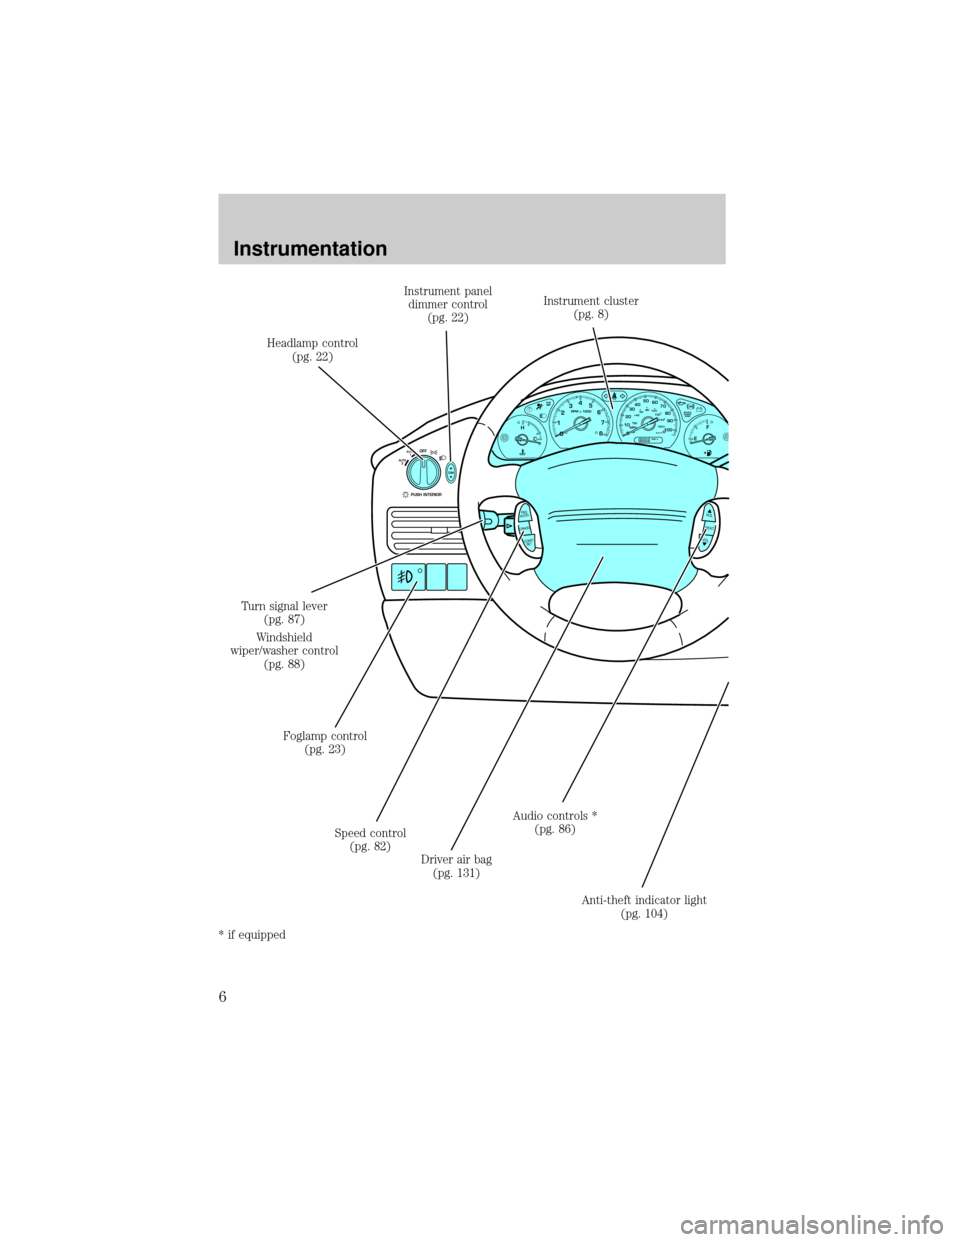
Headlamp control
(pg. 22)Instrument panel
dimmer control
(pg. 22)Instrument cluster
(pg. 8)
Anti-theft indicator light
(pg. 104) Audio controls *
(pg. 86)
Driver air bag
(pg. 131) Speed control
(pg. 82) Foglamp control
(pg. 23) Turn signal lever
(pg. 87)
Windshield
wiper/washer control
(pg. 88)
* if equipped
Instrumentation
6
Page 12 of 256

TheService Engine Soonindicator light illuminates when the ignition is
first turned to the ON position to check the bulb. If it comes on after the
engine is started, one of the engine's emission control systems may be
malfunctioning. The light may illuminate without a driveability concern
being noted. The vehicle will usually be drivable and will not require
towing.
What you should do if the Service Engine Soon light illuminates
Light turns on solid:
This means that the OBD II system has detected a malfunction.
Temporary malfunctions may cause yourService Engine Soonlight to
illuminate. Examples are:
1. The vehicle has run out of fuel. (The engine may misfire or run
poorly.)
2. Poor fuel quality or water in the fuel.
3. The fuel cap may not have been properly installed and securely
tightened.
These temporary malfunctions can be corrected by filling the fuel tank
with high quality fuel of the recommended octane and/or properly
installing and securely tightening the gas cap. After three driving cycles
without these or any other temporary malfunctions present, theService
Engine Soonlight should turn off. (A driving cycle consists of a cold
engine startup followed by mixed city/highway driving.) No additional
vehicle service is required.
If theService Engine Soonlight remains on, have your vehicle serviced
at the first available opportunity.
Light is blinking:
Engine misfire is occurring which could damage your catalytic converter.
You should drive in a moderate fashion (avoid heavy acceleration and
deceleration) and have your vehicle serviced at the first available
opportunity.
Under engine misfire conditions, excessive exhaust temperatures
could damage the catalytic converter, the fuel system, interior
floor coverings or other vehicle components, possibly causing a fire.
Instrumentation
12
Page 190 of 256

²If the oil level is below the L
mark, add enough oil to raise the
level within the L and H range.
²Oil levels above the H mark may cause engine damage. Some oil must
be removed from the engine by a service technician.
7. Put the indicator back in and ensure it is fully seated.
Adding engine oil
1. Check the engine oil. For instructions, refer toChecking the engine
oilin this chapter.
2. If the engine oil level is not within the normal range, add only certified
engine oil of the recommended viscosity. Remove the engine oil filler cap
and use a funnel to pour the engine oil into the opening.
3. Recheck the engine oil level. Make sure the oil level is not above the H
mark on the engine oil level indicator (dipstick).
4. Install the indicator and ensure it is fully seated.
5. Fully install the engine oil filler cap by turning the filler cap clockwise
until three clicks can be heard.
To avoid possible oil loss, DO NOT operate the vehicle with the
engine oil level indicator and/or the engine oil filler cap removed.
Maintenance and care
190
Page 201 of 256

4. Install a new air filter element. Be
careful not to crimp the filter
element edges between the air filter
housing and cover. This could cause
filter damage and allow unmetered
air to enter the engine if not
properly seated.
5. Replace the air filter housing
cover and secure the four clamps.
BATTERY
Your vehicle is equipped with a
maintenance-free battery which
normally does not require additional
water during its life of service.
However, for severe usage or in high temperature climates, check the
battery electrolyte level. Refer to the scheduled maintenance guide for
the service interval schedules.
Keep the electrolyte level in each cell up to the ªlevel indicatorº.
Do not overfill the battery cells.
If the electrolyte level in the battery is low, you can add plain tap water
to the battery, as long as you do not use hard water (water with a high
mineral or alkali content). If possible, however, try to only fill the battery
cells with distilled water. If the battery needs water often, have the
charging system checked.
If your battery has a cover/shield, make sure it is reinstalled
after the battery has been cleaned or replaced.
For longer, trouble-free operation, keep the top of the battery clean and
dry. Also, make certain the battery cables are always tightly fastened to
the battery terminals.
Maintenance and care
201
Page 214 of 256

2. Carefully turn the filler cap counterclockwise 1/4 of a turn until it
stops.
3. Pull to remove the cap from the fuel filler pipe.
4. To install the cap, align the tabs on the cap with the notches on the
filler pipe.
5. Turn the filler cap clockwise 1/4 of a turn until it stops.
If the ªService Engine Soonº indicator comes on and stays on when you
start the engine, the fuel filler cap may not be properly installed. Turn
off the engine, remove the cap, align the cap properly and reinstall it.
If you must replace the fuel filler cap, replace it with a fuel filler
cap that is designed for your vehicle. The customer warranty may
be void for any damage to the fuel tank or fuel system if the
correct genuine Ford or Motorcraft fuel filler cap is not used.
The fuel system may be under pressure. If the fuel filler cap is
venting vapor or if you hear a hissing sound, wait until it stops
before completely removing the fuel filler cap. Otherwise, fuel may
spray out and injure you or others.
If you do not use the proper fuel filler cap, excessive pressure or
vacuum in the fuel tank may damage the fuel system or cause
the fuel cap to disengage in a collision, which may result in possible
personal injury.
Choosing the right fuel
Use only UNLEADED FUEL. The use of leaded fuel is prohibited by law
and could damage your vehicle.
Do not use fuel containing methanol. It can damage critical fuel system
components.
Your vehicle was not designed to use fuel or fuel additives with metallic
compounds, including manganese-based compounds containing MMT.
Repairs to correct the effects of using a fuel for which your vehicle was
not designed may not be covered by your warranty.
Maintenance and care
214
Page 216 of 256

Running out of fuel
Avoid running out of fuel because this situation may have an adverse
affect on powertrain components.
If you have run out of fuel:
²You may need to cycle the ignition from OFF to ON several times after
refueling, to allow the fuel system to pump the fuel from the tank to
the engine.
²Your ªService Engine Soonº indicator may come on. For more
information on the ªService Engine Soonº indicator, refer to the
Instrumentationchapter.
Fuel Filter
For fuel filter replacement, see your dealer or a qualified service
technician. Refer to the scheduled maintenance guide for the appropriate
intervals for changing the fuel filter.
Replace the fuel filter with an authorized Motorcraft part. The
customer warranty may be void for any damage to the fuel system
if an authorized Motorcraft fuel filter is not used.
ESSENTIALS OF GOOD FUEL ECONOMY
Measuring techniques
Your best source of information about actual fuel economy is you, the
driver. You must gather information as accurately and consistently as
possible. Fuel expense, frequency of fillups or fuel gauge readings are
NOT accurate as a measure of fuel economy. We do not recommend
taking fuel economy measurements during the first 1 600 km (1 000
miles) of driving (engine break-in period). You will get a more accurate
measurement after 3 000 km±5 000 km (2 000 miles-3 000 miles).
Filling the tank
The advertised fuel capacity of the fuel tank on your vehicle is equal to
the rated refill capacity of the fuel tank as listed in theRefill Capacities
section of theCapacities and specificationschapter.
The advertised capacity is the amount of the indicated capacity and the
empty reserve combined. Indicated capacity is the difference in the
amount of fuel in a full tank and a tank when the fuel gauge indicates
empty. Empty reserve is the small amount of fuel remaining in the fuel
tank after the fuel gauge indicates empty.
Maintenance and care
216
Page 221 of 256

If the vehicle's powertrain system or its battery has just been serviced,
the on-board diagnostics system is reset to a ªnot ready for I/M testº
condition. To ready the on-board diagnostics system for I/M testing,
follow the procedure described below:
1. Allow the engine to cool to ambient temperature (the engine coolant
temperature gauge indicator will point to C).
2. Start the engine and let it run until it reaches normal operating
temperature (the engine coolant temperature gauge indicator will be
near the center of the normal area between H and C).
3. Accelerate the vehicle to 88 km/h (55 mph), then quickly release the
accelerator pedal completely for at least six seconds.
4. Quickly depress the accelerator pedal for a moment, then drive the
vehicle at a speed of 86 to 96 km/h (53 to 60 mph) for at least five
minutes.
5. Bring the vehicle to a complete stop.
6. Accelerate the vehicle to 55 km/h (35 mph), and maintain the speed
for 20 seconds.
7. Repeat steps five and six at least three times.
8. Accelerate the vehicle to 88 km/h (55 mph), and maintain the speed
for at least three minutes.
9. Bring the vehicle to a complete stop and turn the engine off.
10. Repeat steps one through nine at least one more time.
If step one through eight are interrupted, repeat the preceding step. Any
safe driving mode is acceptable between steps. Once started, do not turn
off the engine until step seven is completed.
BULBS
Replacing exterior bulbs
It is a good idea to check the operation of the following lights frequently:
²Headlamps
²Turn signals
²Cornering lamps
²High-mount brakelamp
²Tail lamps
Maintenance and care
221
Page 253 of 256

Heating ........................................24
heating and air
conditioning system .................24
HomeLink universal
transceiver (see
Garage door opener) ............94±97
Hood ..........................................187
I
Ignition .................................82, 234
Infant seats
(see Safety seats) .....................137
Inspection/maintenance
(I/M) testing ..............................220
Instrument panel
cleaning ...................................230
cluster ..................................8, 230
lighting up panel
and interior ...............................22
location of components ..............8
J
Jack ............................................175
positioning ...............................175
storage .....................................175
Jump-starting your vehicle ......179
K
Keys
key in ignition chime ...............13
positions of the ignition ...........82
L
Lamps
autolamp system .......................23bulb replacement
specifications chart ................225
cargo lamps ...............................22
fog lamps ...................................23
headlamps .................................22
headlamps, flash to pass ..........22
instrument panel, dimming .....22
interior lamps ...........................98
replacing bulbs ...............221±225
Lane change indicator
(see Turn signal) ........................87
Liftgate ......................................106
Lights, warning and indicator ......8
air bag ..........................................8
anti-lock brakes (ABS) ....11, 153
brake ............................................9
charging system ..........................8
cruise indicator ...................10, 86
door ajar ....................................10
high beam .................................10
low fuel ......................................11
low washer fluid .......................13
oil pressure .................................9
overdrive off ..............................13
safety belt ...................................9
service engine soon ..................11
turn signal indicator .................10
Load limits .................................160
GAWR ......................................160
GVWR ......................................160
trailer towing ..........................160
Locks
childproof ..................................92
doors ..........................................92
Lubricant specifications ...233±234
Lumbar support, seats .............113
Index
253