high beam MINI 5 door 2015 Owner's Manua
[x] Cancel search | Manufacturer: MINI, Model Year: 2015, Model line: 5 door, Model: MINI 5 door 2015Pages: 248, PDF Size: 5.43 MB
Page 14 of 248
CockpitVehicle features and op‐
tions
This chapter describes all standard, country-
specific and optional features offered with the
series. It also describes features that are notnecessarily available in your car, e. g., due to
the selected options or country versions. This
also applies to safety-related functions and sys‐
tems. The respectively applicable country provi‐
sions must be observed when using the respec‐
tive features and systems.
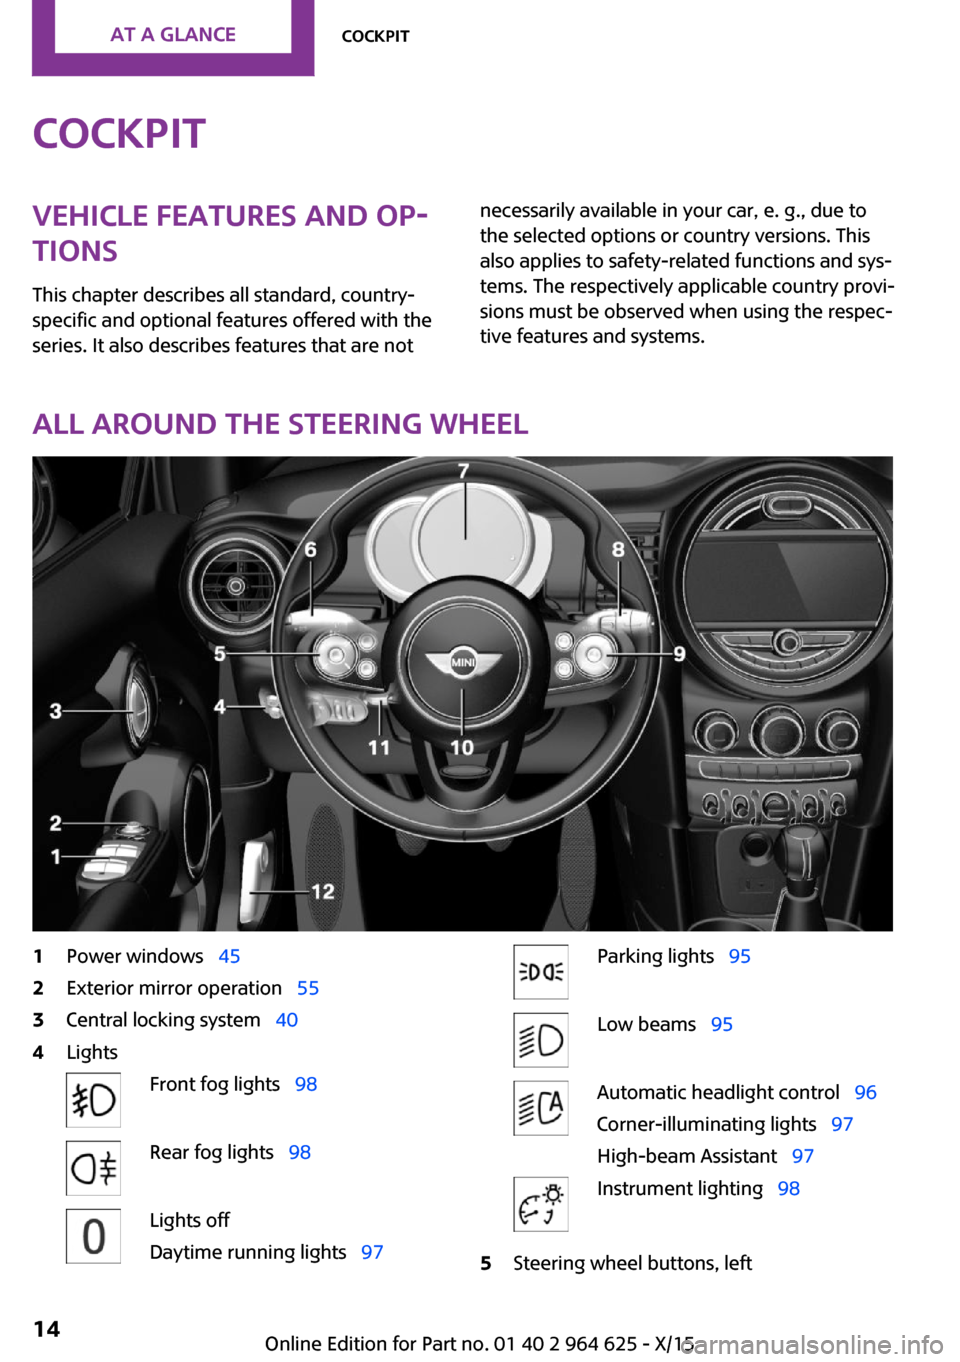
All around the steering wheel
1Power windows 452Exterior mirror operation 553Central locking system 404LightsFront fog lights 98Rear fog lights 98Lights off
Daytime running lights 97Parking lights 95Low beams 95Automatic headlight control 96
Corner-illuminating lights 97
High-beam Assistant 97Instrument lighting 985Steering wheel buttons, leftSeite 14AT A GLANCECockpit14
Online Edition for Part no. 01 40 2 964 625 - X/15
Page 15 of 248
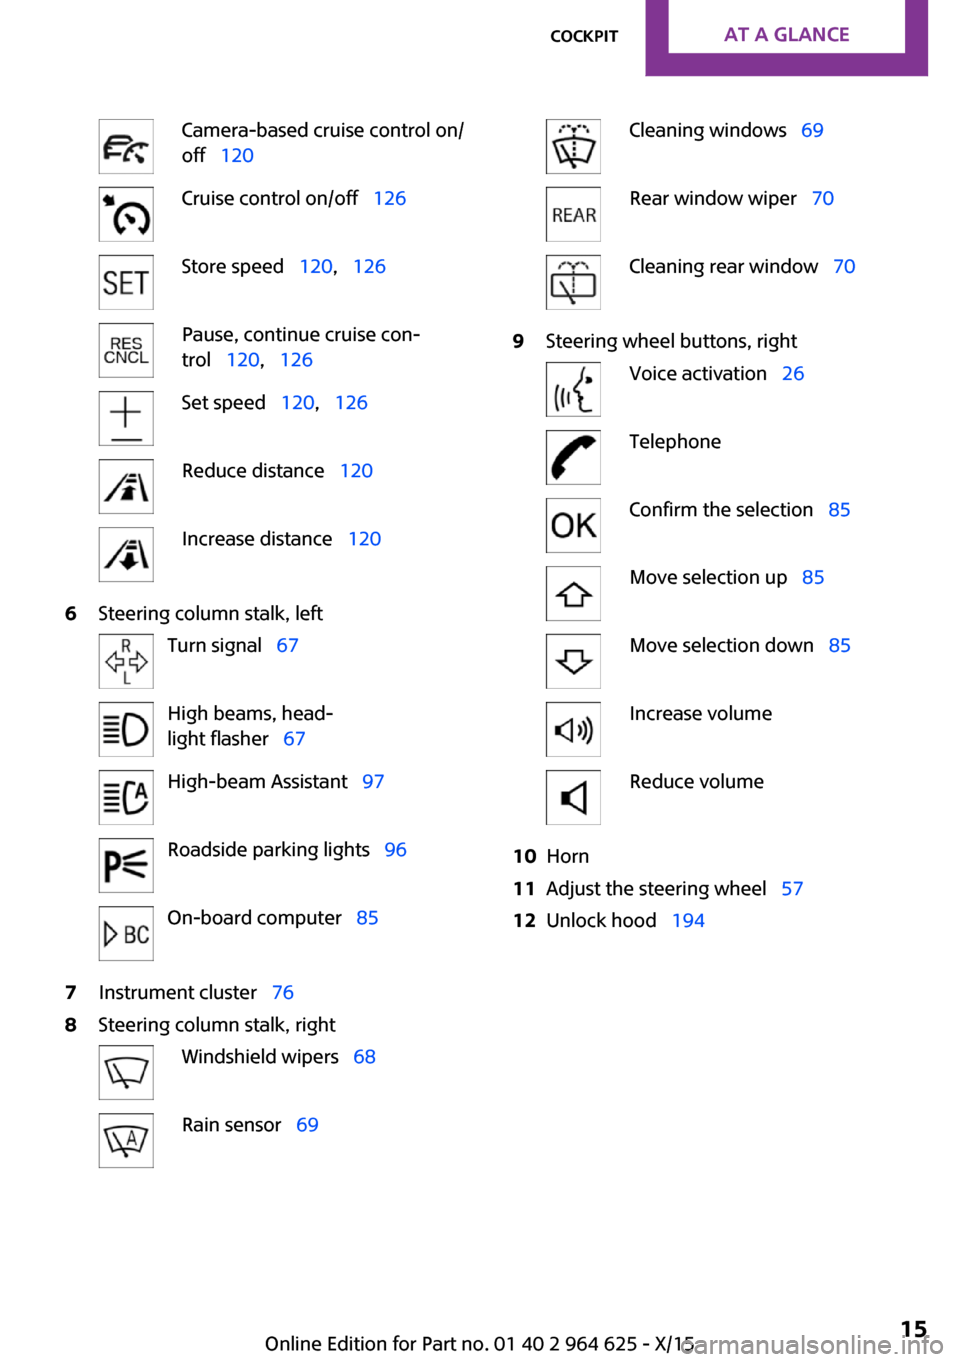
Camera-based cruise control on/
off 120Cruise control on/off 126Store speed 120, 126Pause, continue cruise con‐
trol 120, 126Set speed 120, 126Reduce distance 120Increase distance 1206Steering column stalk, leftTurn signal 67High beams, head‐
light flasher 67High-beam Assistant 97Roadside parking lights 96On-board computer 857Instrument cluster 768Steering column stalk, rightWindshield wipers 68Rain sensor 69Cleaning windows 69Rear window wiper 70Cleaning rear window 709Steering wheel buttons, rightVoice activation 26TelephoneConfirm the selection 85Move selection up 85Move selection down 85Increase volumeReduce volume10Horn11Adjust the steering wheel 5712Unlock hood 194Seite 15CockpitAT A GLANCE15
Online Edition for Part no. 01 40 2 964 625 - X/15
Page 63 of 248
▷After approx. 8 minutes.▷When the vehicle is locked using the central
locking system.▷Shortly before the battery is discharged
completely, so that the engine can still be
started.
The radio-ready state remains active if, for ex‐
ample, the ignition is automatically switched off
for the following reasons:
▷Opening or closing the driver's door.▷Unfastening of the driver's safety belt.▷When automatically switching from low
beams to parking lights.
If the engine is switched off and the ignition is
switched on, the system automatically switches
to the radio-ready state if the lights are turned
off or, if correspondingly equipped, the day‐
time running lights are activated.
Starting the engine
Information DANGER
If the exhaust pipe is blocked or ventila‐
tion is insufficient, harmful exhaust gases can
enter into the vehicle. The exhaust gases con‐
tain carbon monoxide, an odorless and color‐
less but highly toxic gas. In enclosed areas, ex‐
haust gases can also accumulate outside of the
vehicle. There is danger to life. Keep the ex‐
haust pipe free and ensure sufficient ventila‐
tion. ◀
WARNING
An unsecured vehicle can put itself into
motion and roll away. There is risk of an acci‐
dent. Before exiting, secure the vehicle against
rolling.
In order to ensure that the vehicle is secured
against rolling away, observe the following:
▷Set the parking brake.▷On uphill grades or on a slope, turn the
front wheels in the direction of the curb.▷On uphill grades or on a slope, also secure
the vehicle, for example with a wheel
chock. ◀
CAUTION
In the case of repeated starting attempts
or repeated starting in quick succession, the
fuel is not burned or is inadequately burned.
The catalytic converter can overheat. There is
risk of property damage. Avoid repeated start‐
ing in quick succession. ◀
Steptronic transmission
Starting the engine
1.Depress the brake pedal.2.Engage selector lever position P or N.3.Press the Start/Stop button.
The ignition is activated automatically for a cer‐
tain time and is stopped as soon as the engine
starts.
Manual transmission
Starting the engine
1.Depress the brake pedal.2.Press on the clutch pedal and shift to neu‐
tral.3.Press the Start/Stop button.
The ignition is activated automatically for a cer‐
tain time and is stopped as soon as the engine
starts.
Engine stop
Information WARNING
Unattended children or animals can move
the vehicle and endanger themselves and traf‐
fic, for example with the following actions:
Seite 63DrivingCONTROLS63
Online Edition for Part no. 01 40 2 964 625 - X/15
Page 67 of 248
▷On uphill grades or on a slope, also secure
the vehicle, for example with a wheel
chock. ◀
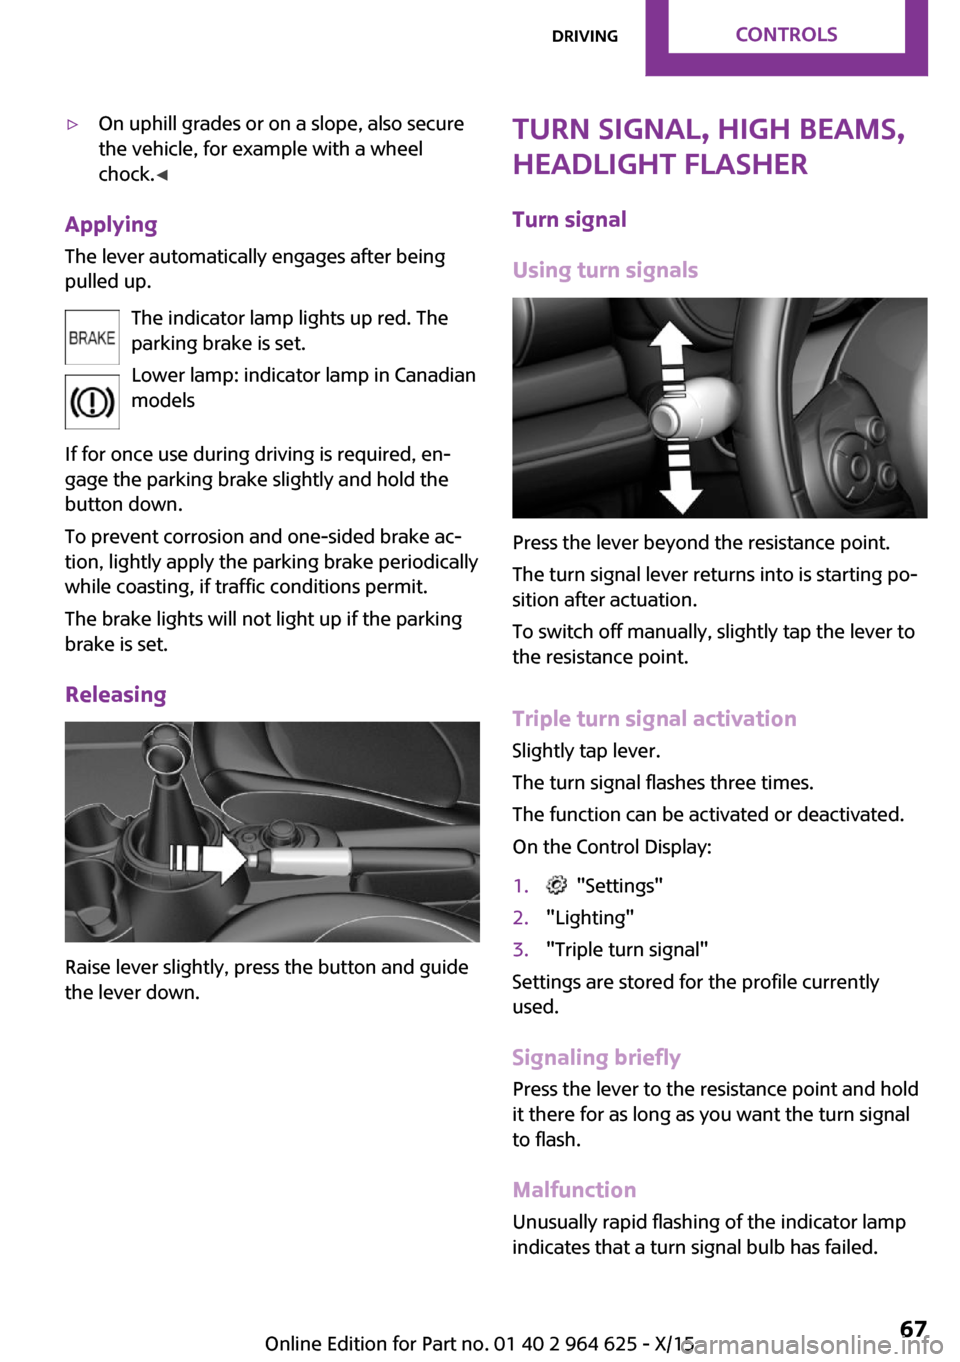
Applying
The lever automatically engages after beingpulled up.
The indicator lamp lights up red. The
parking brake is set.
Lower lamp: indicator lamp in Canadian
models
If for once use during driving is required, en‐
gage the parking brake slightly and hold the
button down.
To prevent corrosion and one-sided brake ac‐
tion, lightly apply the parking brake periodically
while coasting, if traffic conditions permit.
The brake lights will not light up if the parking
brake is set.
Releasing
Raise lever slightly, press the button and guide
the lever down.
Turn signal, high beams,
headlight flasher
Turn signal
Using turn signals
Press the lever beyond the resistance point.
The turn signal lever returns into is starting po‐
sition after actuation.
To switch off manually, slightly tap the lever to
the resistance point.
Triple turn signal activation Slightly tap lever.
The turn signal flashes three times.
The function can be activated or deactivated.
On the Control Display:
1. "Settings"2."Lighting"3."Triple turn signal"
Settings are stored for the profile currently
used.
Signaling briefly Press the lever to the resistance point and hold
it there for as long as you want the turn signal
to flash.
Malfunction
Unusually rapid flashing of the indicator lamp
indicates that a turn signal bulb has failed.
Seite 67DrivingCONTROLS67
Online Edition for Part no. 01 40 2 964 625 - X/15
Page 68 of 248
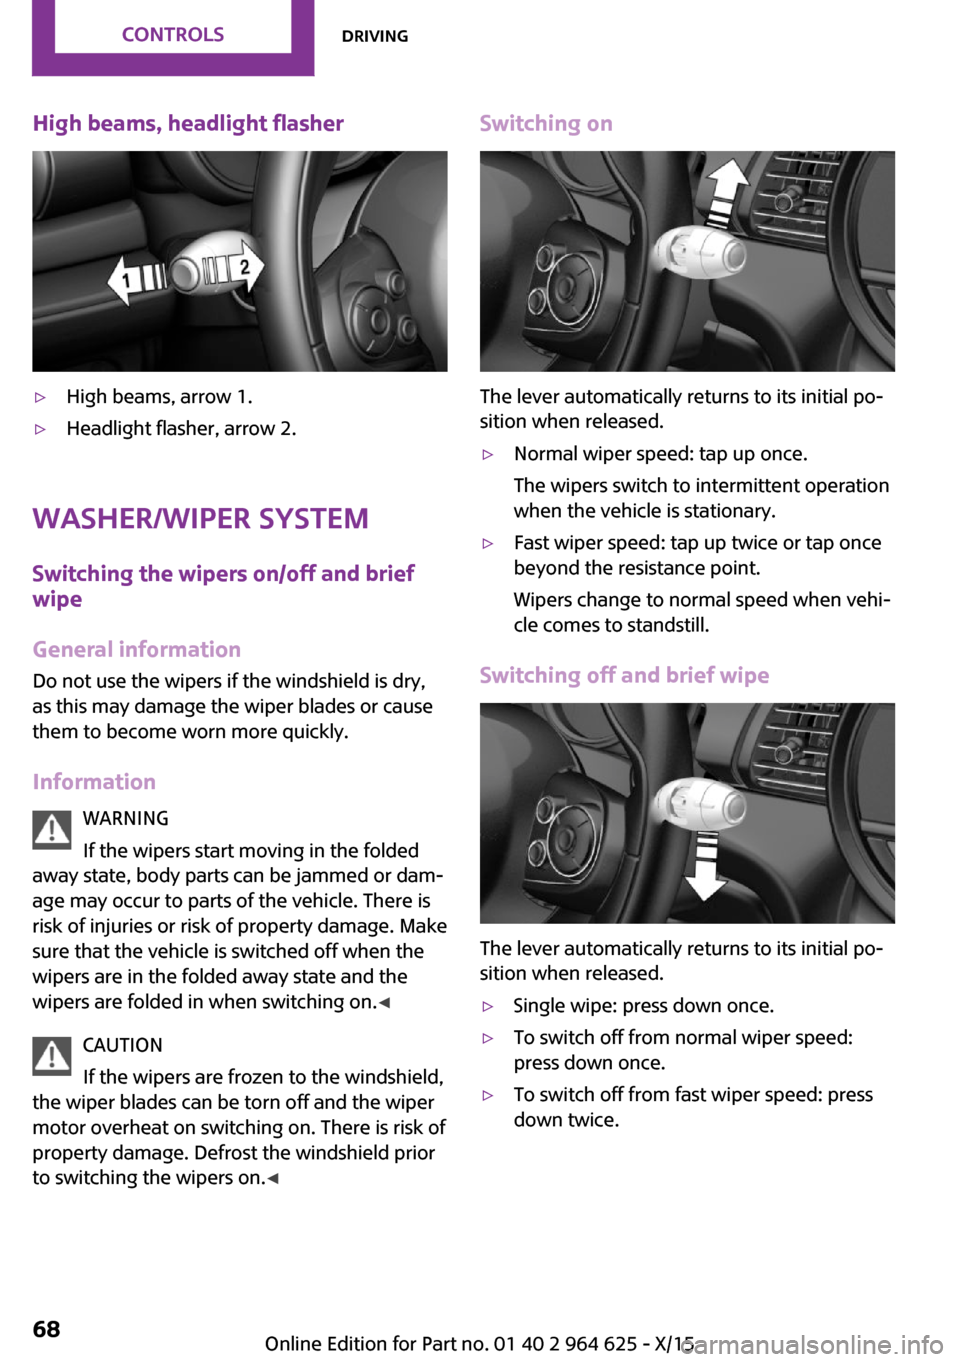
High beams, headlight flasher▷High beams, arrow 1.▷Headlight flasher, arrow 2.
Washer/wiper system
Switching the wipers on/off and brief
wipe
General information Do not use the wipers if the windshield is dry,
as this may damage the wiper blades or cause
them to become worn more quickly.
Information WARNING
If the wipers start moving in the folded
away state, body parts can be jammed or dam‐
age may occur to parts of the vehicle. There is
risk of injuries or risk of property damage. Make
sure that the vehicle is switched off when the
wipers are in the folded away state and the
wipers are folded in when switching on. ◀
CAUTION
If the wipers are frozen to the windshield,
the wiper blades can be torn off and the wiper
motor overheat on switching on. There is risk of
property damage. Defrost the windshield prior
to switching the wipers on. ◀
Switching on
The lever automatically returns to its initial po‐
sition when released.
▷Normal wiper speed: tap up once.
The wipers switch to intermittent operation
when the vehicle is stationary.▷Fast wiper speed: tap up twice or tap once
beyond the resistance point.
Wipers change to normal speed when vehi‐
cle comes to standstill.
Switching off and brief wipe
The lever automatically returns to its initial po‐
sition when released.
▷Single wipe: press down once.▷To switch off from normal wiper speed:
press down once.▷To switch off from fast wiper speed: press
down twice.Seite 68CONTROLSDriving68
Online Edition for Part no. 01 40 2 964 625 - X/15
Page 80 of 248
Front fog lightsFront fog lights are activated.
For additional information, refer to
Front fog lights, refer to page 98.
High-beam Assistant High-beam Assistant is switched on.
High beams are activated and off auto‐
matically as a function of the traffic sit‐
uation.
For additional information, refer to High-beam
Assistant, refer to page 97.
Cruise control The system is switched on. It maintains
the speed that was set using the control
elements on the steering wheel.
Blue lights
High beams High beams are activated.
For additional information, refer to High
beams, refer to page 68.
General lamps At least one Check Control message is
displayed or is stored.
Text messages
Text messages in combination with a symbol in
the instrument cluster explain a Check Control
message and the meaning of the indicator and
warning lights.
Supplementary text messages
Additional information, such as on the cause of
an error or the required action, can be called up
via Check Control.With urgent messages the added text will be
automatically displayed on the Control Display.
Symbols
Within the supplementary text, the following
functions can be selected independent of the
check control message.▷ Display additional information about
the Check Control message in the
Integrated Owner's Manual.▷ "Service request"
Contact a dealer’s service center or another
qualified service center or repair shop.▷ "Roadside Assistance"
Contact Roadside Assistance.
Hiding Check Control messages
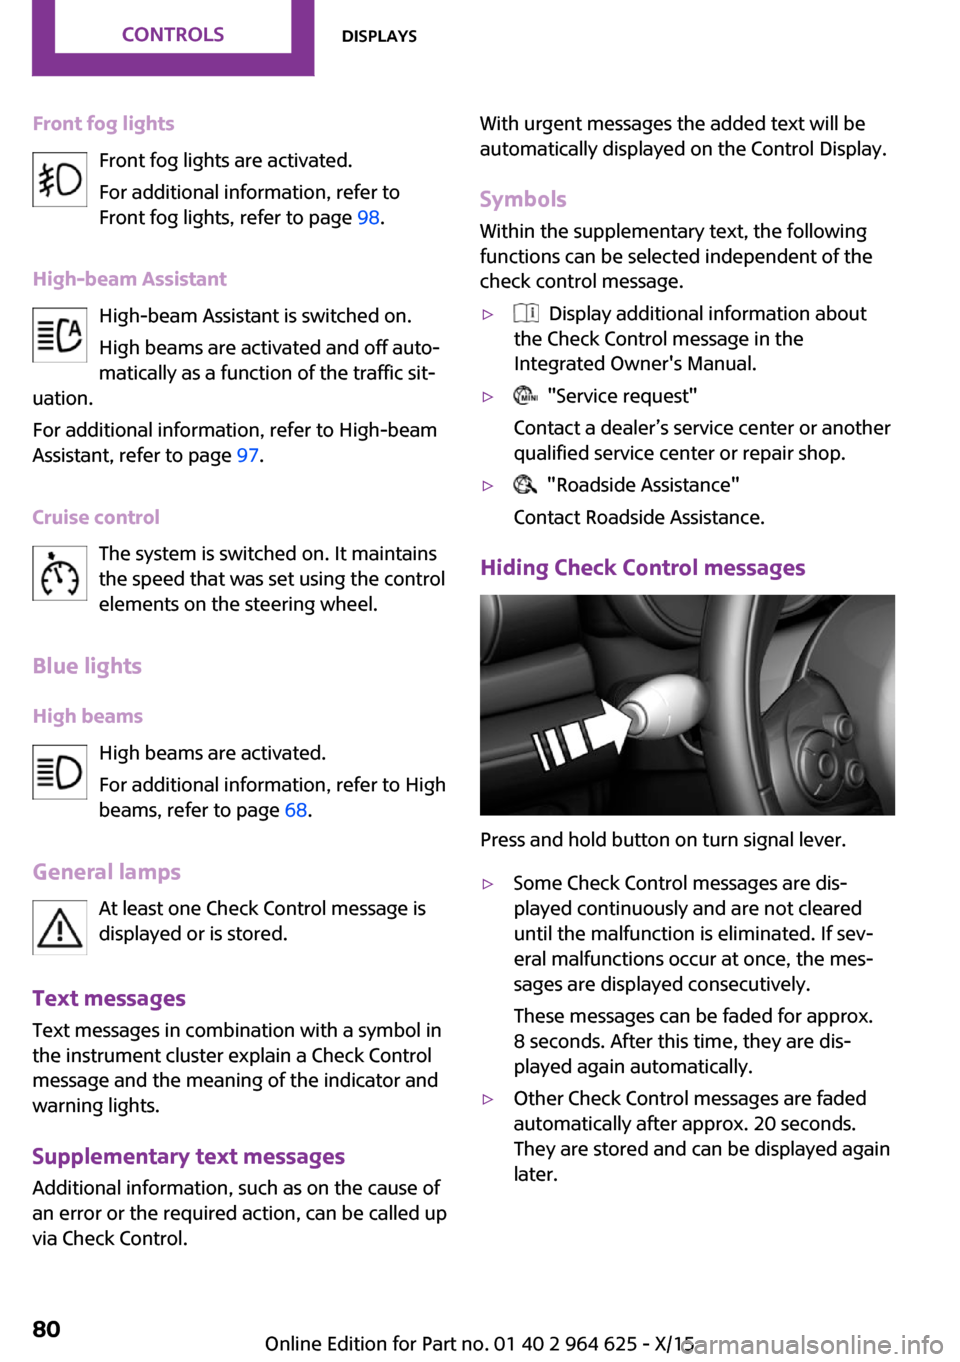
Press and hold button on turn signal lever.
▷Some Check Control messages are dis‐
played continuously and are not cleared
until the malfunction is eliminated. If sev‐
eral malfunctions occur at once, the mes‐
sages are displayed consecutively.
These messages can be faded for approx.
8 seconds. After this time, they are dis‐
played again automatically.▷Other Check Control messages are faded
automatically after approx. 20 seconds.
They are stored and can be displayed again
later.Seite 80CONTROLSDisplays80
Online Edition for Part no. 01 40 2 964 625 - X/15
Page 97 of 248
System limits
The automatic headlamp control cannot serve
as a substitute for your personal judgment of
lighting conditions.
E. g. the sensors are unable to detect fog or
hazy weather. To avoid safety risks under these
conditions, you should always switch on the
lights manually.
Daytime running lights General information
Position of switch:
, ,
The daytime running lights light up when the
ignition is switched on. After the ignition is
switched off, the parking lights light up in posi‐
tion
.
Activating/deactivating
In some countries, daytime running lights are
mandatory, so it may not be possible to deacti‐ vate the daytime running lights.
On the Control Display:
1. "Settings"2."Lighting"3."Daytime running lamps"
Settings are stored for the remote control cur‐
rently used.
Cornering lamp General information Position of switch:
When going around corners, the cornering light
also lights the interior area of the curve. Below
a speed of approx. 25 mph/40 km/h when the
turn signal is switched on and the steering an‐
gle is detected, there is automatic activation.
Malfunction
A Check Control message is displayed.
Cornering light is malfunctioning or has failed.
Have the system immediately checked by a
dealer’s service center or another qualified
service center or repair shop.
High-beam Assistant The concept The high-beam Assistant detects other traffic
participants early on and automatically
switches the high beams on or off depending
on the traffic situation. The assistant ensures
that the high beams are switched on, whenever
the traffic situation allows. In the low speed
range, the high beams are not switched on by
the system.
General information The system responds to light from oncoming
traffic and traffic driving ahead of you, and to
adequate illumination, e.g., in towns and cities.
The driver can intervene at any time and switch
the high beams on and off as usual.
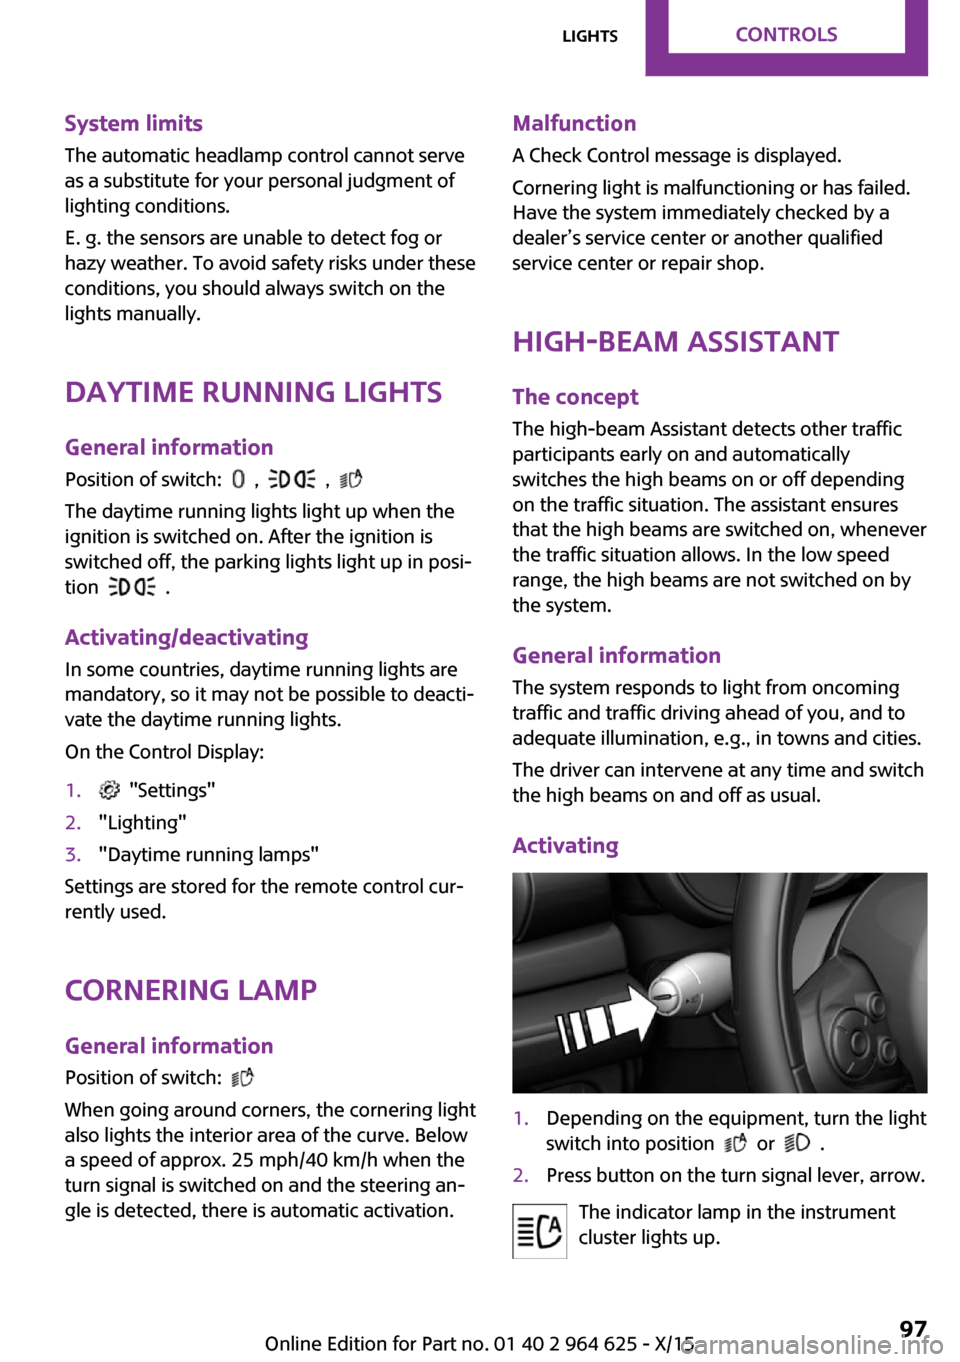
Activating1.Depending on the equipment, turn the light
switch into position
or .
2.Press button on the turn signal lever, arrow.
The indicator lamp in the instrument
cluster lights up.
Seite 97LightsCONTROLS97
Online Edition for Part no. 01 40 2 964 625 - X/15
Page 98 of 248
When the low beams are on, the lights are au‐
tomatically brightened or dimmed.
The blue indicator lamp in the instru‐
ment cluster lights up when the system
switches on the high beams.
Deactivating The High-beam Assistant is deactivated when
manually switching the high beams on and off,
refer to page 68.
To reactivate the High-beam Assistant, press
the button on the turn signal lever.
System limits The High-beam Assistant cannot serve as a
substitute for the driver's personal judgment of when to use the high beams. Therefore, man‐
ually switch off the high beams in situations
where required to avoid a safety risk.
The system is not fully functional in the follow‐
ing situations, and driver intervention may be
necessary:▷In very unfavorable weather conditions,
such as fog or heavy precipitation.▷When detecting poorly-lit road users such
as pedestrians, cyclists, horseback riders
and wagons; when driving close to train or
ship traffic; and at animal crossings.▷In tight curves, on hilltops or in depressions,
in cross traffic or half-obscured oncoming
traffic on highways.▷In poorly-lit towns and cities and in the
presence of highly reflective signs.▷When the windshield behind the interior
mirror is fogged over, dirty or covered with
stickers, etc.
Fog lights
Front fog lights
The low beams must be switched on.
Press button. The green indicator lamp
lights up.
If the automatic headlight control, refer to
page 96, is activated, the low beams will come
on automatically when you switch on the front
fog lights.
When the high beams or headlight flasher are
activated, the front fog lights are not switched
on.
Rear fog lights
The low beams or front fog lights must be
switched on.
Press button. The yellow indicator
lamp lights up.
If the automatic headlight control, refer to
page 96, is activated, the low beams will come
on automatically when you switch on the rear
fog lights.
Instrument lightingAdjusting The parking lights or low beams
must be switched on to adjust
the brightness.
Adjust the brightness with the
thumbwheel.
Interior lights General information
The interior lights, footwell lights, access lights
and courtesy lights are controlled automati‐
cally.
Thumb wheel for the instrument lighting con‐
trols brightness of some of these features.Seite 98CONTROLSLights98
Online Edition for Part no. 01 40 2 964 625 - X/15
Page 206 of 248
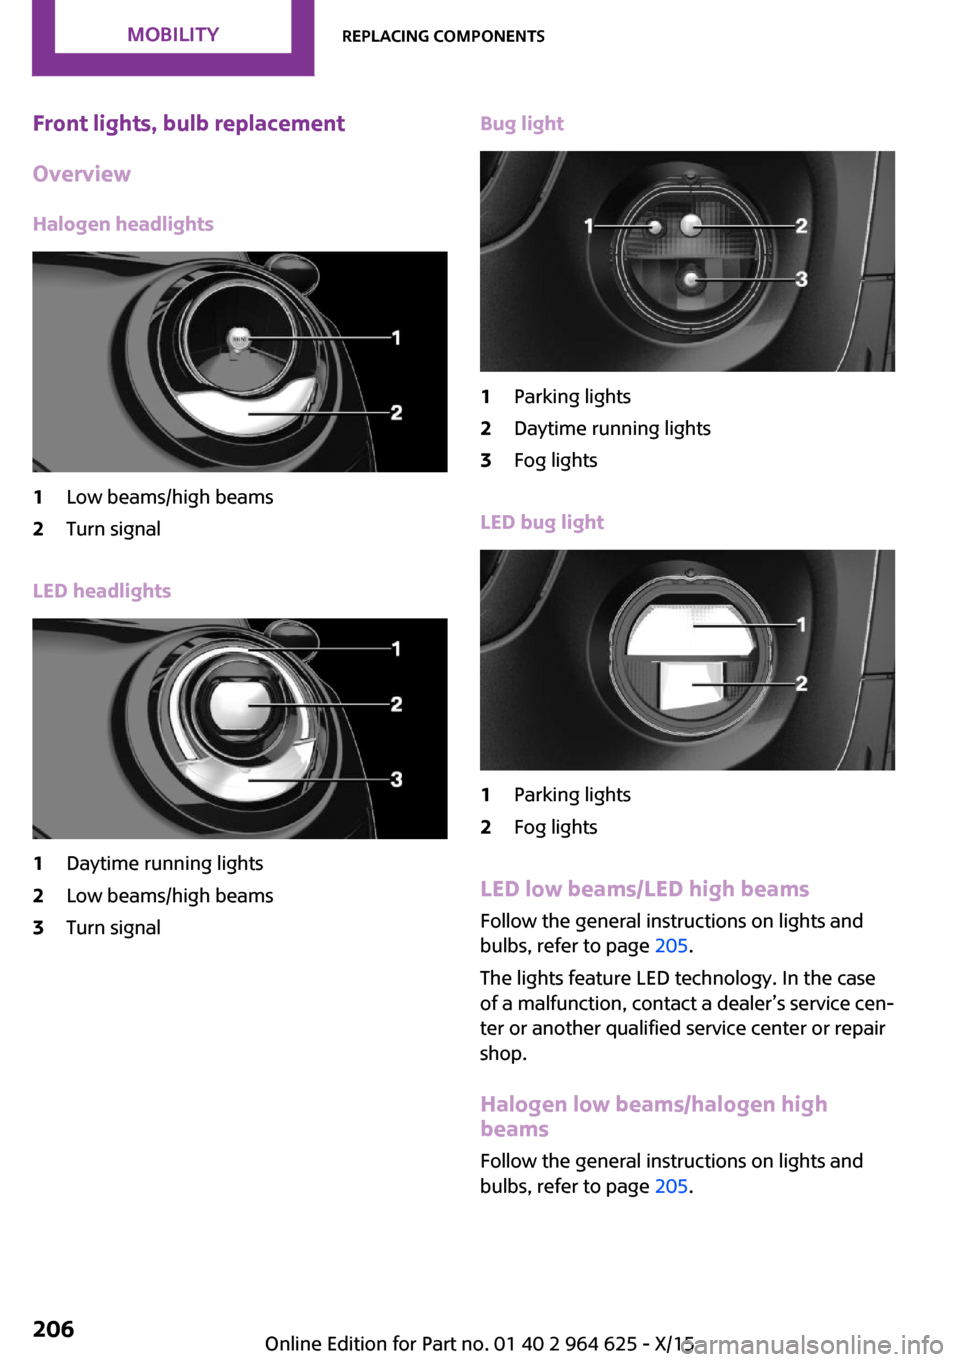
Front lights, bulb replacement
Overview
Halogen headlights1Low beams/high beams2Turn signal
LED headlights
1Daytime running lights2Low beams/high beams3Turn signalBug light1Parking lights2Daytime running lights3Fog lights
LED bug light
1Parking lights2Fog lights
LED low beams/LED high beams Follow the general instructions on lights and
bulbs, refer to page 205.
The lights feature LED technology. In the case
of a malfunction, contact a dealer’s service cen‐
ter or another qualified service center or repair
shop.
Halogen low beams/halogen high
beams
Follow the general instructions on lights and
bulbs, refer to page 205.
Seite 206MOBILITYReplacing components206
Online Edition for Part no. 01 40 2 964 625 - X/15
Page 241 of 248
Front-end collision warningwith City Braking func‐
tion 110
Front fog lights 98
Front-seat passenger airbags, automatic deactivation 102
Front-seat passenger airbags, indicator lamp 102
FTM Flat Tire Monitor 107
Fuel 178
Fuel consumption, see Aver‐ age fuel consumption 86
Fuel filler flap 176
Fuel gauge 81
Fuel lid 176
Fuel quality 178
Fuel recommendation 178
Fuel, tank capacity 232
Fuse 215
G Garage door opener, see Uni‐ versal Integrated Remote
Control 145
Gasoline 178
Gear change, Steptronic trans‐ mission 72
Gear shift indicator 83
General driving notes 161
Glare shield 149
Glass sunroof, refer to Panor‐ amic glass sunroof 47
Glove compartment 153
GREEN Mode 167
GREEN Mode, bonus range 169
GREEN Mode driving style analysis 171
GREEN Mode indicator 167
GREEN - program, driving dy‐ namics 118
GREEN tip 169
Gross vehicle weight, ap‐ proved 229
Ground clearance 162 H
Halogen headlights 206
Handbrake, see parking brake 66
Hand-held transmitter, alter‐ nating code 146
Hazard warning flashers 216
Head airbag 100
Headlight control, auto‐ matic 96
Headlight courtesy delay fea‐ ture 96
Headlight flasher 68
Headlight glass 205
Headlights, care 222
Head restraints 49
Head restraints, front 53
Head restraints, rear 54
Head-up Display 90
Head-Up Display, Shift point indicator 92
Head-up Display, sport dis‐ plays 92
Head-up Display, standard view 91
Heavy cargo, stowing 164
High-beam Assistant 97
High beams 68
High beams/low beams, see High-beam Assistant 97
Hills 162
Hill start assistant, see Drive- off assistant 119
Holder for beverages 154
Homepage 6
Hood 194
Horn 14
Hot exhaust system 161
HUD Head-up Display 90
Hydroplaning 161
I
Ice warning, see External tem‐ perature warning 81 Icy roads, see External tem‐
perature warning 81
Identification marks, tires 186
Identification number, see ve‐ hicle identification num‐
ber 10
Ignition key, see Remote con‐ trol 34
Ignition off 62
Ignition on 62
Illuminated ring, central in‐ strument cluster 89
Indication of a flat tire 104, 107
Indicator lamp, see Check Control 77
Individual air distribu‐ tion 139, 142
Individual settings, see Per‐ sonal Profile 36
Inflation pressure, tires 180
Inflation pressure warning, tires 107
Info display, refer to On-Board computer 85
Information 6
Initialize, Tire Pressure Moni‐ tor TPM 104
Initializing, Flat Tire Monitor FTM 107
Instrument cluster 76
Instrument cluster, electronic displays 77
Instrument lighting 98
Integrated key 34
Integrated Owner's Manual in the vehicle 29
Intelligent Safety 109
Intensity, AUTO program 142
Interior equipment 145
Interior lights 98
Interior lights during unlock‐ ing 37
Interior lights with the vehicle locked 38 Seite 241Everything from A to ZREFERENCE241
Online Edition for Part no. 01 40 2 964 625 - X/15