remove seats MINI Clubman 2009 Owner's Manual (Mini Connected)
[x] Cancel search | Manufacturer: MINI, Model Year: 2009, Model line: Clubman, Model: MINI Clubman 2009Pages: 218, PDF Size: 3.69 MB
Page 41 of 218

MOBILITYAT A GLANCE CONTROLS DRIVING TIPS ENTERTAINMENT
39
NAVIGATION REFERENCE
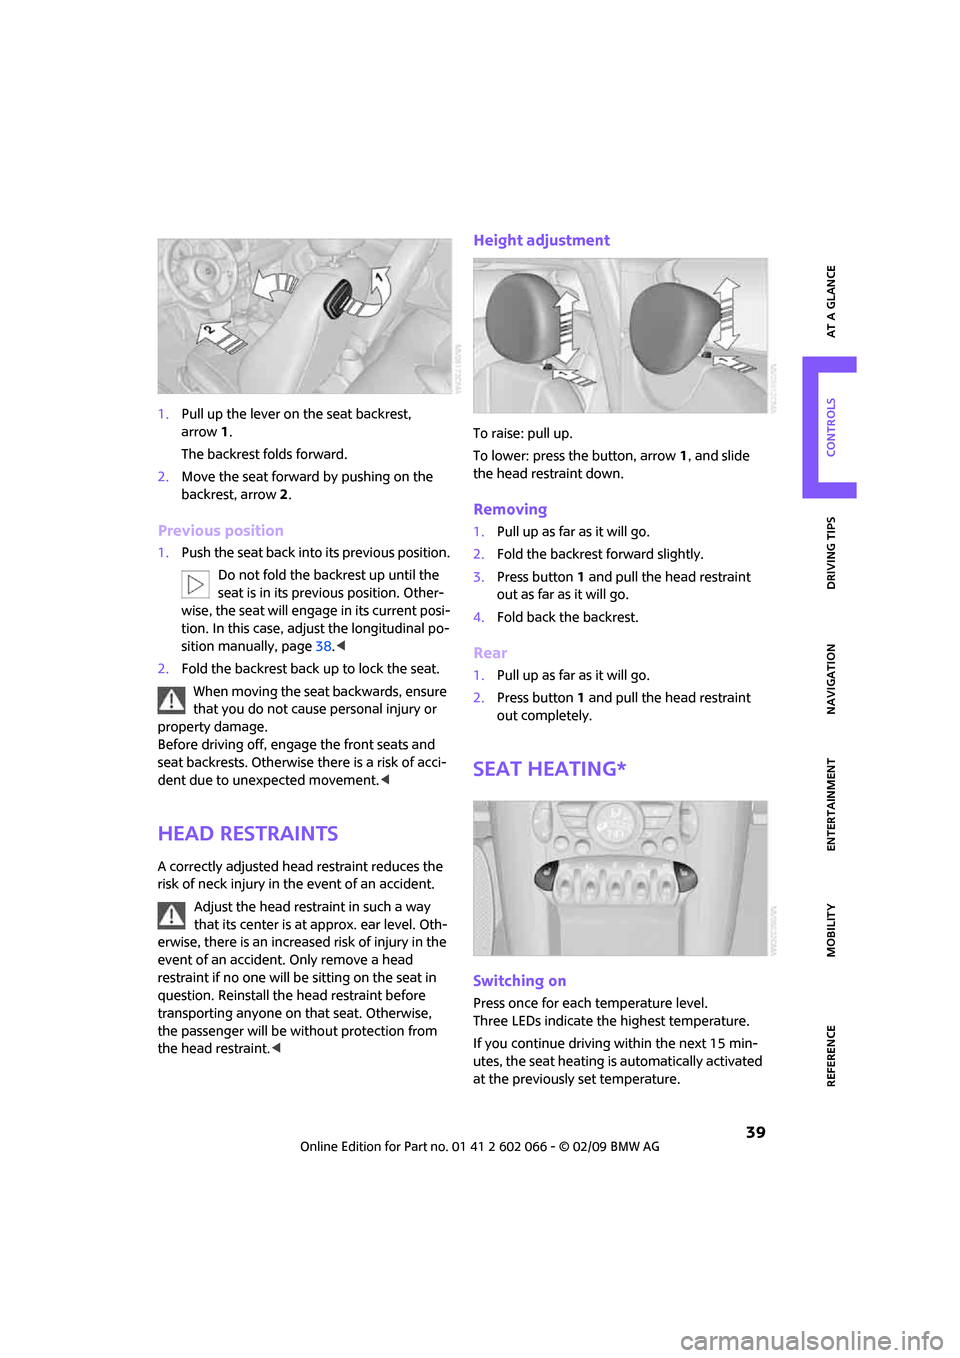
1.Pull up the lever on the seat backrest,
arrow1.
The backrest folds forward.
2.Move the seat forward by pushing on the
backrest, arrow2.
Previous position
1.Push the seat back into its previous position.
Do not fold the backrest up until the
seat is in its previous position. Other-
wise, the seat will engage in its current posi-
tion. In this case, adjust the longitudinal po-
sition manually, page38.<
2.Fold the backrest back up to lock the seat.
When moving the seat backwards, ensure
that you do not cause personal injury or
property damage.
Before driving off, engage the front seats and
seat backrests. Otherwise there is a risk of acci-
dent due to unexpected movement.<
Head restraints
A correctly adjusted head restraint reduces the
risk of neck injury in the event of an accident.
Adjust the head restraint in such a way
that its center is at approx. ear level. Oth-
erwise, there is an increased risk of injury in the
event of an accident. Only remove a head
restraint if no one will be sitting on the seat in
question. Reinstall the head restraint before
transporting anyone on that seat. Otherwise,
the passenger will be without protection from
the head restraint.<
Height adjustment
To raise: pull up.
To lower: press the button, arrow1, and slide
the head restraint down.
Removing
1.Pull up as far as it will go.
2.Fold the backrest forward slightly.
3.Press button1 and pull the head restraint
out as far as it will go.
4.Fold back the backrest.
Rear
1.Pull up as far as it will go.
2.Press button 1 and pull the head restraint
out completely.
Seat heating*
Switching on
Press once for each temperature level.
Three LEDs indicate the highest temperature.
If you continue driving within the next 15 min-
utes, the seat heating is automatically activated
at the previously set temperature.
Page 82 of 218

Technology for driving comfort and safety
80
Airbags
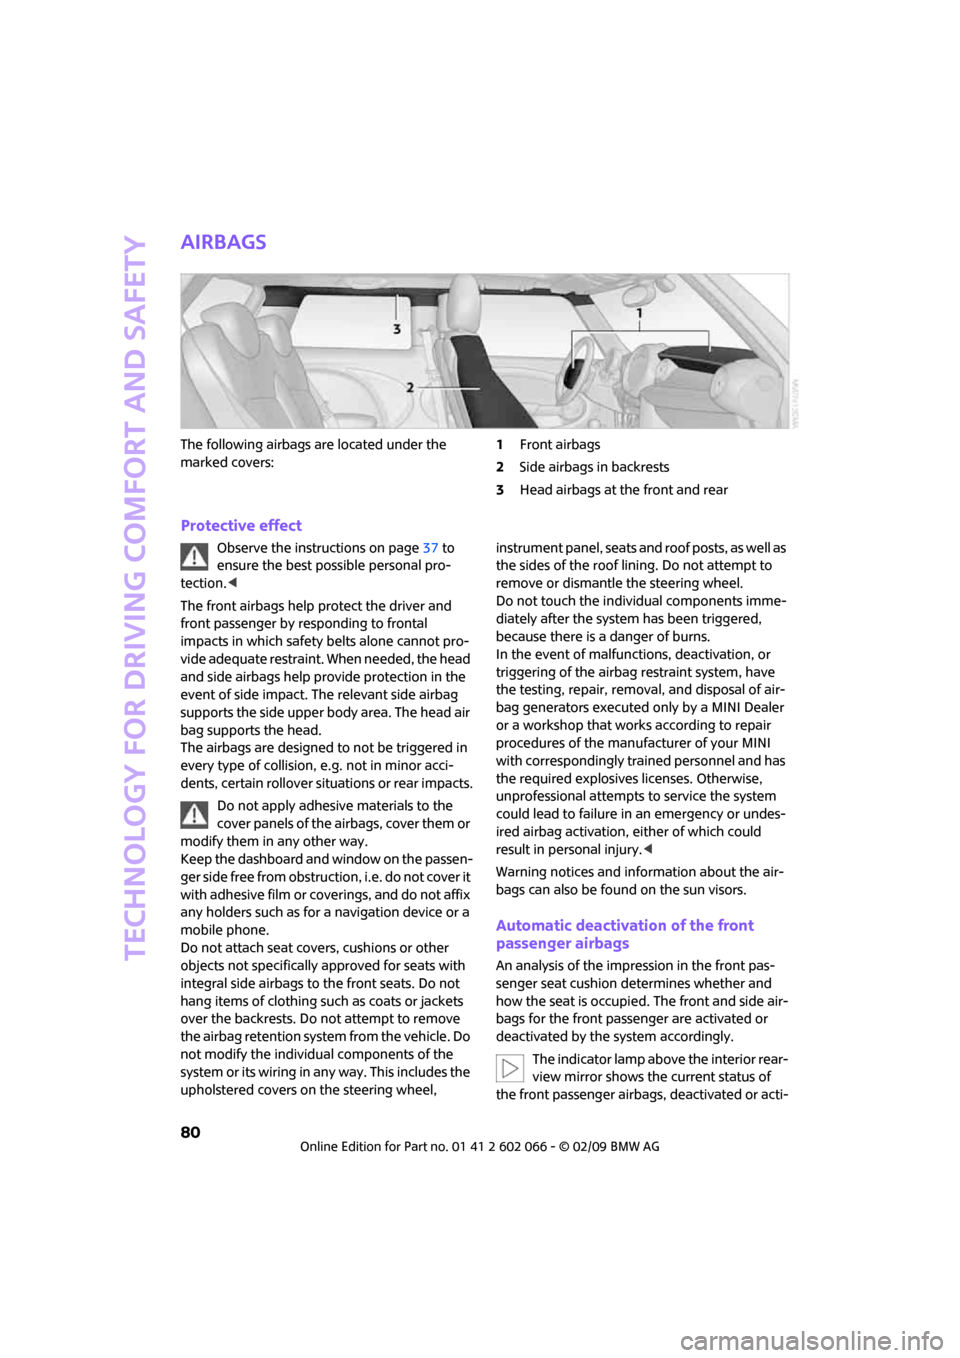
The following airbags are located under the
marked covers:1Front airbags
2Side airbags in backrests
3Head airbags at the front and rear
Protective effect
Observe the instructions on page37 to
ensure the best possible personal pro-
tection.<
The front airbags help protect the driver and
front passenger by responding to frontal
impacts in which safety belts alone cannot pro-
vide adequate restraint. When needed, the head
and side airbags help provide protection in the
event of side impact. The relevant side airbag
supports the side upper body area. The head air
bag supports the head.
The airbags are designed to not be triggered in
every type of collision, e.g. not in minor acci-
dents, certain rollover situations or rear impacts.
Do not apply adhesive materials to the
cover panels of the airbags, cover them or
modify them in any other way.
Keep the dashboard and window on the passen-
g e r s i d e f r e e f r o m o b s t r u c t i o n , i . e . d o n o t c o v e r i t
with adhesive film or coverings, and do not affix
any holders such as for a navigation device or a
mobile phone.
Do not attach seat covers, cushions or other
objects not specifically approved for seats with
integral side airbags to the front seats. Do not
hang items of clothing such as coats or jackets
over the backrests. Do not attempt to remove
the airbag retention system from the vehicle. Do
not modify the individual components of the
syste m o r its w iring in any way. Th is includ es the
upholstered covers on the steering wheel, instrument panel, seats and roof posts, as well as
the sides of the roof lining. Do not attempt to
remove or dismantle the steering wheel.
Do not touch the individual components imme-
diately after the system has been triggered,
because there is a danger of burns.
In the event of malfunctions, deactivation, or
triggering of the airbag restraint system, have
the testing, repair, removal, and disposal of air-
bag generators executed only by a MINI Dealer
or a workshop that works according to repair
procedures of the manufacturer of your MINI
with correspondingly trained personnel and has
the required explosives licenses. Otherwise,
unprofessional attempts to service the system
could lead to failure in an emergency or undes-
ired airbag activation, either of which could
result in personal injury.<
Warning notices and information about the air-
bags can also be found on the sun visors.
Automatic deactivation of the front
passenger airbags
An analysis of the impression in the front pas-
senger seat cushion determines whether and
how the seat is occupied. The front and side air-
bags for the front passenger are activated or
deactivated by the system accordingly.
The indicator lamp above the interior rear-
view mirror shows the current status of
the front passenger airbags, deactivated or acti-
Page 207 of 218

205
MOBILITYAT A GLANCE CONTROLS DRIVING TIPS ENTERTAINMENT NAVIGATION REFERENCE
Gear indicator
– automatic transmission with
Steptronic48
Gear shifting
– automatic transmission48
– manual transmission48
Gearshift lever
– automatic transmission with
Steptronic48
– manual transmission48
General driving notes96
Glass sunroof, electric34
– convenient operation28,29
– opening, closing35
– raising35
– remote control28
Glove compartment90
GPS navigation, refer to
Navigation system106
Grills86
Gross vehicle weight, refer to
Weights194
H
Halogen lamps
– replacing bulb177
Handbrake, refer to Parking
brake47
Hands-free system14
Hazard warning flashers14
"HD radio"138
HD radio, refer to High
Definition Radio138
Head airbags80
Head restraints39
– sitting safely37
Headlamp control,
automatic82
Headlamp flasher50
– indicator lamp11,13
Headlamps
– replacing bulb177
Headlamps, care173
Heated
– mirrors41
– rear window88
– seats39Heating
– mirrors41
– rear window88
– seats39
Heavy loads, refer to Stowing
cargo100
Height adjustment
– seats38
– steering wheel41
Height, refer to
Dimensions193
High beams83
– headlamp flasher83
– indicator lamp13
– replacing bulb177
High Definition Radio, refer to
HD Radio138
High water, refer to Driving
through water97
Highways, refer to Route
criteria118
Hill Start Assist73
Hills97
Holders for cups92
Home address117
"Home address" in
navigation118
Homepage4
Horn10
Hot exhaust system96
"Hour memo"64
"House number" in
destination entry111
Hydroplaning96
I
IBOC, refer to HD Radio138
Ice warning55
Icy roads, refer to Outside
temperature warning55
ID3 tag, refer to Information
about the track144
Ignition46
– switched off46
– switched on46
Ignition key position 1, refer to
Radio readiness46Ignition key position 2, refer to
Ignition on46
Ignition key, refer to
Integrated key/remote
control26
Ignition lock46
Imprint2
Indicator and warning
lamps13
– Tire Pressure Monitor TPM78
Indicator lighting, refer to
Instrument lighting84
Individual settings, refer to
Personal Profile26
Inflation pressure monitoring,
refer to Tire Pressure Monitor
TPM76
Information
– on another location114
– on country114
– on current position114
– on destination location114
"Information" in
navigation114
"Information on
destination"116
Initializing
– Flat Tire Monitor FTM74
– glass sunroof, electric35
Installation location
– drive for navigation DVD and
audio CD106
Instructions for navigation
system, refer to Voice
instructions123
Instrument cluster, refer to
Displays12
Instrument lighting84
Instrument panel, refer to
Cockpit10
Instrument panel, refer to
Displays12
Integrated key26
Integrated universal remove
control89
Interesting destination for
navigation114
"Interim time"68