turn signal bulb MINI Clubman 2009 Owner's Manual (Mini Connected)
[x] Cancel search | Manufacturer: MINI, Model Year: 2009, Model line: Clubman, Model: MINI Clubman 2009Pages: 218, PDF Size: 3.69 MB
Page 52 of 218
Driving
50
If you do not shift gears with the shift paddles or
accelerate for a certain amount of time, the
transmission automatically returns to D, auto-
matic drive.
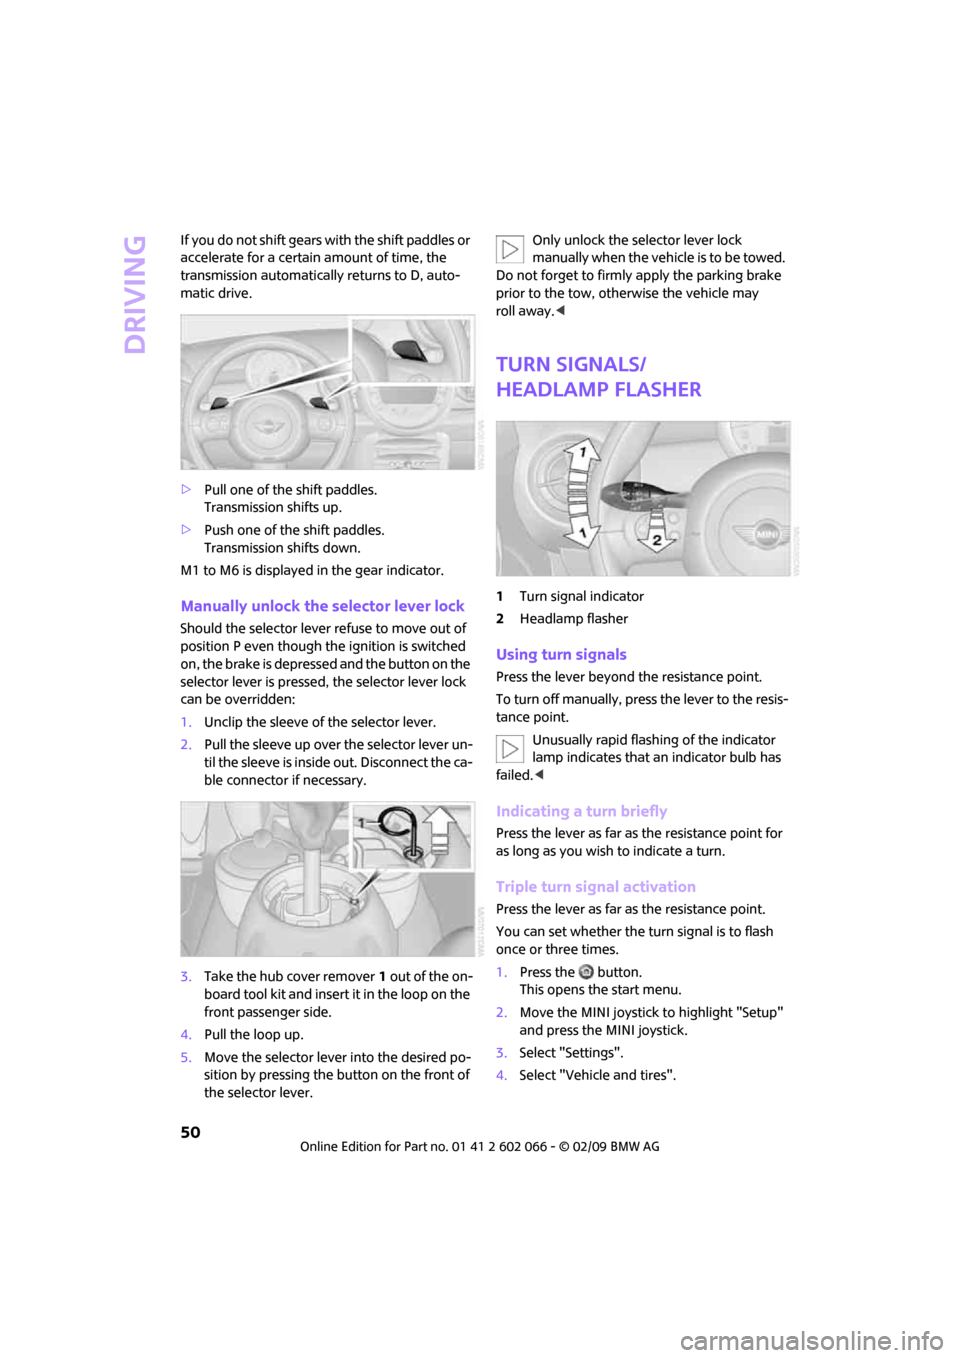
>Pull one of the shift paddles.
Transmission shifts up.
>Push one of the shift paddles.
Transmission shifts down.
M1 to M6 is displayed in the gear indicator.
Manually unlock the selector lever lock
Should the selector lever refuse to move out of
position P even though the ignition is switched
on, the brake is depressed and the button on the
selector lever is pressed, the selector lever lock
can be overridden:
1.Unclip the sleeve of the selector lever.
2.Pull the sleeve up over the selector lever un-
til the sleeve is inside out. Disconnect the ca-
ble connector if necessary.
3.Take the hub cover remover1 out of the on-
board tool kit and insert it in the loop on the
front passenger side.
4.Pull the loop up.
5.Move the selector lever into the desired po-
sition by pressing the button on the front of
the selector lever.Only unlock the selector lever lock
manually when the vehicle is to be towed.
Do not forget to firmly apply the parking brake
prior to the tow, otherwise the vehicle may
roll away.<
Turn signals/
headlamp flasher
1Turn signal indicator
2Headlamp flasher
Using turn signals
Press the lever beyond the resistance point.
To turn off manually, press the lever to the resis-
tance point.
Unusually rapid flashing of the indicator
lamp indicates that an indicator bulb has
failed.<
Indicating a turn briefly
Press the lever as far as the resistance point for
as long as you wish to indicate a turn.
Triple turn signal activation
Press the lever as far as the resistance point.
You can set whether the turn signal is to flash
once or three times.
1.Press the button.
This opens the start menu.
2.Move the MINI joystick to highlight "Setup"
and press the MINI joystick.
3.Select "Settings".
4.Select "Vehicle and tires".
Page 180 of 218
Replacing components
178
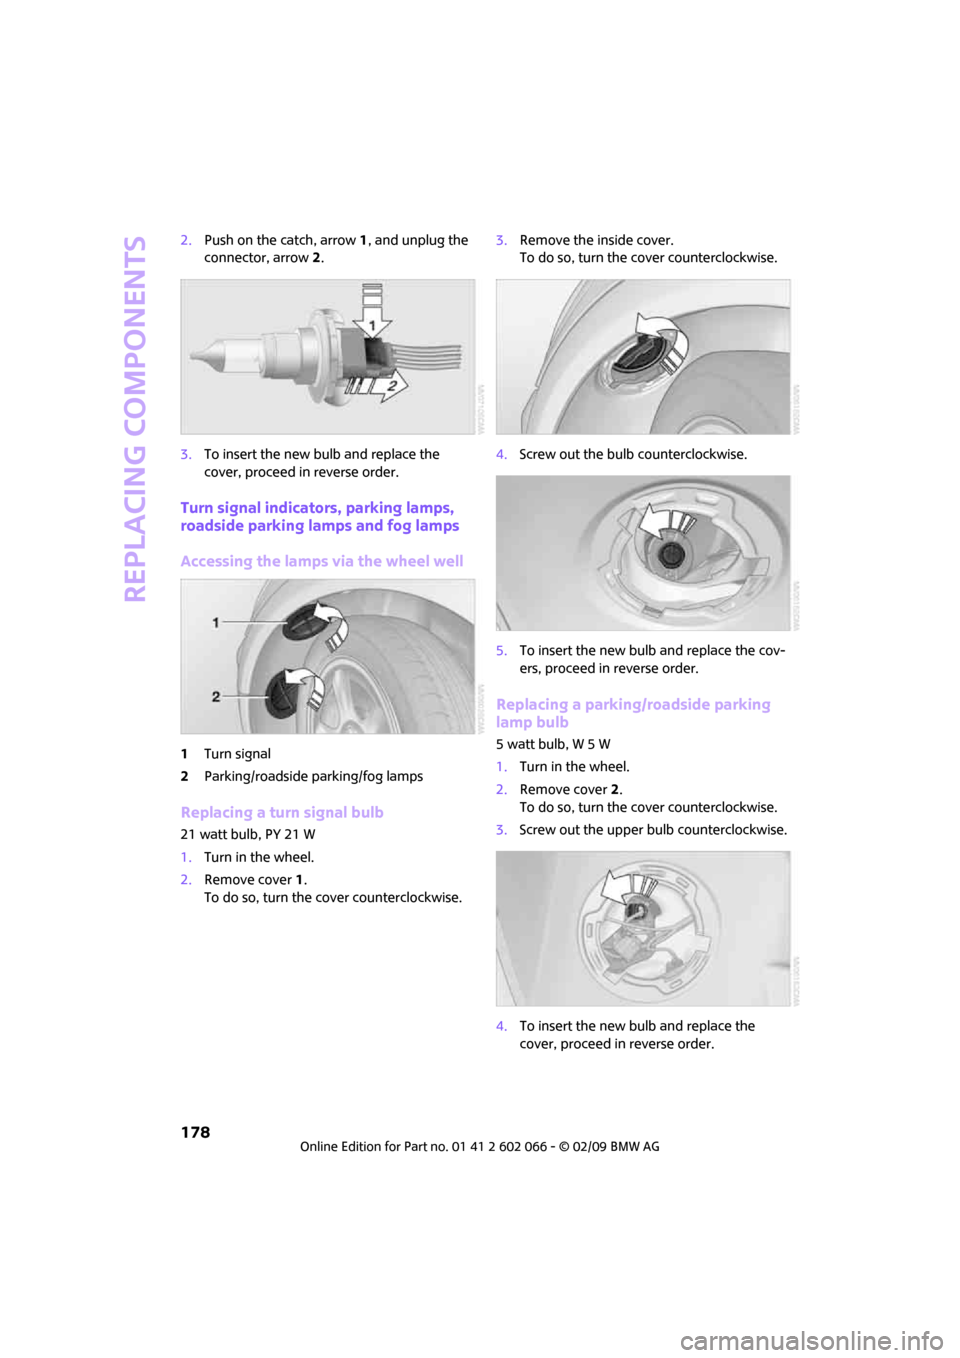
2.Push on the catch, arrow 1, and unplug the
connector, arrow2.
3.To insert the new bulb and replace the
cover, proceed in reverse order.
Turn signal indicators, parking lamps,
roadside parking lamps and fog lamps
Accessing the lamps via the wheel well
1Turn signal
2Parking/roadside parking/fog lamps
Replacing a turn signal bulb
21 watt bulb, PY 21 W
1.Turn in the wheel.
2.Remove cover 1.
To do so, turn the cover counterclockwise.3.Remove the inside cover.
To do so, turn the cover counterclockwise.
4.Screw out the bulb counterclockwise.
5.To insert the new bulb and replace the cov-
ers, proceed in reverse order.
Replacing a parking/roadside parking
lamp bulb
5 watt bulb, W 5 W
1.Turn in the wheel.
2.Remove cover 2.
To do so, turn the cover counterclockwise.
3.Screw out the upper bulb counterclockwise.
4.To insert the new bulb and replace the
cover, proceed in reverse order.
Page 181 of 218
MOBILITYAT A GLANCE CONTROLS DRIVING TIPS ENTERTAINMENT
179
NAVIGATION REFERENCE
Replacing a fog lamp bulb
H8 bulb, 35 watts
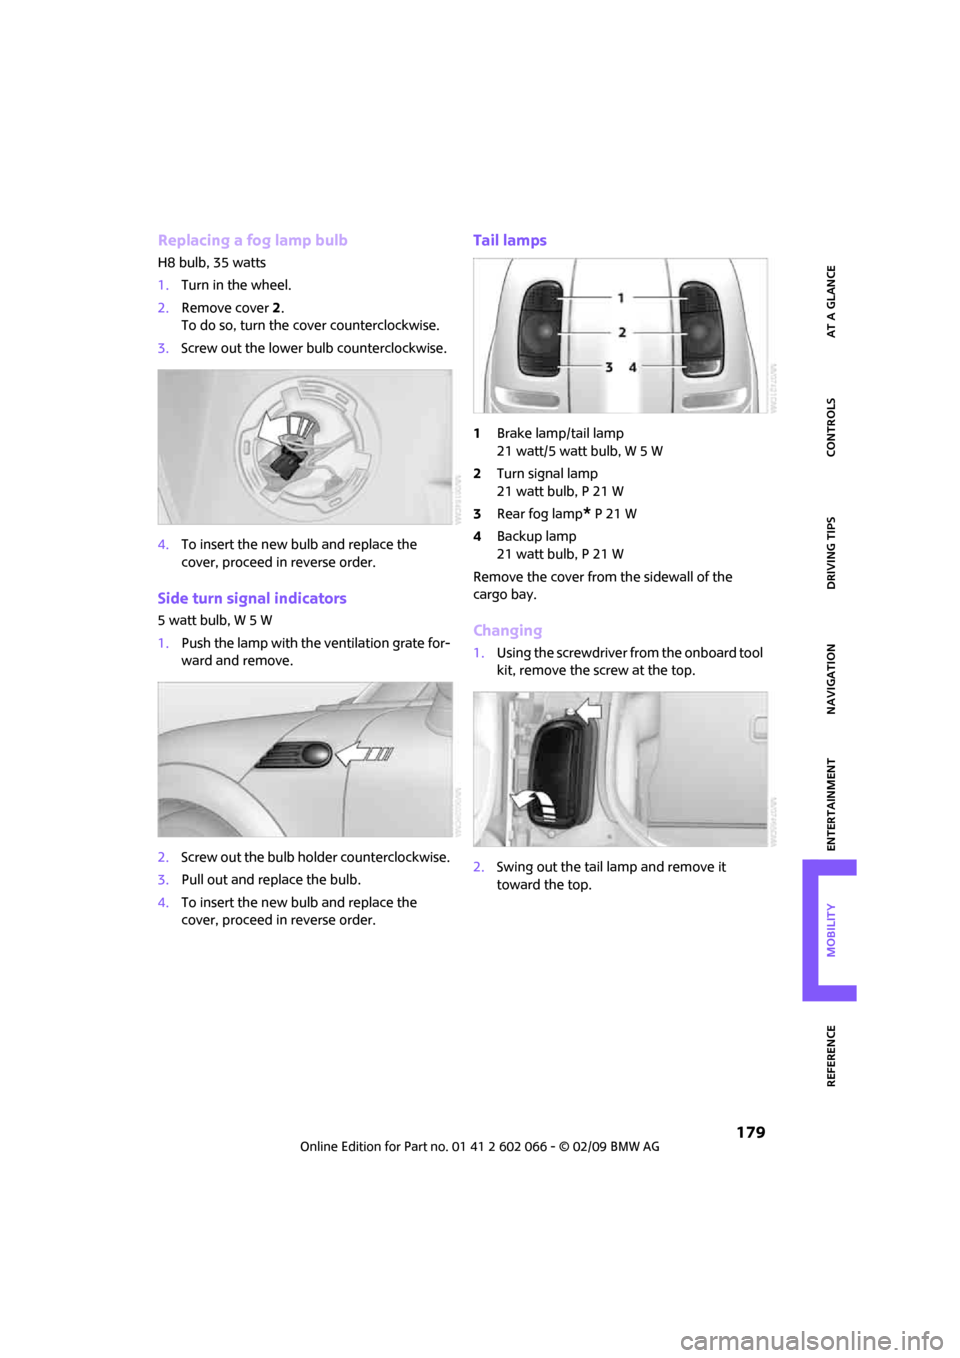
1.Turn in the wheel.
2.Remove cover 2.
To do so, turn the cover counterclockwise.
3.Screw out the lower bulb counterclockwise.
4.To insert the new bulb and replace the
cover, proceed in reverse order.
Side turn signal indicators
5 watt bulb, W 5 W
1.Push the lamp with the ventilation grate for-
ward and remove.
2.Screw out the bulb holder counterclockwise.
3.Pull out and replace the bulb.
4.To insert the new bulb and replace the
cover, proceed in reverse order.
Tail lamps
1Brake lamp/tail lamp
21 watt/5 watt bulb, W 5 W
2Turn signal lamp
21 watt bulb, P 21 W
3Rear fog lamp
* P 21 W
4Backup lamp
21 watt bulb, P 21 W
Remove the cover from the sidewall of the
cargo bay.
Changing
1.Using the screwdriver from the onboard tool
kit, remove the screw at the top.
2.Swing out the tail lamp and remove it
toward the top.
Page 212 of 218
From A to Z
210
Shifting gears
– automatic transmission with
Steptronic49
– manual transmission48
Shiftlock
– automatic transmission, refer
to Changing selector lever
positions48
Short commands for the voice
activation system195
"Short route" in
navigation118
Shortest route in navigation,
refer to Selecting route118
"Show current position"114
"Show destination
position"114
Shuffled, refer to Random
– CD changer146
– CD player146
Side airbags80
Side door, rear, refer to
Clubdoor31
Side turn signal indicator
– replacing bulb179
Side windows, refer to
Windows35
Signal horn, refer to Horn10
Sitting safely37
– airbags37
– safety belts37
– with head restraint37
Size, refer to Dimensions193
Sliding/tilt sunroof
– refer to Glass sunroof,
electric34
Slot for remote control46
Smokers' package, refer to
Ashtray93
Snap-in adapter, refer to
Center armrest storage
compartment91
Snow chains165
Socket for Onboard Diagnosis
OBD170
Socket, refer to Connecting
electrical appliances93
Song search, refer to Playing a
track144Sound output for
entertainment on/off132
Space-saver spare tire
– changing tires182
– inflation pressure158
Spare wheel, refer to Space-
saver spare tire182
Speaking, refer to Voice
instructions from navigation
system123
Special oils, refer to Approved
engine oils168
Speed192
– with winter tires165
Speed control, refer to Cruise
control53
Speed limit
67
– setting67
Speed limit warning, refer to
Speed limit67
"Speed volume", refer to Tone
control134
Speed-dependent volume133
Speedometer12
Split rear seat backrest, refer to
Expanding the cargo bay98
Splitdoor31
– opening from outside31
– unlocking with remote
control29
Sport button73
Stability control, refer to
Driving stability control
systems71
"Start guidance"115,117
Start menu17
Start/stop button46
– starting the engine46
– switching off the engine47
Starting assistance, refer to
Jump starting186
Starting, refer to Starting the
engine46
Starting the engine
– start/stop button46
Start-off assistance, refer to
– DSC71
– Hill Start Assist73"State / Province" in
destination entry109
Station, refer to Radio135
"Status"61
Status of this Owner's Manual
at time of printing4
Steering wheel41
– adjustment41
– buttons on steering wheel11
– lock46
– shift paddles49
Steptronic, refer to Automatic
transmission with
Steptronic48
"Stopwatch"68
Stopwatch68
Storage area
– cargo bay97
Storage compartment, front
passenger side92
Storage compartments91
Storage space
– storage compartments91
"Store in address book" in
navigation116
"Store" on the radio137,141
Storing current position
116
Storing radio stations137
Storing the vehicle175
Storing tires165
Stowage, refer to Storage
compartments91
"Street" in destination
entry110
Summer tires, refer to Wheels
and tires158
Switches, refer to Cockpit10
Switching off
– engine47
Switching off the engine
– start/stop button46
Switching on
– audio132
– CD changer132
– CD player132
– radio132
Switching on the hour
signal64
Page 214 of 218
From A to Z
212
Transporting children safely43
Tread depth, refer to Minimum
tire tread163
Treble, refer to Tone
control133
Treble, refer to Treble and
bass133
Treble, tone control133
"Trip computer"58
Trip computer58
Trip odometer55
Trip-distance counter, refer to
Trip odometer55
"Triple turn signal"51
Triple turn signal activation50
Turn signal indicator50
– front, replacing bulb178
– indicator lamp12,13
– rear, replacing bulb179
– side, replacing bulb179
Turning circle, refer to
Dimensions193
Tying down loads, refer to
Cargo loading100
U
Uniform Tire Quality Grading
UTQR162
"Units"60
Units
– average fuel consumption60
– temperature60
Universal garage door opener,
refer to Integrated universal
remote control89
Universal remove control89
Unlatching, refer to
Unlocking33
"Unlock button"28
Unlocking
– from inside30
– from outside27
– tailgate33
– without remote control, refer
to Convenient access32
Upholstery, care173
USB-audio interface150
V
Vehicle
– battery184
– breaking in96
– cargo loading97
– dimensions193
– Identification Number, refer
to Engine compartment167
– parking47
– storage175
– weight194
Vehicle jack183
– jacking points183
Vehicle position, refer to
Displaying current
position128
Ventilation
– air conditioner88
Vents, refer to Ventilation88
Voice commands
– overview21
– short commands195
Voice instructions from
navigation system123
– switching on/off123
– volume123
Volume132
– audio sources132
– speed-dependent
control133
– voice instructions123
Volume distribution
– front/rear133
– left/right133
Volume of cargo area194
W
Warning and indicator
lamps13
Warning messages, refer to
Check Control65
Warning triangle186
Washer fluid52
– capacity of reservoir53
Washer fluid reservoir52
Waste tray, refer to Ashtray92Water on roads, refer to
Driving through water97
Waterfall lighting, refer to
Ambient lighting85
Waveband of radio135
Wear indicators in tires, refer to
Minimum tread depth163
Weights194
Welcome lamps82
Wheel stud wrench
– space-saver spare tire183
Wheelbase, refer to
Dimensions193
Wheels and tires158
Wheels, new164
Width, refer to
Dimensions193
Window washer, refer to
Washer fluid52
Window washer reservoir,
refer to Washer fluid
– volume, refer to
Capacities194
Windows35
– closing35
– convenient operation28
– opening35
– pinch protection system36
Windows, indicator on Control
Display16
Windshield
– cleaning52
– defrosting and removing
condensation88
Windshield, defrosting, refer to
Defrosting windows88
Windshield washer system51
– washer fluid52
– washer nozzles52
Windshield wiper blades,
changing176
Windshield wipers, refer to
Wiper system51
Winter tires165
– setting speed limit67
– storage165
Wiper blade replacement176
Wiper system51