jump start MINI Clubman 2009 Owner's Manual
[x] Cancel search | Manufacturer: MINI, Model Year: 2009, Model line: Clubman, Model: MINI Clubman 2009Pages: 158, PDF Size: 2.51 MB
Page 122 of 158
Replacing components
120
of any kind. To do so could cause accidents and
personal injury.<
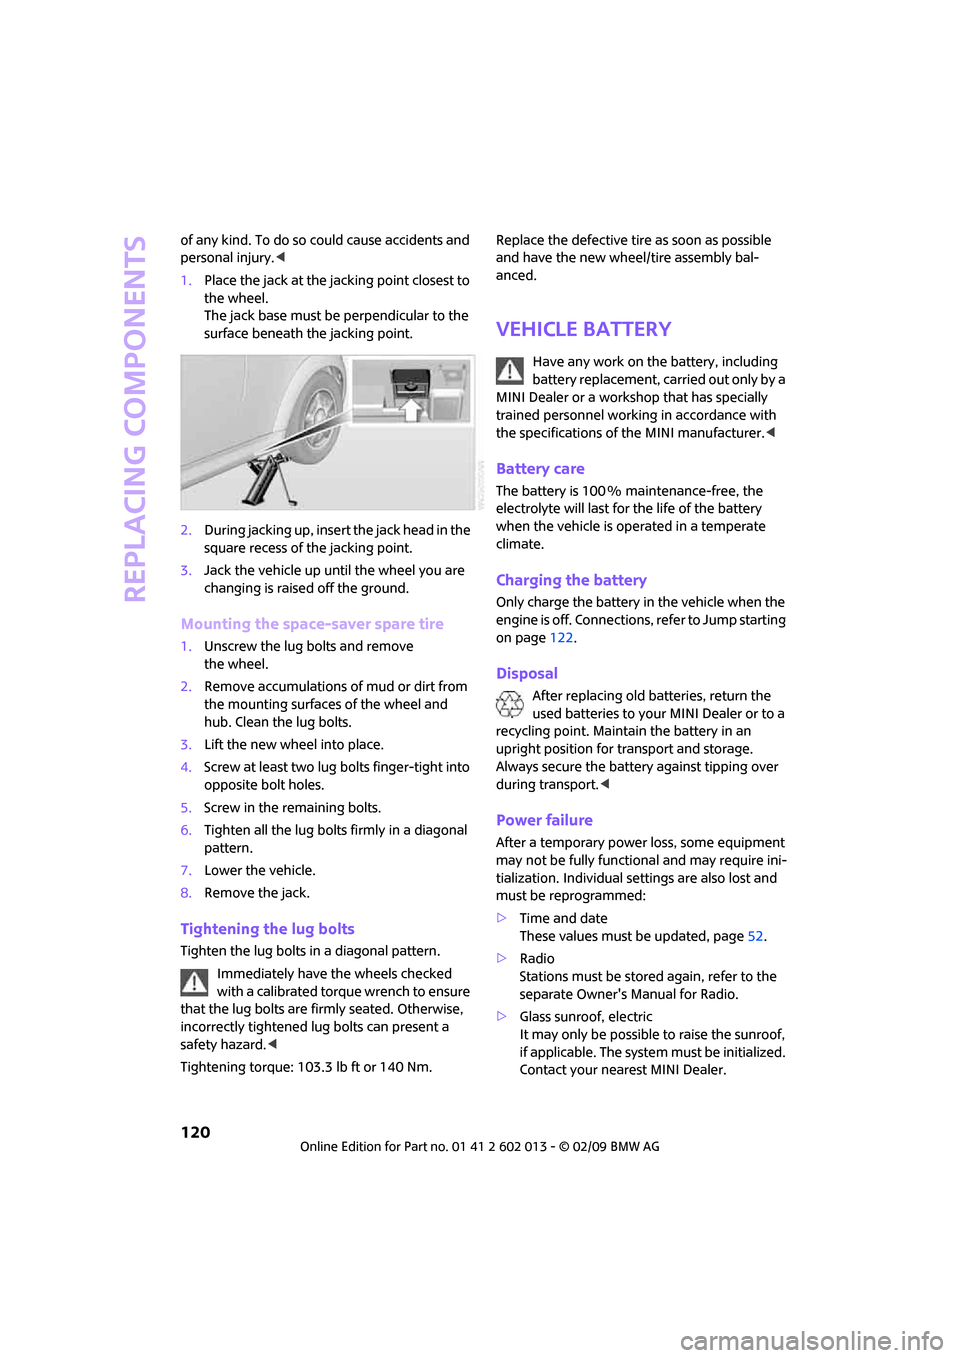
1.Place the jack at the jacking point closest to
the wheel.
The jack base must be perpendicular to the
surface beneath the jacking point.
2.During jacking up, insert the jack head in the
square recess of the jacking point.
3.Jack the vehicle up until the wheel you are
changing is raised off the ground.
Mounting the space-saver spare tire
1.Unscrew the lug bolts and remove
the wheel.
2.Remove accumulations of mud or dirt from
the mounting surfaces of the wheel and
hub. Clean the lug bolts.
3.Lift the new wheel into place.
4.Screw at least two lug bolts finger-tight into
opposite bolt holes.
5.Screw in the remaining bolts.
6.Tighten all the lug bolts firmly in a diagonal
pattern.
7.Lower the vehicle.
8.Remove the jack.
Tightening the lug bolts
Tighten the lug bolts in a diagonal pattern.
Immediately have the wheels checked
with a calibrated torque wrench to ensure
that the lug bolts are firmly seated. Otherwise,
incorrectly tightened lug bolts can present a
safety hazard.<
Tightening torque: 103.3 lb ft or 140 Nm.Replace the defective tire as soon as possible
and have the new wheel/tire assembly bal-
anced.
Vehicle battery
Have any work on the battery, including
battery replacement, carried out only by a
MINI Dealer or a workshop that has specially
trained personnel working in accordance with
the specifications of the MINI manufacturer.<
Battery care
The battery is 100 % maintenance-free, the
electrolyte will last for the life of the battery
when the vehicle is operated in a temperate
climate.
Charging the battery
Only charge the battery in the vehicle when the
engine is off. Connections, refer to Jump starting
on page122.
Disposal
After replacing old batteries, return the
used batteries to your MINI Dealer or to a
recycling point. Maintain the battery in an
upright position for transport and storage.
Always secure the battery against tipping over
during transport.<
Power failure
After a temporary power loss, some equipment
may not be fully functional and may require ini-
tialization. Individual settings are also lost and
must be reprogrammed:
>Time and date
These values must be updated, page52.
>Radio
Stations must be stored again, refer to the
separate Owner's Manual for Radio.
>Glass sunroof, electric
It may only be possible to raise the sunroof,
if applicable. The system must be initialized.
Contact your nearest MINI Dealer.
Page 124 of 158
Giving and receiving assistance
122
Giving and receiving assistance
Roadside Assistance
The Roadside Assistance service is there to
assist you around the clock in the event of a
breakdown, including on weekends and public
holidays.
The phone numbers of the Roadside Assistance
in your home country can be found in the Con-
tact brochure.
First aid pouch*
Some of the articles contained in the first aid
pouch have a limited service life. Therefore,
check the expiration dates of the contents
regularly and replace any items in good time, if
necessary.
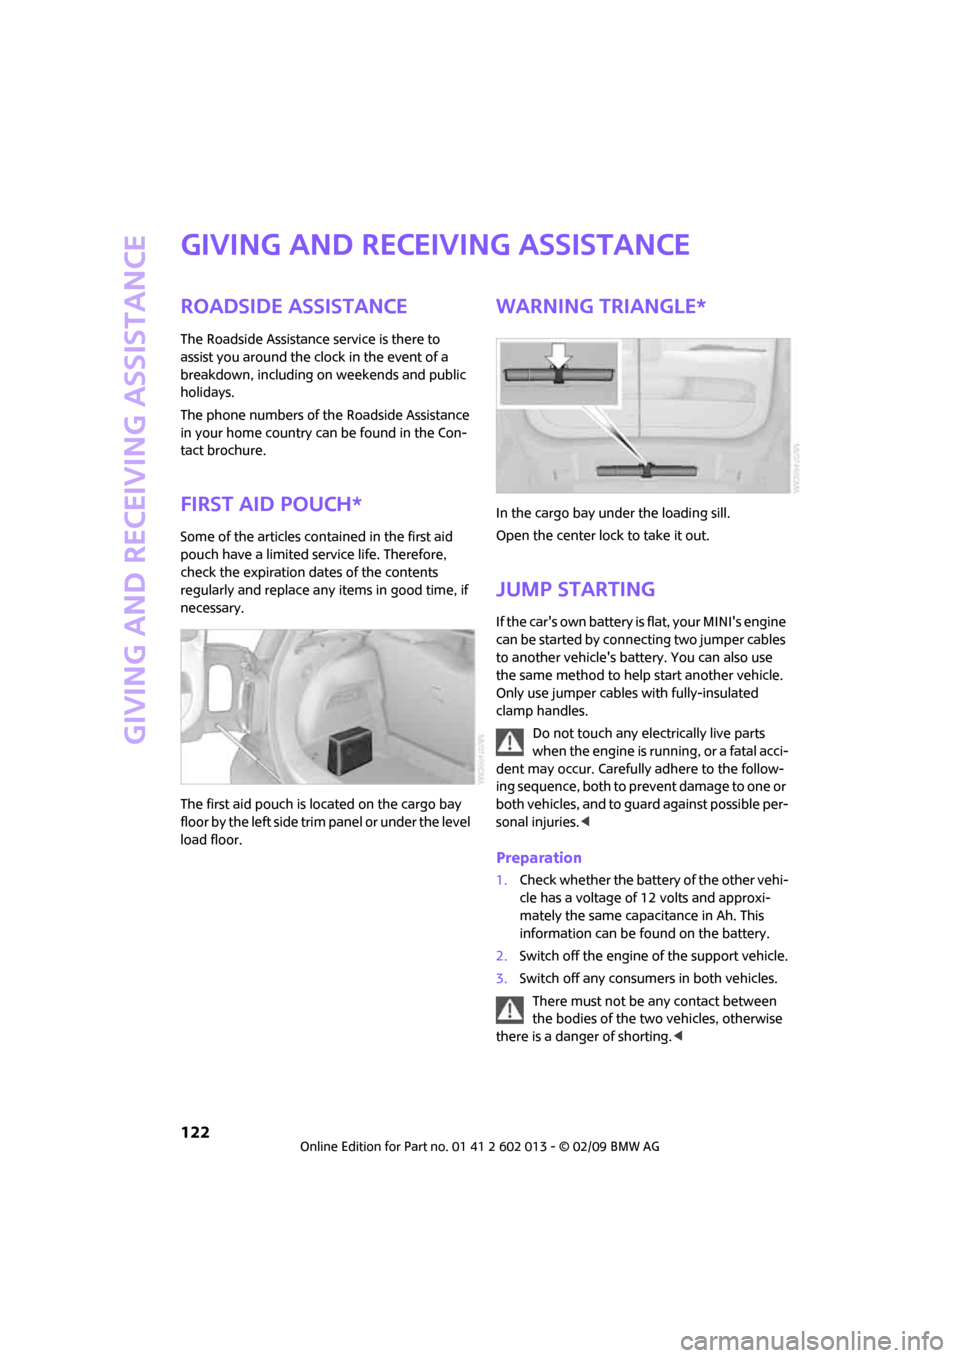
The first aid pouch is located on the cargo bay
floor by the left side trim panel or under the level
load floor.
Warning triangle*
In the cargo bay under the loading sill.
Open the center lock to take it out.
Jump starting
If the car's own battery is flat, your MINI's engine
can be started by connecting two jumper cables
to another vehicle's battery. You can also use
the same method to help start another vehicle.
Only use jumper cables with fully-insulated
clamp handles.
Do not touch any electrically live parts
when the engine is running, or a fatal acci-
dent may occur. Carefully adhere to the follow-
ing sequence, both to prevent damage to one or
both vehicles, and to guard against possible per-
sonal injuries.<
Preparation
1.Check whether the battery of the other vehi-
cle has a voltage of 12 volts and approxi-
mately the same capacitance in Ah. This
information can be found on the battery.
2.Switch off the engine of the support vehicle.
3.Switch off any consumers in both vehicles.
There must not be any contact between
the bodies of the two vehicles, otherwise
there is a danger of shorting.<
Page 125 of 158
REFERENCEAT A GLANCE CONTROLS DRIVING TIPS MOBILITY
123
Connecting jumper cables
Connect the jumper cables in the correct
order, so that no sparks which could cause
injury occur.<
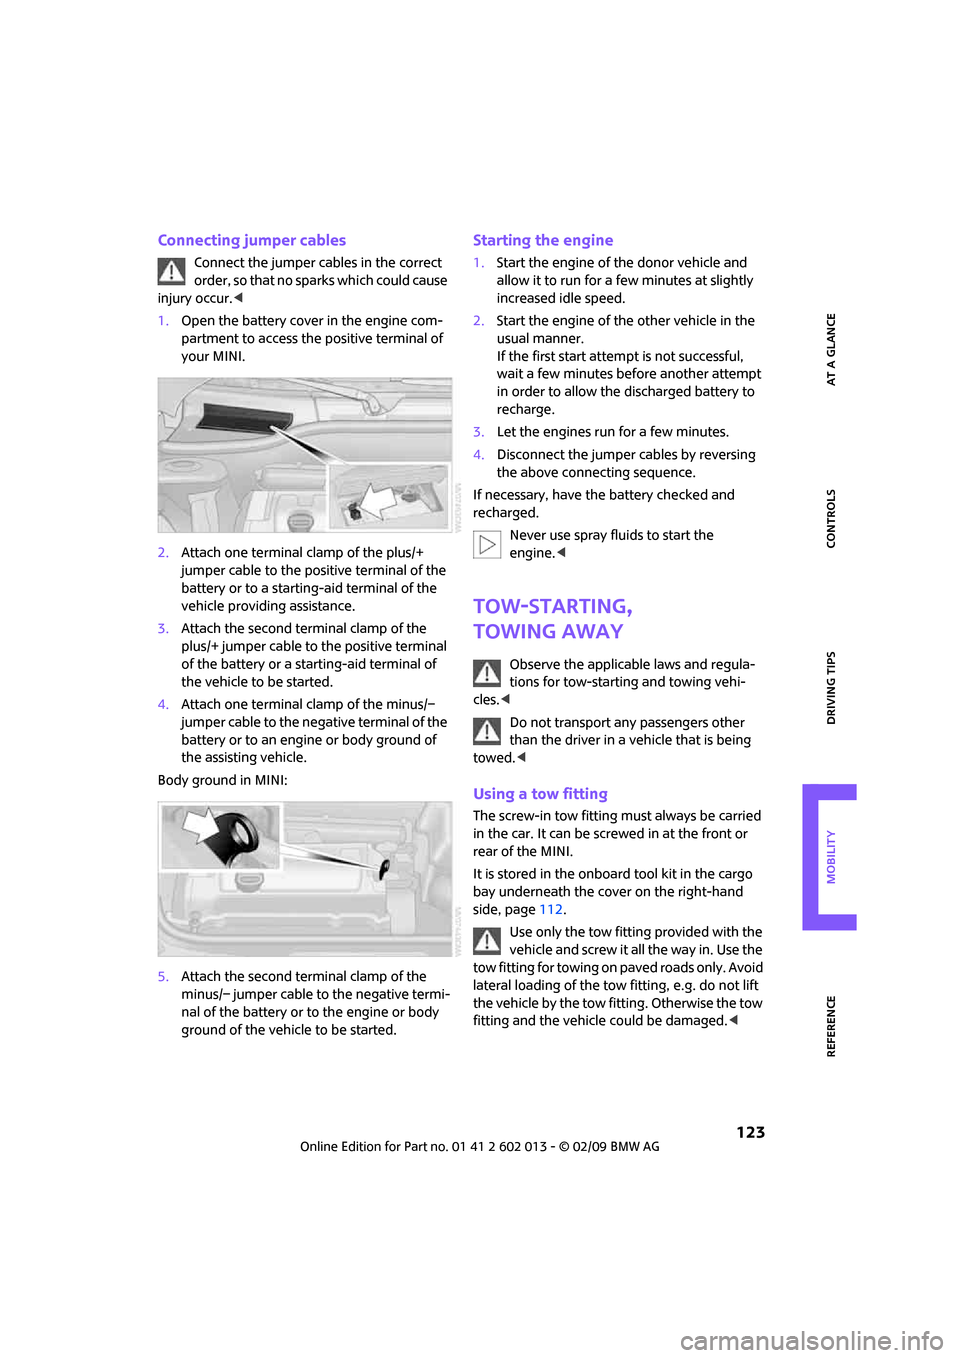
1.Open the battery cover in the engine com-
partment to access the positive terminal of
your MINI.
2.Attach one terminal clamp of the plus/+
jumper cable to the positive terminal of the
battery or to a starting-aid terminal of the
vehicle providing assistance.
3.Attach the second terminal clamp of the
plus/+ jumper cable to the positive terminal
of the battery or a starting-aid terminal of
the vehicle to be started.
4.Attach one terminal clamp of the minus/–
jumper cable to the negative terminal of the
battery or to an engine or body ground of
the assisting vehicle.
Body ground in MINI:
5.Attach the second terminal clamp of the
minus/– jumper cable to the negative termi-
nal of the battery or to the engine or body
ground of the vehicle to be started.
Starting the engine
1.Start the engine of the donor vehicle and
allow it to run for a few minutes at slightly
increased idle speed.
2.Start the engine of the other vehicle in the
usual manner.
If the first start attempt is not successful,
wait a few minutes before another attempt
in order to allow the discharged battery to
recharge.
3.Let the engines run for a few minutes.
4.Disconnect the jumper cables by reversing
the above connecting sequence.
If necessary, have the battery checked and
recharged.
Never use spray fluids to start the
engine.<
Tow-starting,
towing away
Observe the applicable laws and regula-
tions for tow-starting and towing vehi-
cles.<
Do not transport any passengers other
than the driver in a vehicle that is being
towed.<
Using a tow fitting
The screw-in tow fitting must always be carried
in the car. It can be screwed in at the front or
rear of the MINI.
It is stored in the onboard tool kit in the cargo
bay underneath the cover on the right-hand
side, page112.
Use only the tow fitting provided with the
vehicle and screw it all the way in. Use the
tow fitting for towing on paved roads only. Avoid
lateral loading of the tow fitting, e.g. do not lift
the vehicle by the tow fitting. Otherwise the tow
fitting and the vehicle could be damaged.<
Page 126 of 158
Giving and receiving assistance
124
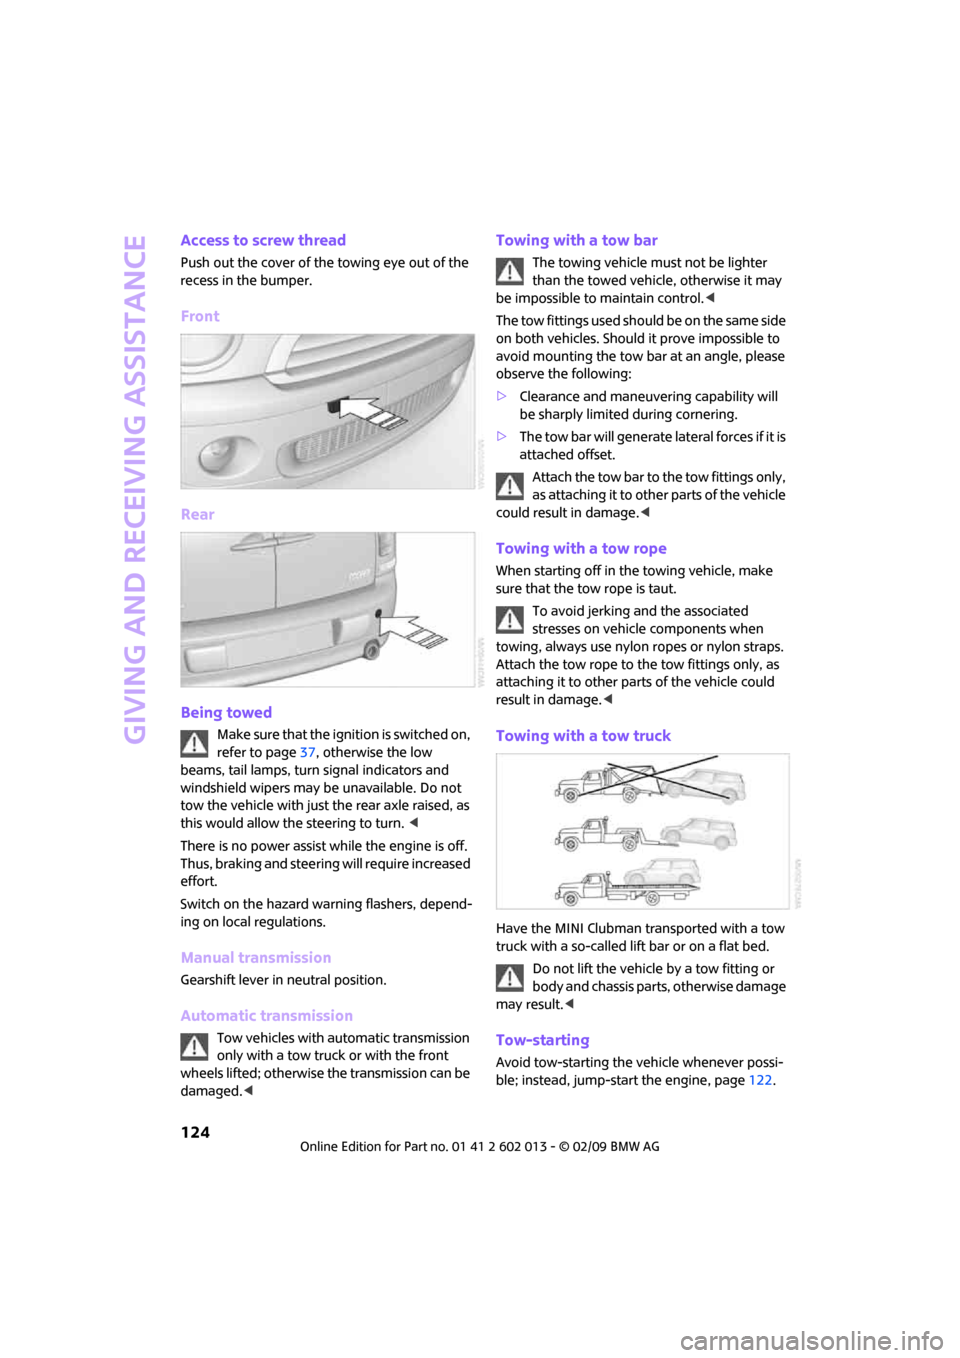
Access to screw thread
Push out the cover of the towing eye out of the
recess in the bumper.
Front
Rear
Being towed
Make sure that the ignition is switched on,
refer to page37, otherwise the low
beams, tail lamps, turn signal indicators and
windshield wipers may be unavailable. Do not
tow the vehicle with just the rear axle raised, as
this would allow the steering to turn. <
There is no power assist while the engine is off.
Thus, braking and steering will require increased
effort.
Switch on the hazard warning flashers, depend-
ing on local regulations.
Manual transmission
Gearshift lever in neutral position.
Automatic transmission
Tow vehicles with automatic transmission
only with a tow truck or with the front
wheels lifted; otherwise the transmission can be
damaged.<
Towing with a tow bar
The towing vehicle must not be lighter
than the towed vehicle, otherwise it may
be impossible to maintain control.<
The tow fittings used should be on the same side
on both vehicles. Should it prove impossible to
avoid mounting the tow bar at an angle, please
observe the following:
>Clearance and maneuvering capability will
be sharply limited during cornering.
>The tow bar will generate lateral forces if it is
attached offset.
Attach the tow bar to the tow fittings only,
as attaching it to other parts of the vehicle
could result in damage.<
Towing with a tow rope
When starting off in the towing vehicle, make
sure that the tow rope is taut.
To avoid jerking and the associated
stresses on vehicle components when
towing, always use nylon ropes or nylon straps.
Attach the tow rope to the tow fittings only, as
attaching it to other parts of the vehicle could
result in damage.<
Towing with a tow truck
Have the MINI Clubman transported with a tow
truck with a so-called lift bar or on a flat bed.
Do not lift the vehicle by a tow fitting or
body and chassis parts, otherwise damage
may result.<
Tow-starting
Avoid tow-starting the vehicle whenever possi-
ble; instead, jump-start the engine, page122.
Page 146 of 158
From A to Z
144
From A to Z
INDEX
A
Accessories, refer to Your
individual vehicle4
Activated-charcoal filter for
automatic climate control74
Additives
– coolant105
– engine oil104
Adjusting temperature inside
the car, refer to Air
conditioner71
Adjusting temperature inside
the car, refer to Automatic
climate control72
Air conditioner70
Air conditioning mode
– air conditioner71
– automatic climate control72
– ventilation74
Air distribution
– automatic73
– individual72
– manual72
Air flow rate71,72
– air conditioning system71
– automatic climate control72
– heating, ventilation71
Air outlets, refer to Air vents70
Air pressure, checking, refer to
Tire inflation pressure94
Air recirculation, refer to
Recirculated-air
mode71,73
Air supply
– air conditioner71
– automatic climate control72
– ventilation74
Air vents70
Airbags63
– sitting safely29
– warning lamp64
Airing, refer to Ventilation74AKI, refer to Fuel
specifications93
Alarm system24
All-season tires, refer to Winter
tires101
Ambient air, refer to
Recirculated-air
mode71,73
Ambient lighting69
Antenna, care108
Antifreeze
– coolant105
– washer fluid44
Antilock Brake System ABS56
Anti-theft alarm system, refer
to Alarm system24
Anti-theft system
19
Approved axle loads, refer to
Weights142
Approved engine oils104
Approved gross vehicle
weight, refer to Weights142
Armrest, refer to Center
armrest77
Ashtray79
Assistant systems, refer to
– Dynamic Stability Control
DSC56
Audio device, external77
AUTO program for automatic
climate control73
Automatic
– air distribution73
– air flow rate73
– cruise control44
– headlamp control65
Automatic climate control70
– automatic air distribution73Automatic transmission with
Steptronic39
– interlock39
– overriding selector lever
lock41
– shiftlock39
– sport program40
AUX-In, refer to External audio
device77
Average fuel consumption47
– setting the units49
Average speed48
Axle loads, refer to
Weights142B
Background lighting, refer to
Ambient lighting69
Backrests, refer to Seats29
Backup lamps
– replacing bulb115
Band-aids, refer to First aid
pouch122
Bar, refer to Tow-starting,
towing away124
Battery120
– charging120
– disposal27,120
– jump starting122
– temporary power failure120
Battery renewal
– remote control27
Being towed124
Belt tensioner, refer to Safety
belts32
Belts, refer to Safety belts32
Beverage holders, refer to Cup
holders79
Blower, refer to Air flow
rate71,72
Bonnet102
Page 150 of 158
From A to Z
148
Gross vehicle weight, refer to
Weights142
H
Halogen lamps
– replacing bulb113
Handbrake, refer to Parking
brake38
Hands-free system14
Hazard warning flashers14
Head airbags63
Head restraints31
– sitting safely29
Headlamp control,
automatic65
Headlamp flasher41
– indicator lamp11,126
Headlamps
– replacing bulb113
Headlamps, care109
Heated
– mirrors33
– rear window71,73
– seats31
Heating70
– mirrors33
– rear window71,73
– seats31
Heavy loads, refer to Stowing
cargo86
Height adjustment
– seats30
– steering wheel33
Height, refer to
Dimensions141
High beams67
– headlamp flasher67
– indicator lamp126
– replacing bulb113
High water, refer to Driving
through water83
Hill Start Assist57
Hills83
Holders for cups79
Homepage4
Horn10
Hot exhaust system82
Hydroplaning82
I
Ice warning46
Icy roads, refer to Outside
temperature warning46
Ignition37
– switched off37
– switched on37
Ignition key position 1, refer to
Radio readiness37
Ignition key position 2, refer to
Ignition on37
Ignition key, refer to
Integrated key/remote
control18
Ignition lock37
Imprint2
Indicator and warning
lamps13,126
– Tire Pressure Monitor TPM61
Indicator lighting, refer to
Instrument lighting68
Individual air distribution72
Individual settings, refer to
Personal Profile18
Inflation pressure monitoring,
refer to Tire Pressure Monitor
TPM60
Initializing
– Flat Tire Monitor FTM58
– glass sunroof, electric28
Instrument cluster, refer to
Displays12
Instrument lighting68
Instrument panel, refer to
Cockpit10
Instrument panel, refer to
Displays12
Integrated key18
Integrated universal remove
control75
Interior lamps68
– remote control21
Interior rearview mirror33
– automatic dimming
feature33
Interlock39
Intermittent mode of the
wipers42Internet page4J
Jacking points119
Jets, refer to Window washer
nozzles44
Jump starting122
Jumpering, refer to Jump
starting122
K
Key Memory, refer to Personal
Profile18
Key, refer to Keys/remote
controls18
Keyless go, refer to Convenient
access25
Keyless opening and closing,
refer to Convenient
access25
Kick-down40
– automatic transmission with
Steptronic40
Knock control93
L
Lamps and bulbs, replacing
bulbs112
Lamps, refer to Parking lamps/
Low beams65
Lashing eyes, refer to Securing
cargo86
LATCH child-restraint fixing
system35
Leather care110
LEDs light-emitting diodes113
Length, refer to
Dimensions141
Level load floor85
License plate lamp
– bulb replacement116
Light switch65
Light-alloy wheels, care109
Light-emitting diodes
LEDs113
Page 153 of 158
REFERENCEAT A GLANCE CONTROLS DRIVING TIPS MOBILITY
151
S
Safety belts32
– damage32
– indicator lamp32
– reminder32
– sitting safely29
Safety belts, care110
Safety systems
– airbags63
– Antilock Brake System
ABS56
– Dynamic Stability Control
DSC56
– safety belts32
Safety tires, refer to Run-Flat
Tires100
Screw thread for tow
fitting124
Seat adjustment
– mechanical30
Seats29
– adjusting the seats30
– heating31
– sitting safely29
Securing the vehicle
– from inside22
– from outside19
Selector lever
– automatic transmission with
Steptronic39
Selector lever lock
– automatic transmission with
Steptronic, refer to
Shiftlock39
– overriding manually41
Selector lever positions
– automatic transmission with
Steptronic39
Service car, refer to Roadside
Assistance122
Service data in the remote
control106
Service Interval Display, refer
to Condition Based Service
CBS106
Service, refer to Roadside
Assistance122Service requirement display,
refer to Condition Based
Service CBS106
Service requirements51
Settings
– clock, 12h/24h mode49
Shifting gears
– automatic transmission with
Steptronic40
– manual transmission39
Shiftlock
– automatic transmission, refer
to Changing selector lever
positions39
Side airbags63
Side door, rear, refer to
Clubdoor23
Side turn signal indicator
– replacing bulb115
Side windows, refer to
Windows
28
Signal horn, refer to Horn10
Sitting safely29
– airbags29
– safety belts29
– with head restraint29
Size, refer to Dimensions141
Sliding/tilt sunroof
– refer to Glass sunroof,
electric27
Slot for remote control37
Smokers' package, refer to
Ashtray79
Snap-in adapter, refer to
Center armrest storage
compartment77
Snow chains101
Socket for Onboard Diagnosis
OBD106
Socket, refer to Connecting
electrical appliances79
Space-saver spare tire
– changing tires118
– inflation pressure94
Spare wheel, refer to Space-
saver spare tire118
Special oils, refer to Approved
engine oils104Speed140
– with winter tires101
Speed control, refer to Cruise
control44
Speedometer12
Split rear seat backrest, refer to
Expanding the cargo bay84
Splitdoor23
– opening from outside24
– unlocking with remote
control21
Sport button57
Stability control, refer to
Driving stability control
systems55
Start/stop button37
– starting the engine37
– switching off the engine38
Starting assistance, refer to
Jump starting122
Starting, refer to Starting the
engine37
Starting the engine
– start/stop button37
Start-off assistance, refer to
– DSC56
– Hill Start Assist57
Status of this Owner's Manual
at time of printing4
Steering wheel33
– adjustment33
– buttons on steering wheel11
– lock37
– shift paddles40
Steptronic, refer to Automatic
transmission with
Steptronic39
Storage area
– cargo bay84
Storage compartment, front
passenger side78
Storage compartments78
Storage space
– storage compartments78
Storing the vehicle111
Storing tires101
Stowage, refer to Storage
compartments78