wheel size MINI Clubman 2009 Owner's Manual
[x] Cancel search | Manufacturer: MINI, Model Year: 2009, Model line: Clubman, Model: MINI Clubman 2009Pages: 158, PDF Size: 2.51 MB
Page 64 of 158
Technology for driving comfort and safety
62
Declaration according to
NHTSA/FMVSS 138 Tire Pressure
Monitoring Systems
Each tire, including the spare, should be
checked monthly when cold and inflated to the
inflation pressure recommended by the vehicle
manufacturer on the vehicle placard or tire infla-
tion pressure label. If your vehicle has tires of a
different size than the size indicated on the vehi-
cle placard or tire inflation pressure label, you
should determine the proper tire inflation pres-
sure for those tires. As an added safety feature,
your vehicle has been equipped with a tire pres-
sure monitoring system TPMS that illuminates a
low tire pressure telltale when one or more of
your tires are significantly under-inflated.
Accordingly, when the low tire pressure telltale
illuminates, you should stop and check your tires
as soon as possible, and inflate them to the
proper pressure. Driving on a significantly
under-inflated tire causes the tire to overheat
and can lead to tire failure. Underinflation also
reduces fuel efficiency and tire tread life, and
may affect the vehicle's handling and stopping
ability. Please note that the TPMS is not a substi-
tute for proper tire maintenance, and it is the
driver's responsibility to maintain correct tire
pressure, even if underinflation has not reached
the level at which the TPMS low tire pressure tell-
tale illuminates.
The TPMS malfunction indicator is combined
with the low tire pressure telltale. When the sys-
tem detects a malfunction, the telltale will flash
for approximately one minute and then remain
continuously lit. This sequence will continue
upon subsequent vehicle startups as long as the
malfunction exists. When the malfunction indi-
cator is illuminated, the system may not be able
to detect or signal low tire pressure as intended.
TPMS malfunctions may occur for a variety of
reasons, including the installation of replace-
ment or alternate tires or wheels on the vehicle
that prevent the TPMS from functioning prop-
erly. Always check the TPMS malfunction telltale
after replacing one or more tires or wheels on
your vehicle to ensure that the replacement or
alternate tires and wheels allow the TPMS to
continue to function properly.
Page 96 of 158
Wheels and tires
94
Wheels and tires
Tire inflation pressures
Information for your safety
It is not merely the tires' service life, but also
driving comfort and, to a great extent, driving
safety that depend on the condition of the tires
and the maintenance of the specified tire
pressure.
Checking pressure
Check the tire inflation pressure regularly
and correct it, if necessary: at least twice a
month and before starting long trips. If you fail
to observe this precaution you may be driving
on tires with incorrect tire pressures, a condition
that can not only compromise your vehicle's
driving stability, but also lead to tire damage and
the risk of an accident. Do not drive with
deflated, i.e. flat tires, except when using Run-
Flat Tires. A flat tire will seriously impair your
vehicle's handling and braking response.
Attempts to drive on a flat tire can lead to loss of
control over the vehicle.<
Check the tire inflation pressures only on cold
tires. This means after a maximum of 1.25 miles/
2 km driving or when the vehicle has been
parked for at least 2 hours. When tires are warm,
the tire inflation pressure is higher.
After adjusting the tire inflation pressure,
reinitialize the flat tire monitor, page58,
or reset the tire pressure control, page60.<
Checking the tire inflation pressure of
the compact tire*
To check the inflation pressure, fold up the level
load floor. Remove the onboard tool kit and the
space-saver spare tire, refer to page119.
Inflation pressure specifications
The tables below provide all the correct inflation
pressures for the specified tire sizes at ambient
temperature.The tire inflation pressures apply to
the tire sizes approved and the tire
brands recommended by the manufacturer of
your MINI. Your MINI Dealer will be glad to
advise you.<
For correct identification of the right tire infla-
tion pressures, observe the following:
>Tire sizes for your vehicle
>Load conditions
>Maximum allowable driving speed
Tire inflation pressures for driving up to
100 mph or 160 km/h
For normal driving speeds of up to 100 mph or
160 km/h and to achieve optimum driving com-
fort, adjust pressures to the respective tire infla-
tion pressures listed on the following pages in
the columns for traveling speeds up to a maxi-
mum of 100 mph or 160 km/h.
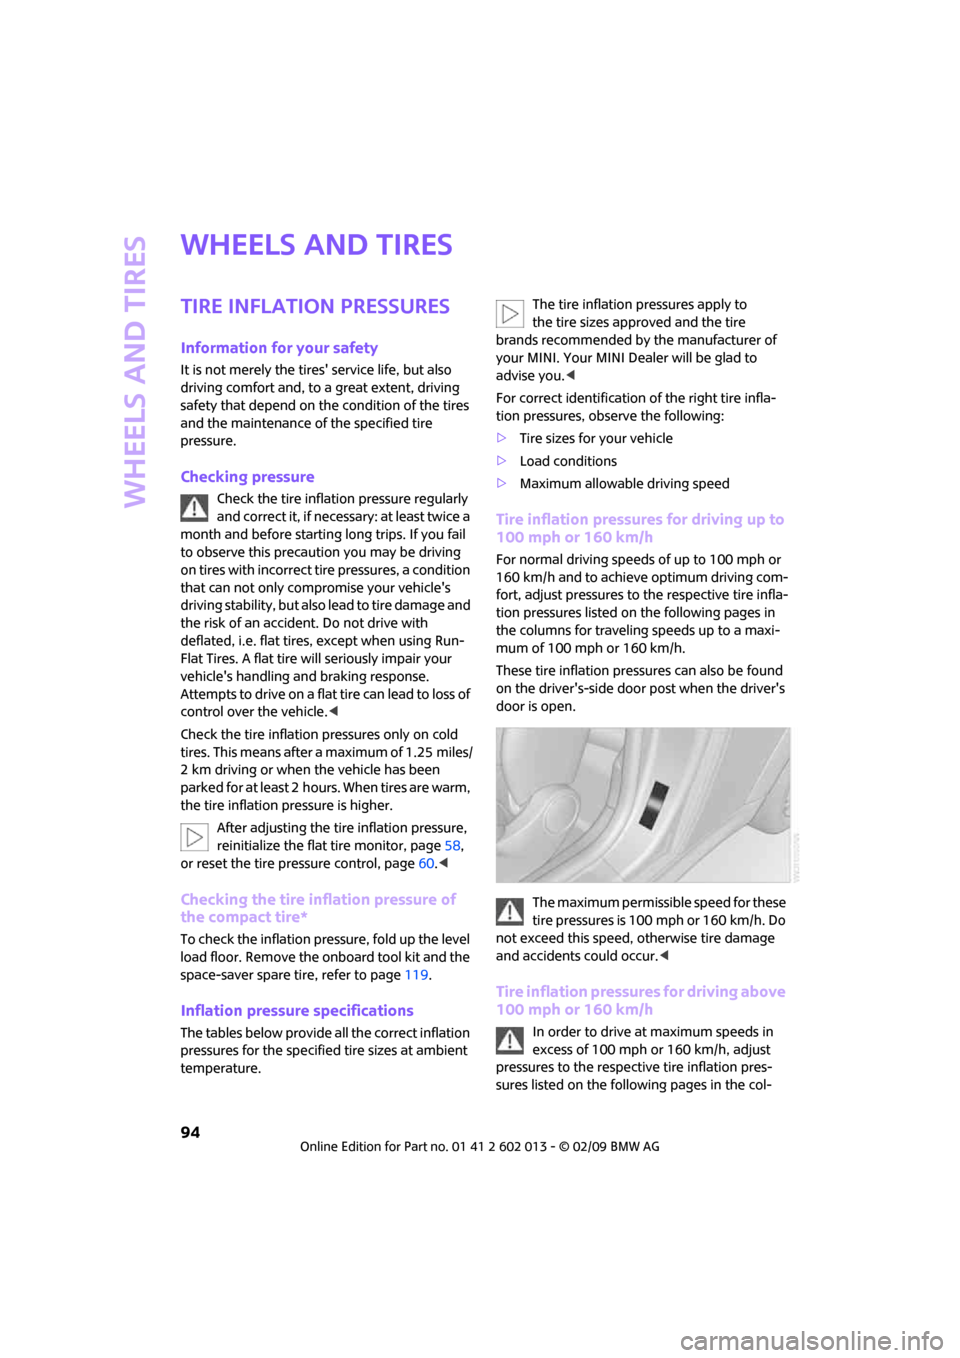
These tire inflation pressures can also be found
on the driver's-side door post when the driver's
door is open.
The maximum permissible speed for these
tire pressures is 100 mph or 160 km/h. Do
not exceed this speed, otherwise tire damage
and accidents could occur.<
Tire inflation pressures for driving above
100 mph or 160 km/h
In order to drive at maximum speeds in
excess of 100 mph or 160 km/h, adjust
pressures to the respective tire inflation pres-
sures listed on the following pages in the col-
Page 97 of 158
REFERENCEAT A GLANCE CONTROLS DRIVING TIPS MOBILITY
95
umns for traveling speeds including those
exceeding 100 mph or 160 km/h. Otherwise tire
damage and accidents could occur.
occur.
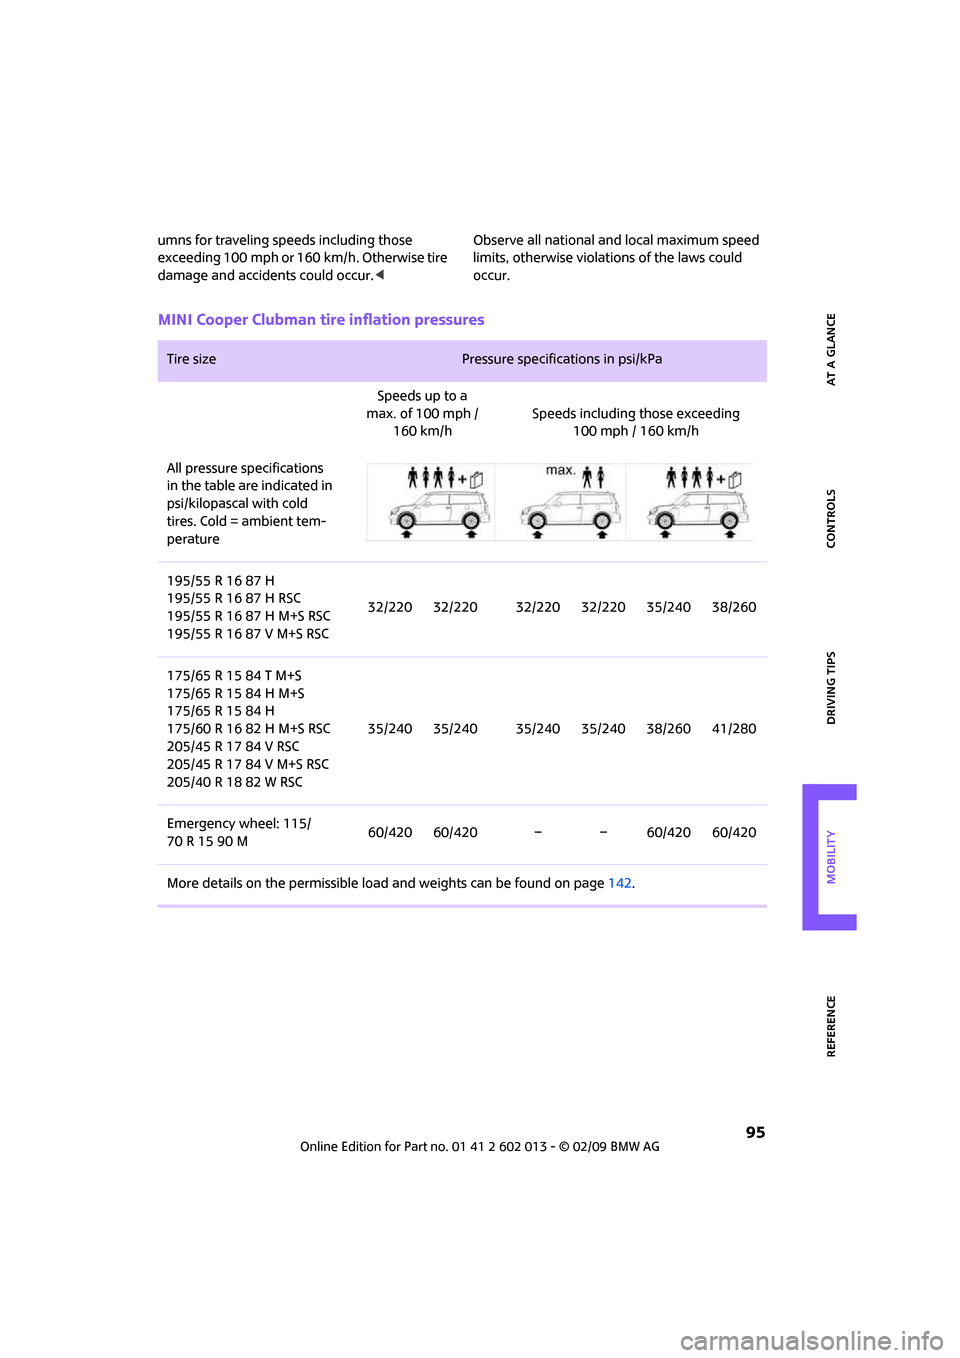
MINI Cooper Clubman tire inflation pressures
Tire size Pressure specifications in psi/kPa
Speeds up to a
max. of 100 mph /
160 km/hSpeeds including those exceeding
100 mph / 160 km/h
All pressure specifications
in the table are indicated in
psi/kilopascal with cold
tires. Cold = ambient tem-
perature
195/55 R 16 87 H
195/55 R 16 87 H RSC
195/55 R 16 87 H M+S RSC
195/55 R 16 87 V M+S RSC32/220 32/220 32/220 32/220 35/240 38/260
175/65 R 15 84 T M+S
175/65 R 15 84 H M+S
175/65 R 15 84 H
175/60 R 16 82 H M+S RSC
205/45 R 17 84 V RSC
205/45 R 17 84 V M+S RSC
205/40 R 18 82 W RSC35/240 35/240 35/240 35/240 38/260 41/280
Emergency wheel: 115/
70R1590M60/420 60/420 – – 60/420 60/420
More details on the permissible load and weights can be found on page142.
Page 98 of 158
Wheels and tires
96
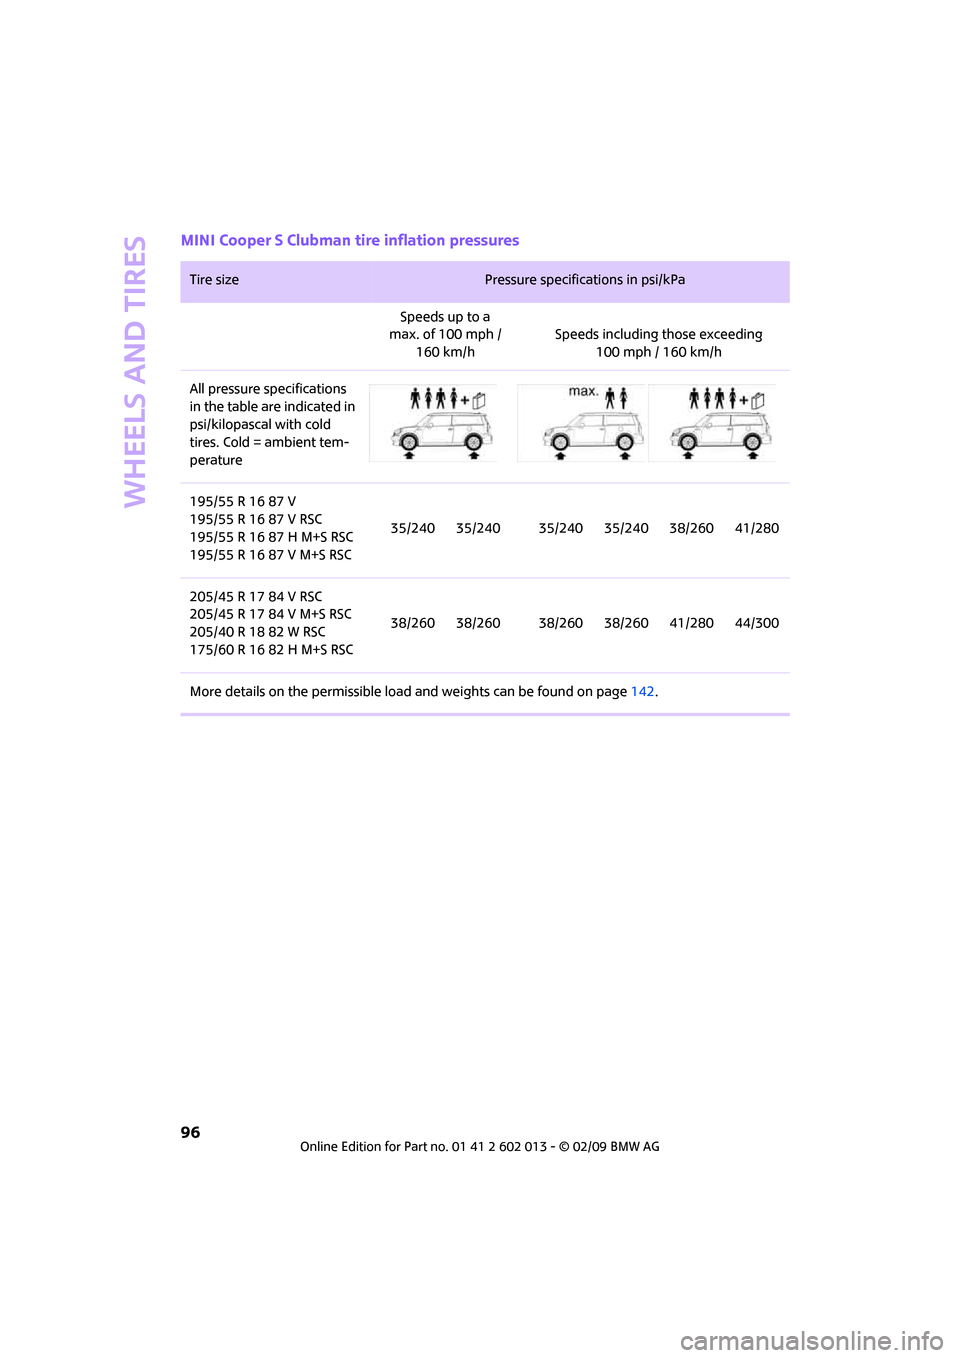
MINI Cooper S Clubman tire inflation pressures
Tire size Pressure specifications in psi/kPa
Speeds up to a
max. of 100 mph /
160 km/hSpeeds including those exceeding
100 mph / 160 km/h
All pressure specifications
in the table are indicated in
psi/kilopascal with cold
tires. Cold = ambient tem-
perature
195/55 R 16 87 V
195/55 R 16 87 V RSC
195/55 R 16 87 H M+S RSC
195/55 R 16 87 V M+S RSC35/240 35/240 35/240 35/240 38/260 41/280
205/45 R 17 84 V RSC
205/45 R 17 84 V M+S RSC
205/40 R 18 82 W RSC
175/60 R 16 82 H M+S RSC38/260 38/260 38/260 38/260 41/280 44/300
More details on the permissible load and weights can be found on page142.
Page 100 of 158
Wheels and tires
98
Tire coding
Knowledge of the labeling on the side of the
tire makes it easier to identify and choose the
right tires.
Tire size
Speed code letter
Q = up to 100 mph or 160 km/h
T = up to 118 mph or 190 km/h
H = up to 131 mph or 210 km/h
V = up to 150 mph or 240 km/h
W = up to 167 mph or 270 km/h
Y = up to 186 mph or 300 km/h
Tire Identification Number
Tires with DOT codes meet the guidelines of the
US Department of Transportation.
DOT code:
Uniform Tire Quality Grading
Quality grades can be found where applicable
on the tire sidewall between tread shoulder and
maximum section width. For example:
Tread wear 200 Traction AA
Temperature A
DOT Quality Grades
Tread wear
Traction AA A B C
Temperature A B C
All passenger car tires must conform to
Federal Safety Requirements in addition
to these grades.<
Tread wear
The tread wear grade is a comparative rating
based on the wear rate of the tire when tested under controlled conditions on a specified gov-
ernment test course. For example, a tire graded
150 would wear one and one-half (1γ) times as
well on the government course as a tire graded
100. The relative performance of tires depends
upon the actual conditions of their use, how-
ever, and may depart significantly from the
norm due to variations in driving habits, service
practices and differences in road characteristics
and climate.
Traction
The traction grades, from highest to lowest, are
AA, A, B, and C.
Those grades represent the tire's ability to stop
on wet pavement as measured under controlled
conditions on specified government test sur-
faces of asphalt and concrete. A tire marked C
may have poor traction performance.
The traction grade assigned to this tire
is based on straight-ahead braking trac-
tion tests, and does not include acceleration,
cornering, hydroplaning, or peak traction char-
acteristics.<
Temperature
The temperature grades are A, the highest, B,
and C, representing the tire's resistance to the
generation of heat and its ability to dissipate
heat when tested under controlled conditions
on a specified indoor laboratory test wheel. Sus-
tained high temperature can cause the material
of the tire to degenerate and reduce tire life, and
excessive temperature can lead to sudden tire
failure. The grade C corresponds to a level of
performance which all passenger car tires must
meet under the Federal Motor Vehicle Safety
Standard No. 109. Grades B and A represent
higher levels of performance on the laboratory
test wheel than the minimum required by law.
The temperature grade for this tire is
established for a tire that is properly
inflated and not overloaded. Excessive speed,
underinflation, or excessive loading, either sep-
arately or in combination, can cause heat
buildup and possible tire failure.<
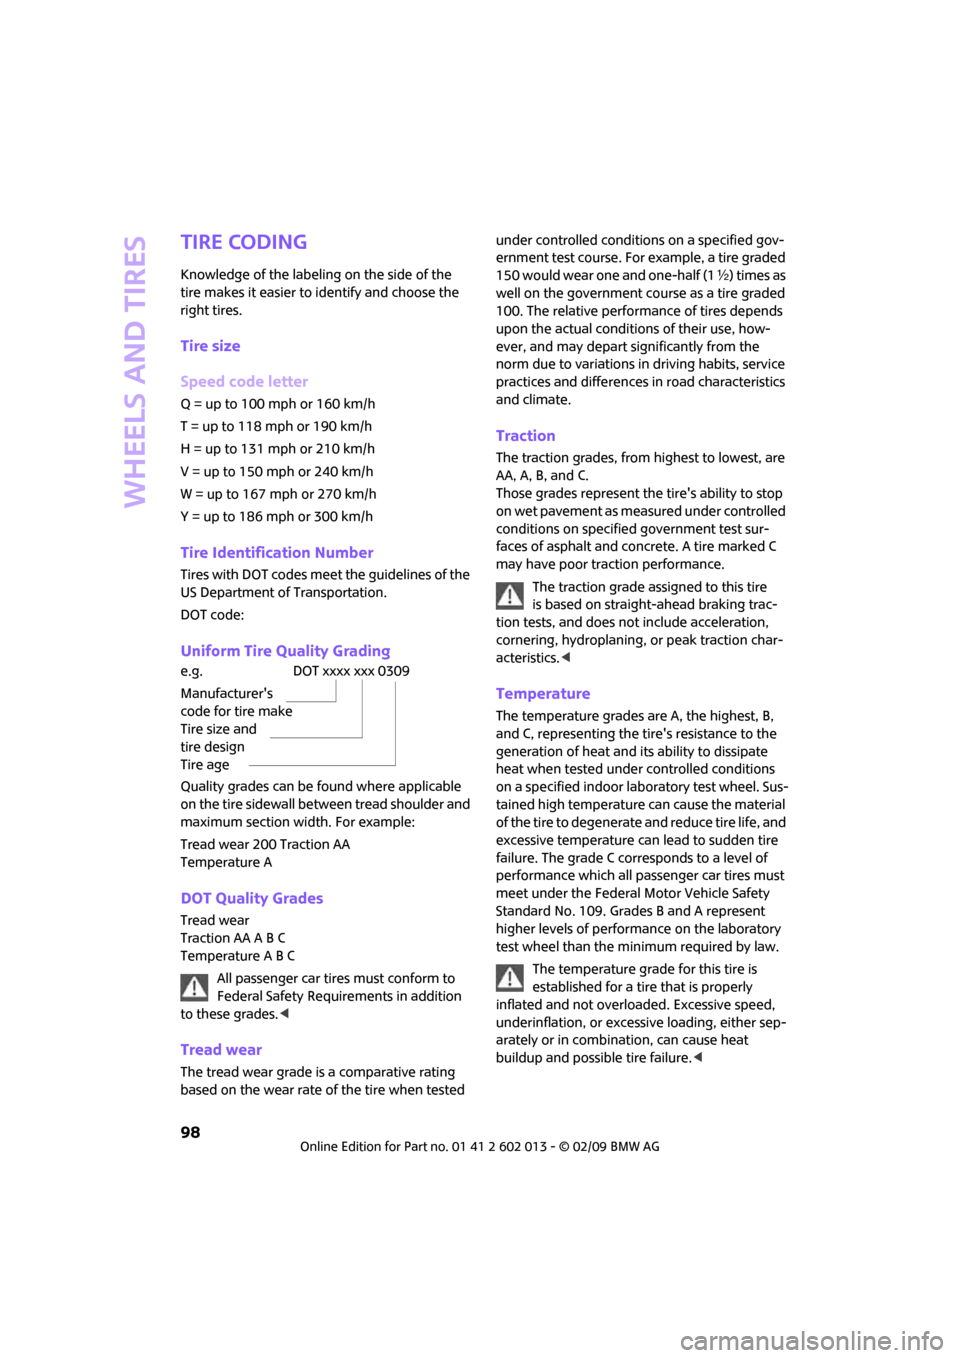
e.g.
Manufacturer's
code for tire make
Tire size and
tire design
Tire ageDOT xxxx xxx 0309
Page 102 of 158
Wheels and tires
100
Run-Flat Tires*
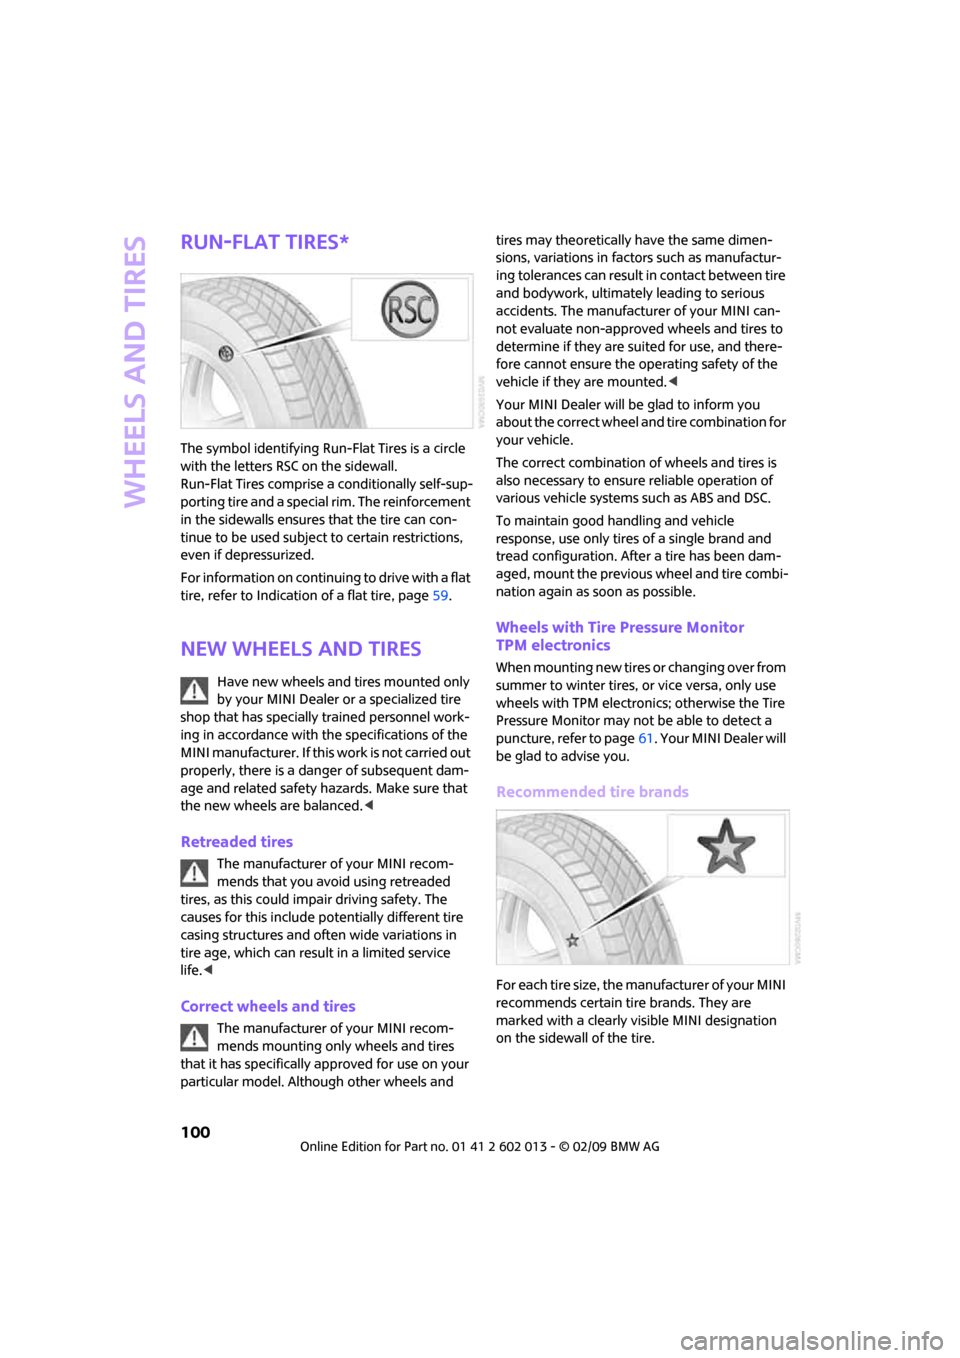
The symbol identifying Run-Flat Tires is a circle
with the letters RSC on the sidewall.
Run-Flat Tires comprise a conditionally self-sup-
porting tire and a special rim. The reinforcement
in the sidewalls ensures that the tire can con-
tinue to be used subject to certain restrictions,
even if depressurized.
For information on continuing to drive with a flat
tire, refer to Indication of a flat tire, page59.
New wheels and tires
Have new wheels and tires mounted only
by your MINI Dealer or a specialized tire
shop that has specially trained personnel work-
ing in accordance with the specifications of the
MINI manufacturer. If this work is not carried out
properly, there is a danger of subsequent dam-
age and related safety hazards. Make sure that
the new wheels are balanced.<
Retreaded tires
The manufacturer of your MINI recom-
mends that you avoid using retreaded
tires, as this could impair driving safety. The
causes for this include potentially different tire
casing structures and often wide variations in
tire age, which can result in a limited service
life.<
Correct wheels and tires
The manufacturer of your MINI recom-
mends mounting only wheels and tires
that it has specifically approved for use on your
particular model. Although other wheels and tires may theoretically have the same dimen-
sions, variations in factors such as manufactur-
ing tolerances can result in contact between tire
and bodywork, ultimately leading to serious
accidents. The manufacturer of your MINI can-
not evaluate non-approved wheels and tires to
determine if they are suited for use, and there-
fore cannot ensure the operating safety of the
vehicle if they are mounted.<
Your MINI Dealer will be glad to inform you
about the correct wheel and tire combination for
your vehicle.
The correct combination of wheels and tires is
also necessary to ensure reliable operation of
various vehicle systems such as ABS and DSC.
To maintain good handling and vehicle
response, use only tires of a single brand and
tread configuration. After a tire has been dam-
aged, mount the previous wheel and tire combi-
nation again as soon as possible.
Wheels with Tire Pressure Monitor
TPM electronics
When mounting new tires or changing over from
summer to winter tires, or vice versa, only use
wheels with TPM electronics; otherwise the Tire
Pressure Monitor may not be able to detect a
puncture, refer to page61. Your MINI Dealer will
be glad to advise you.
Recommended tire brands
For each tire size, the manufacturer of your MINI
recommends certain tire brands. They are
marked with a clearly visible MINI designation
on the sidewall of the tire.
Page 121 of 158
REFERENCEAT A GLANCE CONTROLS DRIVING TIPS MOBILITY
119
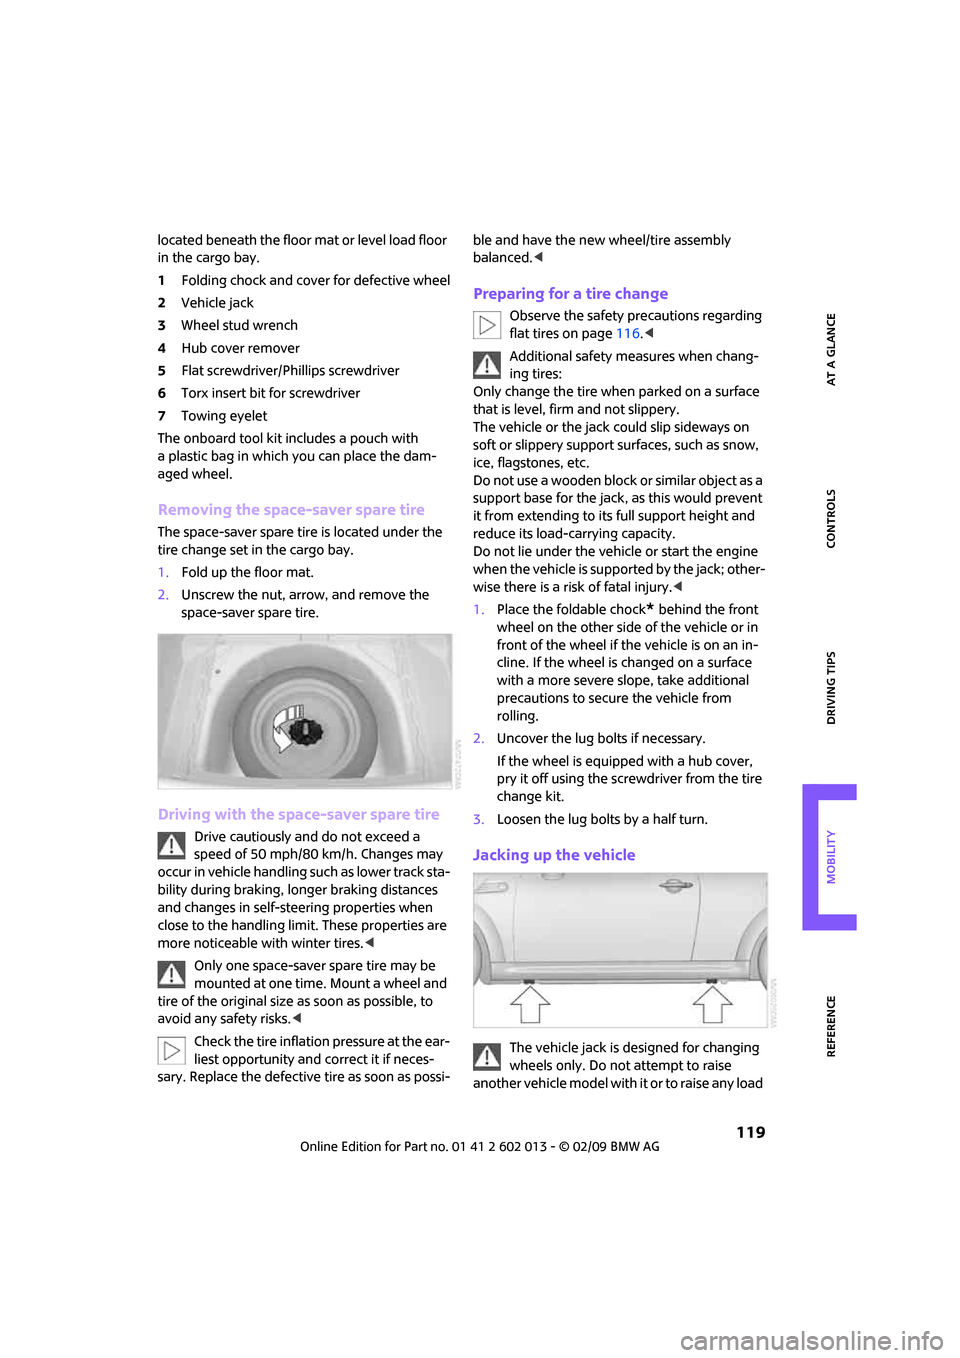
located beneath the floor mat or level load floor
in the cargo bay.
1Folding chock and cover for defective wheel
2Vehicle jack
3Wheel stud wrench
4Hub cover remover
5Flat screwdriver/Phillips screwdriver
6Torx insert bit for screwdriver
7Towing eyelet
The onboard tool kit includes a pouch with
a plastic bag in which you can place the dam-
aged wheel.
Removing the space-saver spare tire
The space-saver spare tire is located under the
tire change set in the cargo bay.
1.Fold up the floor mat.
2.Unscrew the nut, arrow, and remove the
space-saver spare tire.
Driving with the space-saver spare tire
Drive cautiously and do not exceed a
speed of 50 mph/80 km/h. Changes may
occur in vehicle handling such as lower track sta-
bility during braking, longer braking distances
and changes in self-steering properties when
close to the handling limit. These properties are
more noticeable with winter tires.<
Only one space-saver spare tire may be
mounted at one time. Mount a wheel and
tire of the original size as soon as possible, to
avoid any safety risks.<
Check the tire inflation pressure at the ear-
liest opportunity and correct it if neces-
sary. Replace the defective tire as soon as possi-ble and have the new wheel/tire assembly
balanced.<
Preparing for a tire change
Observe the safety precautions regarding
flat tires on page116.<
Additional safety measures when chang-
ing tires:
Only change the tire when parked on a surface
that is level, firm and not slippery.
The vehicle or the jack could slip sideways on
soft or slippery support surfaces, such as snow,
ice, flagstones, etc.
Do not use a wooden block or similar object as a
support base for the jack, as this would prevent
it from extending to its full support height and
reduce its load-carrying capacity.
Do not lie under the vehicle or start the engine
when the vehicle is supported by the jack; other-
wise there is a risk of fatal injury.<
1.Place the foldable chock
* behind the front
wheel on the other side of the vehicle or in
front of the wheel if the vehicle is on an in-
cline. If the wheel is changed on a surface
with a more severe slope, take additional
precautions to secure the vehicle from
rolling.
2.Uncover the lug bolts if necessary.
If the wheel is equipped with a hub cover,
pry it off using the screwdriver from the tire
change kit.
3.Loosen the lug bolts by a half turn.
Jacking up the vehicle
The vehicle jack is designed for changing
wheels only. Do not attempt to raise
another vehicle model with it or to raise any load
Page 153 of 158
REFERENCEAT A GLANCE CONTROLS DRIVING TIPS MOBILITY
151
S
Safety belts32
– damage32
– indicator lamp32
– reminder32
– sitting safely29
Safety belts, care110
Safety systems
– airbags63
– Antilock Brake System
ABS56
– Dynamic Stability Control
DSC56
– safety belts32
Safety tires, refer to Run-Flat
Tires100
Screw thread for tow
fitting124
Seat adjustment
– mechanical30
Seats29
– adjusting the seats30
– heating31
– sitting safely29
Securing the vehicle
– from inside22
– from outside19
Selector lever
– automatic transmission with
Steptronic39
Selector lever lock
– automatic transmission with
Steptronic, refer to
Shiftlock39
– overriding manually41
Selector lever positions
– automatic transmission with
Steptronic39
Service car, refer to Roadside
Assistance122
Service data in the remote
control106
Service Interval Display, refer
to Condition Based Service
CBS106
Service, refer to Roadside
Assistance122Service requirement display,
refer to Condition Based
Service CBS106
Service requirements51
Settings
– clock, 12h/24h mode49
Shifting gears
– automatic transmission with
Steptronic40
– manual transmission39
Shiftlock
– automatic transmission, refer
to Changing selector lever
positions39
Side airbags63
Side door, rear, refer to
Clubdoor23
Side turn signal indicator
– replacing bulb115
Side windows, refer to
Windows
28
Signal horn, refer to Horn10
Sitting safely29
– airbags29
– safety belts29
– with head restraint29
Size, refer to Dimensions141
Sliding/tilt sunroof
– refer to Glass sunroof,
electric27
Slot for remote control37
Smokers' package, refer to
Ashtray79
Snap-in adapter, refer to
Center armrest storage
compartment77
Snow chains101
Socket for Onboard Diagnosis
OBD106
Socket, refer to Connecting
electrical appliances79
Space-saver spare tire
– changing tires118
– inflation pressure94
Spare wheel, refer to Space-
saver spare tire118
Special oils, refer to Approved
engine oils104Speed140
– with winter tires101
Speed control, refer to Cruise
control44
Speedometer12
Split rear seat backrest, refer to
Expanding the cargo bay84
Splitdoor23
– opening from outside24
– unlocking with remote
control21
Sport button57
Stability control, refer to
Driving stability control
systems55
Start/stop button37
– starting the engine37
– switching off the engine38
Starting assistance, refer to
Jump starting122
Starting, refer to Starting the
engine37
Starting the engine
– start/stop button37
Start-off assistance, refer to
– DSC56
– Hill Start Assist57
Status of this Owner's Manual
at time of printing4
Steering wheel33
– adjustment33
– buttons on steering wheel11
– lock37
– shift paddles40
Steptronic, refer to Automatic
transmission with
Steptronic39
Storage area
– cargo bay84
Storage compartment, front
passenger side78
Storage compartments78
Storage space
– storage compartments78
Storing the vehicle111
Storing tires101
Stowage, refer to Storage
compartments78
Page 154 of 158
From A to Z
152
Summer tires, refer to Wheels
and tires94
Switches, refer to Cockpit10
Switching off
– engine38
Switching off the engine
– start/stop button37
Switching the cooling function
on and off74
Symbols4
T
Tachometer46
Tail lamp, refer to Tail
lamps115
– replacing bulb115
Tail lamps115
Tailgate
– convenient access26
Tailgate, see splitdoor21
Tank volume, refer to
Capacities142
Technical data140
Technical modifications4
Telephone
– installation location, refer to
Center armrest77
– refer to separate Owner's
Manual
Telephone call, refer to the
Owner's Manual for the
telephone
Temperature display
– ice warning46
– outside temperature46
– setting the units49
Temperature of coolant, refer
to Coolant temperature46
Temperature setting
– air conditioner71
– automatic climate control73
Tensioning straps, refer to
Securing cargo86
The individual vehicle4
Third brake lamp, refer to
Center brake lamp116
Three-point safety belt32Tightening the lug bolts
– keys119
– torque120
Tightening torque, refer to
Tightening the lug bolts120
Tire change set
– MINI Mobility System118
– space-saver spare tire118
Tire failure
– Flat Tire Monitor59
– indicator/warning lamp59
– MINI Mobility System116
– Run-Flat Tires59
– space-saver spare tire118
– Tire Pressure Monitor60
Tire inflation pressure94
– loss59
– space-saver spare tire94
Tire Pressure Monitor TPM60
– limitations of system60
– resetting system60
– warning lamp61
Tire pressure monitoring, refer
to Flat Tire Monitor58
Tire Quality Grading98
Tires
– age99
– breaking in82
– changing, refer to Changing
wheels118
– condition99
– damage99
– inflation pressure94
– inflation pressure loss61
– minimum tread depth99
– new tires100
– pressure monitoring, refer to
Flat Tire Monitor58
– pressure monitoring, refer to
Tire Pressure Monitor
TPM60
– puncture59
– Run-Flat Tires100
– size98
– wear indicators, refer to
Minimum tread depth99
– winter tires101
Tires with safety features, refer
to Run-Flat Tires100Tools, refer to Onboard tool
kit112
Torque140
– lug bolts120
Tow bar124
Tow fitting123
– screw thread124
Tow fittings for tow-starting
and towing away123
Tow rope124
Towing123
– car with automatic
transmission124
– methods124
Tow-starting123
TPM, refer to Tire Pressure
Monitor60
Track width, refer to
Dimension141
Traction control, refer to
– Dynamic Stability Control
DSC56
Transmission
– automatic transmission with
Steptronic39
– manual transmission39
– overriding selector lever lock
for automatic transmission
with Steptronic41
Transport securing devices,
refer to Securing cargo86
Transporting children safely34
Tread depth, refer to Minimum
tire tread99
Trip odometer
46
Trip-distance counter, refer to
Trip odometer46
Triple turn signal activation41
Turn signal indicator41
– front, replacing bulb114
– indicator lamp12
– rear, replacing bulb115
– side, replacing bulb115
Turning circle, refer to
Dimensions141
Tying down loads, refer to
Cargo loading86