change time MINI Clubman 2010 (Mini Connected) User Guide
[x] Cancel search | Manufacturer: MINI, Model Year: 2010, Model line: Clubman, Model: MINI Clubman 2010Pages: 218, PDF Size: 3.97 MB
Page 76 of 218
Technology for driving comfort and safety
74
Functional requirement
In order to assure the reliable reporting of a flat
tire, the system must be initialized for the cor-
rect tire inflation pressure.
Each time you correct the pressure in a
tire, or change a wheel or tire, the system
must be reinitialized.<
System limitations
The Flat Tire Monitor is unable to warn the driver
of sudden, severe tire damage caused by exter-
nal factors, nor can it identify the gradual loss of
pressure that will inevitably occur in all four tires
over a lengthy period of time.
In the following situations, the system could be
delayed or malfunction:
>System has not been initialized
>Driving on snowy or slippery road surface
>Performance-oriented style of driving: slip in
the drive wheels, high lateral acceleration
>Snow chains are attached
When the vehicle is driven with a space-saver
spare tire
*, page183, the Flat Tire Monitor can-
not function.
Initializing the system
The initialization is completed during driv-
ing, which can be interrupted at any time.
When driving resumes, the initialization is con-
tinued automatically.
Do not initialize the system if you are driving
with snow chains or a space-saver spare tire
*.<
Using the onboard monitor
Onboard monitor, for operating principle refer
to page16.
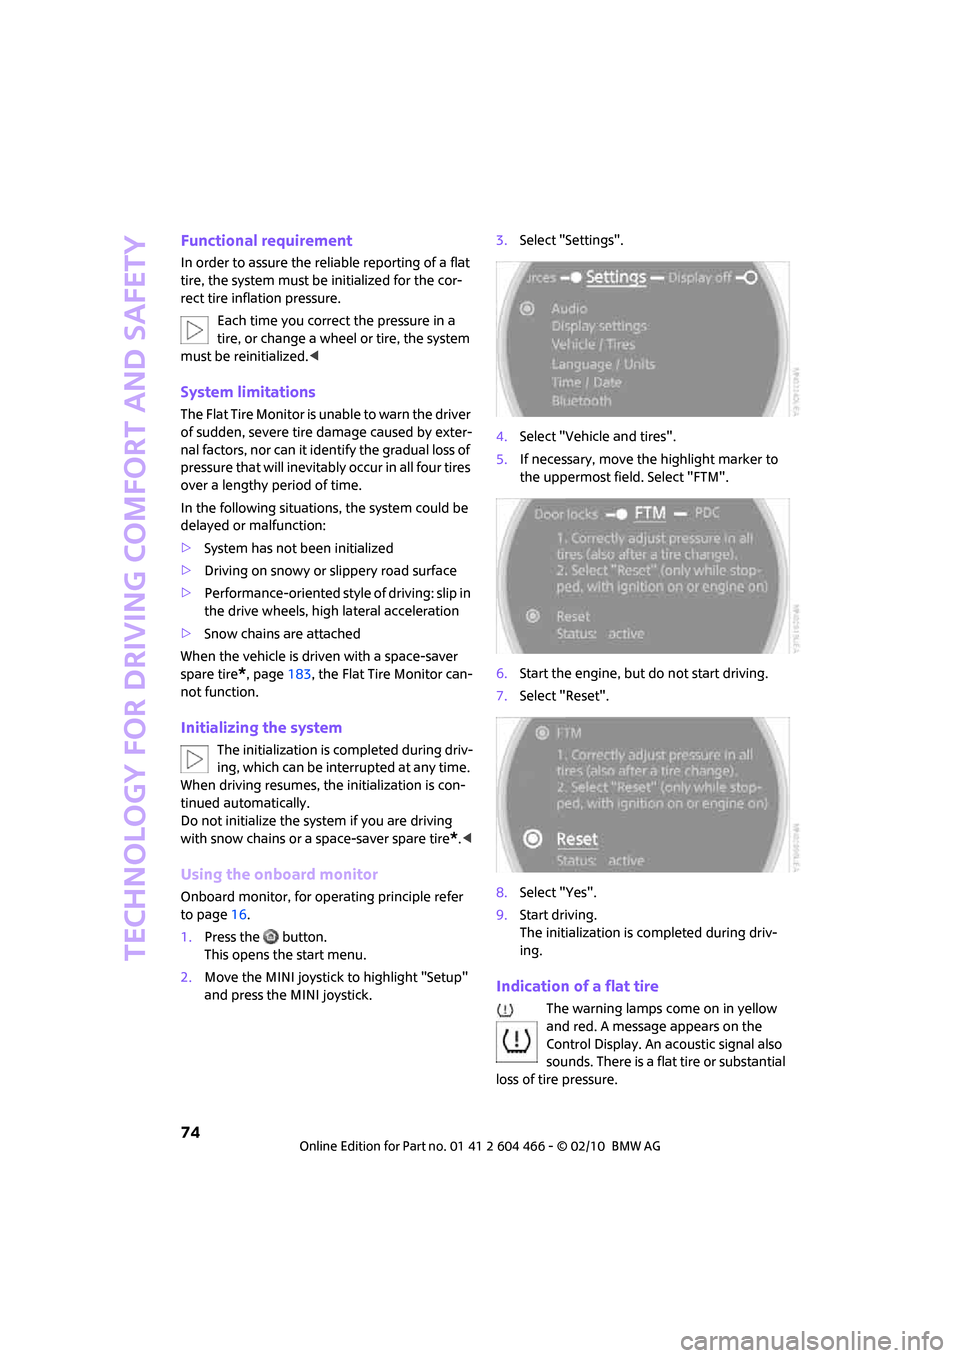
1.Press the button.
This opens the start menu.
2.Move the MINI joystick to highlight "Setup"
and press the MINI joystick.3.Select "Settings".
4.Select "Vehicle and tires".
5.If necessary, move the highlight marker to
the uppermost field. Select "FTM".
6.Start the engine, but do not start driving.
7.Select "Reset".
8.Select "Yes".
9.Start driving.
The initialization is completed during driv-
ing.
Indication of a flat tire
The warning lamps come on in yellow
and red. A message appears on the
Control Display. An acoustic signal also
sounds. There is a flat tire or substantial
loss of tire pressure.
Page 77 of 218
MOBILITYAT A GLANCE CONTROLS DRIVING TIPS ENTERTAINMENT
75
NAVIGATION REFERENCE
1.Reduce speed and stop the vehicle with cau-
tion. Avoid sudden braking and steering
maneuvers.
2.Check whether your vehicle is equipped
with normal tires or run-flat tires.
The symbol identifying run-flat tires is
a circle with the letters RSC on the
sidewall, refer to Run-flat tires, page165.<
Normal tires
1.Determine which tire is damaged.
If this cannot be determined, contact
your MINI dealer.<
2.Repair the flat tire, refer to page180, or
change the damaged tire, refer to page183.
Run-flat tires*
1.Cautiously reduce speed to below 50 mph
or 80 km/h. Avoid sudden braking and
steering maneuvers. Do not exceed a speed
of 50 mph or 80 km/h.
Do not continue driving if the vehicle is
not equipped with run-flat tires,
page165; otherwise, a serious accident
could result.<
2.At the next opportunity, check the air pres-
sure in all four tires.
If all four tires are inflated to the cor-
rect pressures, the Flat Tire Monitor
might not have been initialized. The system
must then be initialized.<
3.In the event of complete tire pressure loss,
0 psi/0 kPa, you can estimate the possible
distance for continued driving on the basis
of the following guidelines:
>With a light load:
1 to 2 persons without luggage:
approx. 155 miles/250 km
>With a medium load:
2 persons, cargo bay full, or 4 persons
without luggage:
approx. 94 miles/150 km
>With a full load:
4 persons, load compartment full:
approx. 30 miles/50 kmDrive cautiously and do not exceed a
speed of 50 mph or 80 km/h; otherwise,
an accident may occur. In the event of pressure
loss, vehicle handling changes. This includes
reduced tracking stability in braking, extended
braking distance and altered natural steering
characteristics.
If unusual vibration or loud noises occur during
the journey, this may be an indication that the
damaged tire has finally failed. Reduce the vehi-
cle speed and stop as soon as possible. Other-
wise, sections of the tire may come loose and
cause accidents. Do not continue driving and
contact your MINI dealer.<
Tire Pressure Monitor
TPM*
The concept
TPM checks the tire pressure in the four
mounted tires during driving. The system noti-
fies you if there is a significant loss of pressure in
one or more tires.
Functional requirement
In order to assure the reliable reporting of a flat
tire, the system must be reset while all tire infla-
tion pressures are correct.
Always use wheels with TPM electronics. Other-
wise, the system may malfunction.
Each time a tire inflation pressure has
been corrected or a wheel or tire has been
changed, reset the system.<
System limitations
TPM cannot warn you in advance of sud-
den severe tire damage caused by outside
influences.<
The system does not work correctly if it has not
been reset; for example, a flat tire may be indi-
cated even though the tire inflation pressures
are correct.
The system is inactive and cannot indicate a flat
tire if a wheel without TPM electronics, such as a
compact spare wheel
*, has been mounted, or if
Page 78 of 218
Technology for driving comfort and safety
76
TPM is temporarily malfunctioning due to other
systems or devices using the same radio fre-
quency.
Status indicator on the onboard monitor
The tire and system condition is indicated by the
color of the tires.
TPM takes into account the fact that tire pres-
sure changes while the vehicle is being driven.
The tire pressure does not need to be corrected
unless the TPM instructs you to do so by means
of color indicators.
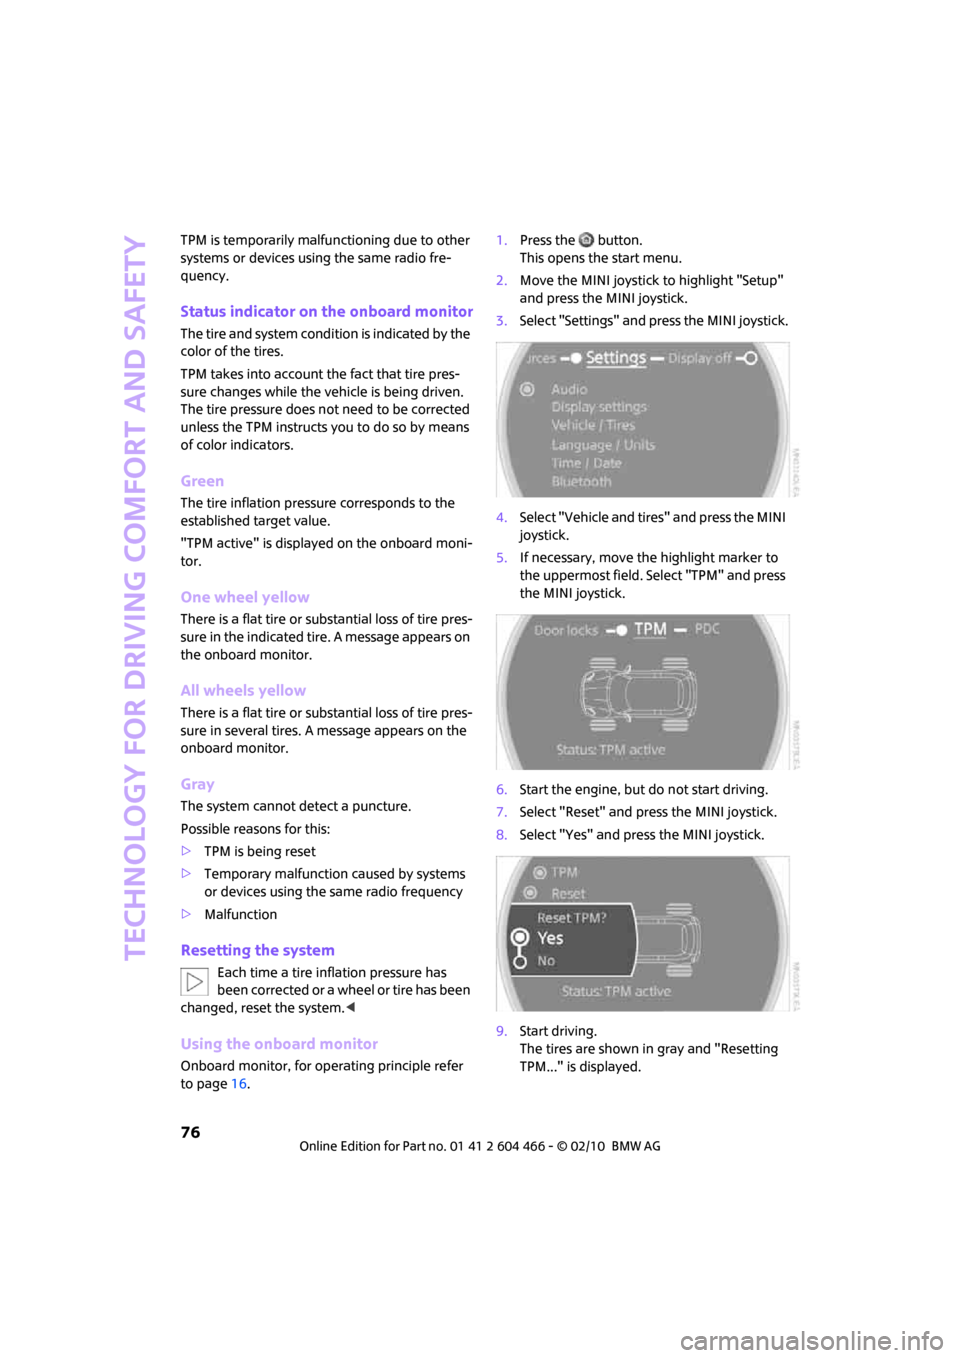
Green
The tire inflation pressure corresponds to the
established target value.
"TPM active" is displayed on the onboard moni-
tor.
One wheel yellow
There is a flat tire or substantial loss of tire pres-
sure in the indicated tire. A message appears on
the onboard monitor.
All wheels yellow
There is a flat tire or substantial loss of tire pres-
sure in several tires. A message appears on the
onboard monitor.
Gray
The system cannot detect a puncture.
Possible reasons for this:
>TPM is being reset
>Temporary malfunction caused by systems
or devices using the same radio frequency
>Malfunction
Resetting the system
Each time a tire inflation pressure has
been corrected or a wheel or tire has been
changed, reset the system.<
Using the onboard monitor
Onboard monitor, for operating principle refer
to page16.1.Press the button.
This opens the start menu.
2.Move the MINI joystick to highlight "Setup"
and press the MINI joystick.
3.Select "Settings" and press the MINI joystick.
4.Select "Vehicle and tires" and press the MINI
joystick.
5.If necessary, move the highlight marker to
the uppermost field. Select "TPM" and press
the MINI joystick.
6.Start the engine, but do not start driving.
7.Select "Reset" and press the MINI joystick.
8.Select "Yes" and press the MINI joystick.
9.Start driving.
The tires are shown in gray and "Resetting
TPM..." is displayed.
Page 79 of 218
MOBILITYAT A GLANCE CONTROLS DRIVING TIPS ENTERTAINMENT
77
NAVIGATION REFERENCE
After driving a few minutes, the set inflation
pressures in the tires are accepted as the target
values to be monitored. The system reset is
completed during your drive, and can be inter-
rupted at any time. When driving resumes, the
reset is continued automatically. On the
onboard monitor, the tires are shown in green
and "Status: TPM active" is once again dis-
played.
If a flat tire is detected while the system is
being reset and while it is determining the
inflation pressures, all tires on the onboard mon-
itor are displayed in yellow. The message "Tire
low!" is displayed.<
Message for low tire inflation pressure
The warning lamps come on in yellow
and red. A message appears on the
onboard monitor. An acoustic signal
also sounds. There is a flat tire or sub-
stantial loss of tire pressure.
1.Reduce speed and stop the vehicle with cau-
tion. Avoid sudden braking and steering
maneuvers.
2.Check whether your vehicle is equipped
with normal tires or run-flat tires.
The symbol identifying run-flat tires is
a circle with the letters RSC on the
sidewall, page165.<
Normal tires
1.Determine which tire is damaged.
If this cannot be determined, contact
your MINI dealer.<
2.Repair the flat tire or change the damaged
tire, refer to page183.
Run-flat tires*
1.Cautiously reduce speed to below 50 mph/
80 km/h. Avoid sudden braking and steering
maneuvers. Do not exceed a speed of
50 mph/80 km/h.
Do not continue driving if the vehicle is
not equipped with run-flat tires; oth-
erwise, a serious accident could result.<2.In the event of complete tire pressure loss,
0 psi/0 kPa, you can estimate the possible
distance for continued driving on the basis
of the following guidelines:
>With a light load:
1 to 2 persons without luggage:
approx. 155 miles/250 km
>With a medium load:
2 persons, cargo bay full, or 4 persons
without luggage:
approx. 94 miles/150 km
>With a full load:
4 persons, load compartment full:
approx. 30 miles/50 km
Drive cautiously and do not exceed a
speed of 50 mph/80 km/h; otherwise, an
accident may occur. In the event of pressure
loss, vehicle handling changes. This includes
reduced tracking stability in braking, extended
braking distance and altered natural steering
characteristics.
If unusual vibration or loud noises occur during
the journey, this may be an indication that the
damaged tire has finally failed. Reduce the vehi-
cle speed and stop as soon as possible. Other-
wise, sections of the tire may come loose and
cause accidents. Do not continue driving and
contact your MINI dealer.<
Malfunction
The small warning lamp flashes in yel-
low and then lights up continuously; the
larger warning lamp comes on in yel-
low.
On the onboard monitor, the tires are shown in
gray and a message appears. No punctures can
be detected.
This type of message is shown in the following
situations:
>If there is a malfunction.
Have the system checked.
>If a wheel without TPM electronics has been
mounted.
>If TPM is temporarily malfunctioning due to
other systems or devices using the same
radio frequency.
Page 82 of 218
Technology for driving comfort and safety
80
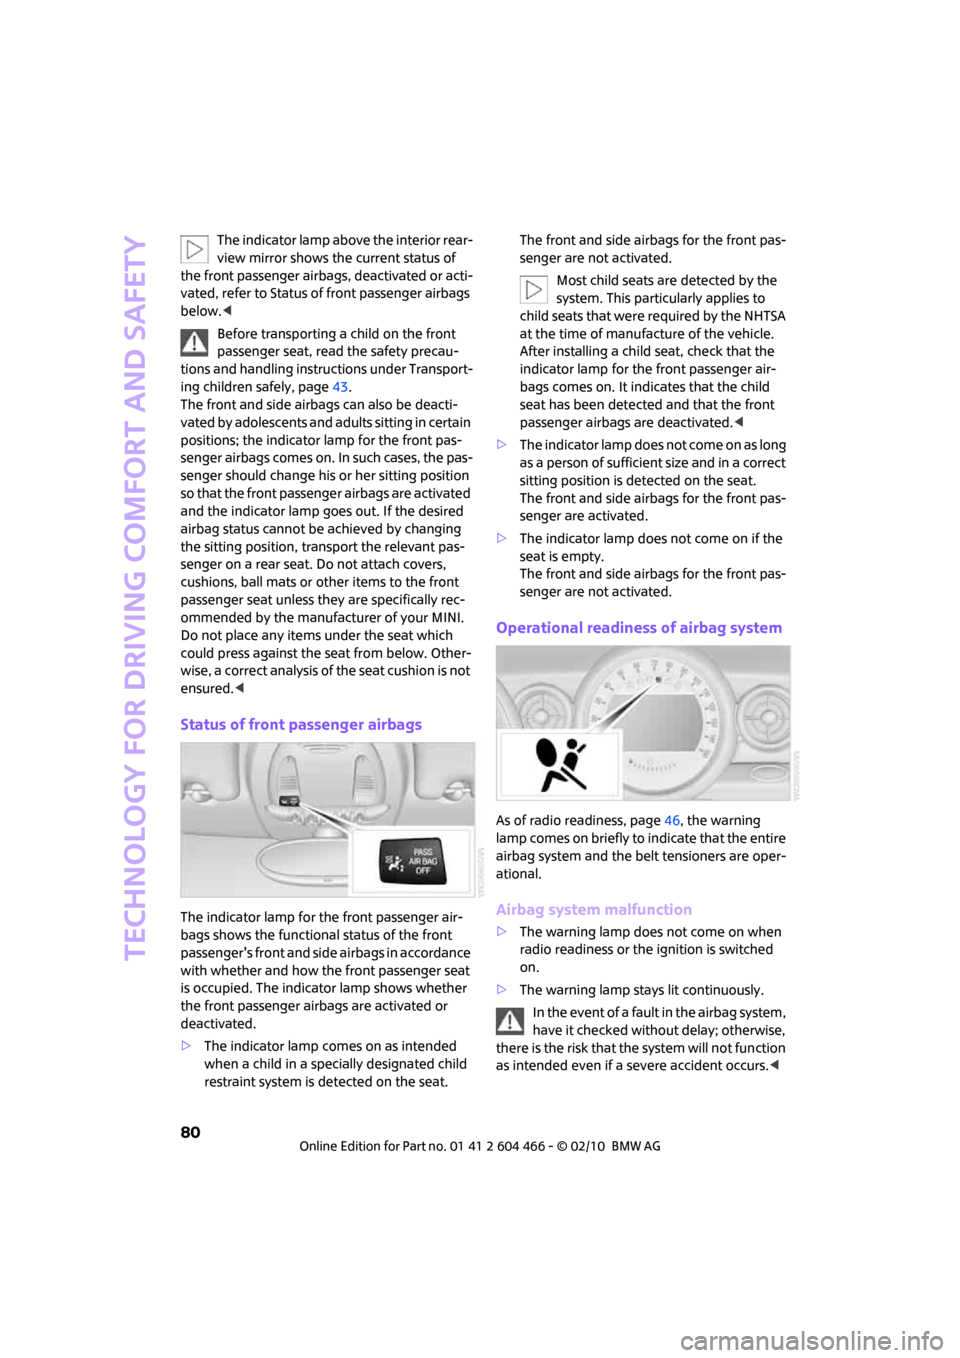
The indicator lamp above the interior rear-
view mirror shows the current status of
the front passenger airbags, deactivated or acti-
vated, refer to Status of front passenger airbags
below.<
Before transporting a child on the front
passenger seat, read the safety precau-
tions and handling instructions under Transport-
ing children safely, page43.
The front and side airbags can also be deacti-
vated by adolescents and adults sitting in certain
positions; the indicator lamp for the front pas-
senger airbags comes on. In such cases, the pas-
senger should change his or her sitting position
so that the front passenger airbags are activated
and the indicator lamp goes out. If the desired
airbag status cannot be achieved by changing
the sitting position, transport the relevant pas-
senger on a rear seat. Do not attach covers,
cushions, ball mats or other items to the front
passenger seat unless they are specifically rec-
ommended by the manufacturer of your MINI.
Do not place any items under the seat which
could press against the seat from below. Other-
wise, a correct analysis of the seat cushion is not
ensured.<
Status of front passenger airbags
The indicator lamp for the front passenger air-
bags shows the functional status of the front
passenger's front and side airbags in accordance
with whether and how the front passenger seat
is occupied. The indicator lamp shows whether
the front passenger airbags are activated or
deactivated.
>The indicator lamp comes on as intended
when a child in a specially designated child
restraint system is detected on the seat.The front and side airbags for the front pas-
senger are not activated.
Most child seats are detected by the
system. This particularly applies to
child seats that were required by the NHTSA
at the time of manufacture of the vehicle.
After installing a child seat, check that the
indicator lamp for the front passenger air-
bags comes on. It indicates that the child
seat has been detected and that the front
passenger airbags are deactivated.<
>T h e i n d i c a t o r l a m p d o e s n o t c o m e o n a s l o n g
as a person of sufficient size and in a correct
sitting position is detected on the seat.
The front and side airbags for the front pas-
senger are activated.
>The indicator lamp does not come on if the
seat is empty.
The front and side airbags for the front pas-
senger are not activated.
Operational readiness of airbag system
As of radio readiness, page46, the warning
lamp comes on briefly to indicate that the entire
airbag system and the belt tensioners are oper-
ational.
Airbag system malfunction
>The warning lamp does not come on when
radio readiness or the ignition is switched
on.
>The warning lamp stays lit continuously.
In the event of a fault in the airbag system,
have it checked without delay; otherwise,
there is the risk that the system will not function
as intended even if a severe accident occurs.<
Page 88 of 218
Climate
86
Automatic climate
control
Comfortable interior climate
AUTO program6 offers the ideal air distribution
and air flow rate for almost all conditions, refer
to AUTO program below. All you need to do is
select an interior temperature which is comfort-
able for you.
The following sections inform you in detail about
how to adjust the settings.
Most settings are stored for the remote control
currently in use, refer also to Personal Profile set-
tings on page26.
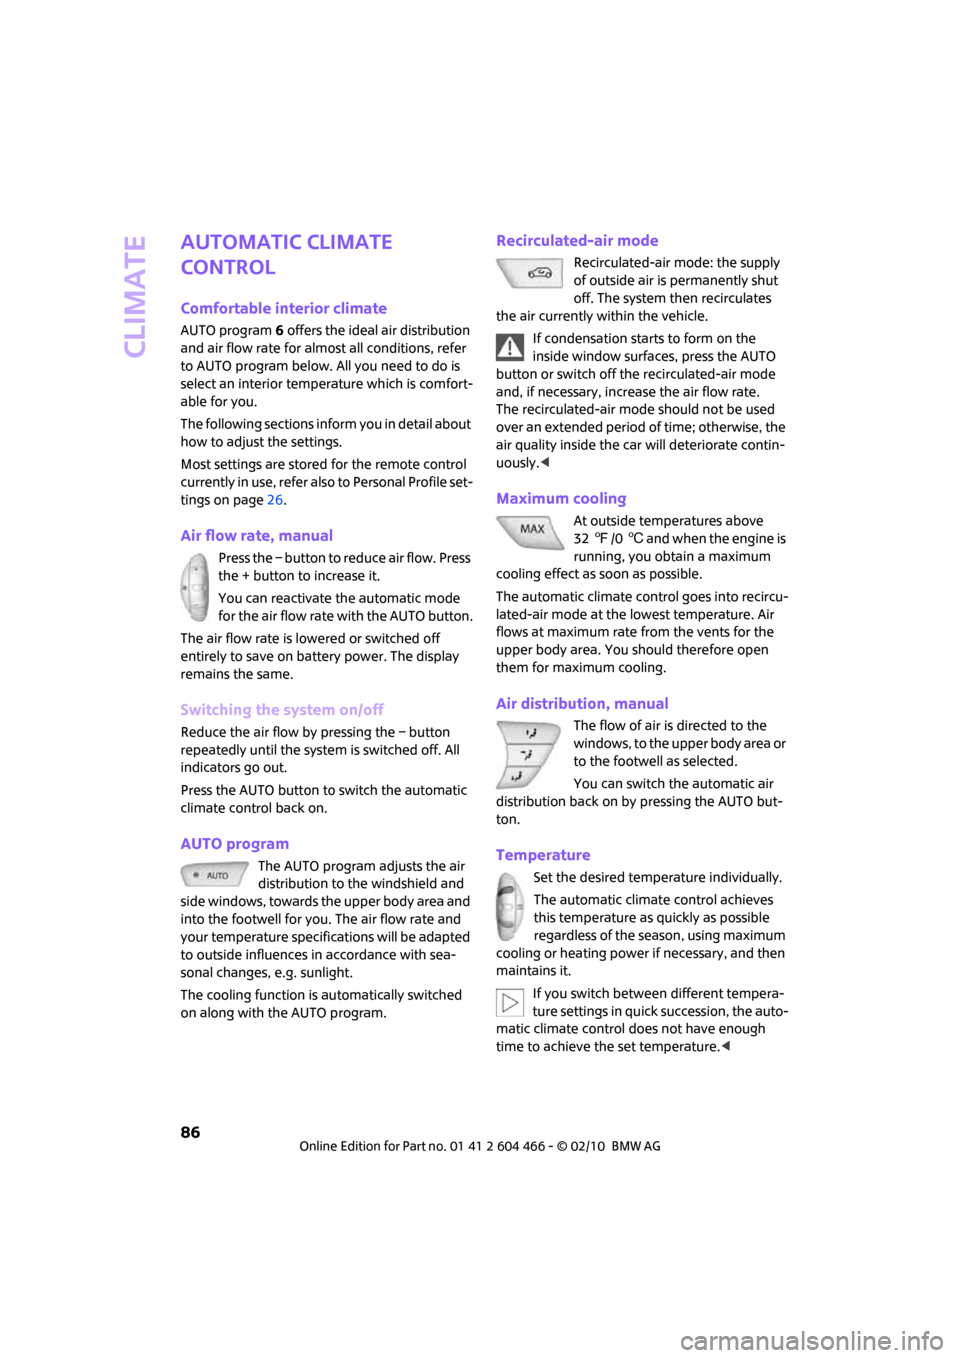
Air flow rate, manual
Press the – button to reduce air flow. Press
the + button to increase it.
You can reactivate the automatic mode
for the air flow rate with the AUTO button.
The air flow rate is lowered or switched off
entirely to save on battery power. The display
remains the same.
Switching the system on/off
Reduce the air flow by pressing the – button
repeatedly until the system is switched off. All
indicators go out.
Press the AUTO button to switch the automatic
climate control back on.
AUTO program
The AUTO program adjusts the air
distribution to the windshield and
side windows, towards the upper body area and
into the footwell for you. The air flow rate and
your temperature specifications will be adapted
to outside influences in accordance with sea-
sonal changes, e.g. sunlight.
The cooling function is automatically switched
on along with the AUTO program.
Recirculated-air mode
Recirculated-air mode: the supply
of outside air is permanently shut
off. The system then recirculates
the air currently within the vehicle.
If condensation starts to form on the
inside window surfaces, press the AUTO
button or switch off the recirculated-air mode
and, if necessary, increase the air flow rate.
The recirculated-air mode should not be used
over an extended period of time; otherwise, the
air quality inside the car will deteriorate contin-
uously.<
Maximum cooling
At outside temperatures above
327/06 and when the engine is
running, you obtain a maximum
cooling effect as soon as possible.
The automatic climate control goes into recircu-
lated-air mode at the lowest temperature. Air
flows at maximum rate from the vents for the
upper body area. You should therefore open
them for maximum cooling.
Air distribution, manual
The flow of air is directed to the
windows, to the upper body area or
to the footwell as selected.
You can switch the automatic air
distribution back on by pressing the AUTO but-
ton.
Temperature
Set the desired temperature individually.
The automatic climate control achieves
this temperature as quickly as possible
regardless of the season, using maximum
cooling or heating power if necessary, and then
maintains it.
If you switch between different tempera-
ture settings in quick succession, the auto-
matic climate control does not have enough
time to achieve the set temperature.<
Page 111 of 218

MOBILITYAT A GLANCE CONTROLS DRIVING TIPS ENTERTAINMENT
109
NAVIGATION REFERENCE
4.Select "Enter address".
The system also supports you with the following
features:
>If you do not enter a street, the system will
guide you to the downtown area of a town
or city.
>You can skip the entry of country and local-
ity if the current entries should be retained
for your new destination.
Selecting country
1.Select "State / Province" or displayed coun-
try.
The list of available countries appears on the
display.
2.Select the country of destination.
At least the town/city of the destination or its zip
code must be entered in order to start the desti-
nation guidance.
Entering destination by town/city name
1.Select "Town / City" or displayed city.
2.Select the first letter.
A list of all towns/cities starting with this let-
ter appears on the Control Display.3.Delete letters if necessary:
>To delete individual numbers or letters:
Move the MINI joystick to the right to
highlight and press the MINI joystick.
>To delete all numbers or letters:
Move the MINI joystick to the right to
highlight and press the MINI joystick
for an extended period.
4.If necessary, enter more letters.
The list gradually grows smaller each time
you enter a new letter.
>To enter spaces, if necessary:
Select the symbol.
5.If necessary, change to the list of towns and
cities and select a name.
Page 113 of 218
MOBILITYAT A GLANCE CONTROLS DRIVING TIPS ENTERTAINMENT
111
NAVIGATION REFERENCE
5.If necessary, enter more letters.
The list gradually grows smaller each time
you enter a new letter.
6.Change to the list of street names and select
the street name in the corresponding town/
city.
Entering a house number
You can enter all house numbers that are stored
for the street on the navigation DVD.
1.Select "House number".
2.To enter the house number:
Select the digits individually.
3.Move the highlight marker to the third field
from the top. Select the house number.
You can only enter house numbers that are
stored for the street on the navigation DVD.
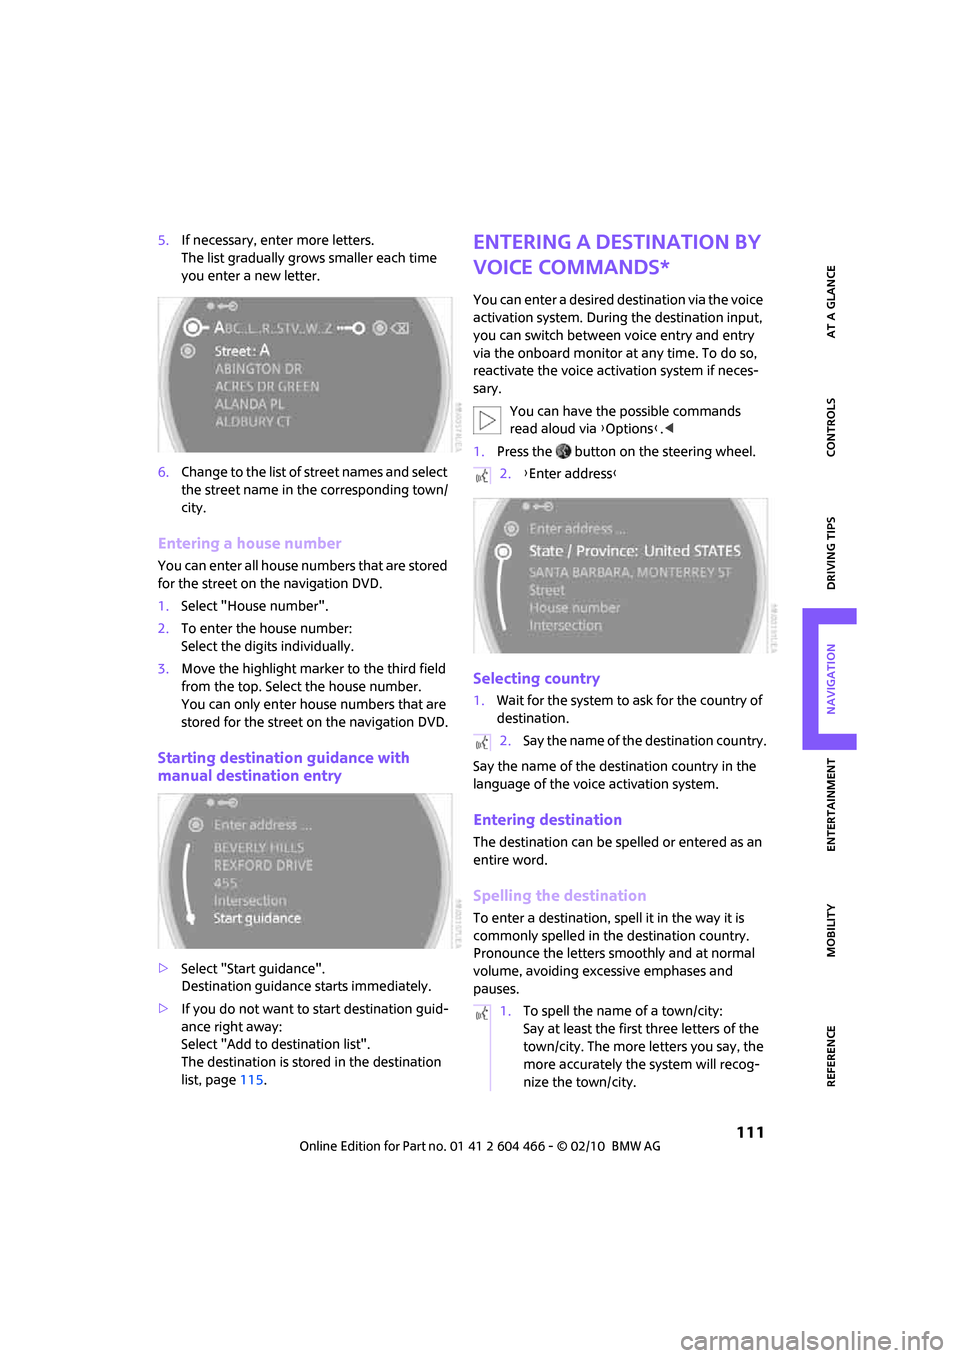
Starting destination guidance with
manual destination entry
>Select "Start guidance".
Destination guidance starts immediately.
>If you do not want to start destination guid-
ance right away:
Select "Add to destination list".
The destination is stored in the destination
list, page115.
Entering a destination by
voice commands*
You can enter a desired destination via the voice
activation system. During the destination input,
you can switch between voice entry and entry
via the onboard monitor at any time. To do so,
reactivate the voice activation system if neces-
sary.
You can have the possible commands
read aloud via {Options}.<
1.Press the button on the steering wheel.
Selecting country
1.Wait for the system to ask for the country of
destination.
Say the name of the destination country in the
language of the voice activation system.
Entering destination
The destination can be spelled or entered as an
entire word.
Spelling the destination
To enter a destination, spell it in the way it is
commonly spelled in the destination country.
Pronounce the letters smoothly and at normal
volume, avoiding excessive emphases and
pauses.
2.{Enter address}
2.Say the name of the destination country.
1.To spell the name of a town/city:
Say at least the first three letters of the
town/city. The more letters you say, the
more accurately the system will recog-
nize the town/city.
Page 120 of 218
Destination entry
118
Using home address as destination
1.Select "Home address".
2.Select "Start guidance".
Changing the home address
1.Select "Home address".
2.Select "Edit address".
For operation, refer to Entering a destination
manually, page108.
Route selection
You can influence the calculated route by choos-
ing certain route criteria. You can change the
route criteria as often as you like during destina-
tion entry or during destination guidance.
The route is planned according to fixed rules.
The type of road is taken into account, e.g.
whether it is a highway or a winding road. The
road types are stored on the navigation DVD. As
a result, the routes recommended by the navi-
gation system may not always be the same ones
that you would choose based on personal expe-
rience.
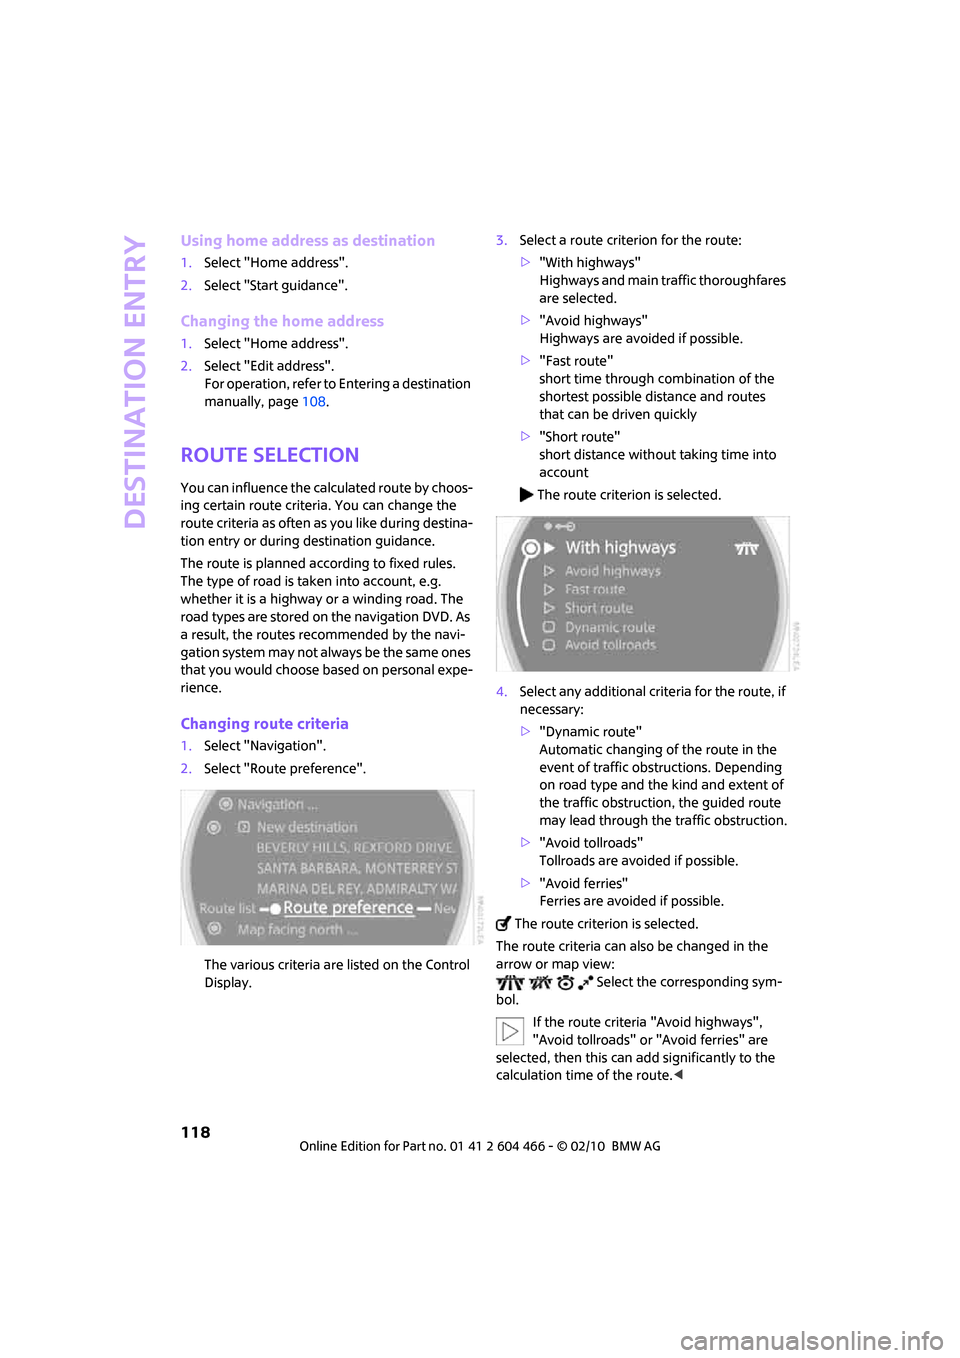
Changing route criteria
1.Select "Navigation".
2.Select "Route preference".
The various criteria are listed on the Control
Display.3.Select a route criterion for the route:
>"With highways"
Highways and main traffic thoroughfares
are selected.
>"Avoid highways"
Highways are avoided if possible.
>"Fast route"
short time through combination of the
shortest possible distance and routes
that can be driven quickly
>"Short route"
short distance without taking time into
account
The route criterion is selected.
4.Select any additional criteria for the route, if
necessary:
>"Dynamic route"
Automatic changing of the route in the
event of traffic obstructions. Depending
on road type and the kind and extent of
the traffic obstruction, the guided route
may lead through the traffic obstruction.
>"Avoid tollroads"
Tollroads are avoided if possible.
>"Avoid ferries"
Ferries are avoided if possible.
The route criterion is selected.
The route criteria can also be changed in the
arrow or map view:
Select the corresponding sym-
bol.
If the route criteria "Avoid highways",
"Avoid tollroads" or "Avoid ferries" are
selected, then this can add significantly to the
calculation time of the route.<
Page 122 of 218
Destination guidance
120
Destination guidance
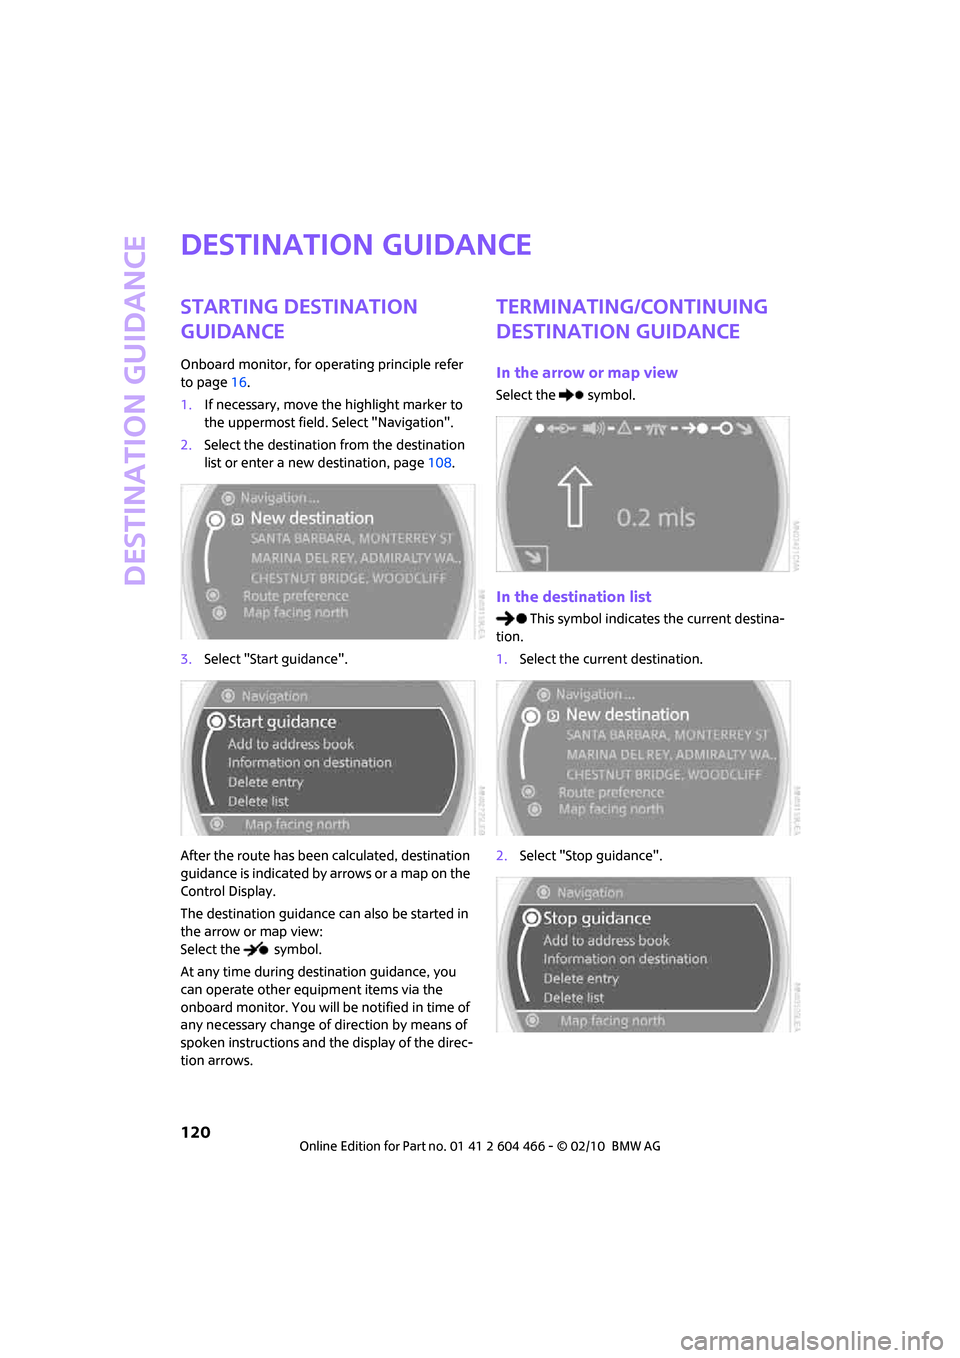
Starting destination
guidance
Onboard monitor, for operating principle refer
to page16.
1.If necessary, move the highlight marker to
the uppermost field. Select "Navigation".
2.Select the destination from the destination
list or enter a new destination, page108.
3.Select "Start guidance".
After the route has been calculated, destination
guidance is indicated by arrows or a map on the
Control Display.
The destination guidance can also be started in
the arrow or map view:
Select the symbol.
At any time during destination guidance, you
can operate other equipment items via the
onboard monitor. You will be notified in time of
any necessary change of direction by means of
spoken instructions and the display of the direc-
tion arrows.
Terminating/continuing
destination guidance
In the arrow or map view
Select the symbol.
In the destination list
This symbol indicates the current destina-
tion.
1.Select the current destination.
2.Select "Stop guidance".