display MINI Clubman 2010 (Mini Connected) Repair Manual
[x] Cancel search | Manufacturer: MINI, Model Year: 2010, Model line: Clubman, Model: MINI Clubman 2010Pages: 218, PDF Size: 3.97 MB
Page 127 of 218
MOBILITYAT A GLANCE CONTROLS DRIVING TIPS ENTERTAINMENT
125
NAVIGATION REFERENCE
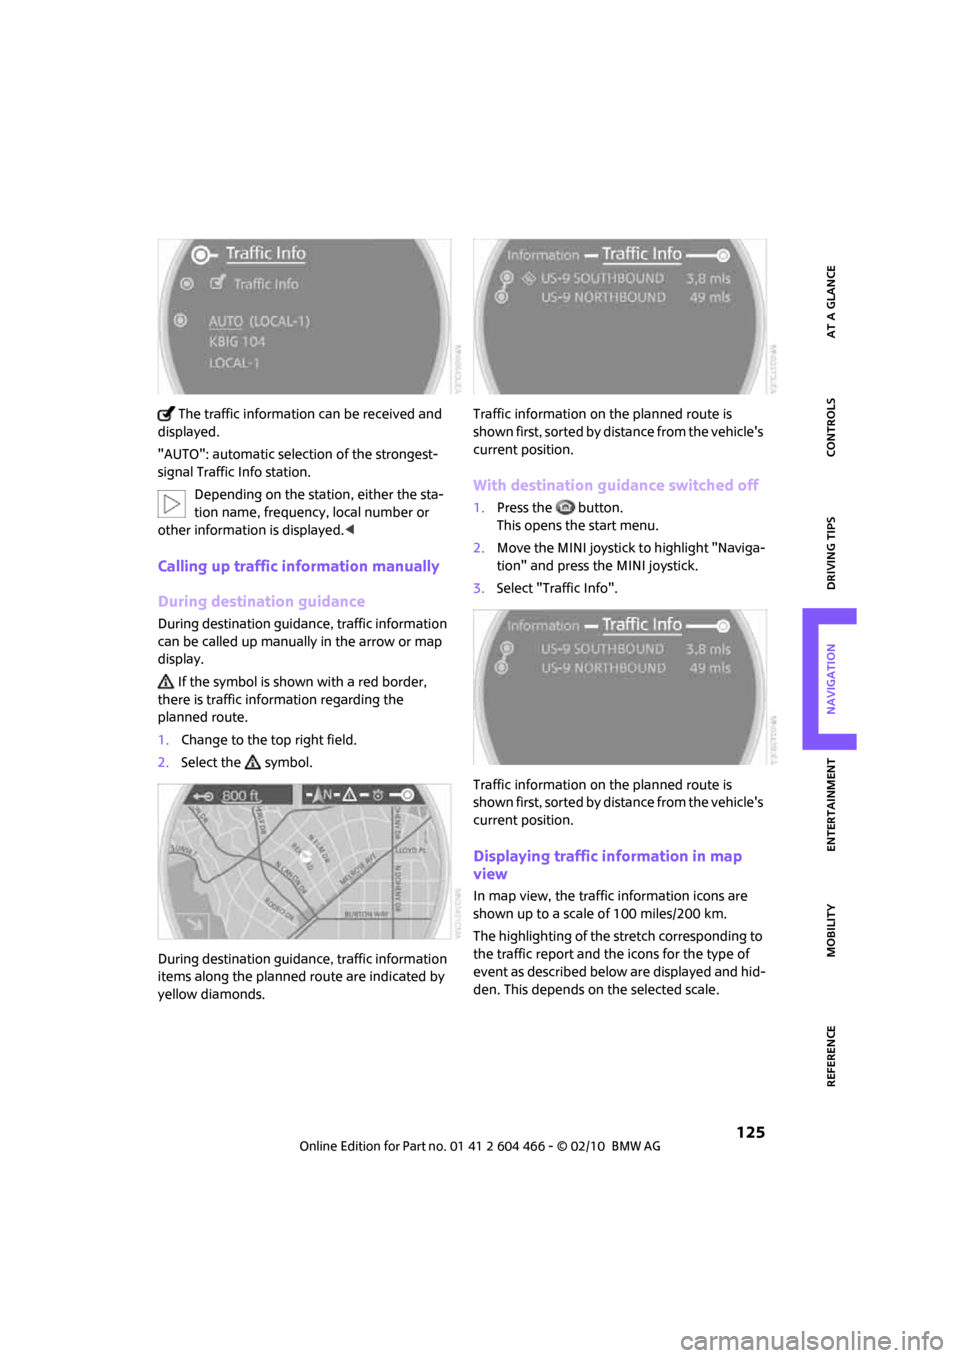
The traffic information can be received and
displayed.
"AUTO": automatic selection of the strongest-
signal Traffic Info station.
Depending on the station, either the sta-
tion name, frequency, local number or
other information is displayed.<
Calling up traffic information manually
During destination guidance
During destination guidance, traffic information
can be called up manually in the arrow or map
display.
If the symbol is shown with a red border,
there is traffic information regarding the
planned route.
1.Change to the top right field.
2.Select the symbol.
During destination guidance, traffic information
items along the planned route are indicated by
yellow diamonds.Traffic information on the planned route is
shown first, sorted by distance from the vehicle's
current position.
With destination guidance switched off
1.Press the button.
This opens the start menu.
2.Move the MINI joystick to highlight "Naviga-
tion" and press the MINI joystick.
3.Select "Traffic Info".
Traffic information on the planned route is
shown first, sorted by distance from the vehicle's
current position.
Displaying traffic information in map
view
In map view, the traffic information icons are
shown up to a scale of 100 miles/200 km.
The highlighting of the stretch corresponding to
the traffic report and the icons for the type of
event as described below are displayed and hid-
den. This depends on the selected scale.
Page 128 of 218
Destination guidance
126
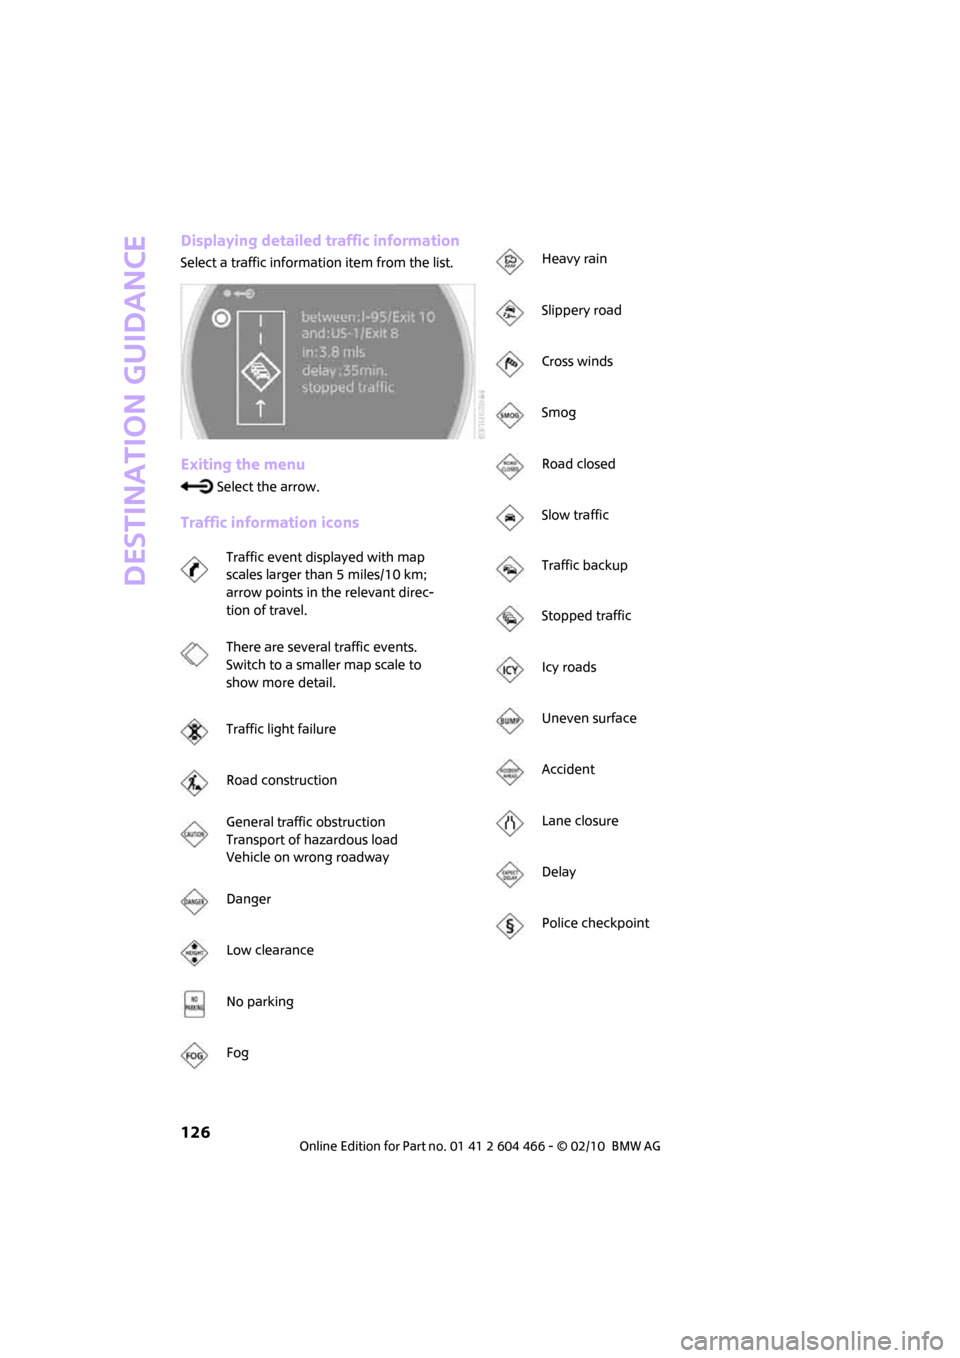
Displaying detailed traffic information
Select a traffic information item from the list.
Exiting the menu
Select the arrow.
Traffic information icons
Traffic event displayed with map
scales larger than 5 miles/10 km;
arrow points in the relevant direc-
tion of travel.
There are several traffic events.
Switch to a smaller map scale to
show more detail.
Traffic light failure
Road construction
General traffic obstruction
Transport of hazardous load
Vehicle on wrong roadway
Danger
Low clearance
No parking
Fog
Heavy rain
Slippery road
Cross winds
Smog
Road closed
Slow traffic
Traffic backup
Stopped traffic
Icy roads
Uneven surface
Accident
Lane closure
Delay
Police checkpoint
Page 129 of 218
MOBILITYAT A GLANCE CONTROLS DRIVING TIPS ENTERTAINMENT
127
NAVIGATION REFERENCE
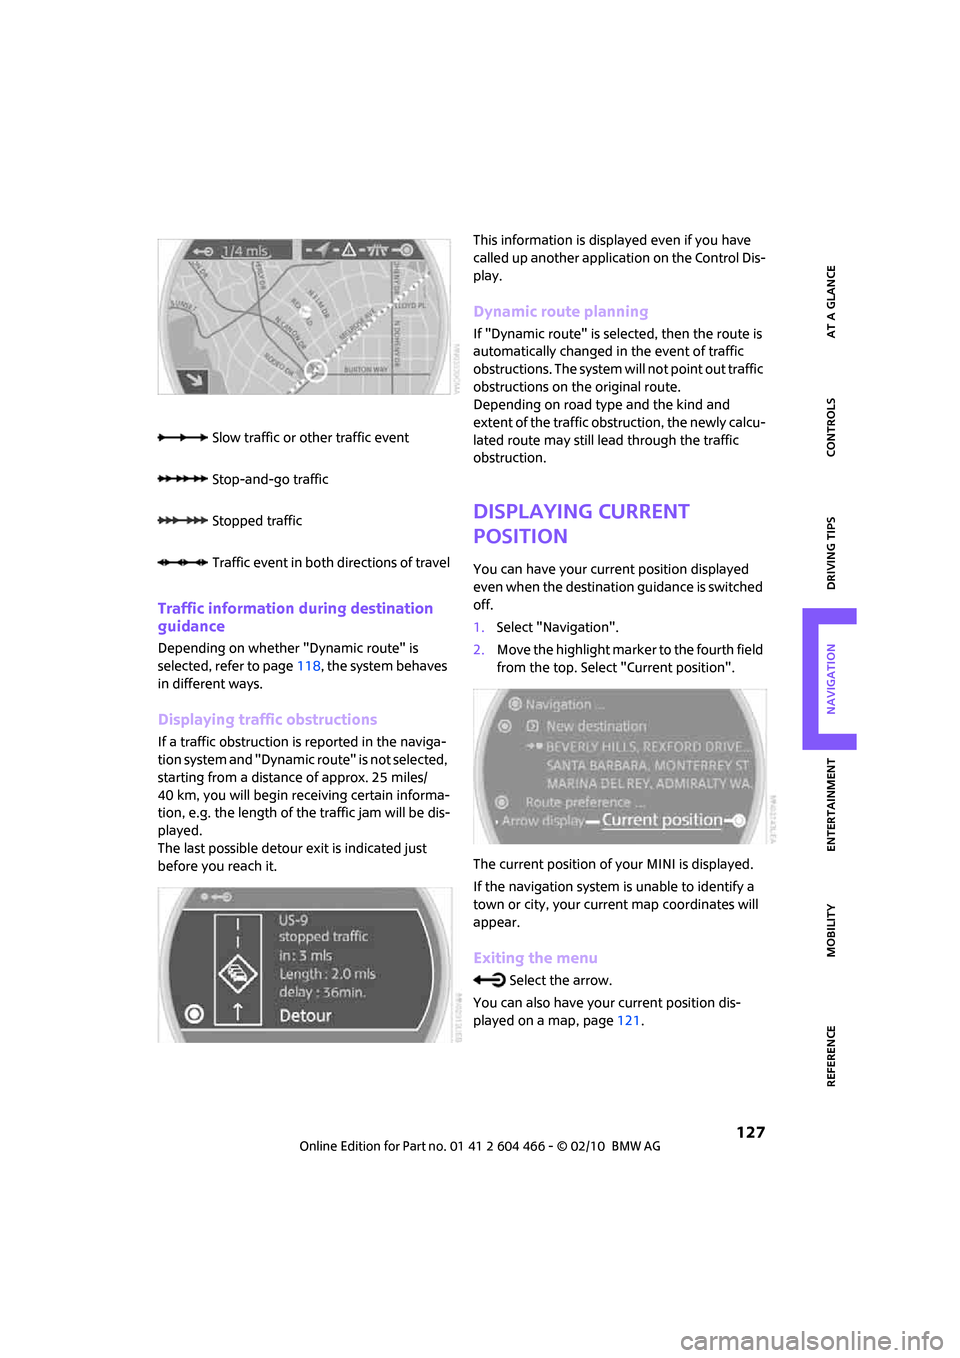
Traffic information during destination
guidance
Depending on whether "Dynamic route" is
selected, refer to page118, the system behaves
in different ways.
Displaying traffic obstructions
If a traffic obstruction is reported in the naviga-
tion system and "Dynamic route" is not selected,
starting from a distance of approx. 25 miles/
40 km, you will begin receiving certain informa-
tion, e.g. the length of the traffic jam will be dis-
played.
The last possible detour exit is indicated just
before you reach it.This information is displayed even if you have
called up another application on the Control Dis-
play.
Dynamic route planning
If "Dynamic route" is selected, then the route is
automatically changed in the event of traffic
obstructions. The system will not point out traffic
obstructions on the original route.
Depending on road type and the kind and
extent of the traffic obstruction, the newly calcu-
lated route may still lead through the traffic
obstruction.
Displaying current
position
You can have your current position displayed
even when the destination guidance is switched
off.
1.Select "Navigation".
2.Move the highlight marker to the fourth field
from the top. Select "Current position".
The current position of your MINI is displayed.
If the navigation system is unable to identify a
town or city, your current map coordinates will
appear.
Exiting the menu
Select the arrow.
You can also have your current position dis-
played on a map, page121. Slow traffic or other traffic event
Stop-and-go traffic
Stopped traffic
Traffic event in both directions of travel
Page 130 of 218
What to do if …
128
What to do if …
What to do if …
>a navigation DVD is inserted, but an instruc-
tion to insert the DVD appears on the Control
Display?
The navigation DVD may not be the correct
DVD for the navigation system. This infor-
mation is indicated on the DVD label.
>you request the current position of your
vehicle, but do not receive a precise display?
The system is unable to receive enough GPS
signals at your current position due to
obstructions, your current position is not yet
available on your navigation DVD, or the sys-
tem is in the process of calculating your cur-
rent position. As a rule, reception is guaran-
teed when you are in the open.
>the destination guidance does not accept a
destination?
The data of the destination is not stored on
the navigation DVD that is loaded. Choose a
destination as close as possible to the origi-
nal one.
>the destination guidance does not accept an
address without the street name?
On the navigation DVD, no downtown area
can be determined for the city or town
entered. Enter any street, or a destination
such as the railway station in the selected
town, and then start the destination guid-
ance.
>you want to enter a destination for the des-
tination guidance, but it is not possible to
select the letters for your desired entry?
The data of the destination is not stored on
the navigation DVD that is loaded. In this
case, the system will not offer you any letters
to choose from. Choose a destination as
close as possible to the original one.
>the system stops furnishing directions on
which way to turn as you approach intersec-
tions?
You are driving in an area that has not yet
been completely recorded on the navigation
DVD. Instead of an arrow indicating a turn, you will see an arrow which indicates the
general direction of your planned route. Or
you have left the recommended route and
the system requires a few seconds to calcu-
late a new recommended route.
>the navigation system does not react to
entries?
If the battery was disconnected, it takes
about 10 minutes before the system is once
again operational.
Page 135 of 218
MOBILITYAT A GLANCE CONTROLS DRIVING TIPS ENTERTAINMENT
133
NAVIGATION REFERENCE
T h is s y m bo l a t t h e l o w e r e d g e o f t h e C o n t r o l
Display indicates that the audio output has been
switched off.
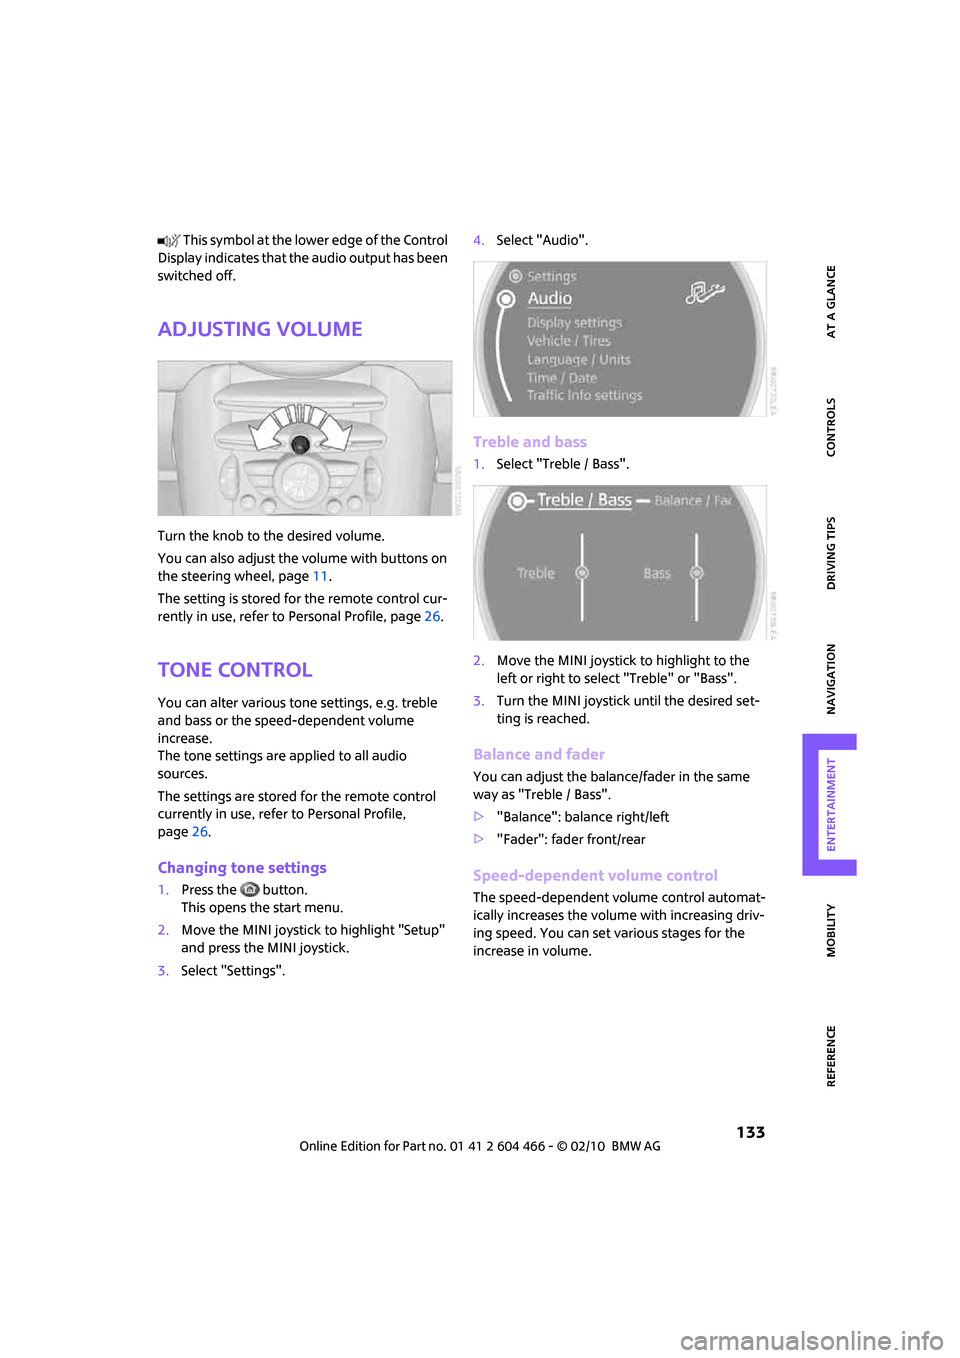
Adjusting volume
Turn the knob to the desired volume.
You can also adjust the volume with buttons on
the steering wheel, page11.
The setting is stored for the remote control cur-
rently in use, refer to Personal Profile, page26.
Tone control
You can alter various tone settings, e.g. treble
and bass or the speed-dependent volume
increase.
The tone settings are applied to all audio
sources.
The settings are stored for the remote control
currently in use, refer to Personal Profile,
page26.
Changing tone settings
1.Press the button.
This opens the start menu.
2.Move the MINI joystick to highlight "Setup"
and press the MINI joystick.
3.Select "Settings".4.Select "Audio".
Treble and bass
1.Select "Treble / Bass".
2.Move the MINI joystick to highlight to the
left or right to select "Treble" or "Bass".
3.Turn the MINI joystick until the desired set-
ting is reached.
Balance and fader
You can adjust the balance/fader in the same
way as "Treble / Bass".
>"Balance": balance right/left
>"Fader": fader front/rear
Speed-dependent volume control
The speed-dependent volume control automat-
ically increases the volume with increasing driv-
ing speed. You can set various stages for the
increase in volume.
Page 137 of 218
MOBILITYAT A GLANCE CONTROLS DRIVING TIPS ENTERTAINMENT
135
NAVIGATION REFERENCE
Radio
Your radio provides reception of the FM and AM
wavebands.
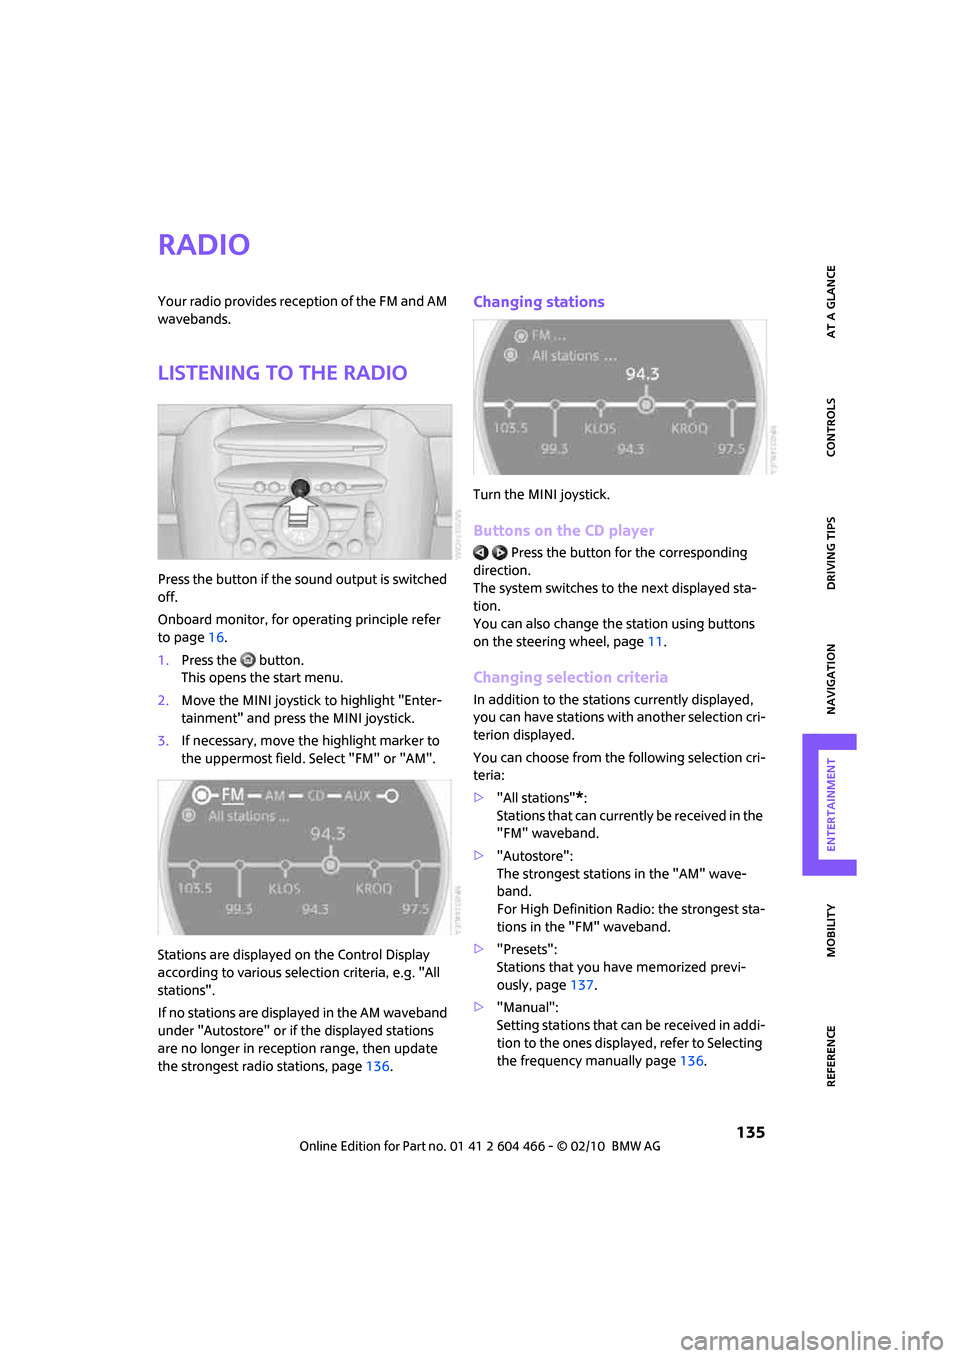
Listening to the radio
Press the button if the sound output is switched
off.
Onboard monitor, for operating principle refer
to page16.
1.Press the button.
This opens the start menu.
2.Move the MINI joystick to highlight "Enter-
tainment" and press the MINI joystick.
3.If necessary, move the highlight marker to
the uppermost field. Select "FM" or "AM".
Stations are displayed on the Control Display
according to various selection criteria, e.g. "All
stations".
If no stations are displayed in the AM waveband
under "Autostore" or if the displayed stations
are no longer in reception range, then update
the strongest radio stations, page136.
Changing stations
Turn the MINI joystick.
Buttons on the CD player
Press the button for the corresponding
direction.
The system switches to the next displayed sta-
tion.
You can also change the station using buttons
on the steering wheel, page11.
Changing selection criteria
In addition to the stations currently displayed,
you can have stations with another selection cri-
terion displayed.
You can choose from the following selection cri-
teria:
>"All stations"
*:
Stations that can currently be received in the
"FM" waveband.
>"Autostore":
The strongest stations in the "AM" wave-
band.
For High Definition Radio: the strongest sta-
tions in the "FM" waveband.
>"Presets":
Stations that you have memorized previ-
ously, page137.
>"Manual":
Setting stations that can be received in addi-
tion to the ones displayed, refer to Selecting
the frequency manually page136.
Page 138 of 218
Radio
136
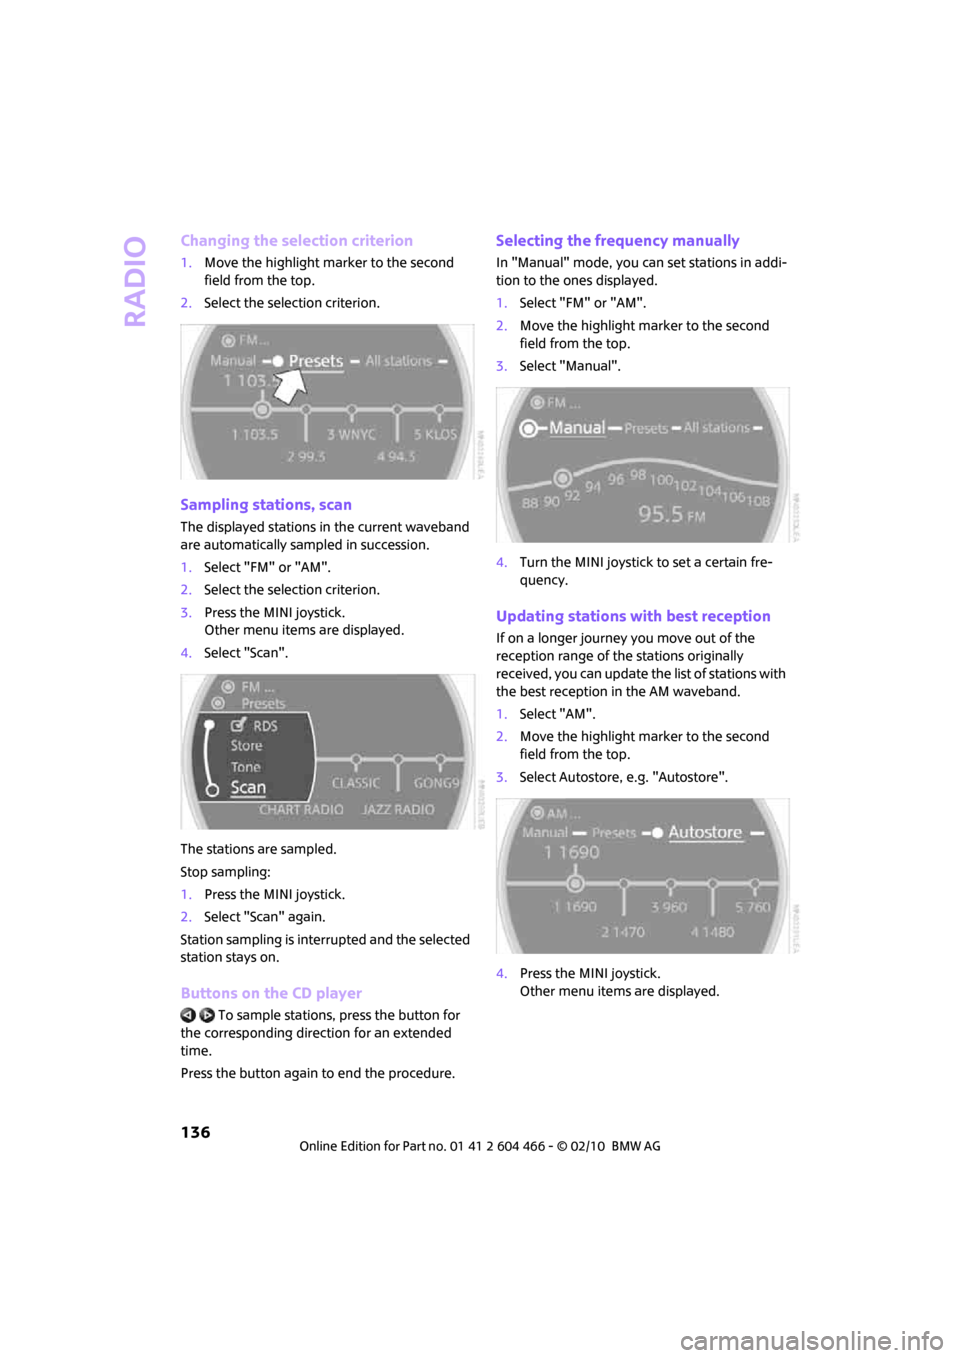
Changing the selection criterion
1.Move the highlight marker to the second
field from the top.
2.Select the selection criterion.
Sampling stations, scan
The displayed stations in the current waveband
are automatically sampled in succession.
1.Select "FM" or "AM".
2.Select the selection criterion.
3.Press the MINI joystick.
Other menu items are displayed.
4.Select "Scan".
The stations are sampled.
Stop sampling:
1.Press the MINI joystick.
2.Select "Scan" again.
Station sampling is interrupted and the selected
station stays on.
Buttons on the CD player
To sample stations, press the button for
the corresponding direction for an extended
time.
Press the button again to end the procedure.
Selecting the frequency manually
In "Manual" mode, you can set stations in addi-
tion to the ones displayed.
1.Select "FM" or "AM".
2.Move the highlight marker to the second
field from the top.
3.Select "Manual".
4.Turn the MINI joystick to set a certain fre-
quency.
Updating stations with best reception
If on a longer journey you move out of the
reception range of the stations originally
received, you can update the list of stations with
the best reception in the AM waveband.
1.Select "AM".
2.Move the highlight marker to the second
field from the top.
3.Select Autostore, e.g. "Autostore".
4.Press the MINI joystick.
Other menu items are displayed.
Page 139 of 218
MOBILITYAT A GLANCE CONTROLS DRIVING TIPS ENTERTAINMENT
137
NAVIGATION REFERENCE
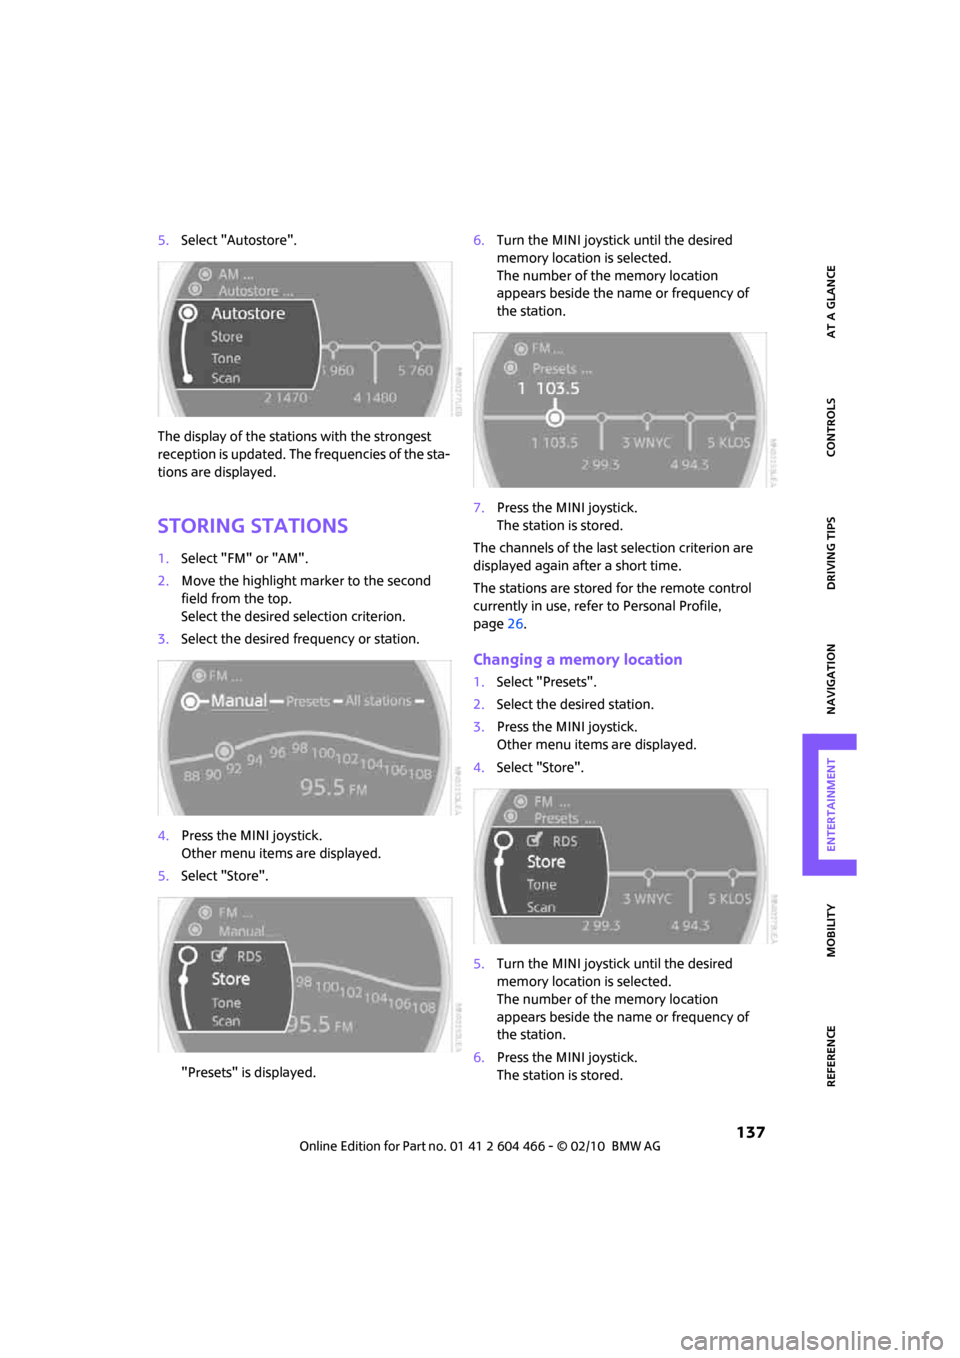
5.Select "Autostore".
The display of the stations with the strongest
reception is updated. The frequencies of the sta-
tions are displayed.
Storing stations
1.Select "FM" or "AM".
2.Move the highlight marker to the second
field from the top.
Select the desired selection criterion.
3.Select the desired frequency or station.
4.Press the MINI joystick.
Other menu items are displayed.
5.Select "Store".
"Presets" is displayed.6.Turn the MINI joystick until the desired
memory location is selected.
The number of the memory location
appears beside the name or frequency of
the station.
7.Press the MINI joystick.
The station is stored.
The channels of the last selection criterion are
displayed again after a short time.
The stations are stored for the remote control
currently in use, refer to Personal Profile,
page26.
Changing a memory location
1.Select "Presets".
2.Select the desired station.
3.Press the MINI joystick.
Other menu items are displayed.
4.Select "Store".
5.Turn the MINI joystick until the desired
memory location is selected.
The number of the memory location
appears beside the name or frequency of
the station.
6.Press the MINI joystick.
The station is stored.
Page 140 of 218
Radio
138
Radio Data System RDS
Radio stations in the FM waveband can broad-
cast additional information, e. g. the station
name, using RDS. If the reception conditions are
good, the station names are shown on the Con-
trol Display. Where reception is poor or in the
event of interference, it may take some time
before the station names will appear in the dis-
play.
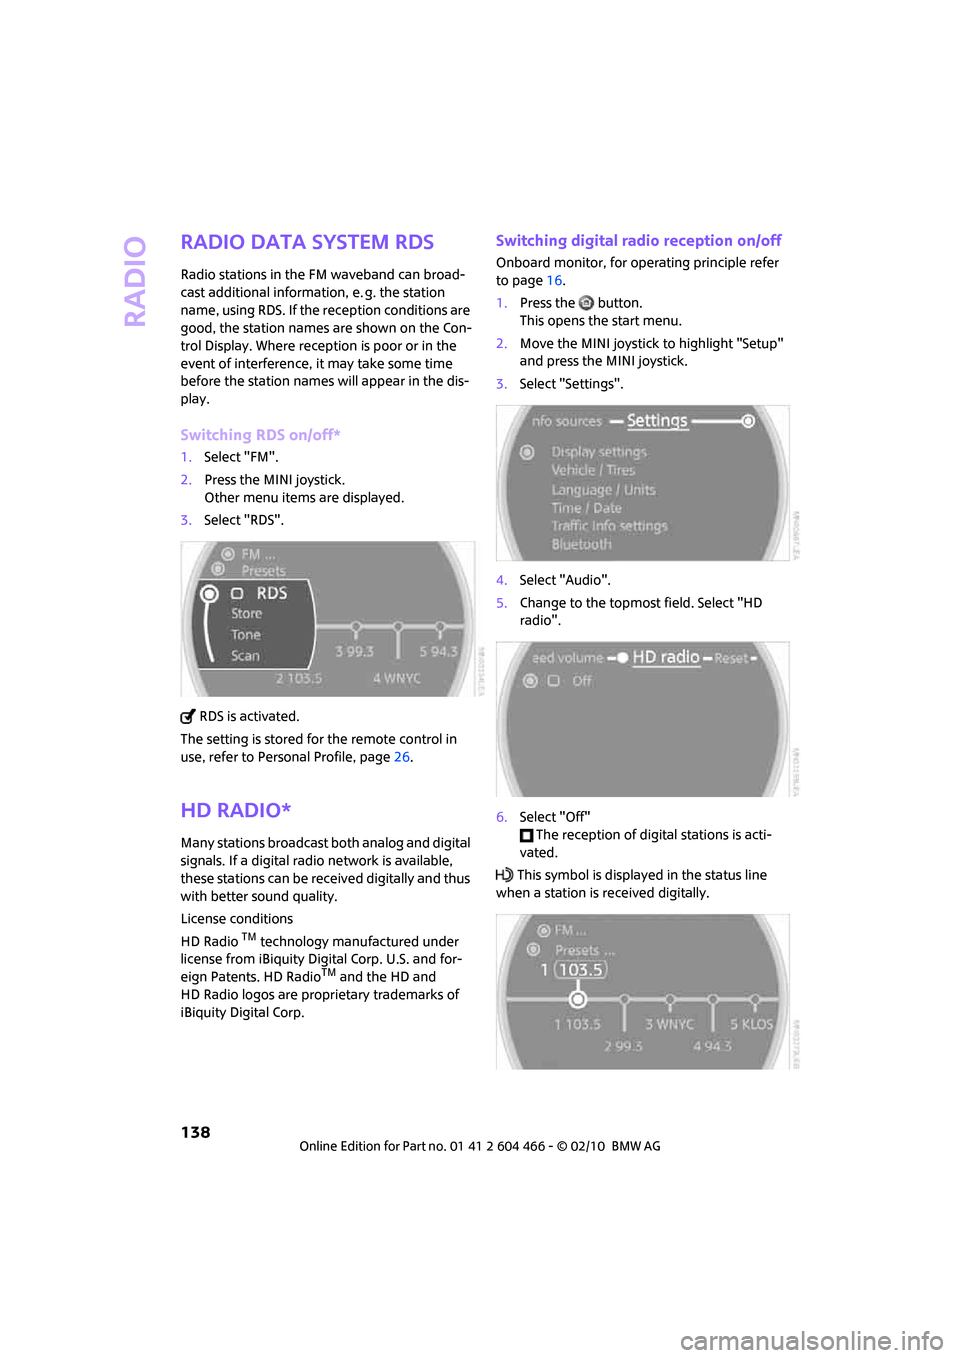
Switching RDS on/off*
1.Select "FM".
2.Press the MINI joystick.
Other menu items are displayed.
3.Select "RDS".
RDS is activated.
The setting is stored for the remote control in
use, refer to Personal Profile, page26.
HD Radio*
Many stations broadcast both analog and digital
signals. If a digital radio network is available,
these stations can be received digitally and thus
with better sound quality.
License conditions
HD Radio
TM technology manufactured under
license from iBiquity Digital Corp. U.S. and for-
eign Patents. HD Radio
TM and the HD and
HD Radio logos are proprietary trademarks of
iBiquity Digital Corp.
Switching digital radio reception on/off
Onboard monitor, for operating principle refer
to page16.
1.Press the button.
This opens the start menu.
2.Move the MINI joystick to highlight "Setup"
and press the MINI joystick.
3.Select "Settings".
4.Select "Audio".
5.Change to the topmost field. Select "HD
radio".
6.Select "Off"
The reception of digital stations is acti-
vated.
This symbol is displayed in the status line
when a station is received digitally.
Page 141 of 218
MOBILITYAT A GLANCE CONTROLS DRIVING TIPS ENTERTAINMENT
139
NAVIGATION REFERENCE
Some stations do not transmit the digital and
analog signals simultaneously. If you are in an
area in which digital reception of the selected
station is not possible continuously, reception
will alternate between analog and digital. This
can cause repetitions or interruptions. In this
case it may be preferable to switch off digital
reception.
Selecting programs of a digital station*
Some stations broadcast several programs on a
single frequency. To select one of these pro-
grams:
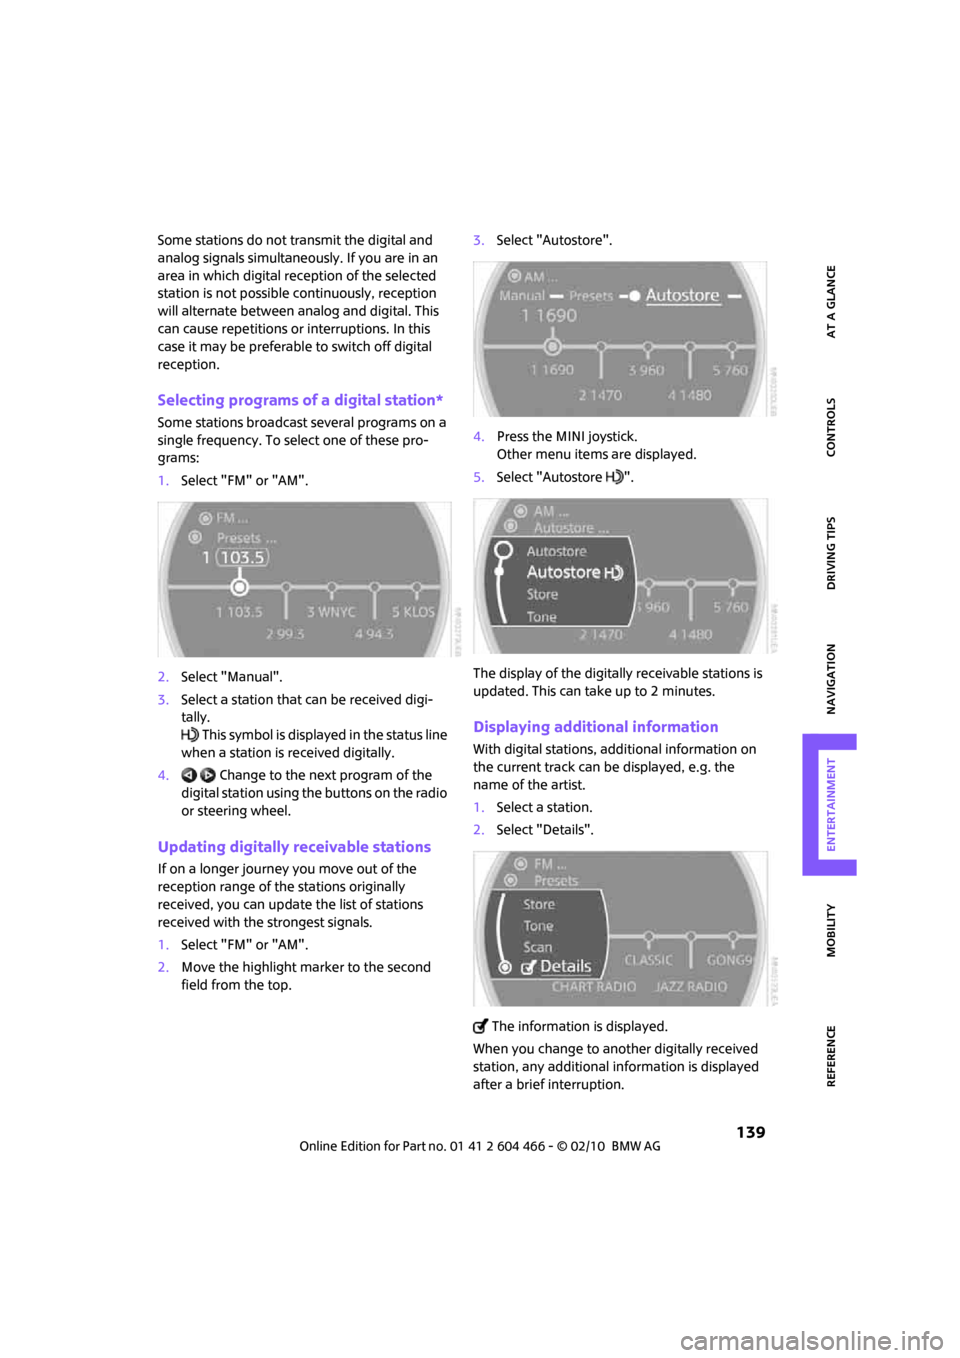
1.Select "FM" or "AM".
2.Select "Manual".
3.Select a station that can be received digi-
tally.
This symbol is displayed in the status line
when a station is received digitally.
4. Change to the next program of the
digital station using the buttons on the radio
or steering wheel.
Updating digitally receivable stations
If on a longer journey you move out of the
reception range of the stations originally
received, you can update the list of stations
received with the strongest signals.
1.Select "FM" or "AM".
2.Move the highlight marker to the second
field from the top.3.Select "Autostore".
4.Press the MINI joystick.
Other menu items are displayed.
5.Select "Autostore ".
The display of the digitally receivable stations is
updated. This can take up to 2 minutes.
Displaying additional information
With digital stations, additional information on
the current track can be displayed, e.g. the
name of the artist.
1.Select a station.
2.Select "Details".
The information is displayed.
When you change to another digitally received
station, any additional information is displayed
after a brief interruption.