check oil MINI Clubman 2010 Owner's Manual (Mini Connected)
[x] Cancel search | Manufacturer: MINI, Model Year: 2010, Model line: Clubman, Model: MINI Clubman 2010Pages: 218, PDF Size: 3.97 MB
Page 63 of 218
MOBILITYAT A GLANCE CONTROLS DRIVING TIPS ENTERTAINMENT
61
NAVIGATION REFERENCE
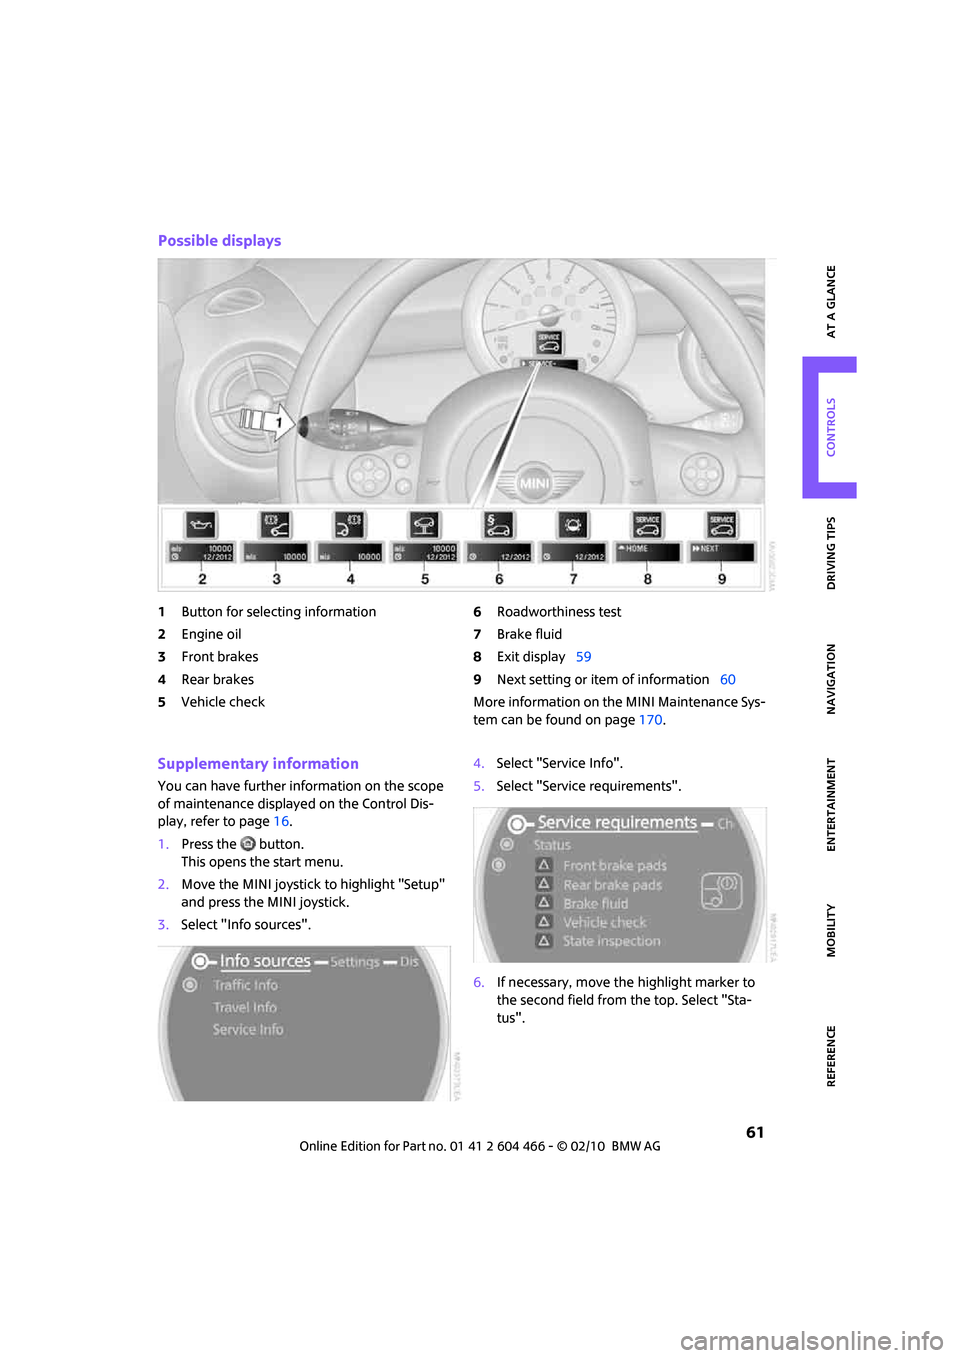
Possible displays
1Button for selecting information
2Engine oil
3Front brakes
4Rear brakes
5Vehicle check6Roadworthiness test
7Brake fluid
8Exit display59
9Next setting or item of information60
More information on the MINI Maintenance Sys-
tem can be found on page170.
Supplementary information
You can have further information on the scope
of maintenance displayed on the Control Dis-
play, refer to page16.
1.Press the button.
This opens the start menu.
2.Move the MINI joystick to highlight "Setup"
and press the MINI joystick.
3.Select "Info sources".4.Select "Service Info".
5.Select "Service requirements".
6.If necessary, move the highlight marker to
the second field from the top. Select "Sta-
tus".
Page 168 of 218
Wheels and tires
166
When properly used, these tires meet the high-
est standards in terms of safety and handling
characteristics.
Run-flat tires*
When mounting new tires or changing over from
summer to winter tires and vice versa, mount
run-flat tires for your own safety. Keep in mind
that no space-saver spare tire is available in the
event of a flat. Your MINI dealer will be glad to
advise you.
Special characteristics of winter tires
The manufacturer of MINI recommends the use
of winter tires on snowy roads or if temperatures
drop below 457/ +76. Although all-season
M+S tires provide better winter traction than
summer tires, they generally fail to provide the
same levels of cold-weather performance as
winter tires.
Pay attention to speed
Always comply with the speed limit for the
winter tires mounted on your car; failure
to do so could result in tire damage and acci-
dents.<
If the car is capable of speeds higher than that
permitted for the winter tires, a label stating the
maximum permitted speed for the mounted
tires must be displayed in your field of view. Spe-
cialist tire dealers and your MINI dealer can sup-
ply these labels.
Storage
Always store wheels and tires in a cool, dry place
with as little exposure to light as possible.
Always protect tires against all contact with oil,
grease and fuels.
Do not exceed the maximum tire inflation pres-
sure indicated on the sidewall of the tire.
Swapping wheels among the axles
Depending on the individual use, front and rear
tires may exhibit different wear and tear.
In order to maintain an even wear and tear, the
wheels may be rotated between the axles. Your
MINI dealer will be glad to advise you.Always check the inflation pressure after the tire
rotation, if necessary change the pressure.
Snow chains*
Only certain types of fine-link snow chains have
been tested by the manufacturer of your MINI,
classified as road-safe and recommended. Con-
tact your MINI dealer for more details.
Only attach snow chains in pairs to the front
wheels with the following tires.
>175/65 R 15 M+S
>175/60 R 16 M+S
John Cooper Works:
>185/50 R 17 86 H M+S XL RSC
Observe the manufacturer's instructions when
mounting snow chains. Do not exceed a speed
of 30 mph or 50 km/h.
Do not initialize the Flat Tire Monitor if
snow chains are mounted; otherwise, the
instrument might issue an incorrect reading.
When driving with snow chains, it can be useful
to briefly deactivate the DSC or activate the DTC,
refer to page72.<
Page 170 of 218
Under the hood
168
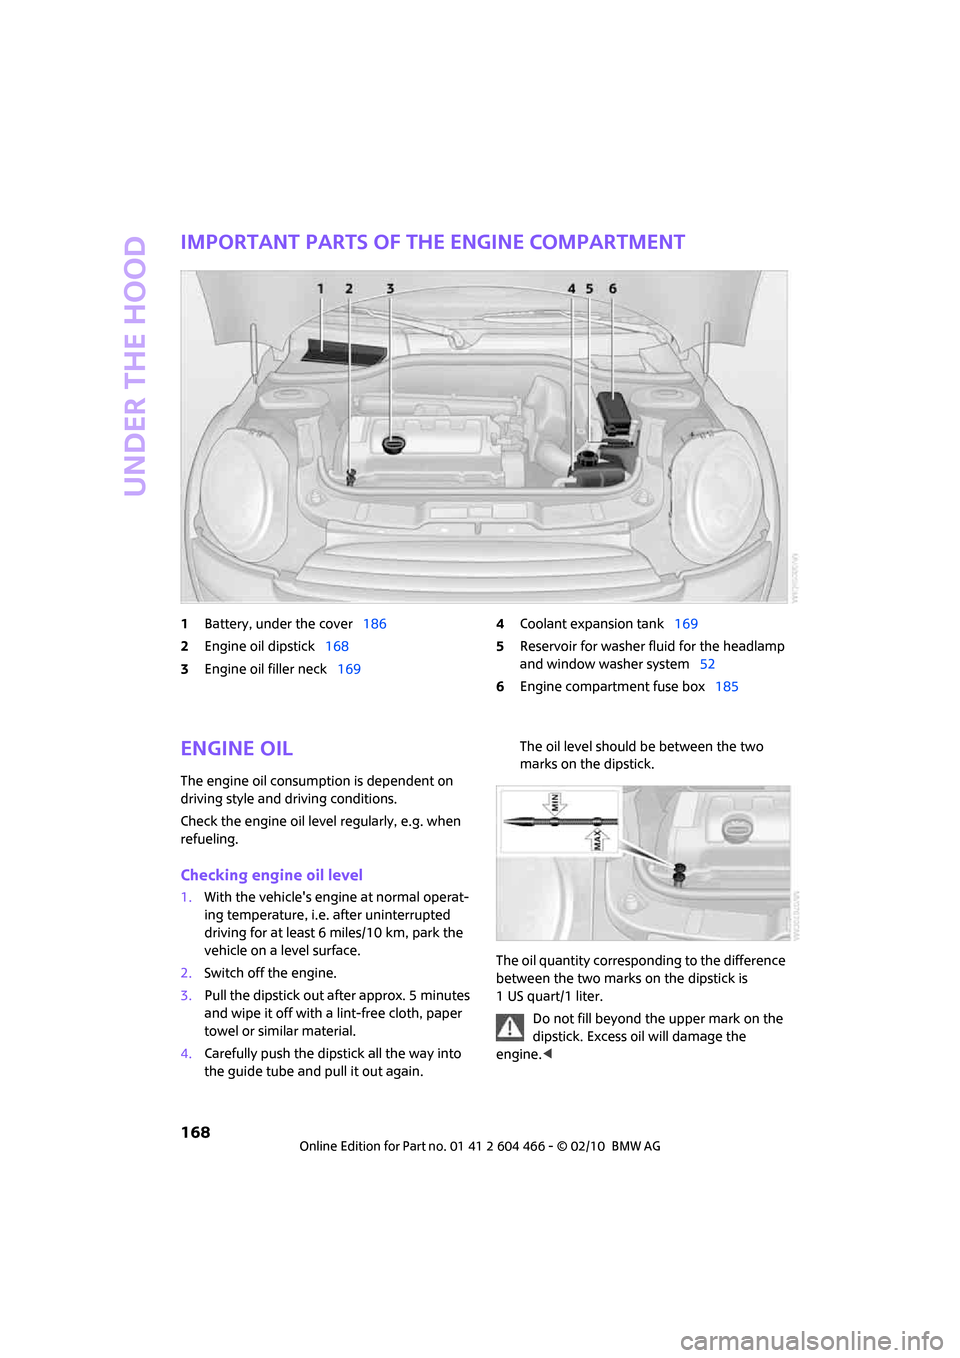
Important parts of the engine compartment
1Battery, under the cover186
2Engine oil dipstick168
3Engine oil filler neck1694Coolant expansion tank169
5Reservoir for washer fluid for the headlamp
and window washer system52
6Engine compartment fuse box185
Engine oil
The engine oil consumption is dependent on
driving style and driving conditions.
Check the engine oil level regularly, e.g. when
refueling.
Checking engine oil level
1.With the vehicle's engine at normal operat-
ing temperature, i.e. after uninterrupted
driving for at least 6 miles/10 km, park the
vehicle on a level surface.
2.Switch off the engine.
3.Pull the dipstick out after approx. 5 minutes
and wipe it off with a lint-free cloth, paper
towel or similar material.
4.Carefully push the dipstick all the way into
the guide tube and pull it out again. The oil level should be between the two
marks on the dipstick.
The oil quantity corresponding to the difference
between the two marks on the dipstick is
1USquart/1liter.
Do not fill beyond the upper mark on the
dipstick. Excess oil will damage the
engine.<
Page 171 of 218
MOBILITYAT A GLANCE CONTROLS DRIVING TIPS ENTERTAINMENT
169
NAVIGATION REFERENCE
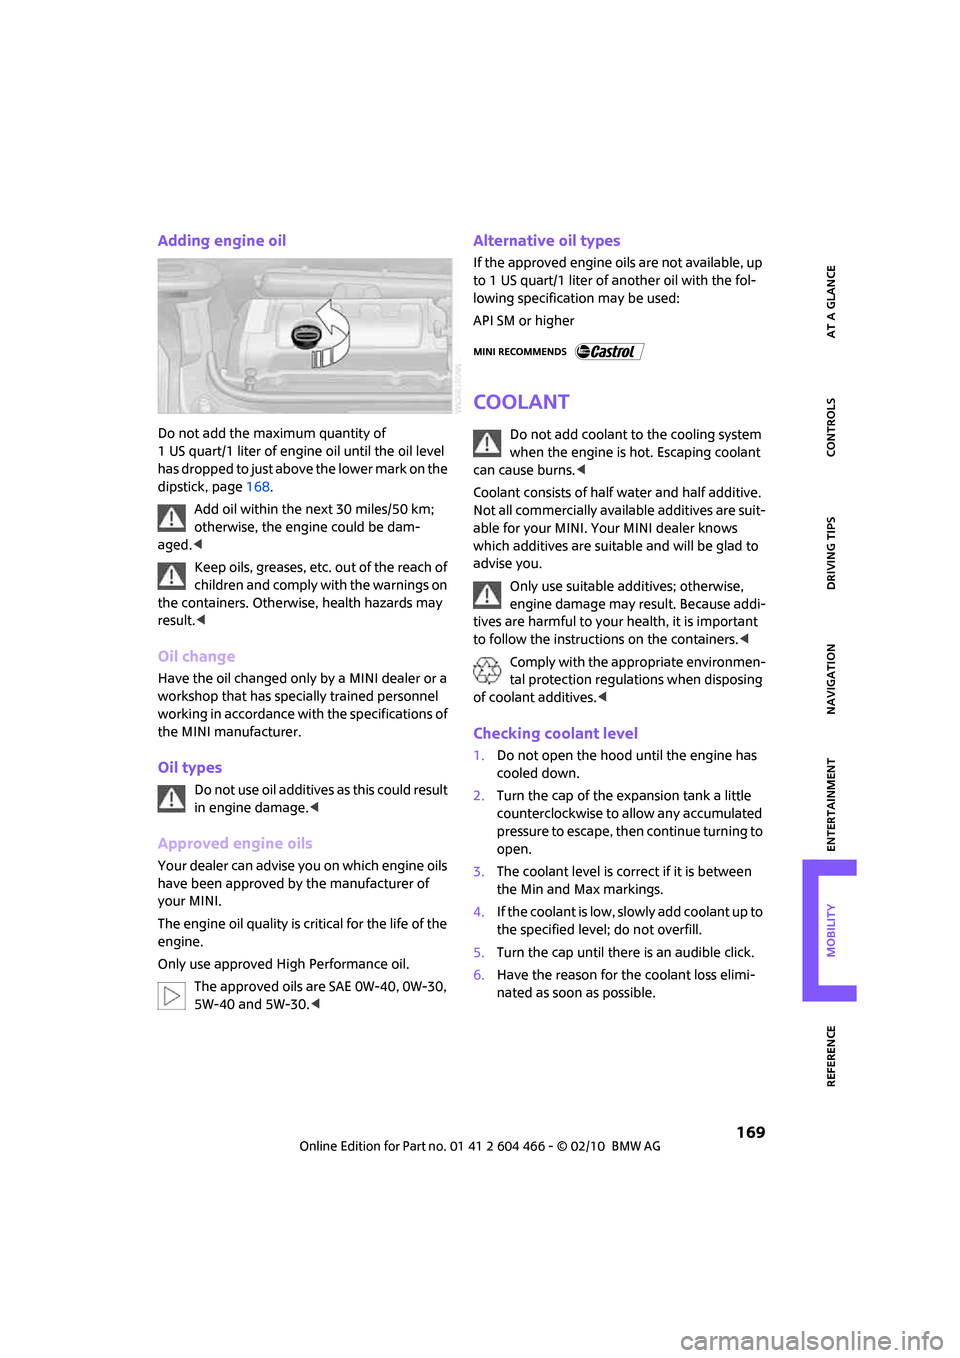
Adding engine oil
Do not add the maximum quantity of
1 US quart/1 liter of engine oil until the oil level
has dropped to just above the lower mark on the
dipstick, page168.
Add oil within the next 30 miles/50 km;
otherwise, the engine could be dam-
aged.<
Keep oils, greases, etc. out of the reach of
children and comply with the warnings on
the containers. Otherwise, health hazards may
result.<
Oil change
Have the oil changed only by a MINI dealer or a
workshop that has specially trained personnel
working in accordance with the specifications of
the MINI manufacturer.
Oil types
Do not use oil additives as this could result
in engine damage.<
Approved engine oils
Your dealer can advise you on which engine oils
have been approved by the manufacturer of
your MINI.
The engine oil quality is critical for the life of the
engine.
Only use approved High Performance oil.
The approved oils are SAE 0W-40, 0W-30,
5W-40 and 5W-30.<
Alternative oil types
If the approved engine oils are not available, up
to 1 US quart/1 liter of another oil with the fol-
lowing specification may be used:
API SM or higher
Coolant
Do not add coolant to the cooling system
when the engine is hot. Escaping coolant
can cause burns.<
Coolant consists of half water and half additive.
Not all commercially available additives are suit-
able for your MINI. Your MINI dealer knows
which additives are suitable and will be glad to
advise you.
Only use suitable additives; otherwise,
engine damage may result. Because addi-
tives are harmful to your health, it is important
to follow the instructions on the containers.<
Comply with the appropriate environmen-
tal protection regulations when disposing
of coolant additives.<
Checking coolant level
1.Do not open the hood until the engine has
cooled down.
2.Turn the cap of the expansion tank a little
counterclockwise to allow any accumulated
pressure to escape, then continue turning to
open.
3.The coolant level is correct if it is between
the Min and Max markings.
4.If the coolant is low, slowly add coolant up to
the specified level; do not overfill.
5.Turn the cap until there is an audible click.
6.Have the reason for the coolant loss elimi-
nated as soon as possible.
Page 174 of 218
Care
172
Care
Car-care products
Regular cleaning and care helps to maintain the
value of your MINI.
The manufacturer of your MINI recommends
using manufacturer-approved products to clean
and care for your vehicle.
MINI Service would be pleased to advise you on
cleaning and care products and services for your
MINI.
The ingredients of original MINI Care Prod-
ucts have been tested, and the products
have been tested in the laboratory and in prac-
tice. They offer optimum care and protection for
your vehicle.<
Do not use any cleansers containing alco-
hol or solvents as these may cause dam-
age.<
Cleaning agents may contain hazardous
or health-damaging substances. Follow
the warning and hazard instructions on the
packaging. For interior cleaning, always open
the doors or windows of the vehicle.
Do not use any products that are not intended
for cleaning the vehicle.<
External care
Washing your vehicle
Especially during the winter months the
vehicle should be frequently washed. Dirt
and road salt can damage the vehicle.<
After washing the vehicle, apply the
brakes briefly to dry them; otherwise,
water can reduce braking efficiency over the
short term and the brake rotors can corrode.<
Car washes
Preference should be given to cloth car washes.Do not use automatic high-pressure car
washes; otherwise, water may drip into
the vehicle around the windows.<
Before driving into the car wash, check if the sys-
tem is suitable for your MINI. Observe the fol-
lowing points:
>Dimensions of the vehicle, page193
>If necessary: fold in the outside mirrors,
page 41.
>Maximum permissible tire width
Avoid car washes with tracks higher than
4 in/10 cm; otherwise, the chassis could
be damaged.<
Preparations for driving into the car wash:
>Unscrew the rod antenna.
>Deactivate the rain sensor
* to prevent unin-
tentional wiping.
>Deactivate the rear window wiper
* and pro-
tect it from damage. Ask the car wash oper-
ator about measures that can be taken to
protect the wipers.
>Remove additional attachments, e.g. spoil-
ers or telephone antennas, if there is a pos-
sibility that they could be damaged.
Automatic transmission
Before driving into the car wash, make sure that
the vehicle can roll:
1.Place the remote control, even with Comfort
Access, in the ignition lock.
2.Move the selector lever to position N.
3.Release the parking brake.
4.Switch off the engine.
5.Insert the remote control in the ignition lock
so that the vehicle can roll.
Steam jets/high-pressure washers
When using steam jets or high-pressure
washers, ensure that you maintain suffi-
cient clearance to the vehicle and do not exceed
a temperature of 1407/606.
Page 202 of 218
Everything from A to Z
200
Everything from A to Z
INDEX
"..." Identifies Control Display
texts used to select
individual functions and tells
you where to find them.
A
Accessories, refer to Your
individual vehicle4
Acknowledgment signals for
locking/unlocking vehicle28
Activated-charcoal filter for
automatic climate control87
"Add to destination list"111
Additives
– coolant169
– engine oil169
Address for navigation
– deleting117
– entering108,111,116
– selecting116
– storing116
– storing current position116
Adjusting temperature inside
the car, refer to Automatic
climate control86
Adjusting the sound during
audio playback, refer to Tone
control133
Air conditioning mode
– automatic climate control86
– ventilation87
Air distribution
– automatic86
Air flow rate86
– automatic climate control86
Air pressure, checking, refer to
Tire inflation pressure158
Air recirculation, refer to
Recirculated-air mode86Air supply
– automatic climate control86
– ventilation87
Air vents85
Airbags79
– sitting safely37
– warning lamp80
Airing, refer to Ventilation87
AKI, refer to Fuel grade157
Alarm system31
"All channels"141
All-season tires, refer to Winter
tires166
"AM", waveband132
Ambient air, refer to
Recirculated-air mode86
Ambient lighting84
Antenna, care172
Antifreeze
– coolant169
– washer fluid52
Antilock Brake System ABS71
Anti-theft alarm system, refer
to Alarm system31
Anti-theft system27
Approved axle loads, refer to
Weights
194
Approved engine oils169
Approved gross vehicle
weight, refer to Weights194
Armrest, refer to Center
armrest90
Arrival time
– computer57
– destination guidance120
"Arrow display" in
Navigation121
Ashtray91
Assistant systems, refer to
– Dynamic Stability Control
DSC71Audio132
– controls132
– switching on/off132
– tone control133
– volume133
Audio device, external90
AUTO program for automatic
climate control86
Automatic
– air distribution86
– air flow rate86
– cruise control53
– headlamp control81
– storing of stations136
Automatic climate control85
– automatic air distribution86
Automatic station search136
Automatic transmission with
Steptronic48
– interlock48
– overriding selector lever
lock50
– shiftlock48
– sport program49
"Autostore"
– on the radio137
"AUX"149,151
– AUX-IN port149
– USB audio interface150
AUX-IN port149
AUX-IN, refer to External audio
device90
Average fuel consumption56
– setting the units60
Average speed57
"Avoid ferries" in
Navigation118
"Avoid highways" in
Navigation118
Page 206 of 218
Everything from A to Z
204
Emergency operation, refer to
Manual operation
– door lock30
– fuel filler flap156
– transmission lock, automatic
transmission50
Emergency services, refer to
Roadside Assistance186
Engine
– breaking in96
– data192
– overheated, refer to Coolant
temperature56
– speed192
– starting47
– starting, Comfort Access33
– switching off47
Engine compartment168
Engine coolant, refer to
Coolant169
Engine malfunction
– indicator lamp13
Engine oil
– adding169
– additives, refer to Approved
engine oils169
– alternative oil types169
– approved engine oils169
– capacity169
– checking level168
– dipstick168
– intervals between changes,
refer to Service
requirements60
– MINI Maintenance
System170
Engine oil level, checking168
Engine output, refer to Engine
data192
Engine starting, refer to
Starting the engine47
Entering address111
Entering destination109
Entering intersection110
Error messages, refer to Check
Control65
"ESN"139,140,141ESP Electronic Stability
Program, refer to Dynamic
Stability Control DSC71
Exhaust system, refer to Hot
exhaust system96
Exterior mirrors41
– adjusting41
– automatic heating41
– folding in and out41
External audio device90
External audio device, refer to
AUX-IN port149
Eyes
– for tow-starting and towing
away187
– for tying down loads100
F
Fader, tone control133
Failure messages, refer to
Check Control65
Failure of an electrical
consumer185
Fast forward
– CD changer146
– CD player146
"Fast route" in Navigation118
Fastening safety belts, refer to
Safety belts40
Fastest route for
navigation118
Filter
– microfilter/activated-
charcoal filter for automatic
climate control87
Fine wood, care174
First aid pouch186
Fixture for remote control,
refer to Ignition lock46
Flash when locking/
unlocking28
Flat tire
– run-flat tires165
– Tire Pressure Monitor TPM75Flat Tire Monitor FTM73
– indicating a flat tire74
– initializing the system74
– snow chains74
– system limits74
Flat tires, refer to Tire
condition164
Floor mats, care174
Floor plate, refer to Level load
floor99
"FM", waveband132,135
FM, waveband135
Fog lamps
– replacing bulb178,180
Folding rear seat backrest98
Footbrake, refer to Braking
safely97
Footwell lamps83
For your own safety5
Frequency, selecting
manually136
Front airbags79
Front fog lamps83
– replacing bulb178
Front seat adjustment37
Frost on windows, refer to
Defrosting windows87
"FTM"76
FTM, refer to Flat Tire
Monitor73
Fuel157
– gauge56
– high-quality brands157
– quality157
– specifications157
– tank capacity194
Fuel clock, refer to Fuel
gauge56
Fuel consumption display
– average fuel consumption56
Fuel display, refer to Fuel
gauge56
Fuel filler flap156
– releasing in the event of
electrical malfunction156
Fuses185