sat nav MINI Clubman 2010 Owner's Manual (Mini Connected)
[x] Cancel search | Manufacturer: MINI, Model Year: 2010, Model line: Clubman, Model: MINI Clubman 2010Pages: 218, PDF Size: 3.97 MB
Page 87 of 218
MOBILITYAT A GLANCE CONTROLS DRIVING TIPS ENTERTAINMENT
85
NAVIGATION REFERENCE
Climate
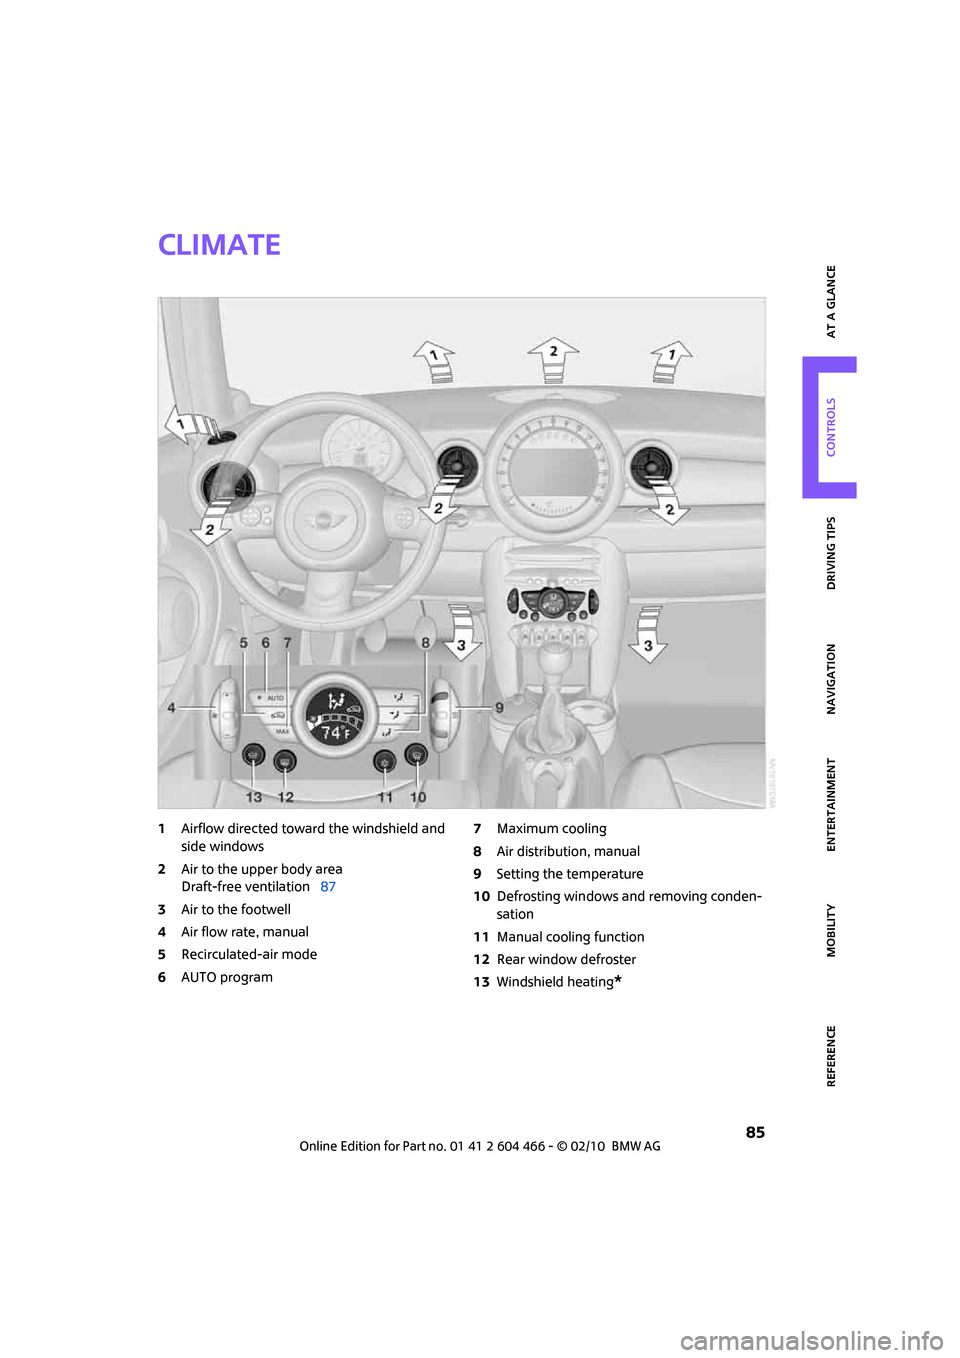
1Airflow directed toward the windshield and
side windows
2Air to the upper body area
Draft-free ventilation87
3Air to the footwell
4Air flow rate, manual
5Recirculated-air mode
6AUTO program7Maximum cooling
8Air distribution, manual
9Setting the temperature
10Defrosting windows and removing conden-
sation
11Manual cooling function
12Rear window defroster
13Windshield heating
*
Page 89 of 218
MOBILITYAT A GLANCE CONTROLS DRIVING TIPS ENTERTAINMENT
87
NAVIGATION REFERENCE
Rear window defroster
The defroster is switched off auto-
matically after a certain time.
Depending on your vehicle's equip-
ment, the upper wires serve as an
antenna and are not part of the rear window
defroster.
Defrosting windows and removing
condensation
Quickly removes ice and condensa-
tion from the windshield and front
side windows.
For this purpose, also switch on the
cooling function.
The windshield heating
* is switched on auto-
matically.
Windshield heating*
The windshield heating is switched
off automatically after a certain
time.
Cooling function
The passenger compartment can only be cooled
while the engine is running.
When the cooling function is on,
the air is cooled, dried, then
reheated according to the temper-
ature setting.
The cooling function helps prevent condensa-
tion on the windows or removes it quickly.
Depending on the weather, the windshield may
fog over briefly when the engine is started. The
recirculated-air mode may be switched on auto-
matically.
When the AUTO button is pressed, the cooling
function switches on automatically.
Microfilter/activated-charcoal filter
The microfilter captures dust and pollen. The
activated-charcoal filter provides additional pro-
tection by filtering gaseous pollutants from the
outside air. Your MINI dealer replaces this com-bined filter as a standard part of your scheduled
maintenance.
You can call up further information in the service
requirements display, page60.
Ventilation
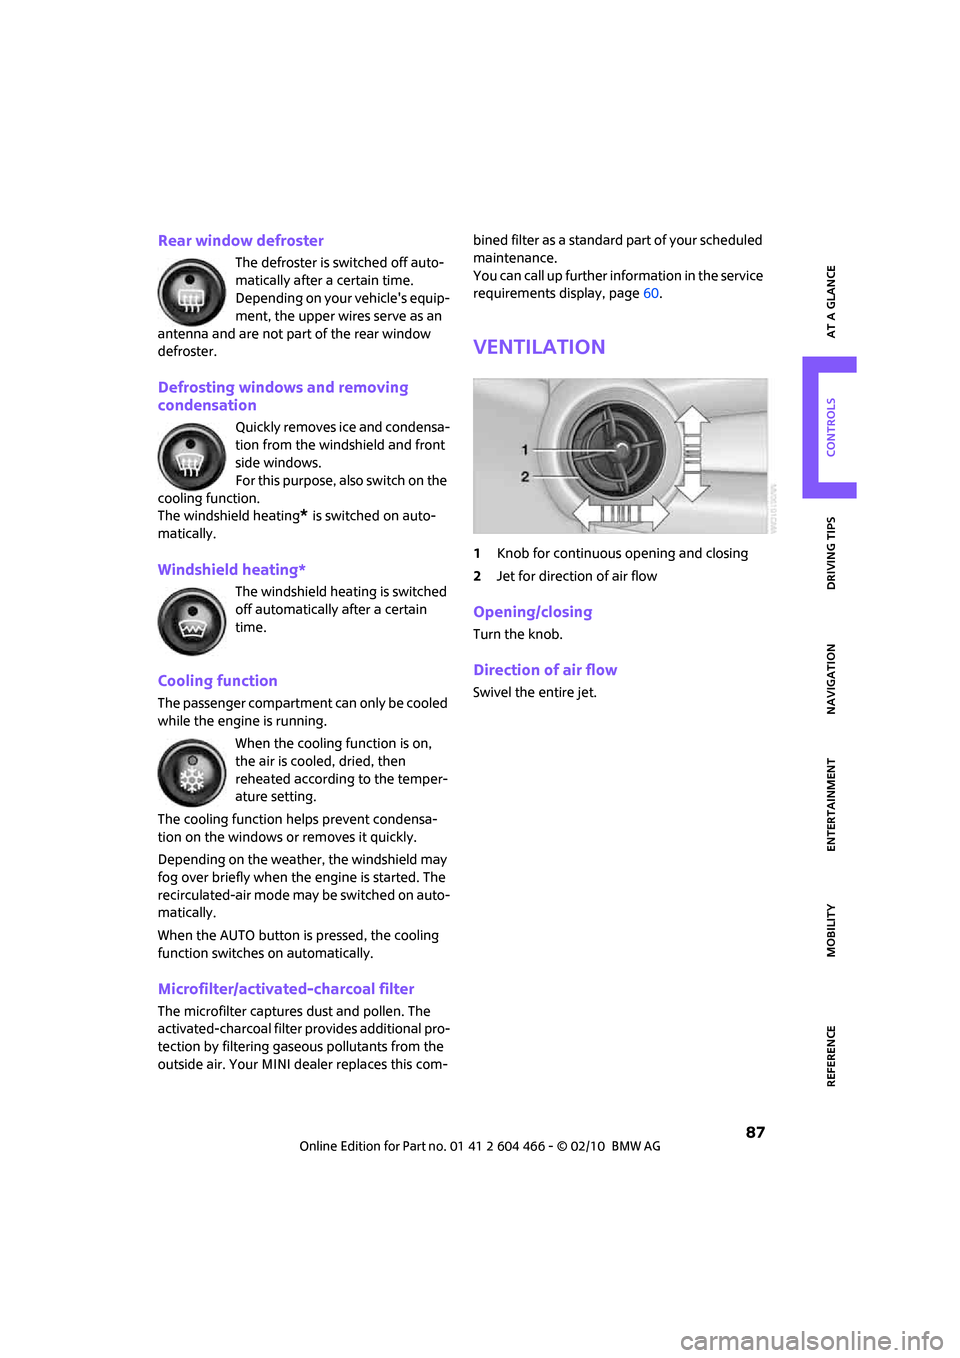
1Knob for continuous opening and closing
2Jet for direction of air flow
Opening/closing
Turn the knob.
Direction of air flow
Swivel the entire jet.
Page 99 of 218
MOBILITYAT A GLANCE CONTROLS DRIVING TIPS ENTERTAINMENT
97
NAVIGATION REFERENCE
The risk of hydroplaning increases with declining
tread depth on the tires, refer also to Tread
depth on page164.
Driving through water
Drive through water on the road only if it is
not deeper than 1 ft/30 cm, and then only
at walking speed at the most. Otherwise, the
vehicle's engine, the electrical systems and the
transmission may be damaged.<
Parking brake on inclines
On inclines, do not hold the vehicle with
the clutch; use the parking brake. Other-
wise, greater clutch wear will result.<
For information on driving off using Hill Assist
*,
refer to page73.
Braking safely
Your MINI is equipped with ABS. If you are in a
situation which requires full braking, it is best to
brake using maximum brake pressure. Since the
vehicle maintains steering responsiveness, you
can still avoid possible obstacles with a mini-
mum of steering effort.
The pulsation of the brake pedal, together with
the sound of hydraulic regulation, indicates that
ABS is actively taking effect.
Driving in wet conditions
When roads are wet or there is heavy rain, briefly
exert gentle pressure on the brake pedal every
few miles. Monitor traffic conditions to ensure
that this maneuver does not endanger other
road users. The heat generated in this process
helps dry the pads and rotors to ensure that
Then full braking force will be immediately avail-
able when it is needed.
Hills
To prevent overheating and the resulting
reduced efficiency of the brake system,
drive long or steep downhill gradients in the
gear in which the least braking is required. Even
light but consistent brake pressure can lead to
high temperatures, brake wear and possibly
even brake failure.
sary. This strategy helps you avoid placing
excessive loads on the brake system. Downshift-
ing in manual mode of the automatic transmis-
sion, page49.
Never drive with the clutch held down,
with the transmission in neutral or with
the engine switched off; otherwise, engine brak-
ing action will not be present or there will be no
power assistance to the brakes or steering.
Never allow floor mats, carpets or any other
objects to protrude into the area around the
pedals; otherwise, pedal function could be
impaired.<
Corrosion on brake rotors
When the vehicle is driven only occasionally,
during extended periods when the vehicle is not
used at all, and in operating conditions where
brake applications are less frequent, there is an
increased tendency for corrosion to form on
rotors, while contaminants accumulate on the
brake pads. This occurs because the minimum
pressure which must be exerted by the pads
during brake applications to clean the rotors is
not reached.
Should corrosion form on the brake rotors, the
brakes will tend to respond with a pulsating
effect that even extended application will fail to
cure.
When the vehicle is parked
Condensation forms while the automatic climate
control is in operation, and then exits under the
vehicle. Traces of condensed water under the
vehicle are therefore normal.
In the MINI Cooper S, the coolant pump may
continue to run for some time after the engine is
switched off. This will generate noise in the
engine compartment.
Page 108 of 218
Starting the navigation system
106
Starting the navigation system
Your navigation system can use satellites to
ascertain the precise position of your vehicle
and guide you reliably to any destination you
enter.
Navigation DVD
The navigation system requires a special naviga-
tion DVD. You can obtain the latest version from
your MINI dealer.
Inserting navigation DVD
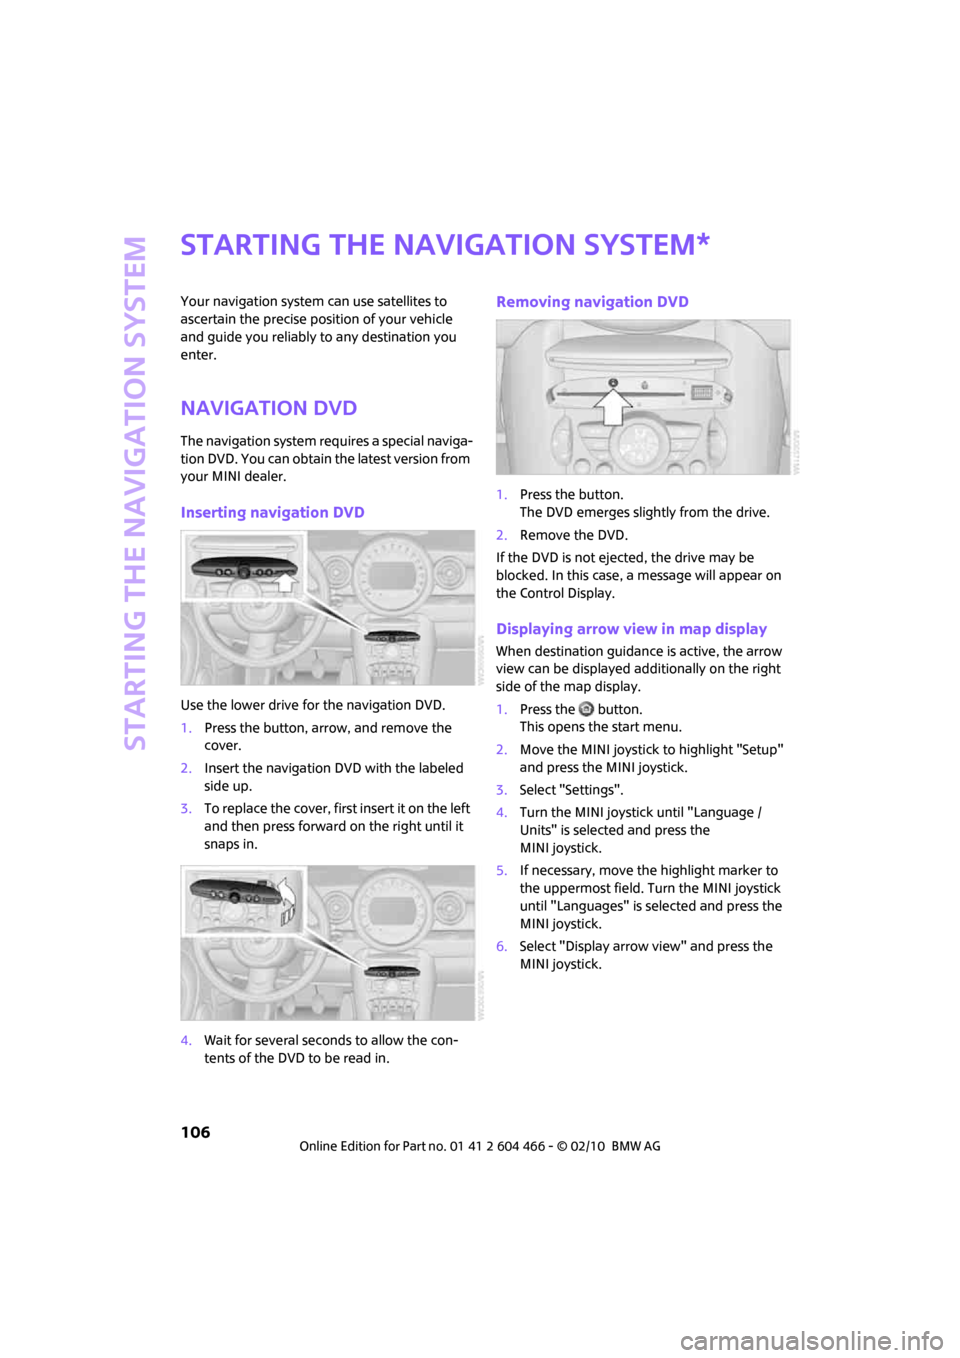
Use the lower drive for the navigation DVD.
1.Press the button, arrow, and remove the
cover.
2.Insert the navigation DVD with the labeled
side up.
3.To replace the cover, first insert it on the left
and then press forward on the right until it
snaps in.
4.Wait for several seconds to allow the con-
tents of the DVD to be read in.
Removing navigation DVD
1.Press the button.
The DVD emerges slightly from the drive.
2.Remove the DVD.
If the DVD is not ejected, the drive may be
blocked. In this case, a message will appear on
the Control Display.
Displaying arrow view in map display
When destination guidance is active, the arrow
view can be displayed additionally on the right
side of the map display.
1.Press the button.
This opens the start menu.
2.Move the MINI joystick to highlight "Setup"
and press the MINI joystick.
3.Select "Settings".
4.Turn the MINI joystick until "Language /
Units" is selected and press the
MINI joystick.
5.If necessary, move the highlight marker to
the uppermost field. Turn the MINI joystick
until "Languages" is selected and press the
MINI joystick.
6.Select "Display arrow view" and press the
MINI joystick.
*
Page 144 of 218
Radio
142
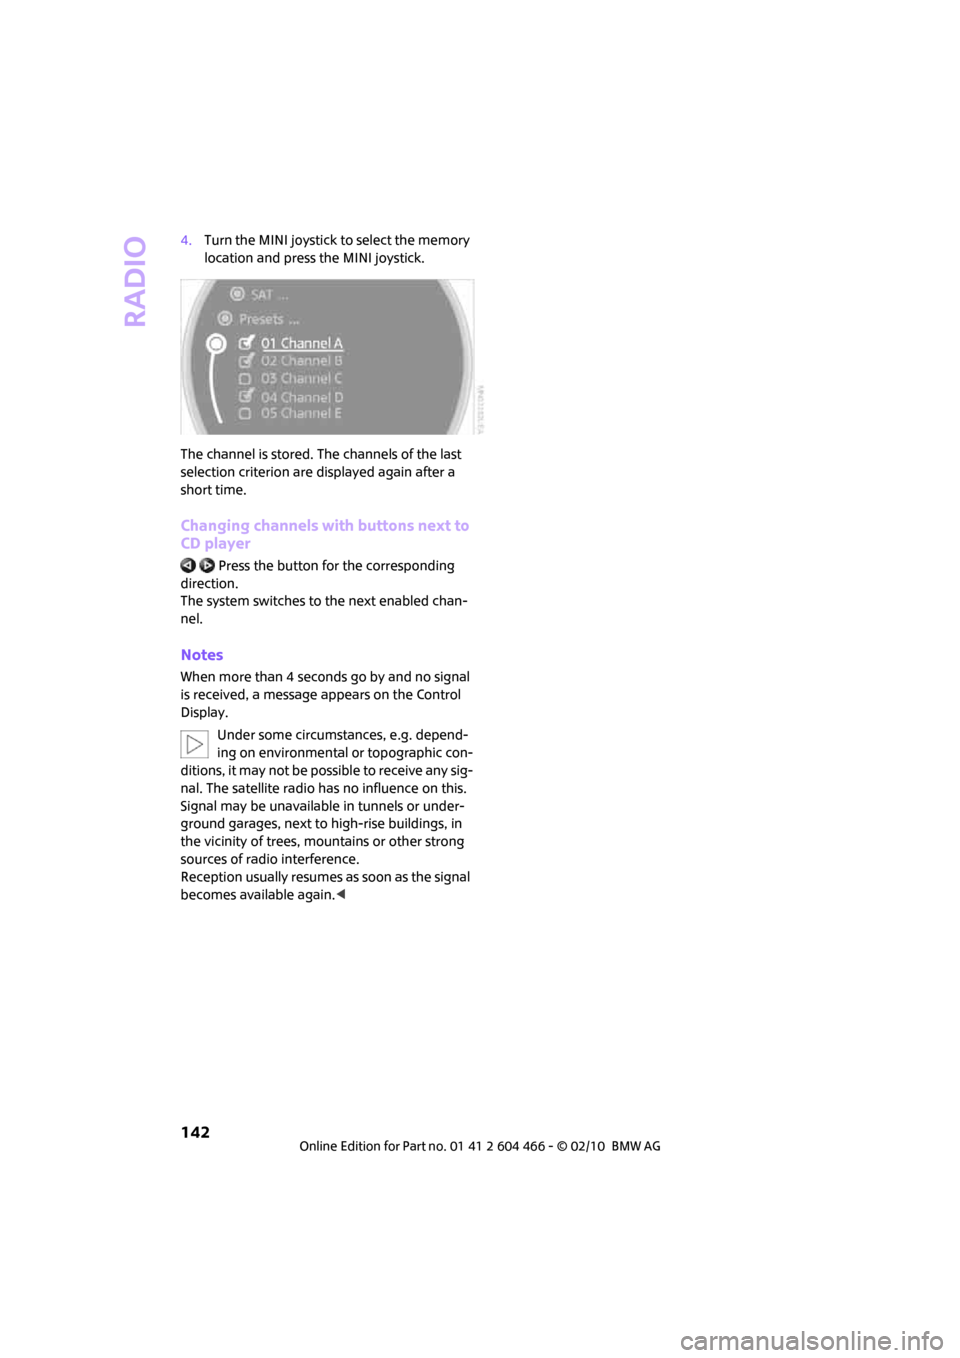
4.Turn the MINI joystick to select the memory
location and press the MINI joystick.
The channel is stored. The channels of the last
selection criterion are displayed again after a
short time.
Changing channels with buttons next to
CD player
Press the button for the corresponding
direction.
The system switches to the next enabled chan-
nel.
Notes
When more than 4 seconds go by and no signal
is received, a message appears on the Control
Display.
Under some circumstances, e.g. depend-
ing on environmental or topographic con-
ditions, it may not be possible to receive any sig-
nal. The satellite radio has no influence on this.
Signal may be unavailable in tunnels or under-
ground garages, next to high-rise buildings, in
the vicinity of trees, mountains or other strong
sources of radio interference.
Reception usually resumes as soon as the signal
becomes available again.<
Page 179 of 218
MOBILITYAT A GLANCE CONTROLS DRIVING TIPS ENTERTAINMENT
177
NAVIGATION REFERENCE
When working on electrical systems,
always begin by switching off the con-
sumer in question; otherwise, short circuits
could result. To avoid possible injury or equip-
ment damage when replacing bulbs, observe
any instructions provided by the bulb manufac-
turer.<
Caring for headlamps, refer to page173.
For any bulb replacement not described
below, contact a MINI dealer or a work-
shop that has specially trained personnel work-
ing in accordance with the specifications of the
MINI manufacturer.<
For checking and adjusting headlamp aim,
please contact your MINI dealer.<
Light-emitting diodes LEDs
Light-emitting diodes installed behind translu-
cent lenses serve as the light sources for many of
the controls and displays in your vehicle. These
light-emitting diodes are related to conven-
tional laser diodes, and legislation defines them
as Class 1 light-emitting diodes.
Do not remove the covers or expose the
eyes directly to the unfiltered light source
for several hours; otherwise, this could cause
irritation of the retina.<
Headlight glass lens
In cool or humid weather, condensation may
occur on the interior of outside lights. The con-
densation disappears a short time after the light
is switched on. Headlight glass lenses do not
need to be replaced. If a lot of moisture is
present, e.g. water droplets in the light, have
them checked by your service center.
Xenon lamps*
The service life of these bulbs is very long and
the probability of failure very low, provided that
they are not switched on and off an excessive
number of times. If a xenon lamp fails neverthe-
less, switch on the fog lamps and continue the
journey with great care, provided that local leg-
islation does not prohibit this.Have any work on the xenon lamp system,
including bulb replacement, carried out
only by a MINI dealer or a workshop that has
specially trained personnel working in accor-
dance with the specifications of the MINI manu-
facturer. Due to high voltage, there is a risk of
fatal injury if work on the xenon lamps is carried
out improperly.<
Halogen low beams and high beams
H13 bulb, 60/55 watts
The H13 bulb is pressurized. Therefore,
wear safety glasses and protective gloves.
Otherwise, there is a risk of injury if the bulb is
damaged.<
Be careful when installing the cover; oth-
erwise, leaks could occur and cause dam-
age to the headlamp system.<
Accessing the lamp from the engine
compartment
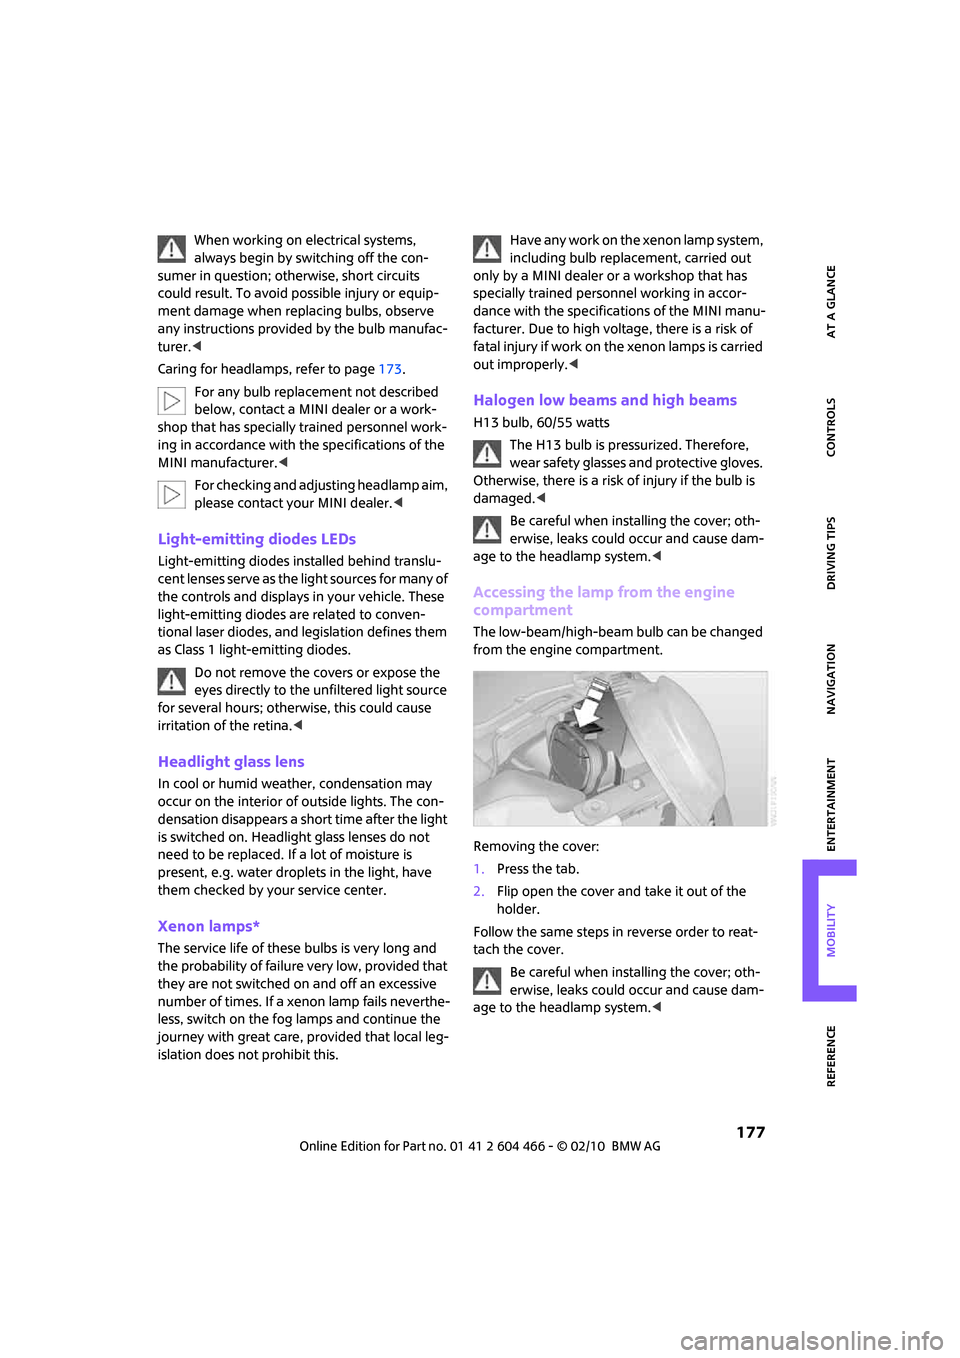
The low-beam/high-beam bulb can be changed
from the engine compartment.
Removing the cover:
1.Press the tab.
2.Flip open the cover and take it out of the
holder.
Follow the same steps in reverse order to reat-
tach the cover.
Be careful when installing the cover; oth-
erwise, leaks could occur and cause dam-
age to the headlamp system.<
Page 199 of 218
MOBILITYAT A GLANCE CONTROLS DRIVING TIPS ENTERTAINMENT
197
NAVIGATION REFERENCE
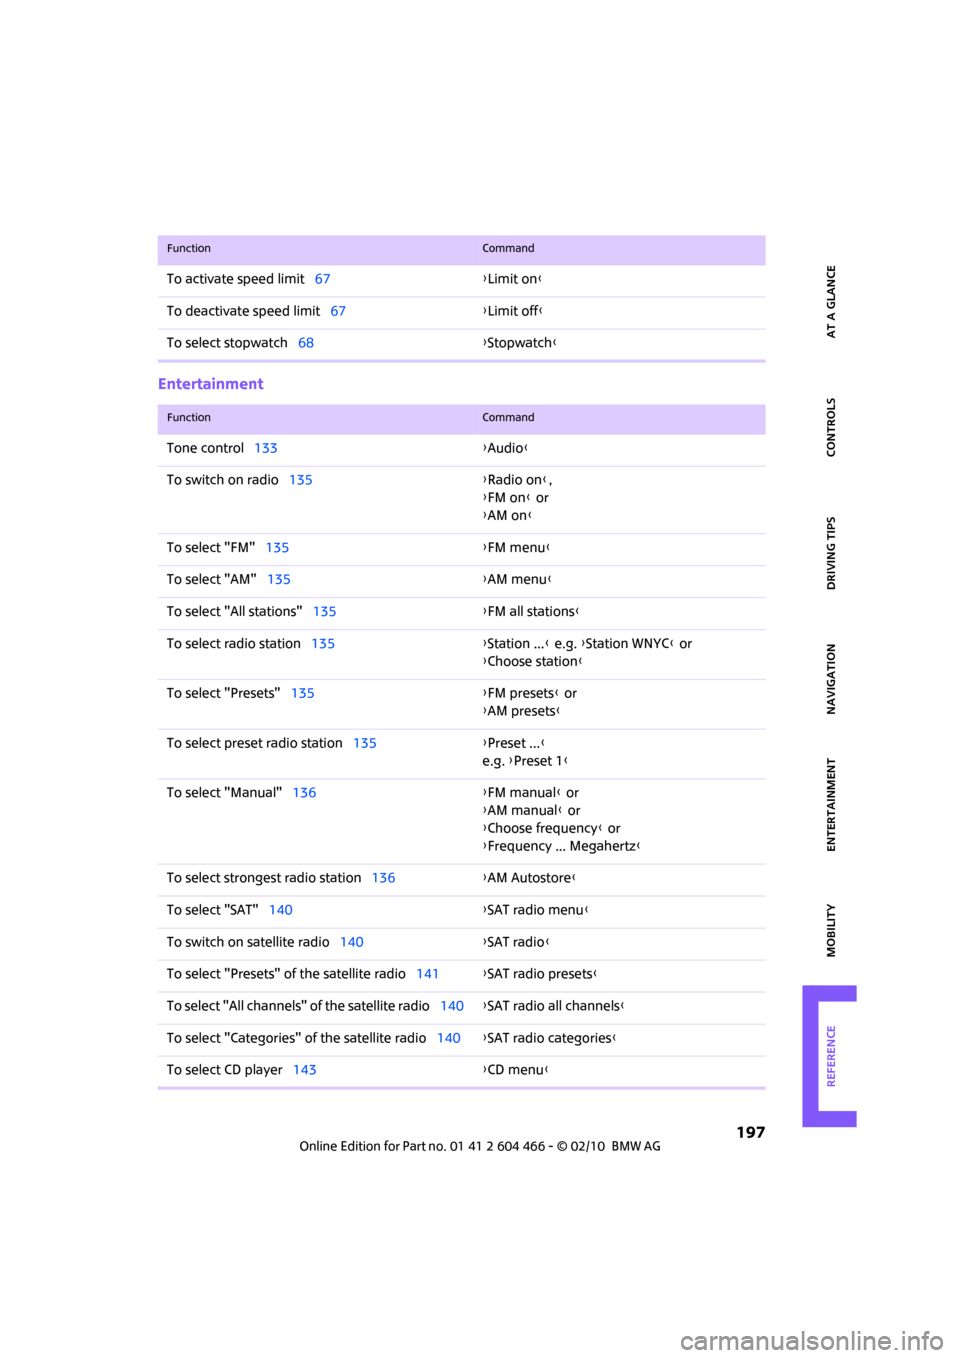
Entertainment
To activate speed limit67{Limit on}
To deactivate speed limit67{Limit off}
To select stopwatch68{Stopwatch}
FunctionCommand
FunctionCommand
Tone control133{Audio}
To switch on radio135{Radio on},
{FM on} or
{AM on}
To select "FM"135{FM menu}
To select "AM"135{AM menu}
To select "All stations"135{FM all stations}
To select radio station135{Station ...} e.g. {Station WNYC} or
{Choose station}
To select "Presets"135{FM presets} or
{AM presets}
To select preset radio station135{Preset ...}
e.g. {Preset 1}
To select "Manual"136{FM manual} or
{AM manual} or
{Choose frequency} or
{Frequency ... Megahertz}
To select strongest radio station136{AM Autostore}
To select "SAT"140{SAT radio menu}
To switch on satellite radio140{SAT radio}
To select "Presets" of the satellite radio141{SAT radio presets
}
To select "All channels" of the satellite radio140{SAT radio all channels}
To select "Categories" of the satellite radio140{SAT radio categories}
To select CD player143{CD menu}
Page 204 of 218
Everything from A to Z
202
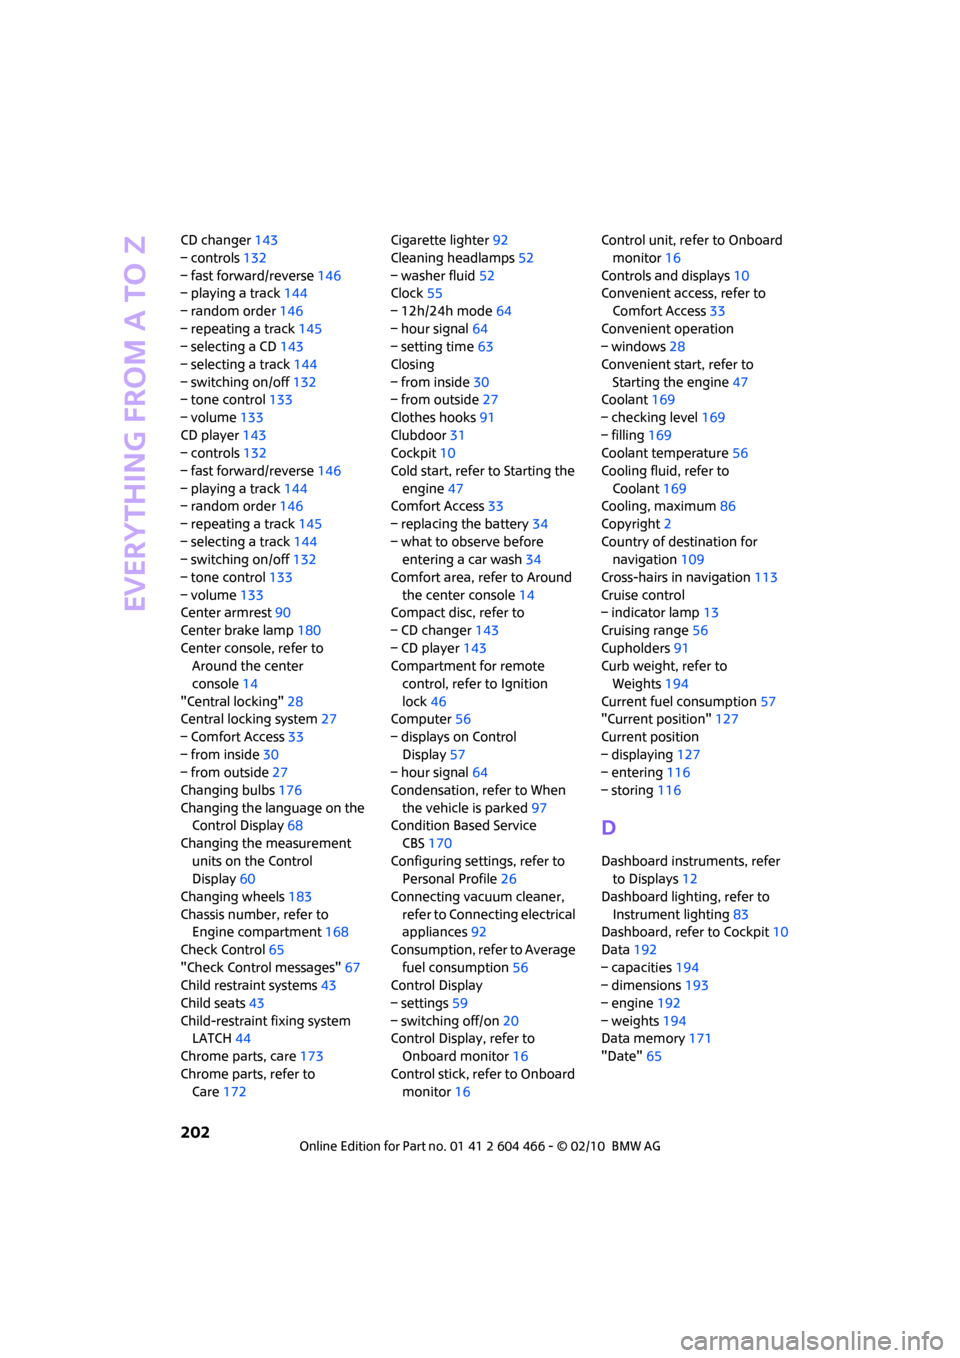
CD changer143
– controls132
– fast forward/reverse146
– playing a track144
– random order146
– repeating a track145
– selecting a CD143
– selecting a track144
– switching on/off132
– tone control133
– volume133
CD player143
– controls132
– fast forward/reverse146
– playing a track144
– random order146
– repeating a track145
– selecting a track144
– switching on/off132
– tone control133
– volume133
Center armrest90
Center brake lamp180
Center console, refer to
Around the center
console14
"Central locking"28
Central locking system27
– Comfort Access33
– from inside30
– from outside27
Changing bulbs176
Changing the language on the
Control Display68
Changing the measurement
units on the Control
Display60
Changing wheels183
Chassis number, refer to
Engine compartment168
Check Control65
"Check Control messages"67
Child restraint systems43
Child seats43
Child-restraint fixing system
LATCH44
Chrome parts, care173
Chrome parts, refer to
Care172Cigarette lighter92
Cleaning headlamps52
– washer fluid52
Clock55
– 12h/24h mode64
– hour signal
64
– setting time63
Closing
– from inside30
– from outside27
Clothes hooks91
Clubdoor31
Cockpit10
Cold start, refer to Starting the
engine47
Comfort Access33
– replacing the battery34
– what to observe before
entering a car wash34
Comfort area, refer to Around
the center console14
Compact disc, refer to
– CD changer143
– CD player143
Compartment for remote
control, refer to Ignition
lock46
Computer56
– displays on Control
Display57
– hour signal64
Condensation, refer to When
the vehicle is parked97
Condition Based Service
CBS170
Configuring settings, refer to
Personal Profile26
Connecting vacuum cleaner,
refer to Connecting electrical
appliances92
Consumption, refer to Average
fuel consumption56
Control Display
– settings59
– switching off/on20
Control Display, refer to
Onboard monitor16
Control stick, refer to Onboard
monitor16Control unit, refer to Onboard
monitor16
Controls and displays10
Convenient access, refer to
Comfort Access33
Convenient operation
– windows28
Convenient start, refer to
Starting the engine47
Coolant169
– checking level169
– filling169
Coolant temperature56
Cooling fluid, refer to
Coolant169
Cooling, maximum86
Copyright2
Country of destination for
navigation109
Cross-hairs in navigation
113
Cruise control
– indicator lamp13
Cruising range56
Cupholders91
Curb weight, refer to
Weights194
Current fuel consumption57
"Current position"127
Current position
– displaying127
– entering116
– storing116
D
Dashboard instruments, refer
to Displays12
Dashboard lighting, refer to
Instrument lighting83
Dashboard, refer to Cockpit10
Data192
– capacities194
– dimensions193
– engine192
– weights194
Data memory171
"Date"65
Page 205 of 218
REFERENCEAT A GLANCE CONTROLS DRIVING TIPS MOBILITY
203
Date
– setting64
– setting format65
"Date format"65
"Daytime running lamps"82
Daytime running lights82
DBC Dynamic Brake Control,
refer to Brake Assist71
Deactivating front passenger
airbags79
Deadlocking, refer to
Locking28
Defect
– door lock30
– fuel filler flap156
Defogging windows87
Defrost position, refer to
Defrosting windows87
Defrosting windows87
Defrosting windows and
removing condensation
– automatic climate control87
Defrosting windshield, refer to
Defrosting windows87
Destination address
– deleting117
– entering108,111
Destination for navigation
– destination list115
– entry108
– home address117
– manual entry108,111
– selecting from address
book116
– selecting using
information114
– selecting via map113
– storing116
Destination guidance120
– changing specified route118
– displaying route121
– distance and arrival120
– interrupting120
– starting120
– taking detours124
– terminating/continuing120
– voice instructions123
– volume for voice
instructions123Destination list for navigation
system115
Destinations recently driven
to115
Detour, refer to Driving around
a traffic congestion127
Differential, breaking in96
Digital clock55
Digital radio, refer to HD
Radio138
Dimensions193
Dipstick, engine oil168
Direction instructions, refer to
Voice instructions123
Directional indicators, refer to
Turn signals50
Directory for navigation, refer
to Address book115
Displacement, refer to Engine
data192
Display lighting, refer to
Instrument lighting83
"Display off"20
Display, refer to Onboard
monitor controls16
Displays12
– instrument combination12
– on the Control Display16
Displays and controls10
Displays, care174
Disposal
– of coolant169
– remote control battery34
– vehicle battery185
"Dist. to dest."58
Distance remaining to service,
refer to Service
requirements60
Distance warning, refer to Park
Distance Control PDC70
Door
– rear, refer to Clubdoor31
Door key, refer to Integrated
key/remote control26
Door lock29
Door lock, confirmation
signals28
"Door locks"28,30
Doors, manual operation30DOT Quality Grades163
Double doors, refer to
Splitdoor31
Drinks holders, refer to
Cupholders91
Drive-off assistant, refer to Hill
Assist73
Driving around a traffic
congestion127
Driving dynamics control, refer
to Sport button73
Driving lamps, refer to Parking
lamps/low beams81
Driving notes96
Driving off on inclines, refer to
Hill Assist73
Driving route, refer to
Displaying route121
Driving stability control
systems71
Driving through water
97
Driving tips, refer to Driving
notes96
Dry air, refer to Cooling
function87
DTC Dynamic Traction Control
DTC72
DVD for navigation106
Dynamic Brake Control DBC,
refer to Brake Assist71
Dynamic Stability Control
DSC71
Dynamic Traction Control72
E
Eject button, refer to Buttons
on the CD player132
Electrical malfunction
– door lock30
– fuel filler flap156
Electronic brake-force
distribution71
Electronic Stability Program
ESP, refer to Dynamic
Stability Control DSC71
Page 210 of 218
Everything from A to Z
208
O
OBD socket, refer to Socket for
Onboard Diagnosis170
Octane ratings, refer to Fuel
specifications157
Odometer55
Oil consumption168
Oil level168
Oil, refer to Engine oil168
Oil types169
Old batteries, refer to
Disposal185
"On a new destination" in
Navigation114
"On destination"114
"On location"114
"Onboard info"57
Onboard monitor16
– adjusting brightness69
– changing date and time63
– changing language68
– confirming selection or
entry19
– displays, menus16
– menu guidance17
– operating principles16
– overview16
– selecting menu items19
– status information20
– symbols18
Onboard vehicle tool kit176
Opening and closing
– Comfort Access33
– from inside30
– from outside27
– using the door lock29
– using the remote control27
Opening and unlocking
– from inside30
Opening/closing the
splitdoor31
Orientation menu, refer to
Start menu17
Outlets
– refer to Ventilation87
Output, refer to Engine
data192Outside temperature
display55
– change units of measure60
– in the onboard computer60
Outside-air mode
– automatic climate control86
Overheated engine, refer to
Coolant temperature56
P
Paintwork, care173
Park Distance Control PDC70
Parking
– vehicle47
Parking aid, refer to Park
Distance Control PDC70
Parking brake47
– indicator lamp13
Parking lamps, replacing
bulb178
Parking lamps/low beams81
Partition net99
Parts and accessories, refer to
Your individual vehicle4
"Pathway lighting"82
Pathway lighting81
"PDC"71
Personal Profile26
"Perspective"122
Pinch protection system
– windows36
Plastic parts, care174
Pollen
– refer to Microfilter/activated-
charcoal filter for automatic
climate control87
Position
– displaying127
– storing116
Power failure185
Power windows35
Power windows, refer to
Windows35
"Presets" on the radio141
Pressure monitoring of tires,
refer to Tire Pressure Monitor
TPM75Pressure monitoring, tires73
– Flat Tire Monitor73
Pressure, tires158
Protective function, refer to
Pinch protection system
– windows36
Puncture
– Flat Tire Monitor73
R
Radio
– autostore136
– controls132
– HD Radio138
– sampling stations136
– satellite radio140
– select waveband132,135
– selecting the frequency
manually136
– station search136
– storing stations137
– strongest stations136
– switching on/off132
– tone control133
– tuning to station135
– volume133
Radio key, refer to Integrated
key/remote control26
Radio position, refer to Radio
readiness46
Radio readiness46
– switched off46
– switched on46
Rain sensor51
"Random all" during audio
playback146
"Random directory" during
audio playback146
Random play sequence146
Range, refer to Cruising
range56
Reading lamps84
Rear door, refer to
Clubdoor31
Rear doors, refer to
Splitdoor31
Rear double doors, refer to
Splitdoor31