window MINI Clubman 2010 User Guide
[x] Cancel search | Manufacturer: MINI, Model Year: 2010, Model line: Clubman, Model: MINI Clubman 2010Pages: 160, PDF Size: 2.58 MB
Page 76 of 160
Climate
74
Air distribution
Direct the flow of air to the win-
dows , to the upper body area
or to the footwell . Interme-
diate settings are possible.
Windshield heating*
The windshield heating is switched
off automatically after a short time.
Defrosting windows and removing
condensation
1.Set air flow rate to the maximum level.
2.Set air distribution to position .
Condensation is removed from the windows more quickly when the cooling function
* is
also activated.
3.Set to the highest temperature, red.
4.Deactivate recirculated-air mode.
5.Turn on windshield heating if necessary.
6.Turn on rear window defroster if necessary.
Microfilter
The microfilter captures dust and pollen. The
microfilter is changed by your MINI dealer dur-
ing routine maintenance work.
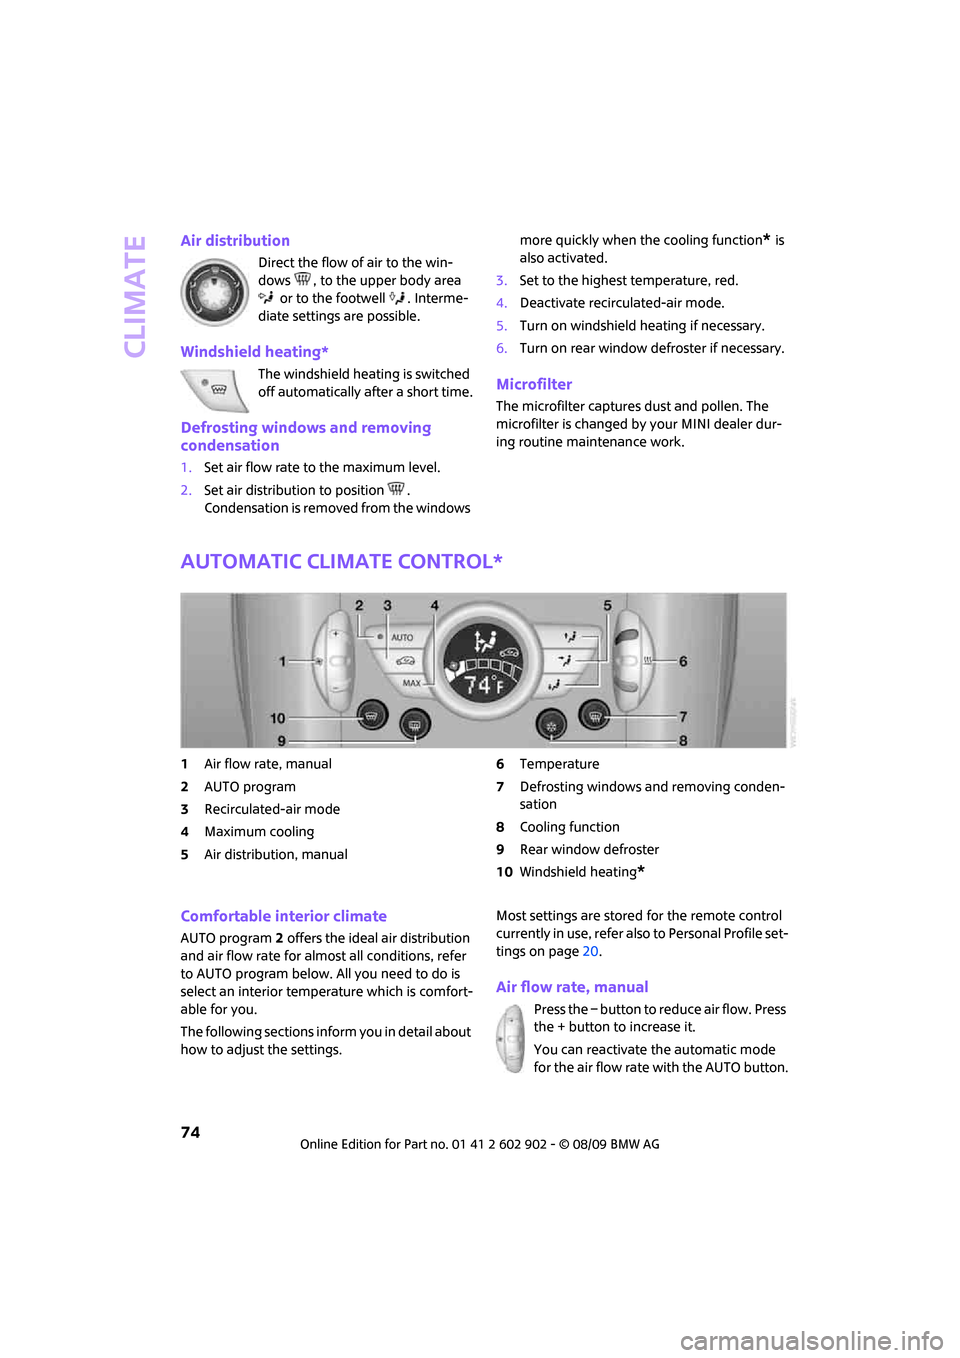
Automatic climate control*
1Air flow rate, manual
2AUTO program
3Recirculated-air mode
4Maximum cooling
5Air distribution, manual6Temperature
7Defrosting windows and removing conden-
sation
8Cooling function
9Rear window defroster
10Windshield heating
*
Comfortable interior climate
AUTO program2 offers the ideal air distribution
and air flow rate for almost all conditions, refer
to AUTO program below. All you need to do is
select an interior temperature which is comfort-
able for you.
The following sections inform you in detail about
how to adjust the settings.Most settings are stored for the remote control
currently in use, refer also to Personal Profile set-
tings on page20.
Air flow rate, manual
Press the – button to reduce air flow. Press
the + button to increase it.
You can reactivate the automatic mode
for the air flow rate with the AUTO button.
Page 77 of 160
REFERENCEAT A GLANCE CONTROLS DRIVING TIPS MOBILITY
75
The air flow rate is lowered or switched off
entirely to save on battery power. The display
remains the same.
Switching the system on/off
Reduce the air flow by pressing the – button
repeatedly until the system is switched off. All
indicators go out.
Press the AUTO button to switch the automatic
climate control back on.
AUTO program
The AUTO program adjusts the air
distribution to the windshield and
side windows, towards the upper body area and
into the footwell for you. The air flow rate and
your temperature specifications will be adapted
to outside influences in accordance with sea-
sonal changes, e.g. sunlight.
The cooling function is automatically switched
on along with the AUTO program.
Recirculated-air mode
Recirculated-air mode: the supply
of outside air is permanently shut
off. The system then recirculates
the air currently within the vehicle.
If condensation starts to form on the
inside window surfaces, press the AUTO
button or switch off the recirculated-air mode
and, if necessary, increase the air flow rate.
The recirculated-air mode should not be used
over an extended period of time; otherwise, the
air quality inside the car will deteriorate contin-
uously.<
Maximum cooling
At outside temperatures above
327/06 and when the engine is
running, you obtain a maximum
cooling effect as soon as possible.
The automatic climate control goes into recircu-
lated-air mode at the lowest temperature. Air
flows at maximum rate from the vents for the
upper body area. You should therefore open
them for maximum cooling.
Air distribution, manual
The flow of air is directed to the
windows, to the upper body area or
to the footwell as selected.
You can switch the automatic air
distribution back on by pressing the AUTO
button.
Temperature
Set the desired temperature individually.
The automatic climate control achieves
this temperature as quickly as possible
regardless of the season, using maximum
cooling or heating power if necessary, and then
maintains it.
If you switch between different tempera-
ture settings in quick succession, the auto-
matic climate control does not have enough
time to achieve the set temperature.<
Rear window defroster
The defroster is switched off auto-
matically after a certain time.
Depending on your vehicle's equip-
ment, the upper wires serve as an
antenna and are not part of the rear window
defroster.
Defrosting windows and removing
condensation
Quickly removes ice and condensa-
tion from the windshield and front
side windows.
For this purpose, also switch on the
cooling function.
The windshield heating
* is switched on auto-
matically.
Windshield heating*
The windshield heating is switched
off automatically after a certain
time.
Page 78 of 160
Climate
76
Cooling function
When the cooling function is on,
the air is cooled, dried, then
reheated according to the temper-
ature setting. This function is only
available while the engine is running.
The cooling function helps prevent condensa-
tion on the windows or removes it quickly.
Depending on the weather, the windshield may
fog over briefly when the engine is started. The
recirculated-air mode may be switched on auto-
matically.
The cooling function is automatically switched
on along with the AUTO program. The passenger
compartment can only be cooled while the
engine is running.
Microfilter/activated-charcoal filter
The microfilter captures dust and pollen. The
activated-charcoal filter provides additional pro-
tection by filtering gaseous pollutants from the
outside air. Your MINI dealer replaces this com-
bined filter as a standard part of your scheduled
maintenance.
You can call up further information in the service
requirements display, page53.
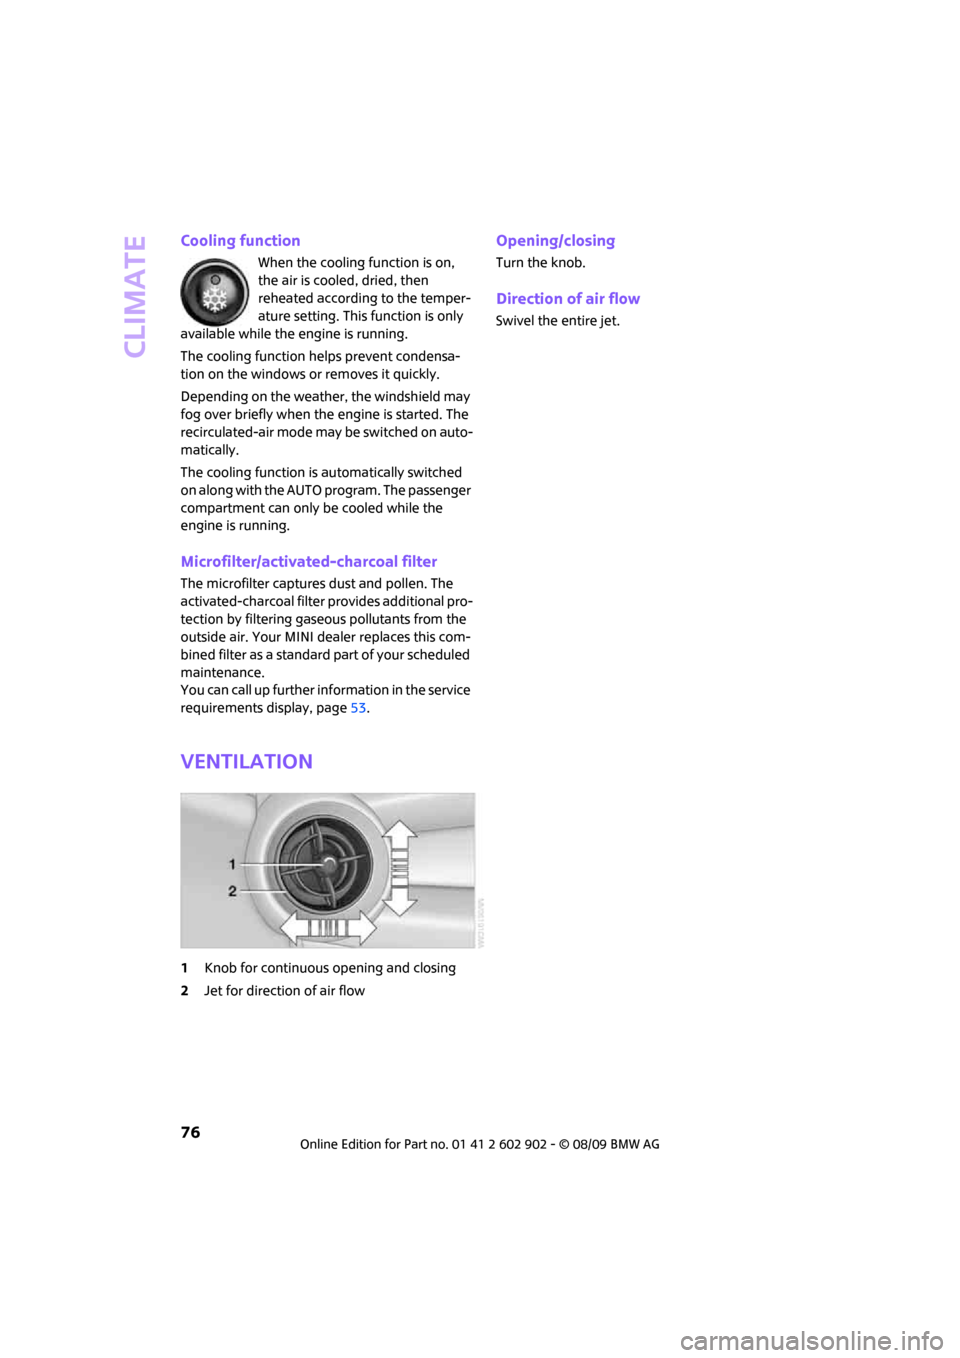
Ventilation
1Knob for continuous opening and closing
2Jet for direction of air flow
Opening/closing
Turn the knob.
Direction of air flow
Swivel the entire jet.
Page 86 of 160
Things to remember when driving
84
Things to remember when driving
Break-in period
Moving parts need breaking-in time to adjust to
each other. Please follow the instructions below
in order to achieve the optimal service life and
economy of operation for your vehicle.
Engine and differential
Always obey all official speed limits.
Up to 1,200 miles/2,000 km
Drive at varying engine and road speeds, but do
not exceed the following:
>Gasoline engine
4,500 rpm or 100 mph/160 km/h
Avoid full-throttle operation and use of the
transmission's kickdown mode.
After driving 1,200 miles/2,000 km
Engine and vehicle speeds can be gradually
increased.
Tires
Due to technical factors associated with their
manufacture, tires do not achieve their full trac-
tion potential until after an initial break-in
period. Therefore, drive cautiously during the
first 200 miles/300 km.
Brake system
Brakes require an initial break-in period of
approx. 300 miles/500 km to achieve optimized
contact and wear patterns between brake pads
and rotors. Drive cautiously during this break-in
period.
Clutch
The function of the clutch reaches its optimal
level only after a distance driven of approx.
300 miles/500 km. During this break-in period,
engage the clutch gently.
Following part replacement
The same break-in procedures should be
observed if any of the components mentioned
above have to be renewed in the course of the
vehicle's operating life.
General driving notes
Close splitdoor
Drive the vehicle only when the splitdoor
is closed. Otherwise, exhaust fumes could
penetrate the interior of the vehicle.<
If special circumstances make it absolutely nec-
essary to drive with the splitdoor open:
1.Close all windows and the glass sunroof
*.
2.Switch off the recirculated-air mode and sig-
nificantly increase the air flow rate of the air
conditioner or automatic climate control,
page73 or74.
Hot exhaust system
In all vehicles, extremely high tempera-
tures are generated in the exhaust sys-
tem. Do not remove the heat shields installed
adjacent to various sections of the exhaust sys-
tem, and never apply undercoating to them.
When driving, standing at idle and while park-
ing, take care to avoid possible contact between
the hot exhaust system and any highly flamma-
ble materials such as hay, leaves, grass, etc. Such
contact could lead to a fire, with the risk of seri-
ous personal injuries and property damage. Do
not touch hot exhaust tail pipes. Otherwise,
there is a risk of burns.<
Hydroplaning
When driving on wet or slushy roads,
reduce road speed. If you do not, a wedge
of water can form between tires and road sur-
face. This situation, known as hydroplaning, can
cause partial or complete loss of tire contact
Page 108 of 160
Under the bonnet
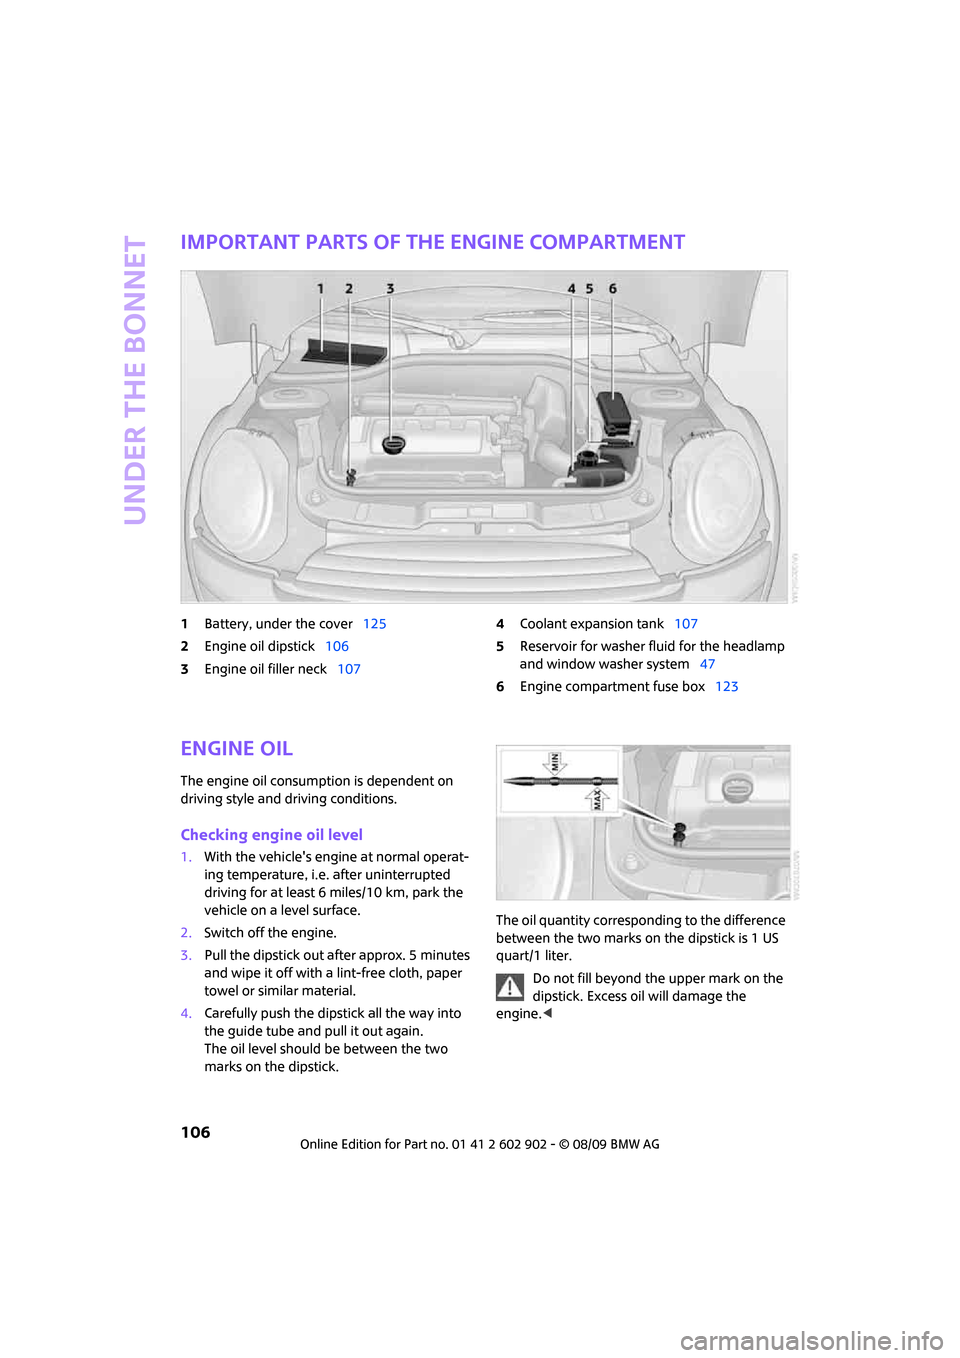
106
Important parts of the engine compartment
1Battery, under the cover125
2Engine oil dipstick106
3Engine oil filler neck1074Coolant expansion tank107
5Reservoir for washer fluid for the headlamp
and window washer system47
6Engine compartment fuse box123
Engine oil
The engine oil consumption is dependent on
driving style and driving conditions.
Checking engine oil level
1.With the vehicle's engine at normal operat-
ing temperature, i.e. after uninterrupted
driving for at least 6 miles/10 km, park the
vehicle on a level surface.
2.Switch off the engine.
3.Pull the dipstick out after approx. 5 minutes
and wipe it off with a lint-free cloth, paper
towel or similar material.
4.Carefully push the dipstick all the way into
the guide tube and pull it out again.
The oil level should be between the two
marks on the dipstick.The oil quantity corresponding to the difference
between the two marks on the dipstick is 1 US
quart/1 liter.
Do not fill beyond the upper mark on the
dipstick. Excess oil will damage the
engine.<
Page 112 of 160
Care
110
Care
Car-care products
Regular cleaning and care helps to maintain the
value of your MINI.
The manufacturer of your MINI recommends
using manufacturer-approved products to clean
and care for your vehicle.
MINI Service would be pleased to advise you
on cleaning and care products and services for
your MINI.
The ingredients of original MINI CareProd-
ucts have been tested, and the products
have been tested in the laboratory and in prac-
tice. They offer optimum care and protection for
your vehicle.<
Do not use any cleansers containing
alcohol or solvents as these may cause
damage.<
Cleaning agents may contain hazardous
or health-damaging substances. Follow
the warning and hazard instructions on the
packaging. For interior cleaning, always open
the doors or windows of the vehicle.
Do not use any products that are not intended
for cleaning the vehicle.<
External care
Washing your vehicle
Especially during the winter months the
vehicle should be frequently washed. Dirt
and road salt can damage the vehicle.<
After washing the vehicle, apply the
brakes briefly to dry them; otherwise,
water can reduce braking efficiency over the
short term and the brake rotors can corrode.<
Car washes
Preference should be given to cloth car washes.
Do not use automatic high-pressure car
washes; otherwise, water may drip into
the vehicle around the windows.<
Before driving into the car wash, check if the sys-
tem is suitable for your MINI. Observe the fol-
lowing points:
>Dimensions of the vehicle, page143
>If necessary: Fold in the outside mirrors,
page 35.
>Maximum permissible tire width
Avoid car washes with tracks higher than
4 in/10 cm; otherwise, the chassis could
be damaged.<
Preparations for driving into the car wash:
>Unscrew the rod antenna.
>Deactivate the rain sensor
* to prevent unin-
tentional wiping.
>Deactivate the rear window wiper
* and pro-
tect it from damage. Ask the car wash oper-
ator about measures that can be taken to
protect the wipers.
>Remove additional attachments, e.g. spoil-
ers or telephone antennas, if there is a pos-
sibility that they could be damaged.
Automatic transmission
Before driving into the car wash, make sure that
the vehicle can roll:
1.Place the remote control, even with Comfort
Access, in the ignition lock.
2.Move the selector lever to position N.
3.Release the parking brake.
4.Switch off the engine.
5.Insert the remote control in the ignition lock
so that the vehicle can roll.
Page 113 of 160
REFERENCEAT A GLANCE CONTROLS DRIVING TIPS MOBILITY
111
Steam jets/high-pressure washers
When using steam jets or high-pressure
washers, ensure that you maintain suffi-
cient clearance to the vehicle and do not exceed
a temperature of 1407/606.
If the distance is too close, the pressure too high,
or the temperature too high, parts of the vehicle
can be damaged, or water can penetrate.
Observe the operating instructions for high-
pressure washers.<
Do not spray sensors such as Park Dis-
tance Control with high-pressure washers
for a long time or at a distance of less than
1 ft/30 cm.<
Manual washing
Use a great deal of water and, if necessary, car
shampoo when washing your car by hand. Clean
the vehicle with a sponge or a washing brush
applying a slight amount of pressure.
Before cleaning the windshield, deacti-
vate the rain sensor or turn off the ignition
to prevent unintentional wiping.<
Observe local regulations regarding wash-
ing vehicles by hand.<
Headlamps
Do not wipe dry and do not use abrasive or cor-
rosive cleaning agents. Remove dirt and con-
tamination, such as insects, by soaking with
shampoo and then washing with plenty of
water.
Do not remove accumulated ice and snow with
an ice scraper; use window deicers instead.
Windows
Clean the outside and inside of the windows and
mirrors with a window cleaner.
Do not clean the mirrors with cleaners
containing quartz.<
Wiper blades
Clean with soapy water and change regularly to
prevent the formation of streaks.
Wax, preservatives and dirt on the win-
dows cause streaks when the windshield wipers are on, and can cause premature wear
of the wiper blades and interfere with the rain
sensor.<
Paintwork, care
Regular care helps your vehicle retain its value
and protects the paint from the long-term
effects of aggressive substances.
In some regions, environmental factors can
affect the vehicle paintwork and damage it. It is
therefore important to adjust the frequency and
extent of vehicle care correspondingly.
Immediately remove aggressive materials such
as spilled fuel, oil, grease, brake fluid, tree sap
or bird droppings to prevent damage to the
paintwork.
Removing paintwork damage
Depending on the severity of the damage,
immediately repair stone damage or
scratches to prevent rusting.<
The manufacturer of the MINI recommends
repairing paint damage professionally according
to factory specifications with original MINI
paints.
Preservation
Preservation is necessary when water no longer
beads on the clean paint surface. To preserve
the paint, only use preservatives that contain
carnauba or synthetic waxes.
Rubber seals
Only treat with water or rubber care products.
Do not use silicon sprays or other silicon-
containing care products on rubber seals;
otherwise, noise and damage could occur.<
Chrome parts*
Carefully clean vehicle parts such as the radiator
grill and door handles with copious quantities of
water and, if necessary, a shampoo additive,
especially when contaminated with road salt.
For additional treatment, use chrome polish.
Page 131 of 160
REFERENCEAT A GLANCE CONTROLS DRIVING TIPS MOBILITY
129
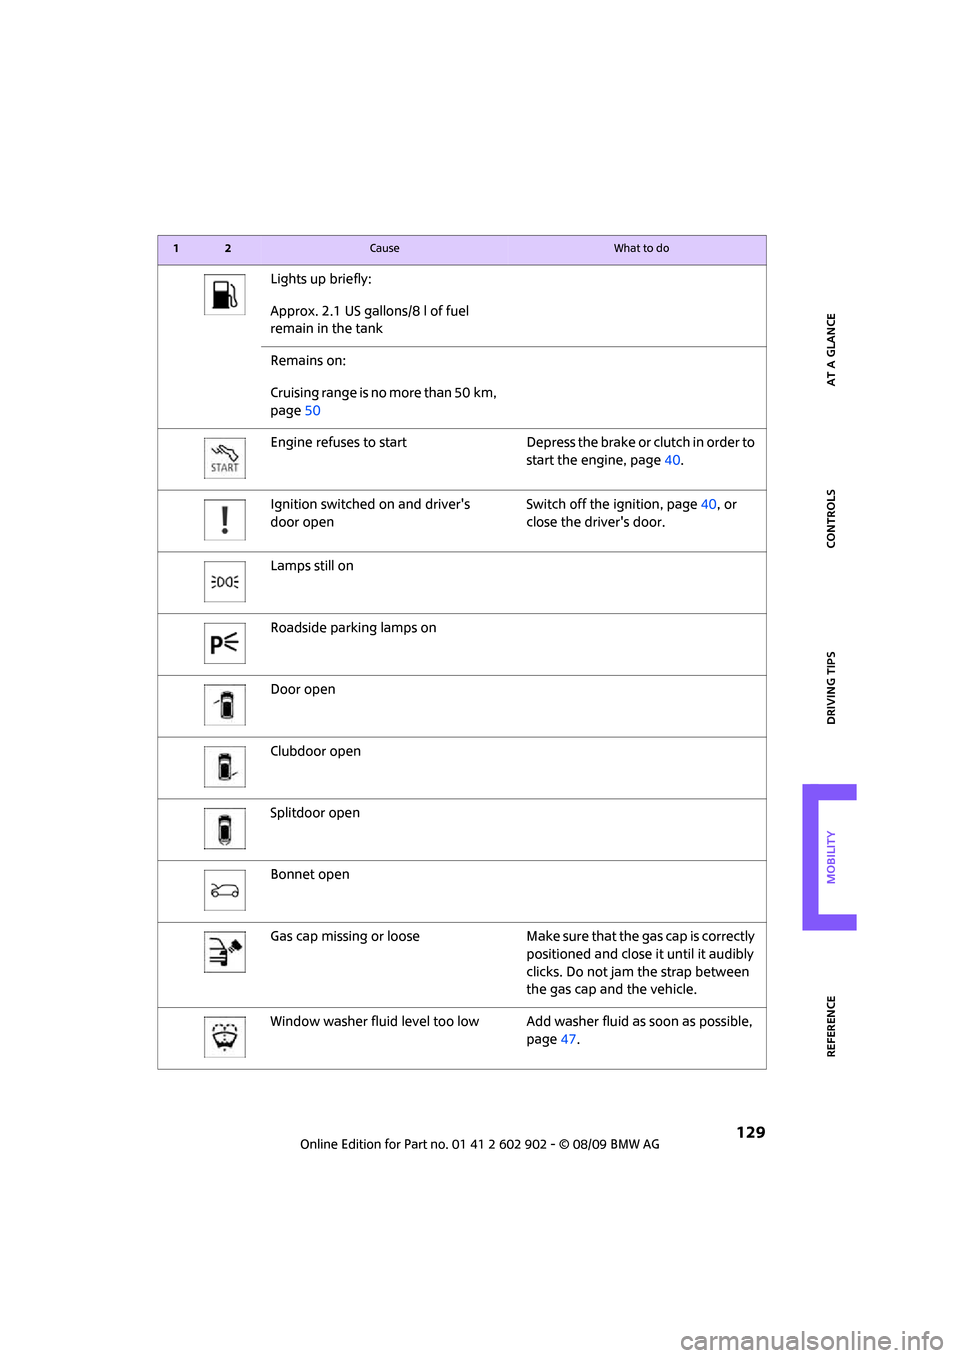
Lights up briefly:
Approx. 2.1 US gallons/8 l of fuel
remain in the tank
Remains on:
Cruising range is no more than 50 km,
page50
Engine refuses to start Depress the brake or clutch in order to
start the engine, page40.
Ignition switched on and driver's
door openSwitch off the ignition, page40, or
close the driver's door.
Lamps still on
Roadside parking lamps on
Door open
Clubdoor open
Splitdoor open
Bonnet open
Gas cap missing or loose Make sure that the gas cap is correctly
positioned and close it until it audibly
clicks. Do not jam the strap between
the gas cap and the vehicle.
Window washer fluid level too low Add washer fluid as soon as possible,
page47.
12Cause What to do
Page 146 of 160
Technical data
144
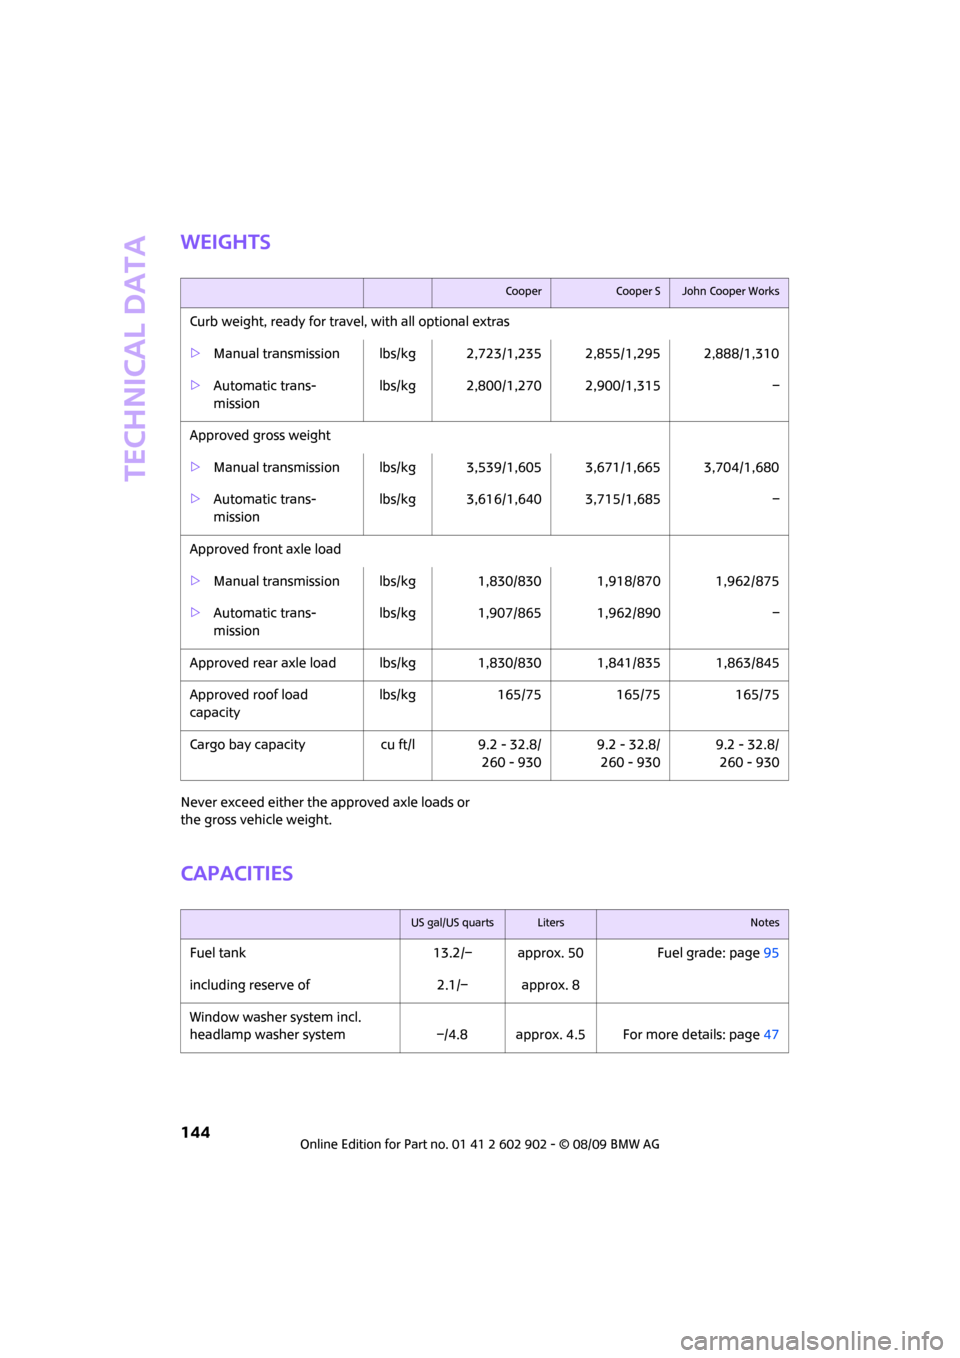
Weights
Never exceed either the approved axle loads or
the gross vehicle weight.
Capacities
CooperCooper SJohn Cooper Works
Curb weight, ready for travel, with all optional extras
>Manual transmission lbs/kg 2,723/1,235 2,855/1,295 2,888/1,310
>Automatic trans-
mission lbs/kg 2,800/1,270 2,900/1,315 –
Approved gross weight
>Manual transmission lbs/kg 3,539/1,605 3,671/1,665 3,704/1,680
>Automatic trans-
mission lbs/kg 3,616/1,640 3,715/1,685 –
Approved front axle load
>Manual transmission lbs/kg 1,830/830 1,918/870 1,962/875
>Automatic trans-
mission lbs/kg 1,907/865 1,962/890 –
Approved rear axle load lbs/kg 1,830/830 1,841/835 1,863/845
Approved roof load
capacitylbs/kg 165/75 165/75 165/75
Cargo bay capacity cu ft/l 9.2 - 32.8/
260 - 9309.2 - 32.8/
260 - 9309.2 - 32.8/
260 - 930
US gal/US quartsLitersNotes
Fuel tank 13.2/– approx. 50 Fuel grade: page95
including reserve of 2.1/– approx. 8
Window washer system incl.
headlamp washer system –/4.8 approx. 4.5 For more details: page47
Page 149 of 160
REFERENCEAT A GLANCE CONTROLS DRIVING TIPS MOBILITY
147
Bottle holders, refer to
Cupholders81
Brake Assist58
Brake fluid, refer to Service
requirements53
Brake lamps
– replacing bulbs117
Brake pads, breaking in84
Brake rotors85
– brakes84
– breaking in84
Brake system84
– breaking in84
– disc brakes85
– MINI Maintenance
System108
Brakes
– ABS58
– breaking in84
– MINI Maintenance
System108
– parking brake41
– service requirements53
Brakes, refer to Braking
safely85
Breakdown service, refer to
Roadside Assistance124
Break-in period84
Breaking in the clutch84
Bulb changing, refer to Lamps
and bulbs114
Button for starting the
engine40
Buttons on the steering
wheel11
C
California Proposition 65
warning5
Can holders, refer to
Cupholders81
Capacities144
Car battery, refer to Vehicle
battery123
Car care110
Car key, refer to Keys/remote
controls20Car phone
– installation location, refer to
Center armrest79
– refer to separate Owner's
Manual
Car wash, care110
Car washes110
Care110
– car washes110
– car-care products110
– CD/DVD drives113
– external110
– high-pressure washers111
– internal112
– leather112
– manual washing111
– upholstery and fabrics112
– windows111
– wiper blades111
Cargo area
– capacity144
Cargo bay86
– Comfort Access28
– doors, refer to Splitdoor25
– lamp70
– opening from outside26
– trunk lid, refer to Splitdoor25
Cargo bay doors, refer to
Splitdoor25
Cargo bay, expanding86
Cargo bay lamp70
Cargo bay partition net, refer
to Partition net87
Cargo loading87
– securing cargo88
– stowing cargo88
– vehicle86
Cargo, securing88
Carpets, care112
Catalytic converter, refer to
Hot exhaust system84
Center armrest79
Center brake lamp118
Center console, refer to
Around the center
console14Central locking system21
– Comfort Access27
– from inside24
– from outside21
Changing bulbs114
Changing wheels121
Chassis number, refer to
Engine compartment106
Check Control55
Child restraint systems37
Child seats37
Child-restraint fixing system
LATCH38
Chrome parts, care111
Chrome parts, refer to
Care110
Cigarette lighter81
Cleaning headlamps46
– washer fluid47
Clock49
– 12h/24h mode52
– setting time55
Closing
– from inside24
– from outside21
Clothes hooks80
Clubdoor25
Cockpit10
Cold start, refer to Starting the
engine41
Comfort Access27
– replacing the battery29
Comfort access
– what to observe before
entering a car wash28
Comfort area, refer to Around
the center console14
Compartment for remote
control, refer to Ignition
lock40
Computer50
Condensation, refer to When
the vehicle is parked85
Condition Based Service
CBS108
Configuring settings, refer to
Personal Profile20
Confirmation signals for
vehicle locking/unlocking22